Typical exhaust system faults
Be sure to verify that there are any problems with the exhaust system before starting any repairs. And identify the node that has become unusable. Any breakdown reveals itself with the following signs:
- Broken connecting pipes. As a result, the integrity of the entire system is compromised and exhaust gases are not properly purified.
- Burnouts on the elements of the main muffler and resonator. This leads to the fact that the exhaust gases are not cleaned, and an extraneous sound appears when the engine is running.
- Strong noises appear from the exhaust system and the main muffler, indicating that there is damage.
If small cracks appear in the VAZ-2110 exhaust system (8-valve injector), then in the early stages they can be healed using sealants. This measure will increase the service life of the elements slightly, by no more than one year.
How can I fix the problem?
So, the place of gas breakthrough through the muffler has been detected, you just need to make a decision about replacement or try to repair the unit. Often the holes in the body are small, and in this case it is not always advisable to buy a new muffler. It is necessary to remove the unit from the car and show it to a welding specialist, who will tell you whether it can be repaired.
The craftsman will cut out the rotten part of the body, shake out the remains of the burnt partitions from the inside and apply a patch of new metal. Fistulas that occur at the points where the pipe is connected to the body must also be eliminated by welding. The only caveat is that these repairs solve the problem only temporarily. Such a muffler will not serve for a long time, and it may perform its function poorly; due to the lack of partitions, the sound will break through.
If it is decided that the muffler needs to be replaced, then you need to select and purchase it. New elements are made of black or stainless steel, so the choice is limited. The latter last much longer than black ones, but their cost is higher. In addition, welding work in case of repair of a stainless steel body will be more expensive. When purchasing a new muffler, it is worth purchasing a new set of suspension rubber bands, as well as a graphite O-ring. It is installed at the junction of the resonator and muffler pipes.
The exhaust system of the VAZ-2110 is designed for cleaning exhaust gases. The components included in it have a fairly long service life. But since the entire system is constantly experiencing temperature overloads, the metal gets tired, cracks and burnouts appear. Repairing the exhaust system yourself is quite simple. This allows owners of the “ten” to significantly save on maintenance. The design of the exhaust system includes: the main muffler, neutralizer, exhaust pipe and resonator.
How to remove the main muffler on a ten
As with most front-wheel drive models, replacing the exhaust system of the VAZ-2110 is quite simple. You do not need any special skills, extensive experience, or special tools.
But it is advisable to carry out all work on an inspection hole or overpass. The sequence of work is as follows:
- The connection between the resonator and the muffler is made using flared pipes and an O-ring. This connection is crimped with a metal clamp, which consists of two halves and bolts.
- First of all, dismantle the clamp; to do this, unscrew the nuts from the bolts using two 13mm wrenches and remove the O-ring. On cars of the tenth family, sealing rings made of graphite are used. Therefore, they do not stick to the surface of the pipe.
- Remove the old main muffler from the rubber hangers.
Step-by-step manufacturing instructions
Before you make a muffler for your car yourself, take care of two important things that are best ordered from a turner: end caps and baffles. The rest will be easy for you to handle on your own.
To make a muffler for a car and successfully install a homemade product, you need to follow the recommendations:
- Take measurements and form a jar assembly from a metal blank.
- Drill holes in the can pipes.
- Weld the pipes to the reflectors and baffles.
- Attach and secure the casing and end caps.
- Install fasteners.
- Fasten the finished part.
Making a muffler with your own hands
After installing a new exhaust device, the sound of the engine may change: become stronger or quieter, which depends on the quality of work.
Installing a new muffler
Assess the condition of the rubber hangers, which are located on different sides of the main muffler body. If they are overstretched or have cracks, be sure to replace them with new ones during installation.
The cost of these rubber bands is small, they are available in any store. Next you need to do the following:
- Install the new main muffler onto the rubber hangers.
- Insert a graphite O-ring between the pipe flares.
- Place the clamp in place and tighten the nuts using 13mm wrenches.
At this point, the repair of the main muffler of the VAZ-2110 exhaust system (8 valves) is completed. Start the engine and check the muffler operation. There should be virtually no sound from the exhaust pipe. The motor will run clean and smooth.
Possible inconveniences associated with a quiet muffler
The car will now be quieter, which is what we wanted to achieve, but there may be some disadvantages - an increase in the overall weight of the exhaust system. Therefore, it is necessary to hang stronger brackets so that the exhaust pipe does not come off on rough roads. There are also cases when rubber shock absorbers are hung. But in fact, a homemade resonator will weigh about 2-3 kg.
It is also necessary to test in action how the exhaust system works so that gases exit normally through the exhaust pipe. Therefore, it is necessary to check at higher speeds, then it will be possible to draw the right conclusions. But as a rule, gases will escape through such a resonator without difficulty.
And then in the video there is another way to reduce the sound of the muffler, making a really very quiet exhaust system:
How to remove the resonator
The resonator needs to be changed only after a new muffler has been installed. The sequence of work aimed at dismantling the device:
- The resonator is secured using a crimp-type clamp and an O-ring.
- The connection to the neutralizer is made using a floating flange, which consists of flared pipes and two bolts.
- The fist is located on the opposite side of the resonator.
The work must be carried out on a cooled engine.
Quite often it is not possible to unscrew the bolts, so to make the work easier, you just need to cut them off using a grinder. Be sure to install new bolts during reassembly. If you don’t have a grinder at hand, then you need to use a penetrating lubricant, for example, WD-40. Apply this composition to all threaded connections, then wait 20-30 minutes.
Unscrew all the bolts and remove the clamps on the resonator. After this, you need to remove the old resonator from the rubber suspensions. Be sure to evaluate the condition of all rubber products. If they show signs of wear, install new ones during reassembly.
Resonator installation
In the VAZ-2110 exhaust system (16-valve injector), work is performed in exactly the same way as on 8-valve engines. The procedure is as follows:
- The new resonator must be mounted on rubber hangers and connected to the muffler. Moreover, it is necessary that the pipe from the resonator be strictly parallel to the ground.
- If the neutralizer has wear, rust, or burrs, the connection must be lubricated with high-temperature sealant. This will ensure a high-quality connection of the exhaust system components.
- Tighten the resonator and catalytic converter flanges using only new nuts and bolts.
- The resonator is fastened to the neutralizer using two bolts and flanges. Moreover, the pipe is secured to the pants using a spring connection and flaring. An O-ring made of metal asbestos or graphite is installed inside.
This completes the replacement of the resonator; repairs present no difficulties. All work can be done independently, you just need an inspection hole or overpass.
Do-it-yourself exhaust for UAZ 469
To turn the classic UAZ-469 SUV into a two-seater off-road coupe, the authors of the concept had to completely abandon the bodywork of the Ulyanovsk enterprise. As a result, all that remained from the factory UAZ was the frame, modernized suspension components, steering and braking system. Many components were borrowed from its descendant - UAZ Patriot. The 75-liter fuel tank was moved back under the trunk for more optimal weight distribution, and the spare wheel was also located there. The entire design and assembly process, which generally lasted 1.5 years, was carried out in an ordinary garage. The standard engine was replaced with a 16-valve ZMZ-405 engine with a power of 155 hp, after chip tuning the power was increased to 170 hp. with a maximum torque of 7000 rpm. The exhaust system has also been completely redesigned and a zero-drag air filter has been installed. The gearbox and transfer case were left original (4 synchronized “short” gears) - the CRAB’s acceleration was not at all all-terrain. The maximum speed is up to 160 km/h, but there is still some reserve left.
The car was equipped with a snorkel (protecting the engine from dust and water), which is usually used by professional racers to overcome shallow streams, rivers and swampy areas during racing races. The maximum ford depth that the UAZ Crab can overcome on its own reaches 1.2 meters. The homemade exhaust was made direct-flow, with pipes running on both sides of the car. For 100 kilometers, the all-wheel drive two-seater Crab, weighing 1,600 kilograms, consumes from 15 to 17 liters of AI-95 gasoline.
The first sketches of the body were made from ordinary photos of the frame and components, scrupulously finishing everything in Photoshop. But the main modeling was done with our own hands using cardboard and foam plastic. For example, the hood was remade only in metal 3 times. The roof and doorways were borrowed from the Honda CR-X. The plumage and all other body parts are independently made from sheet iron, which is then puttied and painted. The name “Crab” came to mind to its creators already during construction. The car received this name thanks to its widely spaced front wheels, optical lighting technology and the bright red color of the body, which the designers decided to paint the car they were creating.
How to remove the neutralizer
The VAZ-2110 exhaust system is standard for all cars. Almost the same design is used on nines, sevens, and even foreign cars. Even a motorist with very little experience can repair all elements of the system. If you have already decided to change the resonator and muffler, then it is also advisable to install a new neutralizer. The neutralizer is necessary to dampen the vibration coming from the car engine. This is a device that mechanically separates the muffler resonator and the exhaust pipe.
Replacement is carried out as follows:
- If there is no damage to the springs and bolts, they can be reused. If there is wear, you need to purchase new elements.
- The ring is replaced in any case, even if it is in almost perfect condition. If this ring begins to allow exhaust gases to pass through, damage to the flaring of the exhaust pipe and the converter will occur.
- Unscrew all the bolts used to secure it. They must first be treated with a penetrating lubricant.
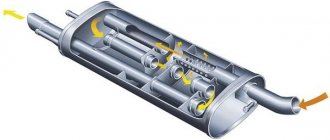
The role of mufflers in cars
In order to determine for yourself what kind of muffler you need, you need to know all the functions of this device.
Firstly, it suppresses noise, but this is done in several stages. On the first, this function is performed by the muffler resonator; it is placed immediately after the collector pipes, that is, it is the first or front chamber of the standard unit. This resonator not only suppresses primary sound waves, but also evens out the pulsation of the gas flow from the engine.
The muffler in a car is a very important part.
Secondly, in the next chamber the noise from the running engine is completely absorbed. This is achieved by various methods of removing gases, for example, shifting the flow by 90 degrees or using perforated tubes inside the main chamber, but more often the methods are combined in one device.
Thirdly, the muffler is capable of purifying exhaust gases. This happens at the molecular level using a gold or platinum mesh through which the exhaust gas passes. It is clear that due to the high cost of materials, these systems are not installed in all cars. But, nevertheless, such mufflers are used quite widely.
Installation of a new neutralizer
If you decide to modify your car, you can install the Stinger exhaust system on the VAZ-2110. It is more reliable and advanced than stock.
All work is carried out the same way. The neutralizer is installed as follows:
- Install the neutralizer, and then put on the bolts. This must be done very carefully, making half a turn, no more.
- When tightening, you must first tighten the bolts that secure the neutralizer to the resonator. The last to be tightened are the bolts securing the converter to the exhaust pipe.
Removing the exhaust pipe
Most drivers call the exhaust pipe “pants”, since the element is very similar to this item of clothing. It is secured to the exhaust manifold using bronze nuts and studs. The trousers are attached to the neutralizer using a spring-loaded connection. There is a gasket between the exhaust manifold and the pants to prevent gases from leaking.
Dismantling the intake pipe is carried out as follows:
- Using a 13mm wrench, you need to unscrew the nuts that secure it to the exhaust manifold. If there are metal plates with bent edges under the nuts, they must be bent. Please note that the connection uses studs that are screwed directly into the manifold.
- If the stud is damaged, replacement is quite problematic. Therefore, it is necessary to carry out all work carefully to keep the threaded connection intact.
- Be sure to allow the engine to cool before starting work, then apply penetrating lubricant to all threaded connections. With these simple steps, you won't have to use too much force, which will save your studs. If you break a pin, it will need to be drilled out. Before this, the exhaust manifold must be removed. Moreover, if you damage the exhaust manifold, replacing it will cost you a pretty penny. The cost of a new one is more than 2000 rubles.
- After unscrewing all the nuts, it is necessary to move the exhaust pipe to the side and remove the gasket.
- Unscrew the bolts that connect the exhaust pipe to the converter.
This completes the dismantling of the exhaust pipe of the VAZ-2110 exhaust system.
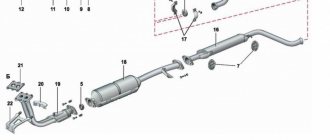
Composition of the output unit
The exhaust system for a VAZ 2110 car consists of the following elements:
- Exhaust manifold;
- Lambda probe;
- Receiving type pipes;
- Neutralizer;
- Two mufflers: main type and additional.
Not all exhaust components are disassembled; some parts, such as the converter, as well as both mufflers, are replaced entirely.
Description of individual components
To make the structure of such an element as the discharge system clearer, it is necessary to give a detailed description of all components:
- Neutralizer. A unit designed for effective purification and suppression of emissions of harmful substances into the environment. When driving, a car produces substances such as non-combustible hydrocarbons, oxide compounds of nitrogen and carbon. The work of this system is aimed at eliminating them. The design itself is a combination of two ceramic-type components. The surface of these components is coated with special afterburning catalysts, which include rhodium, palladium and platinum. These substances make it possible to purify exhaust gases emitted into the environment by almost 100%;
- Lambda probe. It is a special sensor whose task is to control the composition and amount of fuel that enters the engine. The lambda probe thereby controls the purifier. If the lambda probe does not work properly, then the entire output assembly will quickly become unusable, after which it will have to be replaced;
- Reception pipe. Designed for forced removal of exhaust gases from the cylinders of a power unit. The pipe is made of stainless steel, and its fastening to the collector is carried out using special pins, of which there are four in total. The studs guarantee reliable fastening of the two outlet pipes and the element. In order to combine the exhaust pipe and the neutralizer, as well as an additional muffler, hinged fasteners are used;
- An exhaust manifold. A component that is cast from pure cast iron. The manifold is secured with four studs in the exhaust pipe. Heat-resistant gaskets reinforced with metal are installed between the manifold and cylinder heads.
- Silencers. Necessary for effectively suppressing the exhaust rate of burnt gases. This is necessary in order to significantly reduce the noise level in a type of transport such as the VAZ 2110. The distribution device in this part of the unit is carried out as follows: the additional one is followed by the main one. These two components are connected to each other by clamps and sealing rings and are covered with a special casing on top.
Nuances of operation
There are some points that need to be taken into account when operating the VAZ 2110 system:
- Under no circumstances should the vehicle be refueled with leaded fuel, as this will cause damage. It is very sensitive to lead compounds;
- When operating a VAZ 2110 car, you also need to monitor the proper, precise operation of the ignition, since its poor-quality operation leads to the neutralizing part being removed from its working condition. Fuel that does not burn when a spark passes during ignition enters the converter and burns out there. For this reason, the ceramic coating of the component quickly deteriorates;
- Frequent malfunctions will sooner or later lead to complete or partial blockage of the output system, in turn to the failure of the engine and its repair or replacement will be required.
Installing a new exhaust pipe
All work is done in reverse order. But there are several features that you definitely need to know:
- Install a new exhaust pipe.
- A new gasket needs to be installed between the exhaust manifold and the pants.
- Be sure to install a new O-ring between the neutralizer and the pants.
- Tighten the nuts on the exhaust manifold studs. Tighten them evenly in a crisscross pattern.
- Tighten the bolts that are on the spring-loaded connection to the converter.
This completes the repair of the exhaust system. The sound will be muffled as much as possible, the car will become almost silent. It is advisable to lubricate the new gasket with a CV joint type compound. This will improve the seal.
There is no need to worry; replacing a muffler on a VAZ 2110 is not at all a regular job that will have to be done systematically. Replacing the exhaust system is performed in several situations:
- The muffler begins to make a loud noise;
- Muffler elements burn out;
- Connecting pipes break.
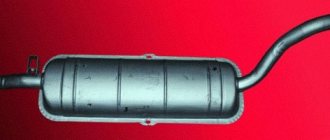
The sound of a burnt out muffler.
On a VAZ 2110, you can replace the muffler with your own hands, which will allow you to significantly save on the services of a service station.
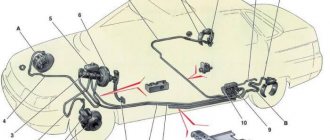
The exhaust system of the VAZ 2110 includes a downpipe (pants), a neutralizer, a resonator and a main muffler.
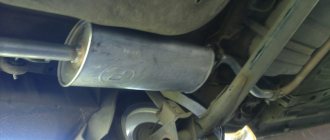
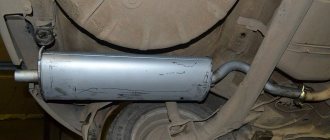
Photo of the new muffler on the VAZ 2110
Today we will tell you about replacing the muffler, as well as the resonator.
Exhaust system VAZ 2110
Types and their differences
There are several types of mufflers and each has its own individual characteristics. Each is described in detail below.
Reflective
They are sometimes called reactive. The operating principle is based on multiple reflections of sound. This is achieved by changing the diameter of the tubes or the number of branches.
Resonator
These are the same jets, but with a slightly modified design. Sound attenuation is achieved thanks to the weakly damped resonances of its elements.
There are several types of mufflers
Restrictive
This is the simplest type of device, based on replacing a large hole with a small one. Which significantly reduces engine power.
Absorption
A simple but not very effective muffler, the action of which is based on the absorption of sound waves in a noise-absorbing material. Usually this is basalt wool laid around the gas outlet pipe.
Replacing the muffler on a VAZ 2110
VAZ 2110 owners are quite lucky, since replacing the muffler is quite simple and does not require special skills or extensive experience. But you definitely need an inspection hole.
The replacement procedure sequence is as follows:
- The muffler is connected to the resonator through an O-ring on the pipe flare. Plus, the connection is compressed with a clamp, which consists of two parts.
- The clamp must be dismantled, so remove the ring. Since the O-rings used here are graphite, they should not stick to the metal.
- Now the old muffler can be dismantled quite easily.
- Be sure to check the condition of the suspension rubber bands located on different sides of the muffler body. They often end up stretched or covered with cracks. Rubber bands are quite cheap, so buy new ones and replace the old ones with them.
- The new muffler is first mounted on rubber bands, after which it is inserted into the same new graphite sealing ring between the flares. Use a clamp to compress the connection. Ready!
Changing the resonator
It is also advisable to replace the resonator on a VAZ 2110. This is done after changing the muffler.
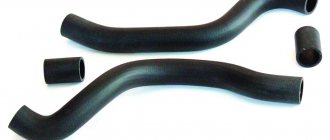
New resonator for VAZ 2110
The work of replacing the resonator is performed in the following sequence:
- The resonator is secured to the muffler with a crimp clamp with an O-ring.
- It is attached to the neutralizer using a floating flange consisting of two bolts and a flare.
- On the opposite side of the element there is a so-called fist.
- Removing bolts is often quite difficult. So that you don't have to suffer, just cut them off with a grinder and buy new bolts. This is the simplest solution to the problem.
- If you couldn’t get a grinder, use a liquid key. This is a popular product among motorists - WD40 or its analogues. Treat the bolt attachment points with this compound, wait a while, after which the bolts should come off.
- After removing the bolts, remove the muffler clamp.
- Remove the resonator from the suspension rubber bands. Check the condition of the rubber bands. If they are worn out, replace them with new ones.
- Take a new resonator, secure them to rubber and connect them to the muffler so that the pipe leading to the muffler from the resonator is parallel to the ground.
- If you notice wear, burrs, or traces of rust on the neutralizer fist, be sure to coat the connection with sealant. Moreover, it must be a high-temperature sealant.
- Armed with new bolts and nuts, tighten the catalytic converter and resonator flanges.
- The neutralizer is fixed to the resonator with two bolts using a flange connection. The fastening occurs to the states, but there is a receiving pipe, using a spring-loaded connection and two flares. The space between them contains a sealing ring made of graphite or metal asbestos.
Replacing the neutralizer
As you can see, the exhaust system of the VAZ 2110 car is designed quite standardly, its repair is not difficult even for a motorist with little experience.
When changing the muffler and resonator, it is likely that you may need to replace the converter. This operation is simple and can be done in a few steps.
The neutralizer serves to dampen vibrations from the engine and prevent them from occurring in the exhaust system of the domestically produced VAZ 2110 car.
If it needs to be replaced, it is done like this:
- If the old springs and bolts are intact and have no obvious damage, you can continue to use them. They show characteristic signs of wear, be sure to buy new elements.
- The ring should be replaced in any case, no matter how well the old one is preserved. If gases begin to leak through the old ring, this will lead to very rapid wear and damage to the converter flare and the exhaust pipe.
- After installing the neutralizer, new bolts are put on, they are carefully but firmly tightened. Moreover, the first thing you need to do is tighten the bolts that secure the resonator.
How to make forward flow quieter?
To make the sound of your car not just quiet, but also unique and beautiful, several special exhaust pipe attachments will help. It is quite possible to make them yourself.
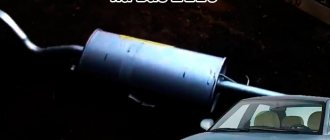
DIY muffler from a fire extinguisher
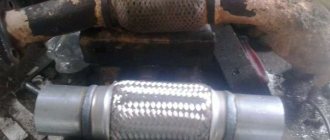
Flute
The most common device in this direction is the so-called flute. It is a perforated tube fixed inside a metal case, no more than 25 cm long. It is capable of reducing exhaust sound by 4-5 dB.
It's easy to make:
- to begin with, take a pipe with a diameter slightly smaller than the exhaust pipe;
- holes are drilled in it along the entire length, and a metal disk with holes for bolts is welded to one of its ends;
- exactly the same disk is welded to the cut of the exhaust pipe;
- After this, the perforated pipe is placed in the exhaust pipe, and the discs are bolted together.
Replacing pants
Trousers
The exhaust pipe, also called pants (due to its appearance), is attached to the manifold using studs and nuts. Its fixation with the neutralizer is carried out by a spring-loaded connection.
- Remove the exhaust pipe, paying special attention to its attachment to the manifold. Studs are used here, not bolts. They are screwed into the manifold, and connecting nuts are screwed onto them.
- If the pin is damaged, it will be extremely difficult to replace it. Therefore, it is important to try to keep the old one intact and safe.
- Treat the nuts with WD40, a product we all know. This will allow you to avoid using excessive force and keep the studs intact. If that doesn't work, the studs are drilled out. The process is complex, lengthy, and requires experience and skill.
- There is a gasket between the manifold and the pants that needs to be replaced. Also install a new converter o-ring.
- Now firmly press the exhaust pipe using the nuts. To do this you will need to compress the gasket.
- Then tighten the bolts of the spring-loaded connection with the neutralizer of your VAZ 2110.
As you noticed, there is nothing complicated in this work. Each element is quite easily dismantled and a new one is installed in its place. Just be careful, act carefully and consistently. Plus, of course, do not forget about the importance of the quality of new parts. Buy only good spare parts that will ensure long-term and efficient service of the exhaust system on your VAZ 2110.