Before you start working on the exhaust system, you need to give it time to cool down. Since it is clear that when the engine is running it gets very hot.
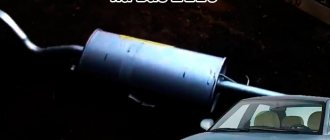
In order to determine damaged areas of the exhaust (rust, breakdowns, etc.), you should put the car on a pit or overpass and start the engine. I advise you to wear a respirator to avoid poisoning from toxic fumes. Now walk around the entire area of the exhaust system; a distinct loud noise will be heard in the areas of damage. And also in this place you can see the release of exhaust gases. To be sure, you can bring your hand to the possible damage, but do not touch the pipe, as you may get burned. I advise you to periodically check the exhaust system, since not everyone likes to drive with noise like a tractor - this does not apply to fans of direct flow :).
You can change the exhaust system by unit, that is, separately the exhaust pipe, the resonator or the muffler itself. Basically, in 99% of cases, the exhaust system rusts, as a result of which holes appear in it.
In injection models of the VAZ 2110, a catalytic converter for exhaust gases is installed between the exhaust pipe and the resonator. The latter is responsible for reducing emissions of harmful particles into the environment.
- If you are the owner of a dozen, then you can skip this point, but if a person comes to our site who has a VAZ 2111 or VAZ 2112, then I advise them to remove the minus from the battery.
- For VAZ 2111 and 2112 car engine models, you must first disconnect the negative terminal from the battery. There is no point in doing this on a VAZ 2110.
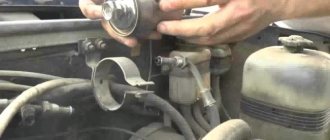
- We unscrew the bolts that connect the exhaust pipe and the catalyst. Be careful, there are springs on the bolts, don’t lose them.
- Unhook the plastic fastener for the wire to the oxygen sensor.
5. Disconnect the wiring harness from the oxygen sensor.
6. Unscrew the 4 nuts (pictured as number 2) that hold the 2 fasteners. Before doing this, you need to bend the edges of the plates (pictured as number 1), since they lock the nuts.
7. If you have a VAZ 2112 modification engine, then the exhaust pipe is secured to the manifold with six nuts.
8. Release the bracket that secures the exhaust pipe by unscrewing a couple of bolts.
9. Take out the exhaust pipe. Note that the bracket and gasket remain on it.
10. Now you need to get rid of the oxygen sensor on the pipe. Unscrew it with a wrench.
11. Next, we get rid of the bracket by unscrewing a couple of nuts.
12. Do not forget to remove the sealing ring from the old exhaust pipe, as it will need to be installed on the new one.
13. Change the gasket.
14. The new exhaust pipe is installed in the reverse order.
Replacing the exhaust pipe of a VAZ 2110 muffler: 1 comment
I raised my hand and felt hot air gushing out from under the gasket. It turns out that the plane of the intake pipe flange is also not flat.
The exhaust system of the VAZ-2110 is designed for cleaning exhaust gases. The components included in it have a fairly long service life. But since the entire system is constantly experiencing temperature overloads, the metal gets tired, cracks and burnouts appear. Repairing the exhaust system yourself is quite simple. This allows owners of the “ten” to significantly save on maintenance. The design of the exhaust system includes: the main muffler, neutralizer, exhaust pipe and resonator.
Composition of the output unit
The exhaust system for a VAZ 2110 car consists of the following elements:
- Exhaust manifold;
- Lambda probe;
- Receiving type pipes;
- Neutralizer;
- Two mufflers: main type and additional.
Not all exhaust components are disassembled; some parts, such as the converter, as well as both mufflers, are replaced entirely.
Exhaust system of VAZ 2110
Typical exhaust system faults
Be sure to verify that there are any problems with the exhaust system before starting any repairs. And identify the node that has become unusable. Any breakdown reveals itself with the following signs:
- Broken connecting pipes. As a result, the integrity of the entire system is compromised and exhaust gases are not properly purified.
- Burnouts on the elements of the main muffler and resonator. This leads to the fact that the exhaust gases are not cleaned, and an extraneous sound appears when the engine is running.
- Strong noises appear from the exhaust system and the main muffler, indicating that there is damage.
Exhaust system elements
In order to understand what the exhaust system on a VAZ-2112 is, you need to know all its elements:
Visual arrangement of exhaust system elements.
- Receiving pipe (they are also called “pants” - approx.).
- Neutralizer.
- Resonator (additional muffler - approx.).
- Main muffler.
Exhaust system breakdowns
Among the possible breakdowns in the exhaust system, the following facts can be highlighted:
Mechanical damage to the exhaust system can be solved by welding these parts. A crack in the area of the gander, from which exhaust gases escape. If one of the elements breaks, or a weld seam or tank burns out, it should be replaced only as a whole, since its restoration may not bring the desired results. And the only detail to which this fact cannot be attributed are metal expansion joints. They must be replaced independently of the entire exhaust system. Since the cost of a new neutralizer in comparison with other parts is quite decent, many VAZ-2112 owners replace it with a flame arrester (stronger - approx.). In this case, the neutralizer is simply cut off, leaving only the flanges and a fist with flaring, after which the flame arrester is welded. The cost of a flame arrester in comparison with a neutralizer is much less, however, unlike its analogue, it does not burn out residual fuel
Please note that this fact can cause the muffler to fire and increase fuel consumption by 10-15 percent. Therefore, when installing it, pay attention to the presence of a lambda sensor (oxygen sensor - approx.)
Passport data on fuel consumption for the VAZ-2112.
How to remove the main muffler on a ten
As with most front-wheel drive models, replacing the exhaust system of the VAZ-2110 is quite simple. You do not need any special skills, extensive experience, or special tools.
But it is advisable to carry out all work on an inspection hole or overpass. The sequence of work is as follows:
- The connection between the resonator and the muffler is made using flared pipes and an O-ring. This connection is crimped with a metal clamp, which consists of two halves and bolts.
- First of all, dismantle the clamp; to do this, unscrew the nuts from the bolts using two 13mm wrenches and remove the O-ring. On cars of the tenth family, sealing rings made of graphite are used. Therefore, they do not stick to the surface of the pipe.
- Remove the old main muffler from the rubber hangers.
Description of individual components
To make the structure of such an element as the discharge system clearer, it is necessary to give a detailed description of all components:
- Neutralizer. A unit designed for effective purification and suppression of emissions of harmful substances into the environment. When driving, a car produces substances such as non-combustible hydrocarbons, oxide compounds of nitrogen and carbon. The work of this system is aimed at eliminating them. The design itself is a combination of two ceramic-type components. The surface of these components is coated with special afterburning catalysts, which include rhodium, palladium and platinum. These substances make it possible to purify exhaust gases emitted into the environment by almost 100%;
- Lambda probe. It is a special sensor whose task is to control the composition and amount of fuel that enters the engine. The lambda probe thereby controls the purifier. If the lambda probe does not work properly, then the entire output assembly will quickly become unusable, after which it will have to be replaced;
- Reception pipe. Designed for forced removal of exhaust gases from the cylinders of a power unit. The pipe is made of stainless steel, and its fastening to the collector is carried out using special pins, of which there are four in total. The studs guarantee reliable fastening of the two outlet pipes and the element. In order to combine the exhaust pipe and the neutralizer, as well as an additional muffler, hinged fasteners are used;
- An exhaust manifold. A component that is cast from pure cast iron. The manifold is secured with four studs in the exhaust pipe. Heat-resistant gaskets reinforced with metal are installed between the manifold and cylinder heads.
- Silencers. Necessary for effectively suppressing the exhaust rate of burnt gases. This is necessary in order to significantly reduce the noise level in a type of transport such as the VAZ 2110. The distribution device in this part of the unit is carried out as follows: the additional one is followed by the main one. These two components are connected to each other by clamps and sealing rings and are covered with a special casing on top.
Replacing a muffler on a VAZ 2108/2109 has its own nuances, which can be found here: https://vazweb.ru/desyatka/vyhlop/zamena-glushitelya-vaz-2109.html
Installing a new muffler
Assess the condition of the rubber hangers, which are located on different sides of the main muffler body. If they are overstretched or have cracks, be sure to replace them with new ones during installation.
The cost of these rubber bands is small, they are available in any store. Next you need to do the following:
- Install the new main muffler onto the rubber hangers.
- Insert a graphite O-ring between the pipe flares.
- Place the clamp in place and tighten the nuts using 13mm wrenches.
At this point, the repair of the main muffler of the VAZ-2110 exhaust system (8 valves) is completed. Start the engine and check the muffler operation. There should be virtually no sound from the exhaust pipe. The motor will run clean and smooth.
Malfunctions on VAZ cars of the tenth family
AvtoVAZ specialists conducted research, the results of which revealed that the car body, being a closed structure, has its own peak harmonics and can resonate at a certain frequency. To suppress spurious frequencies emitted by both the vehicle engine and those shielded by the body, it is necessary to use the range from 60 to 400 Hz, corresponding to medium and high engine speeds. A change in noise characteristics can be caused by making minimal changes to its design.
The most difficult noise to deal with is at low frequencies. From a technical point of view, it is impossible to combine tuning the exhaust system of a car and combating noise. You can maintain maximum power with a direct-flow muffler, and reduce the sound to a comfortable volume with a factory one.
Owners of VAZ 2110–2112 most often encounter breakdowns, burnouts and leaks in the exhaust system. Incorrectly set ignition, excessively rich mixture and pipe corrosion are the main causes of burnt out exhaust pipes. This defect is accompanied by knocks and pops, which indicate burnout of metal parts. A sign of burnout may be smoke from the exhaust pipe, indicating an overly enriched fuel mixture that is burning in the exhaust pipe.
Car muffler malfunctions can be caused by various reasons - pipe burnout, system leakage, breakdowns
The appearance of knocks on the body in the area where the muffler is located indicates mechanical defects in the part - changes in geometry, destruction of the rubber band, suspension or damper cushion. Eliminated by identifying the location of the breakdown and troubleshooting. Worn parts are replaced with new ones.
Muffler gaskets
The gas junction formed between the rear and additional mufflers is insulated using a rubber gasket or O-ring. In addition to the main function of closing the gap, it is also used to eliminate the movement of the pipes of the part relative to each other.
Rubber O-ring located between the car muffler flanges
The appearance of carbon deposits under the bottom of the car at the joints of the exhaust pipe sections indicates damage to the gasket. Ruptures of the sealing ring are accompanied by the appearance of an unpleasant smell of exhaust gases in the vehicle interior and a sharp grinding noise that occurs during operation of the power unit.
How to remove the resonator
The resonator needs to be changed only after a new muffler has been installed. The sequence of work aimed at dismantling the device:
- The resonator is secured using a crimp-type clamp and an O-ring.
- The connection to the neutralizer is made using a floating flange, which consists of flared pipes and two bolts.
- The fist is located on the opposite side of the resonator.
The work must be carried out on a cooled engine.
Quite often it is not possible to unscrew the bolts, so to make the work easier, you just need to cut them off using a grinder. Be sure to install new bolts during reassembly. If you don’t have a grinder at hand, then you need to use a penetrating lubricant, for example, WD-40. Apply this composition to all threaded connections, then wait 20-30 minutes.
Unscrew all the bolts and remove the clamps on the resonator. After this, you need to remove the old resonator from the rubber suspensions. Be sure to evaluate the condition of all rubber products. If they show signs of wear, install new ones during reassembly.
Making your own dual exhaust
If you have the time, materials and necessary technical means, you can make a double exhaust for a VAZ car yourself. You will still have to purchase the main parts of the exhaust system. However, when manufacturing an exhaust system, you can save significantly, at least on the purchase of parts.
Experienced motorists have long developed two main options for manufacturing double exhaust for VAZs.
- The first option involves manufacturing an exhaust with different angles of both exhaust pipes. With this option, the second pipe is simply welded from the side into the pipe that comes from the manifold. When the car is idling, the exhaust gases exit the pipes almost uniformly, but at high engine speeds, most of the exhaust exits from a straight pipe that comes from the manifold.
Exhaust with different angles of both exhaust pipes
- A different version of the exhaust system will ensure the same amount of exhaust gases from both pipes. In this case, you need to weld two pipes with the same angles and turns at even angles to the pipe that comes from the collector. This can give the structure a more aesthetic appearance.
Exhaust with equal angles of both exhaust pipes
After choosing your exhaust system design, you need to move on to the next step of installing your own dual exhaust design. When installing a self-made structure, problems may arise with pipes deviating from the location of the old holders. But this is not a big problem, since they can be made and installed independently.
Remember that before installing your own exhaust, it must be wrapped with asbestos cord, which will provide thermal insulation. It is extremely necessary in order to avoid fire, since the fuel system is located dangerously close.
As for the installation process, it is identical to the one mentioned above.
To become more familiar with all the nuances of manufacturing and installing dual exhaust on VAZ cars, we bring to your attention a video with a more detailed description.
Resonator installation
In the VAZ-2110 exhaust system (16-valve injector), work is performed in exactly the same way as on 8-valve engines. The procedure is as follows:
- The new resonator must be mounted on rubber hangers and connected to the muffler. Moreover, it is necessary that the pipe from the resonator be strictly parallel to the ground.
- If the neutralizer has wear, rust, or burrs, the connection must be lubricated with high-temperature sealant. This will ensure a high-quality connection of the exhaust system components.
- Tighten the resonator and catalytic converter flanges using only new nuts and bolts.
- The resonator is fastened to the neutralizer using two bolts and flanges. Moreover, the pipe is secured to the pants using a spring connection and flaring. An O-ring made of metal asbestos or graphite is installed inside.
This completes the replacement of the resonator; repairs present no difficulties. All work can be done independently, you just need an inspection hole or overpass.
Troubleshooting
The operation of a machine is always associated with the occurrence of malfunctions in parts and mechanisms. If some parts become unusable, then they need to be replaced or repaired yourself.
To replace the additional muffler in the exhaust unit:
- unscrew the two bolts that secure the clamp, for this you need a 13mm wrench;
- remove the clamp itself;
- remove the ring;
- disconnect the additional suspension cushions;
- remove the unit.
After this, a replacement is made, it is mounted in place in the reverse order. These are basic troubleshooting repair steps.
In addition to replacing standard faulty components with the same ones, but only new ones, you can modify individual components of the exhaust system, or tune the entire assembly.
How to remove the neutralizer
The VAZ-2110 exhaust system is standard for all cars. Almost the same design is used on nines, sevens, and even foreign cars. Even a motorist with very little experience can repair all elements of the system. If you have already decided to change the resonator and muffler, then it is also advisable to install a new neutralizer. The neutralizer is necessary to dampen the vibration coming from the car engine. This is a device that mechanically separates the muffler resonator and the exhaust pipe.
Device
The muffler is part of the exhaust system. Its complete structure is as follows:
- an exhaust manifold. Through it, gases penetrate into the “pants”;
- “pants” (reception pipe). They are separated from the manifold by a special gasket that holds the mount hermetically;
- pipe. Which is attached to the gearbox using a bracket;
- additional resonators. They are attached to the main muffler and exhaust pipe with clamps. They form an additional muffler;
- main muffler. Fixed to the bottom of the car to prevent the transfer of vibrations to the body;
- exhaust pipe.
The VAZ 2107 (injector) is equipped with a part that is shorter than that of the 2104 due to the length of the body itself.
Installation of a new neutralizer
If you decide to modify your car, you can install the Stinger exhaust system on the VAZ-2110. It is more reliable and advanced than stock.
All work is carried out the same way. The neutralizer is installed as follows:
- Install the neutralizer, and then put on the bolts. This must be done very carefully, making half a turn, no more.
- When tightening, you must first tighten the bolts that secure the neutralizer to the resonator. The last to be tightened are the bolts securing the converter to the exhaust pipe.
Main signs of a faulty or dim headlight
Replacing glass on a headlight on a VAZ 2110
The problem associated with road lighting overtakes every motorist, but what to do in this situation is an individual matter. If, for example, the headlamp begins to work poorly, it can be replaced completely; for this you need to buy sealant and new spare parts, and then, after dismantling the old lamp and applying a new sealant, insert the headlight in the place where the old one was
It is very important to prevent dirt from getting into the connections. The first signs that the car light is not working properly:
- Shaking headlights;
- Darkening and deterioration of lighting;
- Poor adjustment of the light beam;
- Malfunction of the hydraulic corrector.
Removing the exhaust pipe
Most drivers call the exhaust pipe “pants”, since the element is very similar to this item of clothing. It is secured to the exhaust manifold using bronze nuts and studs. The trousers are attached to the neutralizer using a spring-loaded connection. There is a gasket between the exhaust manifold and the pants to prevent gases from leaking.
Dismantling the intake pipe is carried out as follows:
- Using a 13mm wrench, you need to unscrew the nuts that secure it to the exhaust manifold. If there are metal plates with bent edges under the nuts, they must be bent. Please note that the connection uses studs that are screwed directly into the manifold.
- If the stud is damaged, replacement is quite problematic. Therefore, it is necessary to carry out all work carefully to keep the threaded connection intact.
- Be sure to allow the engine to cool before starting work, then apply penetrating lubricant to all threaded connections. With these simple steps, you won't have to use too much force, which will save your studs. If you break a pin, it will need to be drilled out. Before this, the exhaust manifold must be removed. Moreover, if you damage the exhaust manifold, replacing it will cost you a pretty penny. The cost of a new one is more than 2000 rubles.
- After unscrewing all the nuts, it is necessary to move the exhaust pipe to the side and remove the gasket.
- Unscrew the bolts that connect the exhaust pipe to the converter.
This completes the dismantling of the exhaust pipe of the VAZ-2110 exhaust system.
An exhaust manifold
The exhaust manifold is attached to the cylinder head directly with studs through a heat-resistant reinforced gasket. It is made of heat-resistant cast iron according to scheme 4-2. The collector is constantly subject to alterations from tuning studios, which replace the factory circuit with a wide variety of configurations and mounting options. It must be said that replacing the standard circuit, and especially replacing cast iron with steel, cannot bring anything good to the car.
The exhaust manifold is made of heat-resistant cast iron
Unless you are designing a narrow-profile car for competition. Moreover, for each discipline of motor sports, the exhaust manifold is configured separately and has some nuances in the design, which 90% of tuning studios have no idea about. Especially their customers. In most cases, the main focus is on the appearance of the pipe, but how it will work there is, by and large, all the same.
It must be said that the exhaust manifold is a rather important part and making it from steel, even the most heat-resistant, is a very questionable undertaking if the car will be used under normal conditions, and not just on the track or in rally raids. The collector temperature in operating mode can reach 1000 degrees. The cast iron is there for good reason and not at all to weigh down the engine structure. Any steel will burn out quite quickly under high load conditions, so before you buy an upgraded exhaust manifold made of super-Japanese steel, it would be worth thinking about the feasibility of such a replacement. Most of the top ten, thank God, do not participate in the world circuit racing championships; they simply have nothing to do there. Therefore, it would be more logical to correlate the rather modest capabilities of the VAZ 2110 engine with the level and quality of exhaust system tuning.
The exhaust manifold lasts almost forever and burns out in rare cases, and then due to a manufacturing defect. As part of improving the manifold with more effective methods, we would recommend that instead of installing thin-walled beautiful pipes of space configurations, simply pay attention to the mating of the exhaust ports of the cylinder head and the manifold holes. The fact is that the whole essence of tuning the exhaust system comes down, of course, to an amazing increase in power by reducing the resistance to exhaust gases. So it is precisely at this interface that the first additional power losses occur - at the junction of the manifold and the cylinder head. If the exhaust window and the manifold opening have even the slightest difference in size or level, parasitic vortices are formed that prevent the exhaust gases from escaping. If this is the case, after the collector you can even hang platinum direct flows with Swarovski diamonds, there will be no sense. If we are, of course, talking about saving power.
Installing a new exhaust pipe
All work is done in reverse order. But there are several features that you definitely need to know:
- Install a new exhaust pipe.
- A new gasket needs to be installed between the exhaust manifold and the pants.
- Be sure to install a new O-ring between the neutralizer and the pants.
- Tighten the nuts on the exhaust manifold studs. Tighten them evenly in a crisscross pattern.
- Tighten the bolts that are on the spring-loaded connection to the converter.
This completes the repair of the exhaust system. The sound will be muffled as much as possible, the car will become almost silent. It is advisable to lubricate the new gasket with a CV joint type compound. This will improve the seal.
The work of replacing the muffler on a VAZ-2112 is not a systematic and periodic work, but is carried out only when this element fails. Noise, disconnection, burnout of its elements are the best example of this.
Video on replacing the muffler on a VAZ-2112 in a garage, do it yourself, watch:
In order to independently replace any of the muffler parts, you do not need special skills. All you need to do is strictly follow our instructions.
Replacing pants
So:
- The receiving pipe (pants) is attached to the manifold by means of studs with nuts, and to the converter by means of a spring-loaded connection
- When removing the exhaust pipe, we pay special attention to attaching it to the manifold. Instead of bolts, there are studs screwed into the manifold, with nuts screwed onto them. Replacing a damaged stud is not easy, so it is very important to preserve them
Nuts securing the pants to the manifold
- The nuts should be sprayed with WD-40 so as not to use excessive force, and save the studs;
- Otherwise, you will have to drill out the stud if it breaks; this requires experience and considerable effort;
- We replace the gaskets between the pants and the manifold. We also install a new o-ring for the neutralizer;
- Then we firmly press the exhaust pipe using nuts to the manifold (squeezing the gasket);
- Tighten the bolts of the spring-loaded joint with the neutralizer.
Now replacing the muffler on a VAZ 2110 yourself is not a problem for you. If anything in our article remains unclear to you, watch the VAZ 2110 muffler replacement video.
Step-by-step process for replacing a muffler
Before purchasing a new muffler element from an auto store, remove the old one, as there are several varieties. For example, the middle part can be with a lambda probe, or without it, it can be short, it can be long, and accordingly the rear part will differ in size.
Depending on which element requires replacement, the order of work should be carried out strictly individually. Let's start in order.
Downpipe
Work to dismantle the “pants” should be carried out in the following order:
- We lubricate the joints of the studs and nuts with WD-40, so that in the future everything can be easily unscrewed.
Note that the downpipe is attached to the manifold with studs, not bolts. Therefore, when unscrewing, you should be extra careful so as not to break them. And if this happens, you will have to put a lot of effort into drilling them out.
- We unscrew the 6 nuts that secure it, and on the neutralizer side we loosen the spring-loaded connection.
All bolts are marked with arrows.
If there is damage, replace the spring with a new one.
The bolts on the springs between the exhaust pipe and the converter are marked with arrows.
And now close
Neutralizer
- We treat the connections with lubricant for better dismantling.
- Then we unscrew the spring-loaded bolts from the pants to the neutralizer (see above).
- We unscrew the two bolts that secure the neutralizer to the resonator.
The indicated bolts are marked with arrows.
Resonator
- The resonator is secured to the neutralizer using a floating flange with two bolts; to dismantle we unscrew them (see above).
- Fixation to the muffler is carried out with a crimp clamp with an o-ring inside using two bolts and nuts.
- If difficulties arise when unscrewing these bolts, then the joints must be treated with WD-40, liquid wrench and cleaned from traces of rust. And if after this they still do not unwind, they need to be cut off with a grinder.
- We unscrew all the bolts.
The required bolts are marked with arrows. Everything looks beautiful in the picture, in real life it will be like in the photo below.
Connection between the middle part and the rear part of the muffler
Ready. The new middle section of the muffler has been installed. Get ready for it to stink for two days.
Muffler
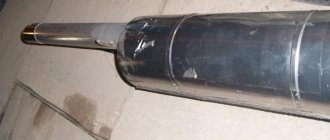
Main muffler. This is what it looks like at 160,000 km, editorial car. Pictured is the 8-valve version
- We replace the muffler on an inspection pit or a lift.
- Since the muffler is connected to the resonator only using an O-ring in a flared pipe and compressed with a clamp fixed on two bolts, we inspect this connection for the presence of corrosion and the general condition of the bolts.
- We treat it with WD-40 or liquid key.
- If the connection gives in, then unscrew the bolts or cut them off with a grinder.
- Then we remove the clamp, inspect it and decide whether to replace it with a new one or continue using it.
- We move the flared pipes apart and remove the sealing ring. Since it is graphite, it should not stick or stick to the metal.
The ring is marked with an arrow.
Remove the muffler from the rubber bands carefully.
Thus, the work on replacing the muffler can be considered completed.
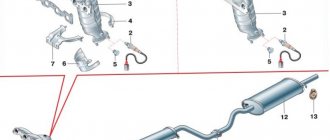
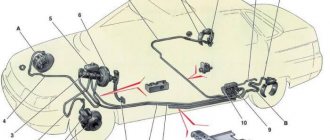
Design of the exhaust gas system of VAZ 2110, VAZ 2111, VAZ 2112, Lada Ten
Exhaust system
a - without neutralizer b - with neutralizer c - exhaust gas flow diagram 1 - exhaust pipe mounting bracket 2 - gasket 3 - exhaust pipe 4 - muffler suspension cushion 5 - additional muffler 6 - muffler pipe connection clamp 7 - main muffler 8 - rear cushion muffler suspension 9 – oxygen sensor (lambda probe) 10 – three-component neutralizer 11 – additional muffler housing 12 – inlet perforated pipe 13 – blind partitions 14 – exhaust perforated pipe 15 – main muffler housing 16 – left perforated pipe 17 – front blind partition 18 – middle blind partition 19 – rear blind partition 20 – rear perforated pipe 21 – right perforated pipe
The exhaust system consists of an exhaust manifold, a exhaust pipe 3, an additional 5 and a main 7 muffler. The exhaust manifold and exhaust pipe mounting bracket 1 for 8-valve engines (2110 and 2111) are interchangeable with parts from Samara. The exhaust system of the 2112 engine is distinguished by an exhaust manifold and a downpipe.
On most cars equipped with an injection system, the exhaust pipe is equipped with an oxygen sensor (lambda probe). A three-component neutralizer is additionally installed in the exhaust system of these cars. The mufflers and neutralizer of the VAZ 2110 are non-separable units and, if they fail, must be replaced with new ones.
The exhaust manifold is cast from cast iron. A metal-reinforced heat-resistant gasket is installed between it and the cylinder head of the VAZ 2112. The exhaust pipe is attached to the exhaust manifold on four studs (for the 2112 engine - on six). The connection is sealed with a heat-resistant gasket. The receiving pipe is made of stainless steel. It is attached to the power unit using a bracket with a clamp covering both outlet pipes.
The exhaust pipe is pivotally connected to the pipe flange of the additional muffler or neutralizer (for models where it is provided). Between the flanges there is a metal-graphite ring with a spherical outer surface. The inner surface of the flanges is also spherical, and they are tightened with spring-loaded bolts, which allows the VAZ 2110 muffler pipe to move (without loss of tightness) relative to the exhaust pipe when the power unit oscillates relative to the body.
To reduce noise and better thermal insulation of the body, the additional muffler has a protective cover. For vehicles with a neutralizer, an additional muffler is available with a shortened front pipe.
The neutralizer is designed to reduce emissions of carbon monoxide, nitrogen oxides and unburned hydrocarbons into the atmosphere. For this purpose, two ceramic blocks with many pores, coated with so-called afterburning catalysts: rhodium, palladium, platinum, are used. Passing through the pores of the neutralizer, carbon monoxide is converted into low-toxic carbon dioxide, and nitrogen oxides are reduced to harmless nitrogen. The degree of gas purification in a working neutralizer reaches 90-95%. For normal operation of the converter, the composition of the exhaust gases (in particular, the oxygen content in them) must be within strictly specified limits. This function is performed by the controller, determining the amount of fuel supplied depending on the readings of the oxygen sensor (see section VAZ 2111 engine control system).
The neutralizer and oxygen sensor are very sensitive to lead compounds - both of them are quickly “poisoned” and stop working, which, accordingly, leads to an increase in emissions of toxic substances. Therefore, if your car is equipped with a neutralizer, its operation, even short-term, on leaded gasoline is strictly prohibited. A faulty ignition system can also cause the neutralizer to fail. If sparking is missed, unburned fuel enters the converter, burns out and sinteres the ceramics, which can lead to complete blockage of the exhaust system and engine shutdown (or severe loss of power).
The main muffler is located after the additional muffler and is connected to it using an O-ring with clamps (as on the Samara). The VAZ 2111 mufflers are suspended from the body brackets on four rubber pads.
Source
Dual Exhaust Installation Steps
- First of all, you need to remove the old muffler.
- Afterwards, you should hang the right part of the new muffler on the right side of the car (previously placed on a lift), while using the existing cushions. In this case, the left part does not need to be fastened; you just need to connect the muffler to the resonator using a clamp and seals.
- Next, you need to connect the left part of the muffler to the main part through the pipes. In this case, it is necessary to take into account the location of the fastening rod, and it is also necessary to calculate the place where the holders in the form of brackets will be placed.
- It is necessary to use a drill to make two holes with a diameter of 1.5 mm in the spar. These holes can attach a holder, which is screwed with self-tapping screws.
- The completed operations allow you to move on to attaching the main left part. Fastening is carried out by inserting the muffler cushion directly into the bracket-shaped holder; the exhaust rod is also inserted into the cushion.
- The opposite side of the muffler is secured using O-ring clamps. This fastening should not be too tight.
- All the work done allows us to move on to the process of adjusting and establishing symmetry between the two exhaust pipe tips. Initially, loosely tightening the connections will allow the installation to be fine-tuned.
When to change the resonator, and which resonator to choose?
When to change the resonator, and which resonator to choose?
A resonator is a part of a car’s exhaust system, which is responsible for partial compensation of the sound wave that appears when the fuel mixture detonates in the engine combustion chamber.
Not every car has resonators; some small cars can be equipped without it at the factory, but in most cases it is installed in the car. This part of the exhaust system is responsible for damping the sound wave corresponding to the low-frequency range. The resonator works in tandem with a muffler, due to which it is possible to achieve relatively quiet engine operation, even at high speeds. The resonator is especially effective at compensating for resonant sound waves.
Do I need to change the resonator?
The resonator is subject to a large temperature and vibration load, which leads to its failure after some time.
In essence, the resonator, like the muffler, is a consumable component of the car. The validity period depends on the quality of production. Over time, under the influence of high temperature and corrosion processes, aging of the resonator metal occurs. As a result, the steel burns out and the resonator loses its seal. Sometimes the internal parts of the resonator (the filling of the can) are the first to fail, then the resonator may become clogged. This is often the answer to the question of why the resonator is ringing or making a humming sound.