If during operation of the VAZ 2106 engine you hear extraneous noise from the water pump (pump) or a leak occurs, this part must be replaced. In most cases, this is a complete replacement rather than a repair, since the cost of the part is not that high, only about 600 rubles.
So, to perform this repair we will need the following set of tools:
- Small and medium ratchet
- Chapters 10 and 13
- Subtle Extension
- Screwdriver
- Fixed or fixed key 13
Now below we will analyze in more detail the procedure for removing and installing the pump. First of all, unscrew the clamps that secure the coolant supply pipes:
Then disconnect the hose from the water pump:
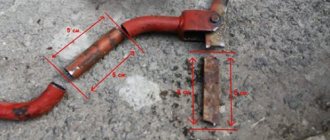
Now you need to unscrew the two nuts securing the metal pipe on the left side, through which antifreeze (antifreeze) is supplied to the internal heating system (stove radiator):
And then we remove the tube from the studs, pulling it out with a little effort and moving it to the side, as shown in the photo below:
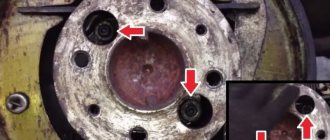
Then you need to unscrew the three bolts securing the pump to the VAZ 2106 engine block. One of which is located in the top center:
And with two more bolts from below, the VAZ 2106 water pump is attached, this is clearly shown below:
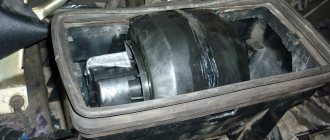
Then you can safely remove the pump:
If necessary, we purchase a new pump and carry out the installation in a strictly defined reverse sequence, installing all the removed parts in their place.
The water pump of the cooling system on classic VAZ 2101-07 models is not reliable. The average mileage of one part is 40 thousand km, after which it fails and requires replacement. But for an experienced Zhiguli owner there is another way out - to remove and repair the pump, replacing worn or broken elements: oil seal, bearing or impeller. If this approach is close to you, then before starting work you should study the detailed instructions for restoring the “classic” pump assembly.”
Malfunctions of “classic” water pumps
In older Zhiguli models, a special antifreeze is used to cool the engine - antifreeze that circulates from the engine water jacket to the main radiator. The rotating impeller of the pump, built into the front of the power unit, forces fluid to move through the system. It is driven by the crankshaft through a belt drive.
The pump and generator pulley is driven by a belt from the crankshaft
To understand the causes of pump failure, you need to know its design. The part consists of the following main elements that perform specific functions:
- a housing with a flange serves for hermetically sealed fastening to the engine;
- the shaft is needed to attach the impeller and drive pulley;
- roller bearing ensures shaft rotation;
- impeller with coolant pump blades;
- hub - fastening the drive pulley;
- the oil seal prevents antifreeze from entering the bearing;
- The set screw secures the bearing race inside the housing.
The cause of pump failure is usually the roller bearing and seal.
The pump is not screwed directly to the cylinder block, but to the second housing, which includes the thermostat pipe.
The vast majority of water pump malfunctions occur due to wear of two elements: the oil seal and the bearing. Owners of “classics” are faced with the following breakdowns:
- antifreeze leakage through the oil seal and pump shaft;
- increased shaft clearance due to bearing wear;
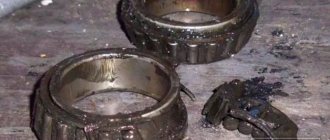
- an impeller broken due to emergency contact with the surface of the second housing (occurs when the shaft gap increases);
- jamming of the support rollers and breakage of the shaft into 2 parts;
A shaft with a broken end can be removed and replaced with a new one.
Due to wear of the bearings, the impeller begins to come into contact with the housing and breaks out a hole where all the antifreeze goes
All of the above problems can be eliminated by replacing the corresponding elements, provided that the housing itself is not broken. In this case, the entire pump is replaced.
Tools for replacement
Do-it-yourself overhaul of the VAZ 2106 engine
It is advisable to replace the pump on a VAZ-2106 rather than repair it. The cost of a new pump is about 700-900 rubles, and it takes a maximum of an hour to operate. And this is provided that the antifreeze cools to ambient temperature. To work you need:
- Several keys: “10”, “13”, “17”. It is advisable to use ratchets with heads, as they are much more convenient to work with.
- Silicone based sealant. White is best. It is not advisable to use red or black - during subsequent repairs it will be difficult to clean the surfaces.
- A basin for draining liquid from the cooling system.
- Phillips and flathead screwdrivers.
You may need a knife to remove the old gasket, but this must be done carefully so as not to damage the surface.
Pump repair manual
To troubleshoot the VAZ 2101-07 water pump, you need to remove it from the car. Replacing a pulley is an exception; in this case, the pump does not need to be disassembled. To carry out repair work, prepare the following set of tools and materials:
- hammer;
- flat screwdriver;
- standard set of sockets and keys (sizes 9-22 mm);
- mounting surface (mount);
- 10 liter capacity and 1 m long garden hose for draining antifreeze from the cylinder block;
- 1 liter of antifreeze for topping up;
- cloth rags and gloves.
Resetting the water pump will require standard plumbing tools.
To replace the pulley you will need keys and a crowbar; no need for frost tray and hose.
Separately, to remove the impeller, you need to prepare a bolt remover with external thread M18x1.5. It is also very desirable to have a vice; without them, disassembling the pump is extremely inconvenient. If you need to remove the new style plastic impeller, be sure to have an M18 x 1.5 tap ready to tap the threads in it. Old metal impellers are molded at the factory.
To cut high-quality threads, you need to use 2 taps - numbers one and two
Preparatory stage - removing the part
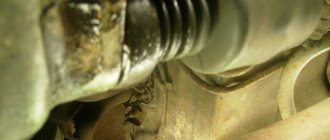
Before disassembling the unit, it is necessary to empty the water jacket of the engine so that antifreeze does not flow through the technological hole after disassembling the pump. To do this, unscrew the bolt - the cap located on the left wall of the cylinder block (if you look towards the car). Place a bowl and tube under the hole to avoid spilling antifreeze on the ground.
To drain the cylinder block, unscrew the cap and remove the radiator cap
After unscrewing the plug on the block, open the top radiator plug - the coolant will drain faster.
When the flow of antifreeze subsides and begins to flow down the wall of the block, screw the cap back on and begin disassembling the unit, performed according to the detailed instructions:
- Using a 17mm wrench, loosen the nut on the long alternator mounting bolt located under the alternator housing. There is no need to completely unscrew the nut.
To release the generator and loosen the belt, unscrew the nut under its seat.
The generator drive belt, which rotates the pump pulley, is removed after unscrewing the lock nut on the bracket
The pump is removed after unscrewing the four mounting nuts
It is more convenient to loosen the pump pulley fastenings when the generator drive belt is tense, which prevents the shaft from rotating.
When the belt is tensioned, it is easier to unscrew the pulley bolts
After disassembling, clean the water pump seat from gasket and sealant residues, and also clean the engine and adjacent components from drops of antifreeze.
How to remove and change the impeller
Practice shows that destruction of the impeller blades occurs from contact with the mating part of the housing when the pump shaft is very weakened. Therefore, failure of the blades of other efficient pumping elements occurs extremely rarely and is the result of a manufacturing defect. But if you find only such a malfunction, the procedure will be limited to replacing the impeller without further disassembling the part.
Failure of the impeller is usually accompanied by wear of the pump bearing.
On water pumps of VAZ 2101-07 cars there are two types of impellers:
- old model, metal, with M18 internal thread with a pitch of 1.5 mm;
- new champion: wireless plastic elements.
All new impellers are made without internal threads
Impellers of both types are attached to the shaft in the same way, pressing them with interference. The new plastic element is dismantled in the following order:
- Secure the shaft hub in a vice and drive the thread into the impeller. Before use, lubricate the device with motor oil or other liquid oil.
- Screw the bolt puller into the hole and lightly tighten the outer bolt.
- By turning the head of the inner bolt clockwise, pull the impeller out and remove it from the shaft.
The inner bolt of the puller rests on the end of the shaft and pushes the impeller up
Old metal elements (more precisely, cast iron) are simply crushed with a puller, since the threads in them are already cut by the manufacturer.
The new impeller is placed on the shaft and pressed with light blows of a hammer through the adapter so as not to break the blades. Pay special attention to the connection of the element: the lower part should rest against the graphite ring on the oil seal, then set it to 2-3 mm (there is a spring inside). The flat surface of the rotating impeller is pressed tightly against the ring, ensuring a tight connection.
After installation, the bottom edge of the impeller should be against the oil seal ring.
Video: technology for dismantling the impeller
Instructions for replacing the bearing and oil seal
In pumps of classic Zhiguli models, the bearing and shaft are unique spare parts and are sold assembled. As a result, if the shaft breaks, it is also replaced along with the roller bearing.
The pump shaft is sold assembled with bearing and is available in various lengths
When buying a new shaft for a VAZ 2101-07 water pump, be sure to take the old part with you to the store. The fact is that there are repair kits on sale for various cars that differ in the length and diameter of the axle, and the seller does not always understand such details.
To replace the shaft, proceed as follows:
- Pull out the impeller using a puller as described in the previous section.
- Loosen and remove the locking screw using a flathead screwdriver.
- Hold the case pump with one hand and hit the weight with the end of the shaft with a hammer. If the part does not give way, clamp the pump in a vice and pull it out of the wood through the guide.
After dismantling the impeller, the old wood is knocked down with a hammer
The hub is pressed onto the shaft with light blows of a hammer
When inserting the bearing into the housing race, ensure that the set screw holes line up on both sides. Do not try to tighten the cap too much, otherwise the next time you replace it there will be problems with disassembly and the pump will have to be completely replaced.
The oil seal is removed by rotating the shaft with the thick end
If you need to replace a leaking oil seal, you can easily get rid of it by using the old shaft. Sand the bearing housing, then flip it over and insert it into the pump hole. Then hammer the steel axle until the oil seal falls off. This is due to the fact that the second end of the shaft under the hub is shorter and larger in diameter. Insert the new oil seal into the seat as far as it will go using a round adapter, such as by cutting off a tube.
The gland is well inserted into the body using a mandrel
Installing a new pulley
Replacing the water pump pulley is simple and does not require removing the part from the engine or draining the coolant. The easiest way to disassemble is as follows:
- First, loosen the three bolts holding the pulley in place.
- Loosen the nuts holding the alternator and belt tension.
- Support the generator with a mounting blade, press it against the engine and remove the belt.
- Unscrew the 3 fastening bolts by hand and remove the pulley.
To replace the pulley, you do not need to drain the antifreeze and disassemble the pump
Installation of a new spare part and assembly of the unit are carried out in the reverse order. Follow the procedure: first install the pulley and tighten the bolts as much as possible with a wrench, then put on the belt. The final tightening of the pulley is done after tensioning the generator drive belt.
Video: how pump parts are changed
Is it possible to eliminate a pump leak on the way?
The loss of some antifreeze on the road is indicated by an increase in coolant temperature and a decrease in the level in the expansion tank. If you find a leak and are sure that the pump is at fault, you can try to fix the problem. Faults that cause antifreeze leaks are as follows:
- the joint between the pump flanges and the cylinder block has lost its tightness, antifreeze is leaking from under the gasket;
- a crack has formed in the pump housing;
- the housing was destroyed by the impact of the impeller.
A wedge is inserted into the hole in the housing from the front and covered with cold welding
Generally, water pump leakage problems are critical and difficult to resolve in the process. Try to compress the leaking gasket by tightening the 4 pump mounting nuts, which will require you to remove the alternator drive belt and pulley. Don't overdo it: it's easy to break the threads on Ø8 mm studs.
Try to seal a small crack with a chemical compound - cold welding. If possible, tie the patch to your body with something to prevent it from falling, add water and go to the garage. It will not be possible to close the large gap from the impeller; you need to look for an option to tow the car or call a tow truck.
Video: repairing a hull crack
From a financial point of view, rebuilding the pump is more profitable than completely replacing it, since it saves about 50% of the cost of a new part. Considering how often minor breakdowns occur on Zhiguli cars, this difference in price plays a role. The technology for replacing the bearing and oil seal on the VAZ 2101 water pump is also suitable for other cars equipped with a classic engine: VAZ 2121 Niva and its modifications, Niva-Chevrolet.”
↑ How to remove the coolant pump?
Drain the liquid from the engine cooling system.
Disconnect the upper and lower thermostat tubes.
Remove the alternator belt.
Disconnect the generator control rod and loosen its lower support. We bring the generator to the wing.
Using a 13mm wrench, unscrew the three bolts and remove the coolant pump drive pulley.
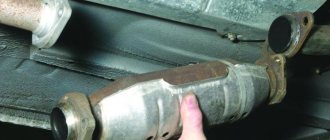
Using a 10 mm wrench, unscrew the two nuts securing the fluid drain hose to the heater core, and also loosen the nut securing the hose to the exhaust manifold.
Using a size 13 wrench, remove the three bolts (one at the top and two at the bottom) that secure the pump to the engine block and remove the coolant pump.
A gasket is installed between the pump and the block.
Using a “13” wrench, unscrew the four nuts and remove the pump cover assembly. A sealing gasket is installed between the cover and the body.
↑ Assembling the VAZ 2106 pump
We assemble the pump with a new cover and new seals. Install on the engine in reverse order.
Replacing the pump on a VAZ 2107 (photo and video)
Features of replacing the ignition switch in a Chevrolet Niva: how to change it yourself
Failure of the VAZ 2107 pump, or water pump, can result in two breakdowns: the formation of a coolant leak and the appearance of a hum or knocking sound. At the first malfunction, immediate replacement is required, since the gradual leakage of coolant can lead to overheating or even seizure of the engine. The appearance of a hum is the first sign of bearing failure, and can, over time, lead to the pump stopping. The consequence of this, as in the first case, may be overheating of the VAZ 2107 engine. So the replacement will only be a matter of time, and there is no point in delaying it.
- Key to 8;
- Key for 10;
- Key to 13;
- Key to 17;
- Screwdriver;
- Container for collecting coolant.
From spare parts and materials, you should stock up on a new pump and coolant, since it will need to be topped up or replaced when performing work. When choosing a new pump, it is recommended to buy a factory-made VAZ pump. Others may be of inferior quality, which may result in money and time being completely wasted and requiring a new replacement soon.
First, you need to drain the coolant from the engine block, or from the entire system if you decide to replace it. To do this, you need to unscrew the bolt in the block (and in the radiator, if a complete replacement is being performed), having first removed the plug on the radiator. Next, using a 17mm wrench, release the generator tension nut and remove the drive belt from the pump pulley.
Lastly, we unscrew the four bolts securing the pump to the engine cylinder block. Now that nothing is holding it in place anymore, we can safely remove the pump from the VAZ 2107 engine. Before installing a new one, we clean the seat of grease. Also, when installing a new pump, it is necessary to replace the gasket, otherwise you will have to repeat the entire procedure again. To ensure the tightness of the system, it is strongly recommended that the gasket be sealed with sealant. Installation of the VAZ 2107 pump is carried out in the reverse order. There shouldn't be any difficulties during the assembly process.
A belt that is too tight can quickly fail, and insufficient tension can lead to belt slipping, and as a result, loss of charging or overheating of the engine. At the end of the procedure, coolant should be added. You must remember to open the heater valve to prevent the formation of air pockets in the cooling system. After filling the fluid to the required level, start the engine and warm it up to operating temperature. After letting it run for a while, turn off the engine, and after allowing it to cool, add the missing volume.