Note: If the coolant level in the tank has dropped to o or below, then when the ignition is turned on, the corresponding indicator lamp in the on-board control system display unit should light up. Otherwise, the display unit (see “On-board control system display unit - removal and installation”) or the coolant level sensor is faulty, or their circuit is faulty. The terminals in the sensor wiring harness block may have oxidized.
To complete the work, you will need a multimeter (in voltmeter and ohmmeter mode).
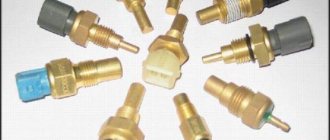
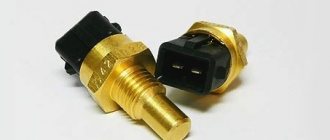
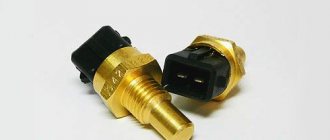
Coolant level sensor for VAZ 2114: device, check and replacement
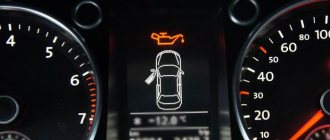
Probably every experienced owner of the fourteenth model has encountered a yellow icon in the form of a cup with a scale burning in the signal lamp block.
This is the coolant light on the VAZ 2114. This article is dedicated to those who encountered this problem for the first time and those who have already solved it. The on-board control system warning lamp unit is located to the driver's right above the central ventilation system nozzles.
It is a narrow plastic panel with seven indicators:
- - little oil;
- -insufficient level of windshield washer fluid;
- -low coolant level;
- -one of the doors is unlocked;
- - there is a malfunction of the brake lights and dimensions;
- - pad wear;
- -belts are not fastened.
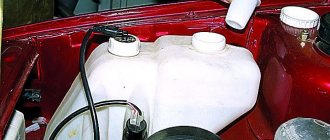
You saw the light on and, first of all, checked the fluid level in the expansion tank (usually it can be seen through it). On a cold engine, the antifreeze is located exactly between the minimum and maximum marks, and the light is still on. This indicates that the VAZ 2114 coolant level sensor is not working.
VAZ-2111 engine cooling system (with fuel injection system)
1 – expansion tank; 2 – plug; 3 – steam removal hose; 4 – hose from the expansion tank to the thermostat; 5 – coolant temperature sensor in the outlet pipe; 6 – throttle unit; 7 – radiator supply hose; 8 – radiator outlet hose; 9 – left radiator tank; 10 – right radiator tank; 11 – drain plug; 12 – radiator core; 13 – electric fan casing; 14 – electric fan impeller; 15 – electric motor; 16 – pump gear pulley; 17 – pump impeller; 18 – camshaft drive toothed belt; 19 – heater radiator outlet pipe; 20 – pump supply pipe; 21 – tap; 22 – heater radiator; 23 – coolant drain hose from the throttle pipe; 24 – coolant supply hose to the throttle pipe; 25 – coolant temperature indicator sensor; 26 – exhaust pipe; 27 – heater supply pipe; 28 – thermostat; 29 – coolant level sensor.
Replacing the coolant level sensor
Unfortunately, plastic sensors often break, and it even happens that newly installed new elements fail. This is a sore spot of the VAZ 2114, so in subsequent models (such as Granta, Priora) they were completely removed. You can do the same.
To no longer deal with broken sensors, buy a new expansion tank with only a cap and install it in place of yours. And you either remove the wires from the mounting block chip, or simply insulate them and leave them as is.
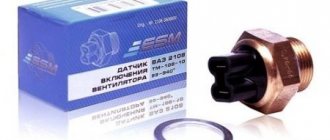
- Go to the store and buy a VAZ 2114 coolant level sensor (90 rubles).
- Disconnect the terminal from the battery.
- Remove the block from the old sensor.
- Unscrew it from the tank.
- Screw in a new one.
- Connect the block and place the terminal on the battery.
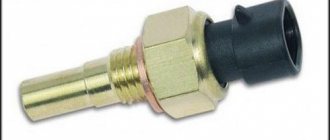
Checking the thermistor for functionality
When the result of our work is already in front of us, we can check all the functionality and correctness of the readings. You can do this using:
- Thermometer.
- Containers with water.
- Ohmmeter.
- Tables of heat versus electrical resistance. The operation of the element is based on the principle of measuring resistance depending on temperature.
If the DTO readings of your VAZ 2114 differ from those presented below, then this element must be replaced. After all, it is almost impossible to repair the device. At twenty degrees the electrical resistance should be at 3520 Ohms, at forty degrees - 1459 Ohms, and with boiling water - 177 Ohms. If everything is in order, then the problem may lie somewhere else, like a thermostat.
Coolant level sensor repair
If the sensor contacts are intact, but the sensor itself does not function as it should, then it can be repaired.
- Remove the sensor from the car.
- Remove the amendments.
- Using sealant, glue it well to the body.
- Then solder the joint (isolate it from antifreeze).
This way you can repair the plastic float. The porous float must be replaced, however, you can find a similar part and install it in its place.
Source
General position
It's no secret that the engine in any car is the main part of its design. When creating the car, engineers took into account all the necessary points related to ensuring the safety and reliability of all transport elements.
Thanks to this part, reliable control of the expander required in the system is ensured. The operating principle of this part is quite simple, since simplicity of design is the key to reliability.
Inside this part there is a special winding that creates an electromagnetic field; a round magnet (float) is fixed around this winding, which changes the resistance at the output of the winding. This system is called a “reed switch”. The main control unit monitors the performance of this sensor and changes the data in the event of a particular winding resistance. Thus, the refrigerant level inside the system is carefully monitored.
This element is located inside the expansion tank, usually at the bottom of its body. As a result, when the liquid exceeds the float threshold, the sensor informs the control unit that the level is within a positive tolerance. If the volume of refrigerant in the tank drops below the float, the sensor changes the resistance, thereby informing the driver that the level is critical and the antifreeze supply should be replenished. This scheme is the most common among modern cars.
The coolant level must be checked in the morning with the engine completely cold, as antifreeze tends to expand. You also need to monitor the state of the electrical contacts on the circuit coming to this sensor. There is a high probability that certain wires with which the sensor monitors the antifreeze level may be damaged. As for the repair and restoration of this unit, this process is impossible. The production technology of this element is based on a completely sealed housing, which is cast in special molds, and its disassembly is completely impossible. Fortunately, the cost of such parts is kept to a minimum, and almost every car owner can fully replace it.
How is the coolant level sensor connected to the VAZ 2114?
Some VAZ 2114 vehicles were equipped with a coolant level sensor (antifreeze, antifreeze).
It is located in the expansion tank of the engine cooling system and sends signals to the driver (through a lamp in the display unit) that it is time to add coolant, because the level has dropped. Here is the connection diagram for this sensor with its description of the elements and operating procedure.
Connection diagram for the coolant level sensor for a VAZ 2114 car
Description of the coolant level sensor connection diagram
— On a VAZ 2114 car, the coolant level sensor is built into the gap in the negative wire of the low coolant level warning lamp in the expansion tank of the engine cooling system.
— Plus (voltage) is supplied to the warning lamp in the display unit of the on-board control system of the front panel of the vehicle. After turning the key in the ignition.
Execution Sequence
2. Disconnect the wiring harness block from the sensor.
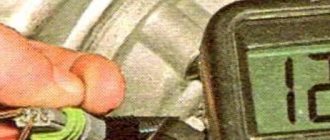
3. Using a piece of wire or a metal clip, we close the terminals of the connecting block. If the warning lamp for insufficient coolant level comes on, the sensor is faulty. If the lamp does not light, then with the ignition on, use a voltmeter to measure the voltage at the terminals of the connecting block. The voltage should be about 12 V. If voltage does not flow to the block, then there may be poor contact or a broken wire in the sensor circuit or the light indication unit is faulty.
4. Unscrew the sensor cover. Remove the sensor float from the tank and remove the sensor.
5. Connect the multimeter (in ohmmeter mode) to the sensor terminals.
6. By moving the float from one extreme position to another, we monitor the readings of the device. The electrical resistance of a working sensor in the upper position of the float should be infinitely large, and in others it should be close to zero.
Recommendation: Oxidized leads in the block should be cleaned with an awl or a thin file. Damaged sections of wires must be repaired. The faulty sensor and display unit are replaced (see “On-board monitoring system display unit - removal and installation”).
The light on the panel of the VAZ 2114 came on - who knows?
Who knows what kind of light came on on the central panel of the VAZ 2114, not where the odometer is, there is an oil light there of course, but on the central panel?
What does this mean, how scary is it and is it possible to drive like this?
Urgent car purchase and car pawnshop
Who knows what kind of light came on on the central panel of the VAZ 2114, not where the odometer is, there is an oil light there of course, but on the central panel?
What does this mean, how scary is it and is it possible to drive like this?
Low oil level light. Check the level on the dipstick - if it’s normal, then most likely the sensor is just messing around. If it doesn't bother you, drive like this.
Probably every experienced owner of the fourteenth model has encountered a yellow icon in the form of a cup with a scale burning in the signal lamp block. This is the coolant light on the VAZ 2114. This article is dedicated to those who encountered this problem for the first time and those who have already solved it.
The on-board control system warning lamp unit is located to the driver's right above the central ventilation system nozzles.
It is a narrow plastic panel with seven indicators:
- - little oil;
- -insufficient level of windshield washer fluid;
- -low coolant level;
- -one of the doors is unlocked;
- - there is a malfunction of the brake lights and dimensions;
- - pad wear;
- -belts are not fastened.
You saw the light on and, first of all, checked the fluid level in the expansion tank (usually it can be seen through it). On a cold engine, the antifreeze is located exactly between the minimum and maximum marks, and the light is still on. This indicates that the VAZ 2114 coolant level sensor is not working.
Preventing problems in the cooling system
Many problems can be prevented if the right preventive measures are taken. For long and stable operation of the cooling system, it is recommended:
- Use only high-quality branded antifreeze that is suitable for your car. You can find out the recommended parameters in the official operating instructions.
- Do not mix several coolants with different chemical compositions, even if they are the same color.
- Change the coolant promptly before it loses its properties.
- Monitor the level in the tank and do not allow it to drop or rise excessively.
- When replacing old antifreeze with a new one, flush the system with clean water or special chemicals.
How to check the coolant level sensor on a VAZ 2114
- Disconnect the electrical connector (latch) from the sensor.
- Unscrew the sensor from the tank.
- Close both terminals of the sensor into an electrical circuit with a 12 V current source and a control light.
- When the float is lowered down, the light should be on, when raised up it should go out.
If the “control” showed that the reed switch sensor is faulty, then there are three possible options for resolving the situation.
Replacing the coolant level sensor
Unfortunately, plastic sensors often break, and it even happens that newly installed new elements fail. This is a sore spot of the VAZ 2114, so in subsequent models (such as Granta, Priora) they were completely removed. You can do the same.
To no longer deal with broken sensors, buy a new expansion tank with only a cap and install it in place of yours. And you either remove the wires from the mounting block chip, or simply insulate them and leave them as is.
- Go to the store and buy a VAZ 2114 coolant level sensor (90 rubles).
- Disconnect the terminal from the battery.
- Remove the block from the old sensor.
- Unscrew it from the tank.
- Screw in a new one.
- Connect the block and place the terminal on the battery.
Installation
Install the new sensor in reverse order.
Such a simple component of the cooling system as the VAZ 2114 expansion tank can cause a lot of trouble for the motorist. Let's look at which ones exactly to be in the know. There are not very many major problems, but the price of repairs may differ, and significantly. The most common breakdown is rubbing of the tank body. A small hole appears through which liquid seeps out. But there are more serious problems.
Coolant level sensor repair
If the sensor contacts are intact, but the sensor itself does not function as it should, then it can be repaired.
- Remove the sensor from the car.
- Remove the amendments.
- Using sealant, glue it well to the body.
- Then solder the joint (isolate it from antifreeze).
This way you can repair the plastic float. The porous float must be replaced, however, you can find a similar part and install it in its place.
1) Good afternoon! VAZ 2114 2013, lately the high coolant temperature sensor (which is yellow) has been lighting up, I can’t understand why, the on-board driver writes that the temperature is normal, the fan turns on. What could be the reason? . 2) Hello everyone, please tell me why maybe you are driving 80 km, everything works fine, you give gas and the VAZ 2109 carb starts to twitch. Write the number of the question you are answering! The coolant sensor on the VAZ 2114 is on.
Similar articles
11 comments on “The coolant sensor on the VAZ 2114 is on. Lately the high coolant temperature sensor has been on.”
1... maybe this is a low fluid level sensor?...
2 clean the carb, or you will change the fuel pump, change the fuel filter.
Andrey, I have antifreeze and it’s normal, everything is at the level. When this light is on, does it mean there is low antifreeze?
1) this is not a high temperature sensor, but a low coolant level sensor
Share...
1 it gets dull for every second one, like the rest of the sensors
1) I agree with Alexey, he either fucks up or doesn’t work
1 unscrew the sensor in the expansion tank and clean the leg on which the float runs. You can also glue a piece of foam or other material that will easily float to the float
2. Clean the carb. Or maybe the accelerator is dead.
1) To start delivery, see if the rod is worn out, then check the fuel pump and then get into the carb.
Source
The first signs of a cooling system malfunction
Obvious signs of a malfunction in one of the cooling system units:
- coolant leak;
- a sharp sweetish-acrid smell in the car interior when the heating system is turned on;
- poor engine warming up in cold weather;
- engine overheating.
If you encounter any of the above, it’s time to go to a service station. There they will carry out diagnostics and determine the faulty unit.
What can go wrong with the cooling system?
The thermostat is broken
Let's start with a malfunctioning thermostat.
- the most subtle among the obvious problems of the cooling system.
The main role of the thermostat is to regulate the circulation of coolant in one of the “circles”: a small one, bypassing the cooling radiator during the initial warm-up of the engine, or a large one, upon reaching its operating temperature.
When the thermostat valve is open, the coolant moves in a large circle; when closed, it moves in a small circle. Typically this part changes its position depending on the engine temperature. A broken thermostat “jams” in one of these two states.
If the thermostat valve is stuck in a fully or partially open state, the engine will take a long time to warm up to operating temperature, and in winter, operating temperature may not be reached. But it’s worse if the thermostat is stuck in the fully closed position, the engine can overheat in any driving mode at any air temperature and even in slight frost. If the thermostat opens, but not all the way, the engine overheats, but may not “boil” - it all depends on the operating mode of the machine.
If the engine temperature indicator is reluctant to move up when warming up or goes off scale in the red zone, most likely there is a problem with the thermostat.
The seal of the cooling system is broken
The cooling system has many pipes, hoses, butt joints and sealing gaskets. Each of these connections can become a hole in the system - then the coolant will leak.
The consequences range from wasting money on buying coolant “to top it up” to overheating and major engine repairs.
The main reasons for the leakage of the cooling system:
- operational wear of parts;
- poor quality repairs;
- manufacturing defects.
Have you seen watery liquid under the car, and the level of antifreeze in the expansion tank is decreasing? You need to look for a leak.
The water pump is broken
A water pump failure can be identified by symptoms similar to previous malfunctions. However, such a defect will lead to dire consequences faster than others.
If the pump is broken, coolant will not circulate through the engine to regulate its temperature. The temperature indicator will be in the red zone, and even with the shortest use, overheating of the engine is inevitable.
It is difficult to determine the problem by eye, but some primary signs can be detected during a routine technical inspection:
- extraneous noise from the engine compartment;
- coolant leaking from under the water pump housing;
- increased engine temperature.
Engine overheating is a problem that can lead to the most tragic consequences:
- emulsion (mixing) of coolant and engine oil as a result of cylinder head gasket rupture due to overheating;
- overhaul of the cylinder-piston group, replacement of main and connecting rod bearings.
Regular technical inspection and timely replacement of components helps prevent such breakdowns.
The light on the panel of the VAZ 2114 came on - who knows?
Who knows what kind of light came on on the central panel of the VAZ 2114, not where the odometer is, there is an oil light there of course, but on the central panel?
What does this mean, how scary is it and is it possible to drive like this?
Urgent car purchase and car pawnshop
Who knows what kind of light came on on the central panel of the VAZ 2114, not where the odometer is, there is an oil light there of course, but on the central panel?
What does this mean, how scary is it and is it possible to drive like this?
Low oil level light. Check the level on the dipstick - if it’s normal, then most likely the sensor is just messing around. If it doesn't bother you, drive like this.
Probably every experienced owner of the fourteenth model has encountered a yellow icon in the form of a cup with a scale burning in the signal lamp block. This is the coolant light on the VAZ 2114. This article is dedicated to those who encountered this problem for the first time and those who have already solved it.
The on-board control system warning lamp unit is located to the driver's right above the central ventilation system nozzles.
It is a narrow plastic panel with seven indicators:
- - little oil;
- -insufficient level of windshield washer fluid;
- -low coolant level;
- -one of the doors is unlocked;
- - there is a malfunction of the brake lights and dimensions;
- - pad wear;
- -belts are not fastened.
INDICATOR BUGS
Also, the instrument panel on the VAZ 2114 has a block of light indicators, which includes the following icons:
Indicators
Let's look at the designation of the icons on the instrument panel in more detail:
- An indicator that displays information about the current engine oil level. When the amount of lubricating fluid is critically low, the light turns orange. Oil must be added immediately after this indicator becomes active;
- This indicator indicates a low amount of working fluid in the windshield washer reservoir. The tank is designed for 5 liters of liquid, the indicator turns on when its quantity drops below 1 liter;
- Fluid quantity sensor in the engine cooling system. One of the most important indicators that needs to be closely monitored;
- Indicates the presence of unlocked doors. Lights up red;
- An indicator that lights up if the dimensions or brake lights are out of order. The active indicator color is red;
- A light that lights up in case of critical wear of the brake pads (1.5 mm). Lights up from the moment you first press the brakes until the car is turned off;
- An indicator indicating that the driver is not wearing seat belts.
An exclamation mark on the instrument panel of a VAZ 2114 can light up in two cases: when the car’s starter is turned on, and when the brake fluid level is low. As a rule, the reason is in the second option.
To eliminate the problem, completely fill the tank and check the contacts of the TZ level sensor, which are located on the container lid, for oxidation.
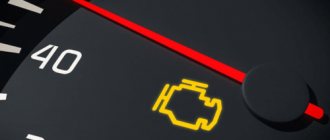
If the engine icon on the panel is on, it means something is wrong with the power unit of the fourteenth. There are many reasons why the Check Engine light comes on; it often stays on even when there are no visible faults. It is best to go to a service station for diagnostics, this way you will be protected from possible problems.
How to check the coolant level sensor on a VAZ 2114
- Disconnect the electrical connector (latch) from the sensor.
- Unscrew the sensor from the tank.
- Close both terminals of the sensor into an electrical circuit with a 12 V current source and a control light.
- When the float is lowered down, the light should be on, when raised up it should go out.
If the “control” showed that the reed switch sensor is faulty, then there are three possible options for resolving the situation.
Replacing the coolant level sensor
Unfortunately, plastic sensors often break, and it even happens that newly installed new elements fail. This is a sore spot of the VAZ 2114, so in subsequent models (such as Granta, Priora) they were completely removed. You can do the same.
To no longer deal with broken sensors, buy a new expansion tank with only a cap and install it in place of yours. And you either remove the wires from the mounting block chip, or simply insulate them and leave them as is.
- Go to the store and buy a VAZ 2114 coolant level sensor (90 rubles).
- Disconnect the terminal from the battery.
- Remove the block from the old sensor.
- Unscrew it from the tank.
- Screw in a new one.
- Connect the block and place the terminal on the battery.
Possible breakdowns of DTOZH
We will name the most common malfunctions that are associated with malfunctions in the operation of the device: contact failures or breaks in which insulation is lost, the fan does not function as required.
Signs of failure include the following:
- When the engine is not warmed up, the fan starts to work;
- The engine is warm enough, but its performance can be considered unsatisfactory;
- Excessive fuel consumption is observed.
Among the common erroneous beliefs, there is one: young and inexperienced motorists do not see the difference between two concepts: DTOZH and coolant temperature indicator sensor.
Coolant level sensor repair
If the sensor contacts are intact, but the sensor itself does not function as it should, then it can be repaired.
- Remove the sensor from the car.
- Remove the amendments.
- Using sealant, glue it well to the body.
- Then solder the joint (isolate it from antifreeze).
This way you can repair the plastic float. The porous float must be replaced, however, you can find a similar part and install it in its place.
1) Good afternoon! VAZ 2114 2013, lately the high coolant temperature sensor (which is yellow) has been lighting up, I can’t understand why, the on-board driver writes that the temperature is normal, the fan turns on. What could be the reason? . 2) Hello everyone, please tell me why maybe you are driving 80 km, everything works fine, you give gas and the VAZ 2109 carb starts to twitch. Write the number of the question you are answering! The coolant sensor on the VAZ 2114 is on.
Similar articles
What you need to know about DDM?
If the indicator lights up indicating low oil pressure, this does not always mean that there is not enough lubrication in the system. It is possible that the DDM is faulty. In order to find the true cause, you need to know what the device is and how it can be checked.
Purpose and location
The DDM consists of a housing, a membrane and a transmitting device. The membrane becomes deformed when oil begins to press on it. Deformation of the membrane is reflected in the rheostat, whose resistance changes. The ECU records changes and reflects them thanks to an indicator on the instrument panel. The controller on the VAZ 2109 is located under the oil filter on the cylinder head on the side where the carburetor is located.
DDM location
Diagnostic features
Before diagnosing the DDM, you should check the oil level in the system using a special dipstick and an oil filter.
One of the simplest diagnostic methods is to check the presence of pressure in the lubrication system. To do this, you need to unscrew the DDM from the socket and manually turn the crankshaft several times. If grease flows or splashes out of the socket and the control light remains on, this means that the pressure is OK and the cause of the malfunction is in the controller.
The process of unscrewing the DDM from the socket
Next, you should visually inspect the device itself. If no mechanical damage is detected, it must be cleaned with gasoline and screwed into the old place. If after this the light does not go out, this indicates that the device is broken and must be replaced.
For the second method of checking, a pressure gauge is required. The controller is removed from the warm engine and screwed into the pressure gauge; the adapter from the pressure gauge is screwed into its place. The control LED is connected to the positive terminal of the battery and the controller contacts. Then the running engine should gradually pick up speed until the pressure gauge shows a value of 1.2-1.6 bar. If the controller is working properly, the LED will go out. Otherwise the device is faulty.
Replacement instructions
To replace the DDM with a VAZ 2109, you will only need one key for “21” and a new device (the author of the video is Avto_Remont).
The procedure consists of a sequence of steps:
- You need to start work by disconnecting the negative terminal of the battery.
- Next, you need to disconnect the supply wire from the lubricant pressure controller.
- Then use the key to “21” to unscrew the faulty device.
- For sealing, aluminum foil in the shape of a ring is placed in the sensor socket.
- Now the new device is screwed in.
- All that remains is to connect the wire, and this completes the procedure.
Thus, there is nothing complicated in replacing; more time is spent on diagnostics.