The “penny” circuit diagram guide is intended for self-repair of a car in case of minor electrical equipment problems. Start the repair by checking the fuses and relays (description and designation will follow). The electrical circuits are divided into several blocks (for ease of viewing via a computer or phone), there are files in the form of a single picture with a description of each element - for printing on a printer. This is a small car, an analogue of the Fiat 124. Years of production of the VAZ-2101: from 1984 to 2014.
As in all other Zhiguli models, the electrical wiring of the penny is made according to a single-wire circuit. Power is supplied to all electrical devices through one wire, and the negative wire is the car body.
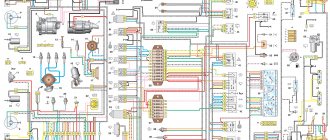
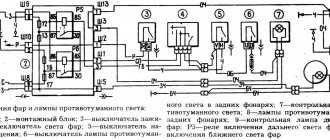
External lighting switching diagram
2 – engine compartment lamp; 3 – battery; 4 – generator; 5 – reverse light switch; 6 – fuse block; 7 – indicator lamp for external lighting in the instrument cluster; 8 – glove box lighting lamp; 9 – instrument cluster lighting lamp; 10 – plug socket for a portable lamp; 11 – instrument lighting switch; 12 – external lighting switch; 13 – brake light switch; 14 – ignition switch; 15 – lamp switches located in the front door pillars; 16 – lamp switches located in the rear door pillars; 17 – lampshades; 18 – trunk lighting lamp; 19 – rear lights; 20 – license plate light; 21 – reversing lamp
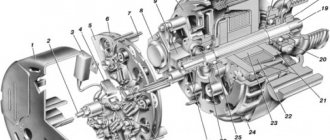
Removing the gearbox and wiper motor of VAZ 2107
To perform the work, you will need open-end or socket wrenches for 10 and 22. The procedure is as follows:
- Use a 10mm wrench to unscrew the nuts securing the wipers;
- remove the VAZ 2107 wipers from their seats (you must first bend them);
- Using a 22mm wrench, unscrew the trapezoid fastening of the windshield wipers and remove the plastic inserts;
- remove the rubber seal in the engine compartment;
- disconnect the power terminals of the windshield wiper;
- pull out the power cord from the hole in the car body;
- unfold the plastic protective cover installed on the wiper motor;
- Using a 10mm wrench, unscrew the nuts securing the wiper gearbox to the body;
- remove the wiper gearbox and the bracket with rods from the installation site (first you need to press the protrusions of the levers inward so that they fall through);
- unscrew the nuts securing the trapezoid to the gearbox and securing the gearbox to the crank;
- disconnect the wiper motor.
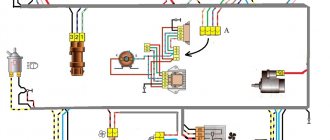
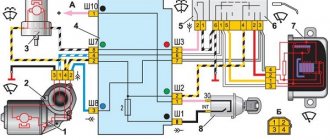
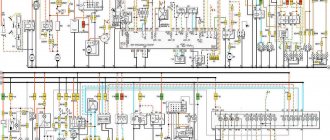
Windshield wiper connection diagram
1 – generator; 2 – battery; 3 – ignition switch; 4 – windshield wiper switch; 5 – windshield wiper relay; 6 – windshield wiper gearmotor; 7 – thermobimetallic fuse; 8 – windshield wiper switch located in the windshield washer pump; 9 – fuse block; A – the order of conditional numbering of the plugs in the relay blocks and the wiper gear motor
Turning relay VAZ 2101 replacement with an electronic relay.
If desired, you can replace the electromagnetic-thermal relays of the VAZ 2101 with an electronic relay used on VAZs of subsequent brands. The connection is made in almost the same way. In addition to the standard wires, it is necessary to add only one wire connecting the electronic relay to the vehicle ground. In this case, you can also connect an alarm button.
admin 26/11/2013
“If you notice an error in the text, please highlight this place with the mouse and press CTRL+ENTER” “If the article was useful to you, share the link to it on social networks”
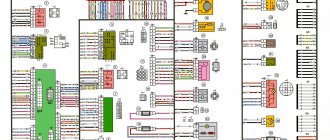
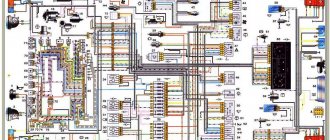
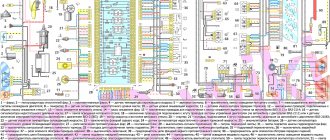
Electrical circuit diagram for VAZ-21011, VAZ-21013 cars
1 – headlights; 2 – front direction indicators; 3 – side direction indicators; 4 – battery; 5 – battery charge warning lamp relay; 6 – relay for turning on low beam headlights; 7 – relay for turning on the high beam headlights; 8 – generator; 9 – starter; 10 – engine compartment lamp; 11 – spark plugs; 12 – oil pressure warning lamp sensor; 13 – coolant temperature indicator sensor; 14 – sound signals; 15 – ignition distributor; 16 – windshield wiper gear motor; 17 – brake fluid level warning lamp sensor; 18 – ignition coil; 19 – electric motor for windshield washer; 20 – voltage regulator; 21 – heater electric motor; 22 – glove box lighting lamp; 23 – additional resistor of the heater electric motor; 24 – plug socket for a portable lamp; 25 – parking brake warning lamp switch; 26 – brake signal switch; 27 – relay-interrupter of direction indicators; 28 – reverse light switch; 29 – fuse block; 30 – relay-interrupter for the parking brake warning lamp; 31 – windshield wiper relay; 32 – heater motor switch; 33 – cigarette lighter; 34 – lamp switches located in the rear door pillars; 35 – lamp switches located in the front door pillars; 36 – lampshades; 37 – ignition switch; 38 – instrument cluster; 39 – coolant temperature indicator; 40 – control lamp for high beam headlights; 41 – indicator lamp for external lighting; 42 – turn signal indicator lamp; 43 – battery charge indicator lamp; 44 – oil pressure warning lamp; 45 – control lamp for parking brake and brake fluid level; 46 – fuel level indicator; 47 – fuel reserve warning lamp; 48 – instrument cluster lighting lamp; 49 – headlight switch; 50 – direction indicator switch; 51 – sound signal switch; 52 – windshield washer switch; 53 – wiper switch; 54 – external lighting switch; 55 – instrument lighting switch; 56 – sensor for level indicator and fuel reserve; 57 – trunk lighting lamp; 58 – rear lights; 59 – license plate light; 60 – reversing light
If the wipers stop turning on
When the VAZ 2107 windshield wiper stops working in both positions of the mode switch, you should start looking for the fault with the wiper fuse. It is installed in the electrical network to protect it from overloads that occur during malfunctions, short circuits or increased load on the wiper motor. If the fuse is working, you should check its contacts. Often they are highly oxidized and prevent the passage of current. Cleaning the contacts is simple - you need to remove the fuse and clean the contacts with a knife, screwdriver or sandpaper. Usually these actions are enough, but sometimes the reason lies in a malfunction of the relay, switch or motor. But more on that below.
Work principles
The variety of turn relays is quite large, but they are all divided into two main types:
- classical electromagnetic-thermal relays;
- electronic relays.
Electromagnetic-thermal relays are considered obsolete and can now only be found on very old cars, for example, classic Zhiguli cars. This type of relay consists of a core with a copper winding. There are two contact groups in the upper part of the core, and metal anchors in the sides. The structure is placed in a metal case, in the lower part of which contacts for connecting to the network are output.
When the turn switch is turned on, the network is closed - the lamp does not light. Then one of the anchors, under the influence of the nichrome string in the core, straightens and closes the contacts. After this, the current begins to flow in a bypass circuit, and the lamp lights up at full power. The click of the turn signals is ensured by the impact of a metal armature on the contacts.
An electronic relay consists of two main parts: a classic electromagnetic relay and an electronic key that ensures the frequency of operation of the relay. In a relay of this type, the operating principle of the nichrome string, which ensures the closure of the contacts, is assigned to a separate circuit board (key). Otherwise, the operation scheme is similar: the flowing current closes the contacts, after which the indicator lamps and the light on the dashboard light up. Interruption of the current leads to lowering of the armature and opening of the contacts - the indicator lamps go out. A characteristic click is also provided by the impact of the armature on the contacts.
Headlight faults and repairs
During operation, the owner of a VAZ 2106 does not always notice that the headlights are gradually becoming paler, forcing the driver to look closely at the road. The reason is the inevitable clouding of the lamp bulb after a certain time, so experts recommend getting into the habit of regularly replacing the lamps of the front lighting devices. If individual lamps or lights in the car do not light up, this may be due to:
- failure of one of the fuses;
- lamp burnout;
- mechanical damage to the wiring, oxidation of the tips or loosening of the electrical wires.
If the high or low beam does not switch, then most likely the high or low beam relay has failed or the contacts of the steering column switch have oxidized. In both cases, as a rule, replacement is required - respectively, a relay or a switch. It is also necessary to replace the three-lever switch if its levers do not lock or switch.
Experts recommend getting into the habit of regularly replacing headlight bulbs on your VAZ 2106
How to disassemble a headlight
To disassemble a VAZ 2106 headlight (for example, to replace the glass), you need to heat the sealant around its perimeter with a hairdryer, then remove the glass with a thin screwdriver or knife. A hairdryer is a convenient tool in this case, but not necessary: some people heat the headlight in a steam bath or in the oven, although this risks overheating the glass. The headlight is assembled in the reverse order - a layer of sealant is applied and the glass is carefully installed in place.
Replacing light bulbs
To replace a VAZ 2106 headlight bulb, you must:
- Remove the plastic cover using a flat-head screwdriver.
- Use a Phillips screwdriver to loosen the fastening screws of the rim holding the headlight.
- Turn the rim until the screws come out of the grooves.
- Remove the rim and lens.
- Remove the headlight from the niche and disconnect the power cable plug.
- Remove the clamp.
- Remove the lamp from the headlight.
Reassembling the structure after replacing the lamp is performed in the reverse order.
Headlights corrector
A device such as a headlight range control is not used every day, but it can be useful, for example, when driving at night with an overloaded trunk. At the same time, the front part of the car “lifts up”, and the low beam is more like high beam. In this case, the driver can use the corrector to lower the beam of light down. In the opposite situation, when the corrector is configured for a loaded trunk and the car is empty, you can perform the opposite manipulation.
If the car is not equipped with a corrector, you can install this device yourself. Based on the type of drive, correctors are divided into hydraulic and electromechanical. The hydraulic one consists of the main cylinder and headlight drive cylinders, as well as a pipe system and a manual regulator, which is installed on the instrument panel. Electromechanical - consisting of a servo drive, wires and a regulator. The headlights are adjusted using a hydraulic corrector by changing the pressure of the working fluid (which must be non-freezing) in the cylinders. The electric corrector changes the position of the headlights using a servo drive, which consists of an electric motor and a worm gear: after applying voltage to the electric motor, the rotational movement is converted into translational motion, and the rod connected to the headlight by a ball joint changes its angle.
Video: operation of the electromechanical headlight range control on a VAZ 2106
Periodic cleaning is required not only on the outside, but also on the inside of the VAZ 2106 headlights. If you need to get rid of dirt and dust accumulated during operation, you can use one of the many special cleaning products
It is important that the product does not contain alcohol, which can damage the coating of the reflector and the optics will have to be changed. In some cases, toothpaste or cosmetic micellar nail polish remover may be sufficient to clean the surface of the headlight.
To wash the inside surface of the headlight without removing the glass, you need to remove the lamp from the headlight, pour water diluted with a cleaning agent inside and shake well several times, then rinse the container with clean water and dry.