Generating a powerful beam of light to illuminate the space in front of the car is not as easy as it might seem. In addition to brightness, the beam must have defined boundaries, revealing your lane and the side of the road from the darkness, and not the eyes of oncoming drivers.
The lighting device has no right to overheat in any conditions, consume too much energy, and must remain within the budget that is reasonable for the given price category of the car.
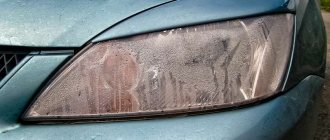
The result is a fairly thin and complex optical device, the properties of which can be distorted even by a certain amount of water vapor in the housing.
Consequences of optics fogging
They won't keep you waiting long:
- reflectors, lenses or unit adjustment mechanisms will be damaged;
- internal gaskets will collapse;
- perspiration will disrupt the centering of the light beam and reduce the illumination of the road surface;
- a lens effect is formed, leading to light refraction;
- the performance of electrical parts will deteriorate;
- Contacts will oxidize and wires will break.
If the headlights sweat, it is recommended not to turn on the optics until they are completely dry. The power connectors must be immediately disconnected to protect against breakdowns. Gas-discharge lights are especially dangerous in terms of short circuits.
How to remove moisture from a headlight without removing the part
Natural drying of the headlight through the ventilation system should occur after a maximum of 20 minutes. After you have turned on the optics, you can dry the headlight without removing it from the car if condensation rarely appears. For example, after the car has been standing in the rain for several hours.
If your windows sweat periodically, here’s some advice on how to remove the moisture yourself in a few minutes:
- Open the plugs on the inside of the headlight and check the breather. Air exchange will go faster.
- Blow with a hairdryer, directing a stream of warm air to the place where the light bulb is being replaced.
- Without removing the part from the car, place a bag of silica gel into the body from the inside.
The reason for condensation collection is natural and is not related to cracks in the headlight or a defective unit.
If moisture regularly enters the unit, it is necessary to find the place of depressurization. Often this is a loose fit of the light bulb to the body due to a worn gasket. After blowing the block with a hair dryer, it is necessary to replace the gasket and check the tightness of the fasteners.
You can clean the drainage channels without removing the optics from the car: remove the breather through the hood or crawl under the bumper. In the Infiniti model, a membrane is installed in the breather that prevents dust from entering the headlight housing. Over time, the membrane becomes clogged and the ventilation system fails.
Clean the channels with thin wire. Some manufacturers make one ventilation hole in the case, but to ensure convection it is necessary that there are two channels in the case. In this case, experienced mechanics recommend making ventilated plugs, this will prevent the glass from sweating:
- Remove the standard plastic plugs.
- Drill two holes with a diameter of 2-3 mm in the plugs.
- Insert polyester thread into the hole as a ventilation tube.
- Cut the thread.
- Coat the edges of the substrate with sealant.
If external checks show that the body is intact, ventilation is normal, but the unit is sweating, it is possible to determine the location of moisture entry only after dismantling the unit from the car.
Why do car headlights sweat: possible reasons
They sweat due to condensation that forms for a number of reasons. Droplets of moisture, mixing with the warm atmosphere, turn into a gaseous state. Perspiration collects on the lampshade, despite the visible tightness of the headlights.
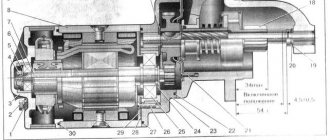
Moisture entry through check valve
In fact, the inner area of the headlights has an outlet realized through a check valve. It is designed to cool and release expanded air, since any type of modern source works on the principle of heating. It is from here, through the valve, that water can enter.
Breathers (vents) can also become clogged and fail to perform their functions. Because of this, the interior space is not ventilated, and condensation gradually accumulates here.
Loose connection of elements
Violation of the tightness of the seams in the area where the lamp is adjacent to the car also causes fogging. The fact is that it is extremely difficult to fix the headlight unit as tightly as possible. To eliminate micro-gaps, special types of sealants are used. But the best of them sooner or later dry out and lose their original properties. Moisture can penetrate even through the smallest cracks. Most often, the headlights of Chinese and domestic cars become depressurized.
Depressurization due to cracks and damage to glass
The headlight fogs up from the inside also due to a crack. It can be so invisible that it is difficult to find without a special device. Water seeps from here into the block, is heated by light and turns into steam.
Violation of geometry during production
Violation of standard instructions during the production of headlights also becomes a factor in the occurrence of the problem. This is usually called a warranty case or a manufacturing defect, and is eliminated by dealers throughout the entire operational period.
Silicone sealants that can be used to seal headlights
If the above-described process of drying the headlights turned out to be ineffective, then you will still need to spend time on a thorough inspection and identifying gaps, cracks or chips.
If they are found, you can use silicone sealant. It goes on sale in cylinders and is available in any auto store.
Applying the product is a fairly simple process and will be easy for any car enthusiast to handle. If you have problems identifying gaps or chips, it is better to immediately turn to professionals - specialists can easily identify them using optical or laser special devices.
It should also be taken into account that the lifespan of sealants is not always long enough, i.e. problems can arise precisely because the sealant has lost its original qualities.
In this case, gaps can form either visible to the human eye or almost invisible. Most often, middle-class cars assembled in the Middle Kingdom or on assembly lines of domestic car factories suffer from such problems.
How to properly dry optics
Fixing foggy headlights is usually quite simple. The main thing is to adhere to this order:
- Unscrew the lamp cover and pull it forward a little;
- turn on the low beam headlights for 10-15 minutes;
- leave to dry overnight in a warm garage.
In the morning there should be no moisture left. But if a relapse is detected, we must resort to a more effective method. You will need a hairdryer to blow out the lampshade. Seal the identified chips with sealant, and also treat the joints and the places where the headlights adhere to the body with silicone. But cracks in glass cannot be eliminated using this method. Here you already need high-quality tinting.
In some cases, it is not practical to deal with moisture seepage. For example, when the plastic headlight housing loses its working properties over time and turns into a hard and homogeneous material. Only replacement will help here.
How to get rid of fogging of car lighting system lights
Eliminating this phenomenon is quite simple. The main thing is to know and perform a certain sequence of actions:
- open the lamp covers and pull them out a little;
- it is necessary to turn on the low beam briefly to warm up the optics, and then turn it off;
- leave everything overnight in a warm, dry box or garage.
In the morning the problem should completely disappear. But, if the formation of condensation was noticed again, you can get rid of it in another way. For example, use a hairdryer to warm up the entire glass surface of the headlight.
Once condensation has been defeated, it is necessary to identify and seal all damage to the lighting fixtures with a special sealant. In addition, it is necessary to seal all loose joints and places where the optics adhere to the vehicle body.
If cracks are found on the surface of the headlight glasses, they must be removed as soon as possible. It is quite possible that you will not be able to carry out high-quality repairs of cracks on your own without damaging the appearance of your car's lights. In this case, the procedure for tinting will help correct the situation, improve and protect the headlights. A motorist of any level can do it.
If the reason for moisture penetration into the car's lighting fixtures is insufficient sealing of their contact point with the body, then the gasket must be replaced. However, it may be completely absent, and sealing of the connection is achieved due to the plastic properties of the material used to make the lantern. As a rule, it is made from plastic, which over time completely loses its plastic properties, turning into a solid, homogeneous material. So, an effective method for eliminating fogging of headlights in this case would be to completely replace their plastic parts.
How to disassemble and reassemble optics to eliminate condensation from the inside
To most effectively get rid of condensation, it is advisable to remove and disassemble the headlight. This is done according to the following instructions:
- Remove the headlight block. Separate the turn signal from the lamp and unclip the back cover. Check the inside of the cover - there should be no noticeable cracks, chips, or scratches. Pay special attention to the gasket. If it is not soft, does not fit well and does not provide a tight seal, then it should be replaced;
- Remove the glass by pressing the six latches with pliers. Check the gap between the glass and the gasket - this is where water often penetrates;
- Separate the gasket placed around the entire perimeter of the headlight. It should not be hard or stiff. The area underneath is clean, free of dirt, leaves and other debris. The rubber fits tightly on the headlight body and seals the edges well;
- Remove the high/low lamps and the marker. Clean the copper pins where the wires are inserted from dirt and oxides. It wouldn't hurt to clean the terminals of the common connector as well. The reflector can be successfully cleaned of dirt and condensation residues using a chemical glass cleaner (dirt is visible as a white coating); you will also need a soft makeup brush. You must work as carefully as possible so that the spray layer does not come off;
- Remove the lamp reflector caps. A lot of soot and moisture collect inside them; this must be cleaned out.
Proper cleaning and assembly
At the final stage, blow the surface of the reflector with hot air. Wash the glass and dry thoroughly with a cloth. Replace the problematic seal with a new one. Be sure to wash and dry the seat of the rubber cuff. Place the gasket on the sealant so that after drying there is no room left for moisture to seep through. It is also recommended to apply silicone over the rubber to seal the now seam between the glass and the headlight.
Proper cleaning and assembly
- It is advisable to clean the disassembled headlight from dust and dirt. Glass and reflectors must not be washed with aggressive detergents or hot water. The best solution is a solution of laundry soap and a soft, lint-free rag. Don't rub!
- Then the washed components should be rinsed generously with distilled water and left to dry naturally.
- Assembly is carried out using clean cotton gloves. A special sealant for headlights is applied to the seam (at this stage you need to work carefully and avoid breaking the lines of the composition).
- The glass is connected to the body and dried at room temperature for 24 hours.
- Then you can check the tightness. To do this, the headlight is immersed with glass in water and held for several minutes. In this case, water should not get into the holes on the back wall.
How to get rid of problems if headlights sweat: video about cleaning ventilation ducts
You can eliminate fogging of the head optics yourself. The main thing is to take your time and choose the right materials. Prevention is even more important. You should periodically check that the breathers are clogged. Try not to drive at high speed through puddles with your headlights on, and let the headlights cool down before visiting a car wash. Then the headlights will fog up less often and you won’t have to remove them for drying.
Traditional ways to prevent headlights from fogging from the inside
There are several effective folk ways to prevent headlights from fogging:
- Remove the lens. Apply sealant to the joint. Assemble the optics;
- Open the headlight. Place a bag of silica gel inside so that it does not come into contact with the light bulb;
- It helps if there is a barely noticeable crack on the ceiling. You need to remove the glass, apply Moment transparent glue to the chip;
- In some cases, it will be enough to open the hood for half an hour to ensure air exchange;
- Make 10 mm holes in special, hollow areas of the headlight unit. Insert polyester fibers through them, which will serve as ventilation tubes. The edges of the fibers must be coated with glue or sealant.
Avoid sudden changes in temperature - this can cause the headlight to sweat. Before washing your car, turn off the headlights for a while, allowing the bulbs to cool. Now you know what to do if the headlight fogs up.
If you have any questions, leave them in the comments below the article. We or our visitors will be happy to answer them
What to do with the breather?
Please note that the design of the air exchange system varies depending on the model of a particular vehicle. In this case, the principle of operation of the system is the same. If the valve is jammed and does not close, cold air will enter the housing through the hole, which will cause condensation. The problem can be eliminated by restoring the operation of the valve system. To get rid of excess moisture, you can use a simple trick. It is enough to take a few bags of silica gel, which can quickly absorb all the moisture. In this case, it is better to place the bag not near the light bulb, but as far away as possible so as not to scorch them. You can also dry the condensation with a hair dryer. At the same time, you should work carefully with elevated temperatures, as this can harm the paintwork and the plastic itself.
Practice shows that inexperienced craftsmen could seriously deform plastic parts, so if you are not confident in your skills, it is better to go to a specialist.