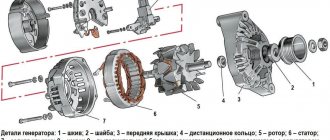
A car generator is one of the key components of a car's electrical equipment; it is operated in harsh conditions and constantly experiences heavy loads. The generator developer takes full account of the features of its operation, paying attention to achieving high operational reliability. However, it is not possible to exclude failures of this node.
Diagnosis of electrical equipment at a service station during scheduled maintenance is included in the list of mandatory checks. Its implementation reveals emerging malfunctions and a high degree of wear of individual components, including the generator. However, even regular car maintenance in certified workshops is not a guarantee against sudden failures.
Next, we consider the procedures for checking the generator, which allow us to assess its technical condition with high accuracy using simple means. The peculiarity of this device is that the design of generators of different cars is based on identical principles, therefore the same testing methodology is used for them, which may differ only in minor details.
It is advisable to carry out work to check the serviceability of the generator using a large-block scheme and only after localizing the faulty unit proceed to accurate diagnostics. We will not dwell on the intricacies of identifying malfunctions of a specific component of this unit, which are carried out according to our own methods.
Signs of a faulty generator
External manifestations of generator failure include:
- the corresponding optical indicator on the dashboard remains active or flashes when the engine is running;
- extraneous noise;
- heating the case to too high a temperature;
- characteristic smell of burnt insulation;
- dim headlights, blinking light bulbs, unstable operation of other electricity consumers (primarily powerful ones), which is clearly manifested when the battery has exhausted its service life;
- battery discharge at a high rate.
During instrumental control, additional consideration is taken into account
- non-compliance of the generated voltage with the rated value, taking into account the existing tolerances in a wide range of loads;
- complete absence of tension.
Common breakdowns
Generator faults can be electrical or mechanical. These include:
- loss of functionality of the voltage regulator;
- breakdown of the rectifier unit (diode bridge);
- short circuit of stator windings;
- current short circuit in the rotor winding;
- wear of bearings and brushes.
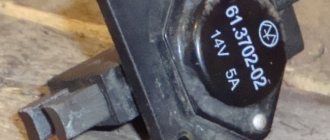
Voltage regulator
The purpose of this unit is to normalize the voltage before feeding it into the automotive electrical circuit. You can check the serviceability of the regulator by checking the voltage that it supplies to the battery terminals. This indicator depends on the model and brand of the vehicle and varies between 13.5-15.5 V. Therefore, you should find out in advance what voltage your particular type of regulator produces. This can be done by studying the manual for using the machine. For example, you can take a VAZ 2107 or 2110 car, since these vehicles have the most typical faults associated with the integral and relays.
Using a Multimeter
To check the VAZ 2110 generator with a multimeter, you need to switch the device to voltmeter mode. Then you need to connect its probes to the battery terminals. The most important thing is to observe the polarity and turn off the car engine. The voltage normally varies from 12 to 12.8 V. Next, the procedure should be repeated, but with the engine running. The voltage readings should rise to 13.5-15.5 V. Lower and higher voltage values indicate a malfunction of the generator.
Checking the generator without removing it from the car
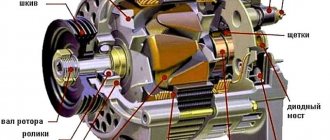
A bridge of diodes performs the functions of a kind of alternating current converter. It contains three negative and three positive diodes.
Before checking the bridge, you need to disconnect all the wires coming from it and from the voltage regulator. You also need to remove the ground anchor from the battery in advance. First you need to check the rectifier for short circuits. We activate the ohmmeter mode on the multimeter and connect the red (positive) probe to the positive contact of the diode bridge, and the negative probe to the surface of the housing of the generator itself. If the rectifier is fully operational, then the readings of the measuring device will go to infinity. In other cases, the rectifier will be inoperative.
Testing of stator and rotor windings
A common breakdown of a car generator is a short circuit in the windings. It occurs when current surges are too intense, brushes wear out and liquid gets in.
So, you need to remove the rotor and find a pair of slip rings on its structure that will need to be ringed. Having started the ohmmeter mode on the multimeter, we connect the probes to these rings. Normal resistance is 2-6 ohms. If you get large values, then there is a loss of contact between the slip rings. If the device shows lower values, then an interturn short circuit has occurred.
The starter has several windings at once. They need to be checked separately. However, first you need to disconnect the wires that connect the diode bridge and the winding terminals.
Then you should measure the resistance between zero and the terminals of the windings. The normal value is no less than 0.3 Ohm.
Wear of brushes and bearings
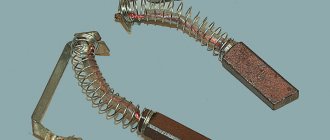
If you have already disassembled the generator, then it is advisable to check the condition of the brushes. They can wear out or break due to misalignment of the rotor shaft. If the brushes are damaged, they should be replaced with new ones.
Inside a car alternator there are a pair of bearings. One is fixed on the rotor shaft, the other is in the center of the cover. The whistling and hum of the generator when the engine is running is a clear sign of bearing wear. In this case, the generator housing can become very hot. If you notice such signs, it is better to replace the bearings immediately, otherwise you may encounter more serious problems.
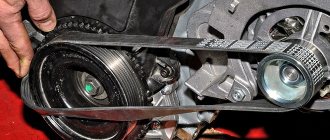
Checking the drive belt tension
Violation of the standard tension of the generator drive belt leads to the fact that when operating without load, the voltage corresponds to the norm, but when the load increases, insufficient friction force will lead to a slipping effect, the required power is no longer transmitted to the generator shaft, and the voltage drops. The load increases by sequentially switching on various consumers, for example, headlights.
If such a phenomenon is detected, we check the belt deflection, which, when pressed with a force of 10 kg, should not be more than 12 mm. If the belt is weakened, we restore its tension, which is done by using an adjusting screw that moves the generator stator away from the engine shaft.
Pullers for standard parts
It is enough to simply knock the front bearing out of the cover with a hammer, even if there is a flange, so in 99% of cases only a puller for the rear bearings of the generator of two types is used:
- with two legs;
- with three legs;
Two-jaw puller
Three-jaw puller
Moreover, the device can be made independently; the most popular are two designs:
- the lower part of the split bushing is put on the outer race of the bearing, a bolt passes through the upper part, the halves of the bushing are pulled together by a tubular casing, a cover made of thick-walled metal is put on the bolt under the nut;
- in a square pipe, cuts are made from below, into which, after being placed on the outer race of the bearing, steel plates are inserted; a nut is welded to the top of the pipe, into which a bolt of sufficient length is screwed.
Split bushing puller
Square tube puller
With homemade devices, replacing a generator bearing is both faster and cheaper. However, they will take some time to produce.
Basic checks without dismantling the generator
The procedures described below are carried out with a warmed-up engine, which runs at idle for 10 - 15 minutes. The primary check is based on the fact that the voltage removed from the generator exceeds the voltage of the battery (a necessary condition for recharging it). To do this, turn off the engine and measure the voltage at the battery terminals with a multimeter that is switched to constant voltage mode (limit 20 V or there). Then start the engine, perform a second measurement and compare the results. If there is no change, the generator is faulty.
The second group of tests is aimed at checking the relay regulator, for which they continue to monitor the output voltage of the generator with a multimeter. Its readings when the engine is running are 14 V. As the shaft speed increases, the voltage increases, but not more than 0.5 - 0.7 V. If this condition is violated, more detailed checks are carried out, the process of which is described here.
To check the generated current, the engine speed is increased to medium. Current clamps are connected to the multimeter, the device is switched to direct current measurement mode, and the working body of the clamps covers the wire from the output of the generator.
Next, sequentially turn on the electricity consumers (headlights, interior heater, etc.), record the readings of the device. Then the previously used consumers are turned on simultaneously and the multimeter readings are compared with the sum of the recorded values. The difference should not exceed 5A, otherwise the generator is considered faulty. The diode bridge is checked with a multimeter or by testing a light bulb for the absence of breakdown of the diodes and an open circuit in the current-carrying circuits. Diagnostics of the diode bridge is carried out on the engine or after dismantling the generator.
Bearing sizes and manufacturers
Before replacing a bearing with a new standard product, you need to buy it. The marking of these standard consumables is complex; the numbers in it are deciphered using special tables. Moreover, bearing designations according to GOST 3189 do not coincide with the markings of foreign manufacturers, so the user needs to know the following nuances:
- the marking consists of three parts (main, left, right), and blocks inside them;
- in the left and main parts the blocks are located from right to left, and in the right block on the contrary, from left to right;
- in cars, the front bearing of the generator most often has the designation of the main part 302 or 303, and the rear bearing 202 or 203;
- usually radial ball modifications with code 0 (0302 or 0202) or angular contact balls with code 6 (6303 and 6203) are used;
- therefore, for the specified parameters, you can decipher the dimensions using the table below;
- For foreign-made bearings, similar markings are used.
Marking of bearings according to GOST 3189
Table for deciphering bearing sizes by marking
Designation of imported bearings
The suffix (right side of the marking) of imported bearings contains additional information. For example, letters and numbers can represent:
- 2RS and RS – double-sided and single-sided rubber seals, respectively;
- N and NR – groove on the outer ring without a latch and with a latch, respectively;
- J – steel holder;
- Z – sheet protection on one side without seals.
The main problem for a car enthusiast when doing self-repair is the variety of bearing sizes inside the generator:
- it is difficult to guess the markings before disassembling, when the car is still running;
- after dismantling and disassembling the generator, the dimensions and markings are known to the owner, but he has to go to the store in a different car;
- in some stores, sellers practice a convenient system - the car owner takes 4 bearings 202, 203, 302 and 303, and returns two of them back.
These modifications have dimensions:
| Marking | External diameter (mm) | Inner diameter (mm) | Clip thickness (mm) |
| 6202 | 35 | 15 | 11 |
| 6203 | 40 | 17 | 12 |
| 6302 | 42 | 15 | 13 |
| 6303 | 47 | 17 | 14 |
In view of the variety of brands and brands of cars, different power and design of generators, it is easier to study the manual before replacing bearings. In it, the marking of these standard parts and adequate replacement options are mandatory.
The most expensive bearings are considered to be from the manufacturer FAG - 450 rubles (6303 modification) and SNR - 400 rubles (6203 ZZ). Bearings from Koyo are half cheaper - 200 rubles for 6303С3, NTN - 180 rubles for 6203ZZ and Nachi - 150 rubles for 6203ZZ. A set of standard products for the KZATE generator on the VAZ 2114 (16 V) from the Chinese manufacturer C&U costs 1,100 rubles. By default, this generator is equipped with Chinese consumables SKF 6202 and SKF 6303 (both with the suffix 2RS) at the factory.
In the old VAZ 2110, the generator was equipped with bearings 302 and 202 2RS; the new ones use a generator with a different shaft; standard products 303 and 203 are required, respectively.
How to check the generator on a car without removing it - we cover it point by point
Good afternoon. In today's article I will tell you how to check the generator on a car without removing it. Traditionally for our site, the article contains a lot of photos and video materials.
How does a generator work and why is it needed?
Modern cars have many consumers of electricity - from the car radio to the heated rear window. All these consumers require electrical energy to operate. Its main supplier is the generator. When it cannot cover all needs, for example in a traffic jam, the energy stored in the battery is consumed. Once conditions arise, the alternator replenishes the battery charge.
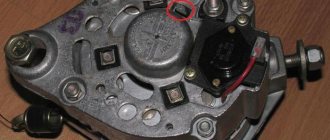
How to check the voltage regulator
The regulator is checked in case of undercharging or overcharging of the battery. The voltage is measured at rpm; it should be in the range of 14.4 - 15V.
In addition, you can check the resistance of the regulator capacitor (at the moment the tester probes are connected, it should decrease until it approaches infinity).
With the generator voltage regulator removed, the condition of the brushes is inspected and serviceability is checked using a 12V light bulb and constant voltage. That is, you need to connect a light bulb to the brushes, and apply 12V to the positive terminal and ground of the regulator (the light bulb should be on, and go out when the voltage increases above 15V).
How to check generator bearings?
In a good way, to check the bearings, you need to remove the generator belt. This is the only way to fully check the play and noise of the bearings.
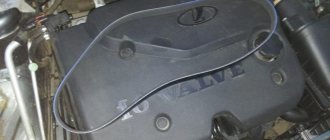
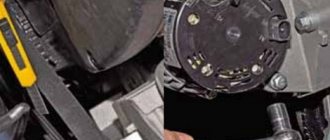
There is an old-fashioned method of listening to bearings.
You will need a metal rod that is long enough.
With the engine running, we rest the bar against the generator, and bring the other end to the ear (ATTENTION, do not put the bar in your ear, you will already hear everything clearly).
How to check a diode bridge (rectifier)
Diodes are checked by measuring resistance and detecting conductivity. Since the diode bridge consists of two plates, we check one at once and then the other. The tester should show the conductivity of the diodes in only one direction . Now, in a little more detail: we hold one tester probe on the “+” terminal, and with the other we check the diode terminals one by one, and then swap the probes (in one case there should be a high resistance, and in the other there should not be). Then we do the same with the other part of the bridge.
Checking the slip rings
Even one bad diode leads to failure of the entire diode bridge and undercharges the battery.