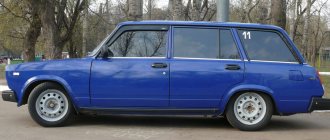
In the summer of 1995, the first production copies of the VAZ 2110, popularly known as the “ten,” rolled off the assembly line of the Volzhsky Automobile Plant. Based on this model, two more cars were later developed: the VAZ 2111 station wagon and the VAZ 2112 hatchback. When tuning the VAZ 2110 and its modifications, you need to know the features of upgrading this car yourself.
Appearance
Most of the upgrades associated with tuning the “tens” were reflected in its appearance. The main objects for tuning are the following parts of the car:
- doors, trunk and other body parts;
- wheels;
- machine optics.
Tuning a VAZ 2112 can be done with your own hands. The same can be said about modifying the “ten” and the station wagon based on it.
Wheels
The most often chosen as modernization objects are car wheels. Drivers are replacing factory stamped steel wheels with cast or forged ones. The combination of such accessories with low-profile tires gives the VAZ a sporty look.
Some car enthusiasts install 16- and 17-inch wheels on the VAZ 2110, the diameter of which is significantly larger than the factory ones. However, most drivers prefer wheels with a diameter of 13 or 14 inches, equal to the diameter of their original wheels.
Fans of off-road driving can increase the vehicle's track by installing wheels with a reduced offset. These wheels with deep tread tires improve vehicle stability and reduce the risk of rollover.
Before installing wheels on a car, you need to make sure that they are suitable for installation on the “ten” and related models. The list of wheels approved for installation on the VAZ 2110, VAZ 2111 and VAZ 2112 can be found in the operating manual for these vehicles.
Overlays
When performing tuning on the VAZ 2110, overlays are often used. Installing such an accessory is a stylish and inexpensive option for upgrading the “tens” with your own hands. The products are installed on the following parts of the car body:
- hood;
- glass;
- fairings;
- bumpers;
- front and rear lights, on which eyelashes are installed;
- air intake.
Chrome mesh trims look good on a car's radiator grille.
The cost of one decorative overlay is from 300 to 1000 rubles. They are attached using self-tapping screws or bolts. Sometimes double-sided tape is used to install the overlays.
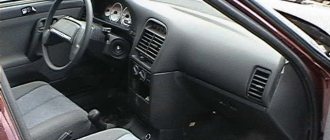
CEILING COVERING
The material from which the ceiling covering in the VAZ 2112 is made gets dirty very quickly. Over time, a dark spot appears on the ceiling, directly above the driver's seat. Similar spots appear above the heads of passengers (but, as a rule, later). Re-upholstering the ceiling covering on your own is not an easy task. But finding a reupholstery specialist is not easy, plus his services are not cheap. So VAZ 2112 owners do it simpler and simply paint the ceilings of their cars using universal paint in spray cans (to paint the ceiling of a “two-wheeler” you need 6 of them).
SEQUENCE OF OPERATION
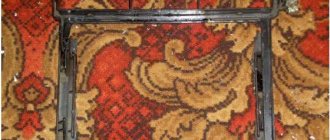
Painting the ceiling directly in the salon is not an option. First, the coating must be dismantled.
- The ceiling covering in the VAZ 2112 is held on by 10 screws and 13 plastic latches located around the perimeter. To remove the screws, use a Phillips screwdriver. The latches are opened manually.
The material of the ceiling covering on the VAZ 2112 gets dirty very quickly - The removed covering is removed from the passenger compartment through one of the rear doors (to do this, the covering will have to be slightly bent).
- The selected paint is sprayed from a can onto the ceiling covering (no preliminary primer is required - the universal paint is well absorbed into the material).
- After painting, the ceiling needs to be dried. It takes 6-8 days for the smell to completely disappear. Drying is carried out only in the open air.
The coating needs to be dried in the open air for 6–7 days. - The dried coating is installed back into the interior.
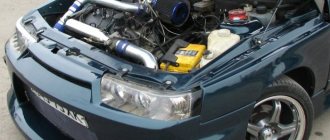
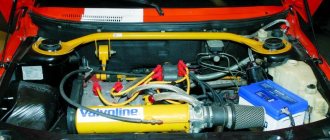
Engine
There are many modifications to the VAZ 2110 engine to improve its performance. A list of engine changes that tuning enthusiasts can do with their own hands:
- A zero resistance filter is installed in the engine.
- Changes are being made to the fuel supply system to the engine. For example, jets are installed - dispensers that control the amount of incoming fuel.
- A larger diameter throttle valve is installed in the intake system to increase the volume of air supplied.
- The receiver is being modified.
- Direct-flow exhaust is installed. This procedure is considered one of the most common modifications performed by car tuning enthusiasts.
- Various manipulations are performed with the cylinder block. For example, new camshafts are installed.
- The engine cooling system is tuned to obtain a cold intake effect.
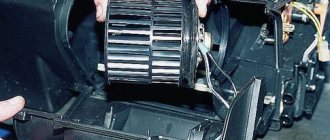
Improvement of standard backlight
The next step in changing the coupe will be to improve the interior lighting.
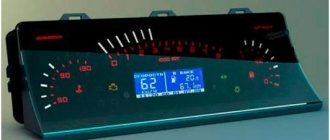
Considering the principle of factory assembly of the shield, the best option for tuning would be to make backlighting from neon lamps located along the contours of the devices. To ensure stable operation of the backlight, an uninterrupted voltage of 12V is required. It is best to select the color of the tape taking into account the shade of the backlight of the sensors, or based on the color of the radio. Disassembling the coupe's instrument panel should not cause any difficulties: unscrew the upper and lower fasteners, and then carefully remove the shield. After this you will need to remove the standard light guide. The latter must be replaced with a plate of the same shape made of plastic. You also need to drill holes in it for attaching the tape. For effective lighting, we use 8 blue and 3 red diodes with 1.2 and 1.4 Ohm resistors soldered to them, respectively. The diodes must be placed in the same way as the light guide in the decorative panel. We insert the light bulbs into the appropriate places in the light guide.
Coupe instrument panel illumination
In order not to forget, it is best to immediately cover the latter with a thin layer of foil, which will help to evenly distribute the light from the bulbs. In addition, we will also need to make small partitions, which we will glue near the red light bulbs.
Having finished inserting the diodes, you will need to solder all the tracks and connect them to the power supply. To do this, you can use a standard lamp socket. After this, you need to secure the light guide, check it for serviceability and reassemble the unit. If everything works, we fix the finished part, after which we mount the instrument panel of the car.
Suspension
Often the object of tuning on the VAZ 2110 and related cars is the suspension. The following manipulations are performed with this VAZ design element:
- Lowering the car. Despite the possibility of purchasing new lowered springs, many owners of the “ten” prefer to limit themselves to shortening the factory units, sawing off several turns from them.
- Installation of helical suspension and adjustable shock absorbers - coilovers. Such a suspension has a high price, however, making coilovers with your own hands is difficult if you lack experience.
- To increase the stiffness of the springs and increase the ground clearance of the car, interturn spacers - buffers - are installed.
- To give the “ten” an extravagant look, wheels with a negative camber angle are installed.
- Manufacturing of independent rear or front suspension.
Despite the ban on most of these modifications, tuning enthusiasts make the following changes to the car’s braking system:
- installation of rear disc brakes;
- installation of multi-colored pads on the caliper;
- installation of brake pads with a modified appearance.
Modernization of coupe interior - painting plastic parts
Having finally decided to repaint some elements of the car’s interior, its owner can go in two ways: to do all the work simply and quickly, or to perform the tuning slowly but efficiently. Which option to choose depends on the amount of money and the result the driver expects to see. Since you and I are used to doing the job conscientiously, it will be best if we consider the second painting method. Yes, we will spend more money, but the end result is worth all the effort, time and expense. In order to paint the car interior, we will need:
- dye;
- two-component urethane varnish;
- degreaser;
- primer;
- plasticizer;
- fine-grained sandpaper or sanding machine;
- spray.
When choosing a coloring composition, you should be very careful. As practice shows, the most popular colors today are anthracite or titanium. If you want something brighter, you can always use blue, red or green paint. Another must-have product is varnish, which contributes to the durability of the shade of the painted element. You can use regular acetone as a degreaser. As a primer, you need to choose a material that will not bubble when applied to an outdated paintwork coating.
Painting of VAZ 2112 interior parts
It is not necessary to buy a plasticizer, but with it the quality of painting will improve significantly. The grain size of this substance must match the texture of the parts that can be painted. A sprayer is necessary if the paint you purchased is not in cans. We will need sandpaper to clean the surface of the interior parts. After preparing the materials, you need to disconnect all the elements to be painted. After this, we transfer them to a warm, ventilated, dust-free room. Carefully wash and dry each of the elements.
If among the latter there are metal parts, then they should be cleaned to a shine to prevent the appearance of rust. Then we grind the metal parts and apply a primer to their surfaces. Plastic elements need to be degreased and lubricated with a plasticizer. After the parts have completely dried, you can begin painting. To do this, you need to apply several layers of paint, allowing each layer to dry completely. We strongly advise against drying surfaces with a hairdryer; a draft in a warm room is an ideal option.
After the last layer of paint has dried, you can apply varnish. Moreover, the more often a person comes into contact with a part, the more layers of varnish need to be applied to it.
Salon
In addition to body design modifications, drivers often make changes inside their cars. Common types of tuning the interior of the “tens”:
- Buying a new audio system and installing subwoofers in the trunk of a car.
- Improving car sound insulation.
- Replacing the factory dashboard with a new one. An updated accessory often includes additional options, such as a temperature sensor.
- Buying new heated and adjustable seats.
- Replacing the original steering wheel. A new steering wheel is often adjustable.
Thanks to the favorable price-quality ratio, the VAZ 2110 and its variants have become popular among Russian car enthusiasts. The low price and simplicity of the design allow tuning and making changes to the “top ten” that improve its appearance and technical characteristics.
REPLACING THE BRAID ON THE STEERING WHEEL
The standard braid on the VAZ 2112 is made of leatherette, the surface of which seems too smooth to many. The steering wheel simply slips out of your hands, which is very dangerous when driving. Therefore, almost all owners of “dvenashki” change the standard braids for something more suitable. There is now a huge selection of braids in spare parts stores. The steering wheel of the VAZ 2112 requires a braid of size “M”. It is put on the steering wheel and sewn along the edges with ordinary nylon thread.
Clamp needles and nylon threads are used to sew the braid together.
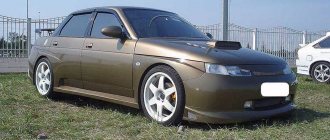
Replacing body kit
A popular choice among owners is tuning the VAZ 2112 body kit. The most interesting choice seems to be the use of a stylish solution in the form of an elegant aerodynamic body kit (besides, it exists in many variations, so choosing the right one will not be difficult).
You can choose a classic version (sporty style) or look for body kit models that would emphasize the unique style and characteristic personality of the car itself.
Today there are 2 options for aerodynamic body kit for the VAZ 2112.
Firstly, it is sporty (in this case, it will affect the smoothness of control during fast driving due to a competent layout). Secondly, it is stylish (the design of the body kit includes a large air intake, which allows you to quickly cool the engine and brake system, due to which they do not overheat and the risk of breakdown is reduced several times).
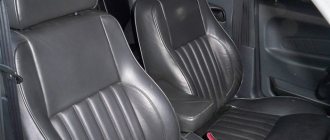
The seats of the VAZ-2112 are more comfortable than previous models. However, replacing them with seats from a foreign car will allow you to operate your car completely differently.
For example, if you install seats from a used BMW-318 instead of your original ones (there is practically no point in installing new seats from foreign cars - they are very expensive), you will receive the following advantages:
- the seat is 5 cm higher than the standard one; thanks to this, the driver has a better perspective to control the traffic situation;
- high back;
- seat height adjustment;
- separate heating of the back and bottom of the seat;
- more comfortable fit;
- excellent appearance that transforms the entire car.
But there are also disadvantages to such a replacement. In the extreme forward position, the lower edge of the seat prevents reverse gear from being engaged. Higher seat positions may cause discomfort for taller drivers. In addition, such a modification reduces the safety of passengers sitting in front, since the seat fastenings are also modified. These are factors you should definitely consider if you decide to replace the seats in your car.
Removing and installing the instrument panel on VAZ 2110, 2111 and 2112
Before you begin this repair, you must do the following:
- Disconnect the “-” terminal from the vehicle’s battery.
- Remove the steering wheel.
- Remove the steering column switches.
- Remove the floor tunnel.
After this, you can proceed to further actions. We immediately remove and remove all the elements of the panel, such as: the standard clock, the heater control unit, the display unit, as well as the central deflector, and do not forget about the buttons with the radio. As a result, we get approximately the following picture:
Next, using a screwdriver, pry up and remove the plugs at the upper corners of the instrument panel mounting. In reality it looks like this.
On the other side, we do the same, after which, using a socket and an extension, we unscrew the nuts securing the instrument panel in the upper part.
Now let's move on to the remaining attachment points. At the bottom, in the left and right parts of the panel - in the corners, there is also one screw that needs to be unscrewed. The first one is shown below.
The second one is located on the right side of the panel in the same place - at the bottom in the corner. Also, immediately unscrew the self-tapping screw that secures the diagnostic block:
Now we move on to the side fastening points of the frame, which are located in the center on each side - the photo below shows the left side:
On the right everything will be the same. Next we move on to the internal frame fastenings, which are located in the following places. The first one is under the fuse mounting block, to get there we open the cover and look inside the panel:
The second one on the right is visible when the glove compartment lid is open:
Of course, the mounting block will also have to be removed so that it remains intact with the sub-panel wiring.
We thread it inside with the instrument panel pulled back; you will also have to cut off some of the wiring fastening clamps, for example, in this place, which is shown in the photo:
Now we are trying to remove the VAZ 2110 panel, moving it to the side on both sides, evenly, without much effort or sudden movements.
In the photo above you can see that the headlight hydraulic corrector tubes were cut off, since in my case they were simply not needed. If you need to save them, do everything carefully and remove them by pulling the control unit out of the instrument panel. Next, we finally remove the panel, of course, after first disconnecting all the wires that will interfere with this.
Installation occurs in the reverse order, connecting all wires and connectors to their places, blocks and switches, as well as other elements that were removed as a result of this procedure.
Tuning the interior of a VAZ 2112 - a selection of photos
A cool selection of photographs of the most diverse tuning of VAZ-2112 interiors - from the most striking options to very sophisticated ones. Perhaps some of these photos will inspire you to tune your VAZ 2112
Sources
- vazdriver.ru/tyuning_salona_vaz_2112_podborka_foto.html
- tuningkod.ru/tyuning-avtomobilej/tyuning-russkix-avto/tyuning-vaz/tyuning-salona-vaz-2112-metody-preobrazheniya.html
- ladaautos.ru/vaz-2112/kak-sdelat-tyuning-salona-vaz-2112-svoimi-rukami.html
- drive2.ru/l/544540281555387922/
- bumper.guru/klassicheskie-modeli-vaz/tyuning/tyuning-salona-vaz-2112.html
Eliminating "crickets"
Almost all owners of VAZ cars know what “crickets” are. When driving at a high enough speed, a hum, noise, creaking and many other sounds appear that are very annoying. This is why moving long distances will be quite painful. Let's look at the most common problems associated with car sound insulation, as well as ways to solve them.
A fairly common problem is squeaks. This is due to poor sound insulation of the interior, which does not improve even with each generation. Plastic rattling can, as a rule, be provoked by a regular blow; periodic rocking of some structural elements of the interior trim also causes quite a lot of problems.
The creaking of plastic is quite unpleasant and can make even the calmest driver nervous, and this promises big problems. There is an opinion that such sounds prevent the driver from falling asleep while driving, but this is not the case. If the driver wants to sleep a lot, then even the loudest sound will become soothing music.
Read more: Citroen C3 Aircross 2018-2019 price photo and video test drive new items specifications and equipment