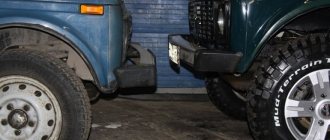
The desire of the owners of the domestically produced VAZ-2109 car to replace factory rims with elements with a different diameter is extremely clear.
Modern lightweight designs can improve the car's handling characteristics and fuel consumption, but, as a rule, the reason for such replacement is a simple desire to improve the appearance.
Such an operation is not difficult to perform.
True, depending on the chosen replacement options, this is either carried out without problems, or such a procedure requires intervention in the design of the car.
What wheels were installed on different bodies and configurations?
The VAZ-2109 car is a 5-door version of the VAZ-2108. Over the entire period of production, from 1987 to 2004, the car underwent 7 modifications, including options for export. Their disk parameters also changed, although the bolt pattern always remained the same. These differences were expressed in the choice of rim width, in the size of the offset and in three options for the diameter of the circle.
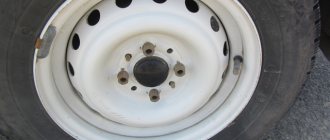
But in the factory, only wheels with a diameter of 13 inches were usually installed. Wheels R14 and R15 were considered only acceptable for installation. Here are the two main brands of rims that cars were equipped with on the factory assembly line:
- 5Jx13 ET35;
- 5Jx13 ET40.
The first numbers of the marking indicate the width of the rim, 13 is the overall diameter, ET35-40 is the offset in mm. The standard factory disk design was a stamped steel product. Losing to its cast light-alloy competitors in a number of indicators, steel stamping has always been and remains durable, inexpensive and reliable.
Design Features
The rear hubs of the V8 are equipped with sealed angular contact ball bearings. Each of them has two rows of balls. This makes the structure as resistant to loads as possible, and also allows them to be distributed with the greatest efficiency.
The rear wheel bearing of the VAZ-2108 is made of heavy-duty steel. Its service life, declared by the manufacturer, is 90-120 thousand kilometers. By the way, these are not empty statements. Oddly enough, VAZ wheel bearings actually last a very long time and, if used correctly, can last twice as long as the stated mileage.
Standard disk sizes
The main technical characteristics of the rims of any car, including the VAZ-2109, are expressed by the following parameters:
- Diameter. This refers to the size of the rim in inches, excluding the tire.
- Rim width is the size of the tire seat in inches.
- The size of the central hole for the hub.
- Bolt pattern is a parameter indicating the number of holes and the diameter of the circle connecting their central points.
- Overhang is the distance between the hub mounting surface and an imaginary plane passing vertically through the middle circumference of the disk.
For the VAZ-2109, two parameters were always the same:
- The central hole is 58.5 mm.
- Bolt pattern - 4x98.
The wheels are manufactured in three versions: R13, R14 and R15. Other factory parameters, taking into account the corresponding tires, are shown in the table.
| Disc diameter, inches | Rim width, inches | Departure amount, | Tire parameters, mm |
| in mm | |||
| 13 | 5 | 35-38 | 165/70 155/75 |
| 5.5 | 35-38 | 185/65 175/70 | |
| 14 | 4 | 45 | 135/80 |
| 5.5 | 35-43 | 175/65 165/65 | |
| 6 | 35-40 | 185/60 175/65 | |
| 15 | 6 | 30 | 185/55 |
| 6.5 | 30 | 195/55 195/50 | |
| 6.5 | 35 | 205/50 195/50 | |
| 7 | 35 | 205/50 195/50 |
What tools will you need?
Before you begin repair work, make sure you have the necessary tools and supplies:
- wheel chocks;
- jack;
- wheel bolt wrench;
- chisel (core);
- some object to fix the position of the car body when jacking up (a stump, several bricks, etc.);
- hammer;
- spacer made of wood (block);
- head at “30” with an extended handle;
- key to "7";
- vice;
- a piece of pipe for the outer diameter of the bearing;
- long nose pliers;
- special puller for the hub;
- special pliers for retaining rings;
- anti-rust liquid.
If you decide to change the rear wheel bearing on a VAZ-2108, also replace the hub nut. At least that's what the car manufacturer recommends. The fact is that the nut has a special edge that bends during installation and gets knocked down during disassembly.
Parameters of standard nuts
Fastening the cast disk to the hub involves the use of special bolts or nuts. It should be noted that nuts from stamped disks are unacceptable here. Firstly, because in cast specimens the conical or spherical part of the fastener is more pronounced than in stamped ones.
For example, the conical part of a bolt or nut has an angle of 60 degrees. This is done in order to increase the area of their contact with a material softer than steel. Secondly, the stamp is thinner than the casting, and when replacing the disk, the length of the bolt simply will not be enough.
It is better to immediately use the fasteners that correspond to the light-alloy wheel used, otherwise deformation of the holes, crumbling and scratches are possible.
By saving on the necessary nuts or bolts, you can irreversibly damage a more expensive element.
The softness of the metal also means regularly checking the tightness of the fasteners, especially at first and with new discs, when the material has not yet become compacted from work loads. Otherwise, under the influence of cyclic shock and vibration, the nuts may spontaneously unscrew.
Nuts must have conical or spherical washers. It is necessary to ensure that the profile of the washers exactly fits the corresponding recess in the hole of the disk being installed. Some disc models are designed to use cylindrical fasteners with flat washers.
How to understand that it is time to change the wheel bearing
A failed VAZ-2108 rear wheel bearing may indicate a malfunction:
- the appearance of a characteristic hum from the wheel;
- uneven rotation of the wheel;
- backlash formation.
If you notice that there is a hum coming from one or both rear wheels, rush to diagnose the wheel bearings. You can do this right in your garage. Simply jack up the rear wheel and turn it by hand. It should rotate easily and evenly without making any sounds. Next, grab it with both hands and try to shake it from side to side in a horizontal direction. If the wheel rotates unevenly and you feel play when it becomes loose, get ready for repairs.
What drives can be installed
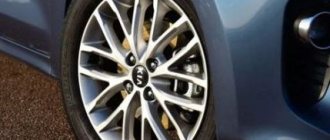
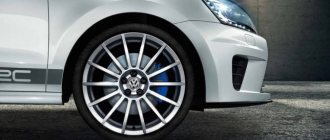
When planning to replace old steel wheels with alloy wheels, you should choose either original products or products from well-known manufacturers who care about the quality and safety of their products.
Alloy wheels combine the following useful properties: they are lightweight, practical to use, endowed with sufficient strength and have an attractive appearance, which is aimed at transforming the entire appearance of the car.
The most common among alloy wheels are aluminum products. This is due to the fact that they are resistant to corrosion, meet strength requirements and, in comparison with other alloy wheels, remain relatively inexpensive.
Titanium alloy is the most expensive option. It also meets all the technical specifications, but at the same time has a more attractive appearance. In third place is the option using a magnesium alloy.
The latest models from AvtoVAZ use wheels with a 4x100 mounting pattern. When installing them on a 4x98 hub, you should use studs with an eccentric to compensate for the difference of 2 mm. To install disks with other mounting patterns, you will have to use the appropriate adapters (spacers).
You must understand that installing wheels larger than 15 inches is impossible without interfering with the car’s design.
Advantages and disadvantages of low profile tires
With low-profile tires installed, the vehicle's maneuverability and controllability are significantly improved - this is especially noticeable when cornering. The steering wheel becomes “sharper” and the car practically does not deviate from the trajectory due to the fact that the low sides of low-profile tires crumple less under lateral loads on the tire.
But when driving on a bad road, such wheels transfer much more shock loads to the body than standard-sized tires, and absorb various road defects less well.
It is worth noting that a tire with a low profile is quite easy to “punch” to the disk even on a small pothole and at low speeds, and the edge of the alloy wheel can become wrinkled and completely fail when using such tires.
Also, it would not be amiss to mention that according to traffic rules it is prohibited to operate vehicles with tires whose characteristics do not correspond to the vehicle model. However, experience shows that traffic police officers usually have a calm attitude towards tuned VAZs with alloy wheels “14”.
And this is not surprising, because R14 wheels are standard equipment on cars of the VAZ 2110 family, the chassis of which is similar to the VAZ 2108, 2109, 21093 and 21099 models. But with R15 alloy wheels, the likelihood of running into trouble when passing a technical inspection is much higher.
VAZ 2103-2106
Wheels of the new model were installed on the “three”. In terms of appearance, they are close to the Fiat wheels used on the 2101 version. They have 16 round holes each with an increased rim width of up to 9.5 inches and a reduced offset of up to 29 mm.
Similar models were used for the VAZ 2103 and VAZ 2106 cars. At the same time, chrome caps from a penny were installed on the 2103 versions, and the original ones were used on the six, which were distinguished by a round black trim in the center.
Initially, for the 2106 model, manufacturers planned to use other versions of disks. However, the intended angular style echoed the design of trendy aluminum (alloy) wheels, so they decided not to use them.
On car releases in 1991, wheel covers from model 2101 were used on rims. Since 1995, developers have removed the protrusions for the hubcaps and began producing rims similar to 2103 for all VAZ car models.
To install the disc on the 5 and 7 Zhiguli model with a chrome cap, the diameter of the centering hole was increased to 60.5 mm. Note that such wheels from 2103 without classic protrusions have become a “national treasure” for the entire AVTOVAZ line.
Changing the rear wheel bearing with your own hands
Replacement of the VAZ-2108 rear wheel bearing is carried out in the following order:
- We install the car on a flat surface, fix the front wheels by placing wheel chocks under them.
- Remove the cap covering the hub nut.
- Using a chisel (core), we bend the bent edge of the hub nut so that it does not interfere with its unscrewing.
- Using a 30mm socket with an extended handle, unscrew the nut. If it does not give in, treat the threaded connection with anti-rust liquid.
- After unscrewing the nuts, unscrew (not completely) the wheel mounting bolts.
- We lift the body with a jack, fix its position with stumps (bricks), and unscrew the wheel bolts. We dismantle the wheel.
- Using a key set to “7”, unscrew the guide bolts on the drum (2 pcs.).
- We remove the drum. If it is not removable, we treat the place where it fits onto the hub protrusion with a rust-fighting liquid, and then knock it down using a hammer and a wooden spacer.
- Now completely unscrew the hub nut.
- Using a special puller, we dismantle the hub, grasping it with “paws” and rotating the nut. If you do not have such a device, take the removed wheel and screw it to the hub with the back side. Use the wheel as a lever.
- Remove the hub from the axle.
- Using long-nose pliers or special pliers, remove the bearing retaining ring.
- We place the hub in a vice and, using a hammer and a piece of pipe, carefully knock out the bearing.
- When the bearing is knocked out, lubricate the inner surface of the hub with grease.
- We install the new bearing without removing the hub from the vice.
- We place a wooden spacer on top of the bearing and, hitting it with a hammer, hammer the part into the hub until it stops.
- We put the locking ring in place.
- We put the hub with the new bearing on the axle. If she sits down tightly, we help her sit down using a hammer and a spacer.
- Screw on the new hub nut. We tighten it until it stops. The hub should still move inward.
- Install the brake drum and secure it with guide bolts.
- We mount the wheel.
- Remove the jack and tighten the hub nut completely. If you have a torque wrench, observe the tightening torque (186.3-225.6 Nm).
- We bend the edge of the nut, fixing its position.
- We put a cap on the nut.
- We jack up the body, check how the wheel rotates and whether there is any play. It is also recommended to check the operation of the parking brake.