30.12.2020
The fuel pump mesh is a coarse fuel filter. Element clogging is a frequently occurring malfunction when operating a car on Russian roads, namely: low quality fuel from individual manufacturers and gas stations. The fuel pump grid of VAZ models is inexpensive, and replacement does not require special knowledge and equipment: it can be done by one person within an hour. Before taking the car to a service center for diagnostics, you need to check the fuel purification elements.
Replacing the fuel filter VAZ 2114 video instructions
Probably everyone knows that proper care of the VAZ-2114 1.6 car, inspection of its technical condition and timely replacement of worn parts reduce the likelihood of breakdowns.
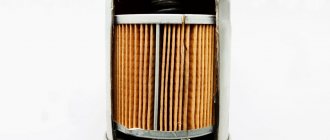
In vehicles, all parts and systems are important, but the fuel system is considered the most capricious, since any malfunction can damage the entire operation of the engine. Its main component is the filter. Its purpose is to eliminate any impurities or rust that may be observed in low-quality fuel. Cleaning is carried out thanks to the presence of special filter paper; as a result, high-quality gasoline that does not contain any impurities enters the car engine. For normal operation of the high-pressure fuel pump, only clean fuel is required so that it does not fail for a long time.
Due to prolonged use, an important component can become heavily contaminated, so a quick replacement of the VAZ-2114 fuel filter will be required. It is worth noting that an injector requires higher quality gasoline than a carburetor, so the fuel filters of an injection engine must be changed more often.
What may indicate a clogged element?
Since cleaning paper allows many impurities to pass through, its cells become clogged over time, which will certainly affect the operation of the motor. A car enthusiast will be able to understand for himself when it is necessary to replace the fuel filter based on the following signs:
- the car began to consume more oil;
- the engine starts to stall if idle speed is selected;
- interruptions in engine operation are observed if the speed increases;
- Difficulties arise when starting the engine;
- engine power is greatly reduced;
- the car may start to slow down even if the brake pedal is not pressed;
- When driving uphill, the engine starts to stall.
The above signs are the main ones, so if they are detected, you should replace the clogged fuel filter as quickly as possible. This process is not very difficult, so the car enthusiast can make the replacement himself.
What tools need to be prepared for this operation?
To replace the filter in the VAZ-2114 yourself, you should prepare the following tools:
- New high quality gasoline filter.
- O-rings that fit the fuel pipes.
- Keys for 19, 10 and 17.
- Containers in duplicate; they will be needed to drain fuel and water.
The first container that will be used to drain gasoline must be clean and completely dry.
Step-by-step replacement of fuel purifier
Replacing a clogged filter is quite simple if you do the manipulations step by step, following the recommendations of specialists:
- all terminals from the car battery are removed to completely cut off the power to the vehicle;
- on the latches of the bolts fixing the bracket, the fixation should be slightly loosened;
- the mount holding the filter should be carefully treated with a special lubricant to simplify the process of removing the part;
- Using two keys, the fitting element is removed. To do this, you need to use a number 19 key to secure the cleaner itself, and use number 17 to unscrew the fitting element related to the fuel supply line. Slowly, so as not to spill, drain any remaining fuel that may remain in the gas line into a dry container;
- the same manipulation must be carried out on the other side of the fuel purifier;
- the fuel wire tubes are disconnected from the base;
- using a 10mm wrench, slightly unscrew the clamp;
- carefully remove the fuel filter. You should not rush through this process so as not to damage other elements of the car’s fuel system.
Assembling the parts is carried out in the reverse order; it is recommended to replace all ring-shaped seals when installing a new filter. If gasoline drops are visible on the new part, they should be carefully removed with a clean rag. Otherwise, the service life of the updated element can be shortened.
https://youtube.com/watch?v=ZBUeKu7vg6E
When should you look for the cause in the fuel pump?
Much less often, problems with fuel pressure occur due to wear on the fuel pump. Its performance is not enough to provide the engine with uninterrupted fuel supply in all operating modes. In this case, it is impossible to check the fuel pump without removing it.
The first step is to make sure that the coarse mesh does not create resistance to the passage of fuel. If everything is fine with the mesh, you can measure the pressure bypassing the filter element. To do this, just connect a pressure gauge to the fittings on the fuel section. In this case, it is much easier to first measure the fuel pressure in the rail in order to register the fact of a malfunction. After replacing the fine filter, repeat the measurement. If the situation has not changed, you will have to remove the fuel module to inspect the grid and check the fuel pump. In my case, the reason for servicing the power system was a high-frequency hum from the running fuel pump.
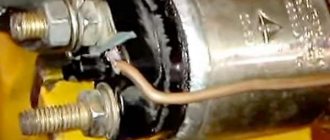
If the pump does not turn on, you need to check the power. “Plus” and “minus” are supplied to the electric motor through the Skoda Octavia fuel pump control unit and relay. The circuit is protected by a fuse.
Replacing the fuel pump and coarse filter on VAZ 2113, 2114, 2115 cars
KIA Shuma FreeLancer Logbook Fuel pump filter
The fuel pump and coarse filter are changed in the same way as described in the article on all VAZ cars with an engine capacity of 1.5 liters.
The fuel pump is located in the tank on all VAZ cars. It is installed in the housing, along with a mesh (coarse filter) and a fuel level indicator. It's easy to get to - just remove the back seat and find the hatch. Having unscrewed the fastening, under it there will be a pump housing with all the auxiliary units.
The pump is changed after diagnostics. It is described in more detail here: checking the pressure in the fuel rail on a VAZ car. It is not recommended to change based on “feelings” and mileage, since without diagnostics it is impossible to understand whether the problem has arisen with the pump or with the mesh (except in cases of complete pump failure). It is also difficult to determine service life. For the most part, it depends on the quality of gasoline. If you are a fan of driving “in steam”, when the tank is almost empty, the pump will have to be changed more often. This is due to air entering the fuel intake, as a result of which the pump begins to operate at high speeds and ceases to be cooled by gasoline. With this driving style, do not be surprised that you will have to change the pump every year (15 thousand kilometers).
If the diagnostics reveal a pump malfunction, then it is advisable to change the coarse filter. It is installed in the pump housing. If problems are found only with the mesh, then the pump does not need to be changed.
To replace, we will need - from the main tool:
- Key "7". Better head "7"
- Key "17"
- Key "19"
- Pliers
- Flat head screwdriver
- crosshead screwdriver
From the additional tool:
- WD-40 (or similar fluid)
- Rags
- Wheel inflation pump
From materials:
- Pump and mesh (or just mesh)
- Rubber O-ring
- Fuel supply hose from the pump to the fitting (not necessary, but preferable if it has not been removed for a long time)
So, the procedure for replacing the pump and coarse filter.
1. It is better to carry out all work with a practically empty tank. It is prohibited to carry out work on a tank filled “under the neck”!
2. First, relieve the pressure in the fuel line. In this case, it is better to do this by disconnecting the terminal from the pump. Remove the seat and unscrew the hatch:
3. Disconnect the terminal:
4. Start the car and let it run until it stalls.
5. Unscrew the fittings with a 17mm wrench (new tubes go to 14mm). It is better to pre-fill all connections with WD-40.
6. Apply WD-40 to the pump housing mounting nuts. Then unscrew the 8 nuts with a “7” wrench
Please note that the pump ground is screwed onto one of them:
7. Remove the metal clamping ring.
8. Pull out the pump housing. Be careful! It has a fuel level sensor installed. When removing the pump, do not bend the pointer. Otherwise the readings will be incorrect.
9. Remove the rubber seal:
10. Disconnect the lower glass. It just snaps off. Typically there will be a lot of dirt in it. We remove it with a rag and wash it. Sometimes this glass cannot be pulled out through the hole along with the pump housing. It just falls into the tank. There is nothing wrong with this (if the tank is not filled to capacity). It can be easily reached by hand and pulled out after dismantling the rubber seal.
11. Remove the coarse filter. We just pull it up. If the task is to change only the mesh, then we put it back together.
12. Remove the locking pin from the guide. We pull it out with pliers:
13. Disconnect the fuel pump and fuel level terminal:
14. Remove the pump housing with the level sensor from the guides.
15. Disconnect the hose from the fuel pump:
16. If the operation has not been performed for a long time, the rubber will lose its elasticity. You can heat it with a hair dryer, but it is better to change the tube. To quickly remove it, cut it off with a knife from the fitting in the upper part:
17. Unscrew the fuel level sensor with a Phillips screwdriver (2 screws). Remove it from the pump housing:
18. Remove the terminal from the fuel pump:
19. Disassemble the fuel pump housing. To do this, press on the 3 latches on the side wall:
20. We take out the fuel pump and replace it with a new one. If necessary, change the tube:
21. Reassemble in reverse order.
Reasons for replacement
Characteristic signs of a fuel pump malfunction:
- power drop;
- failures when sharply pressing the gas pedal;
- difficulty starting the engine;
- when you sharply press the gas pedal to the floor at low speeds, the engine begins to “choke”;
- increased noise level when the motor is turned on;
- “dips” are observed, a loss of power some time after the start of movement, and if the engine is allowed to cool, interruptions in operation disappear for a short period.
Before you begin replacing the fuel pump, it is important to make sure that engine interruptions are related to the fuel supply and not to the ignition system, ECU, or power supply to the pump motor. It is necessary to measure the pressure in the fuel rail
If the value obtained at the time of interruptions in engine operation differs from the standard values, you can begin diagnosing the power system. https://www.youtube.com/watch?v=JX5cP994JTU The symptoms described above can be caused not only by a faulty fuel pump, but also by a clogged mesh or fine fuel filter.
Also, do not forget that the cause of interruptions in the fuel supply may be poor contact in the motor power supply circuit (torn wires, oxidation, etc.)
For your own diagnostics, it is important to know the structure and operating principle of the fuel pump.
Where is TN
On the vast majority of passenger cars, the fuel pump is located inside the tank. A fuel pump with a coarse mesh, a fuel pressure regulator, a fuel level sensor and a critical fuel level sensor, and in some cars also a fine filter, are held inside the tank by the fuel section.
Design features of some cars
After reading the guide on how to replace the fuel pump yourself using the example of a specific car, you can easily replace it on any other car. But do not forget that in some cases the power system design will make adjustments to the replacement method.
For example, on the Ford Focus I and Chevrolet Cruze, there is no technological hole under the rear seat cushion for access to the fuel section cover, so to replace the mesh and the fuel pump itself, the tank will have to be removed. For ease of further maintenance, owners often cut holes above the fuel module themselves.
On the same Chevrolet Cruze, the manufacturer does not suggest a separate replacement of the motor and even the fuel filter (they are simply not in the catalog of original spare parts), so if the fuel pump fails, the fuel module will have to be replaced entirely. If you want to save money, you can pick up the engine, for example, from the related Opel Astra, but it will have to be adjusted a little. You can learn about this kind of design features from the repair and operation manual or from publications on specialized forums of the owners of your car model.
Tools
Replacement often requires only a socket with a wrench, Phillips and slotted screwdrivers, and pliers. In some cars, the cover of the service hole under the rear row of seats is mounted on a sealant, which will need to be cut off to access the fuel section (in most cases, the plug is screwed on with screws).
Important points
After stopping the engine, pressure remains in the fuel lines for a long time. Before you begin manual replacement, the system must be emptied. To do this, you can pull out the fuel pump fuse with the engine running. Stopping the fuel supply will stop the engine, after which replacement can begin. Modern fuel hoses are secured with self-clamping fittings
To remove them, you need to press the clamps on the sides of the latches, after which the hose should come out of the fitting relatively easily. If the fuel pump is replaced in cold weather, you should be extremely careful when unsnapping the plastic clips and removing electrical connectors. At subzero temperatures, the plastic becomes very fragile. The fuel section must be removed with care, since the free exit will be hampered by the FLS float. When disassembling the fuel module and removing the fuel pump, pay attention to the presence of sealing collars, which must be installed during assembly without distortions or deformations. After you have replaced the fuel pump and installed all the elements back, turn on the ignition a couple of times so that the fuel pump pumps gasoline into the line and ramp. At this time, you can check the tightness of the connected hoses.
Fuel filter VAZ 2114. Where is it located and how to replace it
Lada 2114 Lockdown Logbook Relighting the dashboard of the VAZ 2114
This article is simultaneously relevant for the following VAZ models: 2108i, 2109i, 21099i, 2114i, 2115i, 2110, 2112, 2111, Kalina, Priora. On each of these models there are two fuel filters, one for coarse cleaning (fuel pump mesh) located in the fuel module . Another fine filter is located under the car between the gas tank and the spare wheel niche (trough).
Before replacing filters, you first need to relieve the pressure in the system. There are several ways to do this. The first is to remove the fuel pump fuse (f1), located in the fuse box behind the center console.
To access it, you need to unscrew several screws securing the cover at the passenger's feet.
On Kalina, the fuse for the fuel pump is located under a plastic cover in the center console.
Or disconnect the fuel pump power supply, having first unscrewed the screws securing the hatch to access the fuel pump under the rear seat.
After this, start the car, and when it stalls, turn the starter a little.
A simpler option for relieving pressure would be to remove the protective cap from the end of the fuel rail and press the spool. It is better to place some small container under it, because... A small amount of gasoline will leak out.
The coarse filter (fuel pump mesh) is changed as needed, the fine filter every 30,000 miles.
To replace the coarse filter, you will need to unscrew the fuel pipes coming to the pump, and then unscrew the pump mounting nuts (head 10) and remove the pump from the tank. Remove the plastic flask at the bottom of the pump and remove the screen by moving downwards.
To replace the fine filter, you will need to unscrew the nut securing the filter to the car body, and then disconnect the fuel pipes from the filter.
There are two types of fastening of fuel pipes to the filter: classic threaded and snap-on. The first option will need to be unscrewed using two keys, one holding the nut on the filter, the other tightening the fuel pipe nut.
The second option simply snaps off by pressing the bracket.
Don't forget about the rubber O-rings at the ends of the fuel pipes. It would be better to buy at least 4 pieces in advance, and even better, instead of rubber rings, use copper washers.
Assembly is carried out in reverse order.
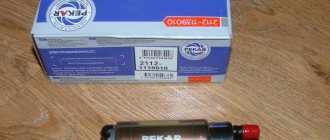
A coarse filter (fuel pump mesh) and a fine filter depend on the engine size. For the 1.5 engine there is a coarse filter with article number 2112-1139200, for 1.6 there is a filter with article number 1118-1139010. The fine filter for 1.5 (before 2005-2006 onwards) comes with threaded connections, for 1.6 (after 2005 onwards) with fittings for latches, but before replacing it is better to separately look at the connections of the fuel pipes to the filter. The catalog number of the original filter on nut connections is 2112-1117010-82, and the filter on snap connections is 2123-1117010-82
Useful information and nuances of installing filters
It’s interesting, but original filters for Ford Focus are practically never found on sale. Thus, the manufacturer forces you to change the entire pump assembly. The Ford Focus car uses two types of filters: FGO (for coarse cleaning), which is a mesh, and FTO in the form of a flask.
The purpose of the filters does not need to be described in detail. Let's just say that they efficiently clean fuel in two stages. This practice has long been found in the automotive industry: one filter removes all large particles of debris (mesh), the other qualitatively cleans the fuel before it is directly supplied to the engine.
The coarse mesh on the Ford Focus is located inside the pump
Fuel filters on a Ford Focus can have different designs and be located in different places, depending on the modification and system of the car. For example, on injection internal combustion engines, the FTO remote filter is located near the tank, and the FGO mesh is located inside the fuel pump.
On a Ford Focus, the FGO mesh is considered a disposable, non-removable element, and according to factory instructions, it can only be replaced when assembled with a pump. The replacement schedule for FTO (external) is every 60,000 km, for FGO (submersible) – every 120,000 km.
Replacing the remote filter is quite easy. You need to crawl under the car, which you have previously placed on a lift or pit. Before doing this, you should put on protective gloves and open the sash or window in the garage to allow benzene vapors to escape. To ensure fire safety, it is recommended to turn off all heating devices.
Next you need to act in the following sequence:
- Pour some fuel into the tank, start the engine and wait until it turns off (the system runs out of fuel - the pressure is released).
- The filter is attached to the body with a bolt, and you need to unscrew it.
- Disconnect the fuel hoses going to the filter (prepare an empty container in advance into which the fuel remaining in the pipes will be poured).
- The filter can then be removed by disconnecting it from the clamp.
- Tighten the new FTO into the clamp.
It is extremely important not to forget to mark the tubes, hoses and fittings that we remove
The Ford Focus remote filter is located separately from the pump
When installing a new filter, you should pay attention to the arrow marked on the housing. It indicates which side of the filter element should face the engine (i.e.
e. the filter must be placed so that it is directed with the arrow towards the car engine).
The arrow on the filter should point towards the engine during installation.
Replacement of the mesh is carried out together with replacement of the pump. However, there are motorists who know how to clean the mesh without changing it. There is another option: install a mesh from another car model at the inlet of the original fuel pump, thereby creating additional filtration. This is something like an upgrade designed to improve the stability of the engine for some time. In fact, only a full replacement of the element will make it possible to improve the dynamic and technical performance of the engine if the submersible filter no longer copes with its duties.
Almost all Ford Focus have a hole cut on top of the fuel tank, which is provided for removing the pump and filter without dismantling the entire tank.
The replacement algorithm looks like this:
- The rear sofa reclines.
- The wires going to the pump determine its location.
Wires to the fuel pump will help determine its location
- If the hatch is not provided by the manufacturer, then you should use metal scissors to cut and bend the iron just enough so that it is enough to remove the pump.
A hatch cut out with scissors will provide easy access to the pump.
- The pump is held on by a nut that must be unscrewed.
After the pump is dismantled, you need to remove the bottom plastic cover protecting the mesh.
The submersible filter is located inside the pump, it is hidden by the bottom plastic cover
All that remains is to remove the submersible filter and replace it. If the pump is being replaced, then you need to install a new unit in place of the old one. After assembly, be sure to pump some fuel into the system with the starter, but do not start the engine. Then you should check the connection for leaks. The car must also be tested in motion. If there are no leaks anywhere, all hoses and tubes are properly secured, then you need to drive the car at speed along the highway, then downhill. This is how the fuel supply is checked in different driving modes.
How to replace the fuel pump mesh, also known as the fuel pump, on a VAZ 2113-VAZ 2115
Lada Priora Sedan 16kl Kvartsukha Logbook REPLACING THE FUEL FILTER
Note!
How to change the fuel pump grid on a VAZ 2114.
For now, let’s start with a few words about this mesh, practically you don’t have to replace it with a new one, you can first remove it and later wash it in gasoline; some dirt from such washing will lag behind the mesh and disappear, but still not all the dirt will disappear, so the leading option will obviously be Replacement of this mesh for the newest one, besides, it costs only around 50-130 rubles.
As annoying as this may sound, if you find yourself in a situation where your grid is very clogged and the car is moving jerkily, and you don’t have this grid next to it, then although there is an option to remove the clogged grid and wash it in gasoline and finally It is best to blow it out with compressed air under pressure, for example a compressor, pump, etc.
Removal: 1) First of all, remove the fuel pump itself from the car. (For information on how to remove the fuel pump, see the text of the article: “Replacing the fuel pump on a VAZ”)
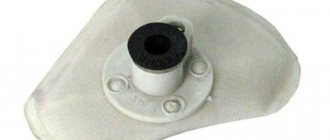
2) Then, when you remove the pump, take it in your hands, in other words, continue to hold it in your hand (Based on the situation), and then turn the pump over so that one of its parts is directed to the top, so that the mesh is in your field of vision, and then grab this mesh with your hand and simply pull it up, then it will move away and disengage, then it will be removed from the fuel pump.
Installation: The new mesh is installed in the same way as it is removed, but only in the reverse order, then you take the new mesh in your hands and simply put it on where the old mesh stood, as annoying as it may sound, just put it on until a proper installation is completed it will not go in one hundred percent, it will not stick, and when it is put on, check whether it fits perfectly on the fuel pump or whether it is wobbly, and after checking, install the fuel pump in its place.
Note! When everything is in place, check how the fuel pump works with the latest network, for this purpose, start it all for you, it should start perfectly (The first time), but only in the circumstances that the engine is working properly, and when it starts, drive a little here, When driving, pay attention to how the car moves, in other words, it should not twitch and its movement should be smooth!
Additional video: You can see exactly how to change the mesh on a fuel pump using the example of replacing the same mesh on a VAZ 2110 car, they are replaced there completely identically, so watch the video and you’ll understand everything right away:
How to measure the pressure in the fuel system?
The easiest way to measure pressure is with a special device - a pressure gauge. The kit also includes an adapter and drain. Pressure can be determined using an air pressure gauge. This device is present in almost every motorist, as it is used to measure tire pressure. A normally functioning pump in a VAZ 2110 should have a reading of 2.8-3.2 atm. You need to connect the pressure gauge and check what the indicator is with the engine not running, but with the fuel pump on. It must be no lower than 2.8 atm.
The heart of the car is the engine. It cannot work without the proper supply of gasoline to it, like the movement of blood through the human body. The main fuel supply unit in a VAZ 2112 car is a gasoline pump, which pumps gasoline in the system for its supply to the filter, and then into the combustion chamber. Its service life depends on how pure the gasoline enters the fuel pump. There are situations when the car moves jerkily or even stops. In such a situation, you need to start repairs with the easiest thing - the VAZ 2112 fuel pump mesh must be replaced. The mesh can become clogged to such an extent that it surprises even experienced auto mechanics. The main reason for this is the poor quality of gasoline.
Features of the electrical circuit
The circuit in which the pump motor is connected contains one fuse (F21) and one relay (K12). Both parts are installed in a single mounting block. We discussed in detail how to access them earlier. In a Lada Kalina car, the fuel pump relay is 4-pin. Two contacts go to the winding, two more are closed when triggered.
Mounting block VAZ-2192/94
The above parts can be dismantled using a special tool, which is secured under the unit cover. If the fuel pump is faulty, the pressure in the fuel rail is equal to atmospheric pressure. The same pressure can be reduced forcibly: by turning off fuse F21, you need to start the engine and wait a few minutes. When the gasoline pressure decreases, the engine will stall.
The fastening of components related to the fuel system should not be loosened without ensuring that the pressure in the rail is reduced to a minimum. The way to achieve this has just been discussed.
conclusions
All of the instructions described above are designed so that even the most unprepared car enthusiast can independently remove the fuel pump on his Lada Kalina; the most important thing is not to rush, do everything consistently and carefully!
To access the Lada Kalina fuel pump, you need to fold back the rear seat, remove the insulation (if any), and then begin dismantling the device.
Tool for the job
- Screwdriver with flat and Phillips blade.
- Hammer.
- Pliers.
Step-by-step work order
- Disconnect the negative terminal from the battery.
- We open access to the protective cover.
Raise the rear airbag up
Then unscrew the four bolts from the black metal cover located under the rear seat.
To avoid losing, we put the bolts in one place.
When the bolts are unscrewed, remove the cover to the side.
Under the decorative cover you can see the fuel pump and DUST!
- When the cover is removed, you will see a picture where the upper part of the fuel pump is visible, as well as the fittings that are connected to it.
- Now you can begin the dismantling itself, and first of all, disconnect the power wires. To do this, remove the plastic clamp on the block and pull it to the side.
- The next step is to disconnect the fittings; in order to remove them, you need to press on the metal clamp with one hand, and use the other hand to pull the fittings to the side using pliers.
- When dismantling the second tip, note that its retainer is made of green plastic, and in order for the fitting to leave the place of fixation, you need to press on it, and then pull the tip itself to the side with your other hand.
- Before you begin removing the fuel pump, you should thoroughly clean everything of dust and dirt to prevent any debris from getting into the fuel.
- When everything is clean, you can begin to dismantle the retaining ring that secures the fuel pump to the housing. To perform these manipulations, you can use a special puller, or using a flat screwdriver and a hammer, knock it counterclockwise from the mounting points.
- Use a hammer and screwdriver carefully so as not to damage the ring or fuel pump housing.
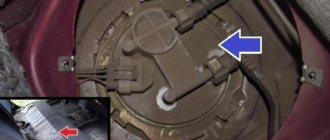
The block is marked with a red arrow, and the fittings with a green arrow.
Replacing the fuel pump mesh - step-by-step instructions
Attention!
We will be working with a flammable substance, so first of all, remove any sources of fire. Do not smoke while doing this work! Some, by the way, light a cigarette out of habit while performing such work. As a result, they pay very dearly for their inattention and violation of basic safety precautions.
- Turn off the power or remove the one that controls the fuel pump.
- Start the engine and let it run until it stalls. This way you will remove excess and spill a minimum of gasoline when removing the fuel pump.
- Next you need to remove the rear sofa (seats).
- For “every fireman”, remove the “-” terminal of the battery, gasoline is highly flammable, you never know.
5. Using a vacuum cleaner and a rag, clean the “working area” so that nothing gets into the tank when removing the fuel pump.
6. Place a rag under the fuel hoses and disconnect them from the fuel pump. Be careful, gasoline will spill. The hoses are disconnected by pressing the metal clamp.
8. Remove the metal ring holder.
9. Carefully remove, do not rush and be careful not to accidentally damage the fuel pump float.
10. When the fuel pump is dismantled, it is necessary to disconnect the plastic pipe, after which you can disassemble the pump itself.
11. It is necessary to remove two small retaining rings located on both sides of the guides.
12. Carefully bend the plastic ears holding the glass, after which you will have access to the mesh itself.
13. To remove the mesh, just carefully pry it off using a flat-head screwdriver.
14. Replace the mesh and reassemble everything in reverse order.
When and why you need to change/clean the fuel pump screen
Let's start with the fact that general problems with the fuel system (fuel pump in particular) should be divided into the most common groups:
- the fuel pump mesh and fuel filter are clogged;
- the fuel pump itself has failed;
- injector problems;
Let us add that we should also not exclude the possibility of air leaks, that is, airing of the power system. Another culprit of problems may be the pressure regulator in the fuel rail. In this case, engine malfunctions may be partially similar to some of the symptoms mentioned above. For example, a slight ingress of air into the fuel system results in the engine not starting for a long time after parking.
Article on the topic: Which type of tinting to choose?
Let's go back to the fuel pump. Its malfunction means that the performance of the fuel supply system is reduced. If the fuel pump breaks down, then the car becomes unsuitable for normal use. Signs of a fuel pump malfunction are as follows:
- It is impossible to start the engine, the fuel pump does not pump;
- the engine starts, but runs with serious interruptions;
In this case, the service often recommends diagnosing, repairing or replacing the fuel pump. It should also be taken into account that the fuel pump mesh filter may become clogged inside the device. Let us immediately note that it is impossible to accurately answer the question of when to clean the fuel pump stack. Some car enthusiasts clean/replace the fuel pump mesh as needed or as a preventative measure every 50-70 thousand km. mileage, while others are faced with the need to clean the fuel pump grid for the first time at mileages of 150 thousand km or more. and more. Let us add that the operating manual for some models specifically states that it is recommended to replace the fuel pump stack once every 120 thousand km.
It should be added that the loss of dynamics and the appearance of symptoms of a clogged mesh occurs gradually. For this reason, each driver decides to clean the fuel pump himself. On powerful naturally aspirated engines, the gradual deterioration in acceleration is not felt as strongly as compared to highly accelerated engines with a small displacement. For this reason, many owners of large-volume trucks begin to solve the problem after noticeable complications appear. Also, the condition of the pump grid is greatly influenced by the quality of the fuel being filled and a number of other factors and individual operating conditions, which we will talk about a little later.
Article on the topic: “Bus stop” sign - what to do if violated?
How to remove the fuel pump
To answer how to change the fuel pump, you need to study the procedure for removing the fuel pump. Removing the fuel pump and replacing it involves dismantling the device. To extract, you will need a special key for removing the fuel pump (puller), open-end wrenches, a tubular wrench, and a set of sockets.
We add that the fuel pump mount may differ on different cars, although the general principle remains almost the same.
You can do this as follows:
- turn off the negative voltage on the battery;
- on the fuel rail under the hood, press the valve through which a certain amount of gasoline will flow out;
You can also go the other way. First, remove the terminal from the battery, then turn off the power to the fuel pump by removing the electrical connector from it. Then the terminal is put back on the battery and the engine is briefly turned with the starter. After a short period of time, the remaining fuel will leave the system. On some cars, the engine may even start and then stall.
So, the fuel pressure has dropped, now we proceed to remove the fuel pump. Remember, the terminal on the battery must be disconnected during work! The first thing to remove from the pump is the chip (electrical connector), if this has not been done previously
Then you need to pay attention to the fuel lines (1 fuel supply pipe and 1 return line to return fuel to the gas tank). On the indicated tubes, loosen the tightening of the clamps and clamps (if any), which are usually used to secure the electrical wiring sections to the lines to supply power to the pump
How to remove the tube from the fuel pump
Now you need to remove the lines themselves from the fuel pump. To figure out how to remove the hose from the fuel pump or disconnect the line, you need to accurately determine the method of attachment to the pump terminals. Often, the standard fastening of the fuel supply line is implemented in the form of a nut (fitting), which must be unscrewed with an open-end wrench. The so-called return line can be secured with a clamp.
Removing the fuel pump and replacing
After unscrewing the fuel lines, you will need to either unscrew the pressure ring of the fuel pump with a special puller, or use a tubular wrench to unscrew the nuts (which depends on the method of mounting the fuel pump on a specific car model).
- Before starting removal, it is worth noting that there are special arrow indicators on the pump and other fixing elements. We recommend remembering their position, which will facilitate subsequent reassembly.
- Then you need to remove the special o-ring. After removing the ring, you can remove the fuel pump from the tank. During removal, care must be taken, since devices for determining the fuel level in the gas tank (float sensor) may be attached to the fuel pump body.
- After removing the pump, there may be a rubber seal on its seat. For example, on cars of the VAZ family this seal is fixed on studs. This seal also needs to be removed by simply pulling it up.
The completion of the fuel pump replacement procedure is the installation of a new fuel pump, as well as the replacement of all rubber seals, which must be included in the kit or purchased separately.
We would like to add that during installation you should:
- Make sure that the pump is positioned correctly. To do this, there are special arrow-shaped markers on the pump itself, covers and pressure rings (depending on the make and model of the car). On some cars the arrows should line up, on others the arrow on the fuel pump should point towards the rear of the car. It is for this reason that it was recommended above to remember the position of the indicated arrows before removal.
- Also, in the process of placing the pump, you should carefully handle the float and other solutions to determine the fuel level in the gas tank. Often, during unprofessional installation, such elements are bent or broken, after which there is a need to replace them.
If the fasteners are over-tightened, they may break. If the fuel pump fixing elements are not tightened enough, then the pump may dangle in the tank, which is unacceptable. After the pump is installed, all that remains is to attach the fuel lines back, connect the pump power connector and the terminal to the battery. This is what replacing a fuel pump with your own hands looks like.
Cleaning the part
Replacing the Lada Granta fuel pump in some cases is not the only way to get rid of fuel supply problems in some cases. To restore the functionality of the fuel pump, it requires thorough cleaning. To do this, you need to dismantle the unit using the method described above.
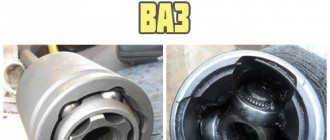
Next, unscrew the lower part of the fuel pump cup. The glass has a filter mesh that needs to be removed using a screwdriver. The mesh will need to be cleaned with a rag and rinsed in solvent. After this, the remaining elements of the fuel pump are cleaned.
After cleaning is completed, it is recommended to install a new coarse mesh, as the cells on the old one may be damaged.
Before performing work, read the operating instructions so that you know in advance where the Lada Granta fuel pump is located, as well as how to attach it. It is better to carry out work in a well-lit room away from open flame sources. For protection, use gloves to avoid damaging your skin with gasoline or solvent.