About types of speedometers
Before figuring out how you can change the readings of such a device with your own hands, you need to consider its possible options. There are several fundamentally different types of speedometers:
- mechanical;
- electromechanical;
- electronic.
Mechanical speedometer
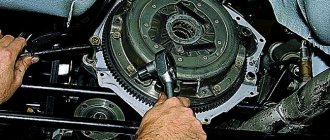
The gearbox speed is transmitted directly to the device by a cable. There the number of revolutions is measured and converted into the distance traveled. For this, a gearbox with a pre-selected conversion coefficient is used. The photo will help you understand how this is done.
In fact, it turns out that one revolution at the output of the gearbox corresponds to a certain number of meters of the distance traveled. This rotation of the output shaft is perceived by special disks (indicating device) with printed numbers displaying the measured distance.
Electromechanical speedometer
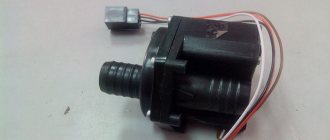
This type of device is a further development of the previously described device. In many cases the cable was the source of increased error and was replaced. A speed sensor installed on the gearbox was inserted into the device. Impulses from it were sent to a motor with appropriate control that rotated the gearbox. Otherwise, the operation of such a speedometer was no different from a mechanical one, resembling it in appearance.
Electronic speedometer
A similar type is installed on modern cars. In this case, the number of wheel revolutions is measured. Knowing the length of its circumference, it is not difficult to convert the number of revolutions into the distance traveled. The result obtained is displayed on the LCD.
Plastic hood
The installation of a plastic product is determined by a number of factors, each of which provides a number of advantages.
The reasons for choosing a polymer part are as follows:
- The inclined shape of the hood leads to frequent impacts from stones, birds and insects. This causes damage to expensive car enamel. Plastic is much more resistant to mechanical stress.
- The polymer part has holes for supplying air to the engine. In the hot season, this will allow for better cooling of the power plant.
- The plastic accessory has a pleasant appearance. Its installation helps to qualitatively transform the design of the machine without high costs.
Depending on the chosen style, a classic or sports version of the hood is installed. After installation, the plastic is covered with a protective film or painted. The production of these parts for GAZelle Next is carried out in Nizhny Novgorod.
Rewinding the device
So how to twist the speedometer on a Gazelle yourself? You can rewind and rewind readings using several schemes; we will consider each of them separately.
Homemade methods
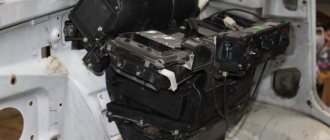
If you don’t know how, then you can use a simple method, which is to interfere with the operation of the odometer. Before winding up the odometer, prepare an awl and tweezers. It is necessary to dismantle the dashboard and partially disassemble it by opening the glass and removing the odometer. Using an awl and tweezers, the mileage in the car is twisted. The twisted odometer is installed in place in the control panel and the device is connected to the on-board network.
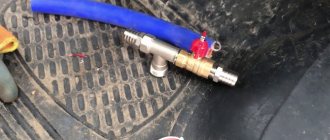
There is also a method called “collective farm”. How to wind up readings using this method? It’s very easy - the winding scheme involves disconnecting the cable from the device and connecting a construction drill with a reverse function through it. The drill turns on and the readings rewind, everything is simple here.
Ready-made options
If you are the owner of a new model, then for winding you can use a ready-made Gazelle Business speedometer twister equipped with an electronic odometer. How to wind the speedometer with such a device? There's nothing complicated about it.
Before you check the indicators, you need to find the OBD-2 connector on the car to which you need to connect the twister:
- First, connect the device to the connector, the ignition must be turned off.
- Having activated the required mode, turn on the ignition, the indicator light on the knob should light up, thanks to which you can adjust the speed of readings. If the speed is low or absent, you need to use submodes.
- After the unwinding work is completed, you can leave the completed speedometer; to do this, turn off the ignition and disconnect the spindle. The nuances of operating the device may vary depending on the manufacturer and device, so follow the instructions when using it.
Loading …
How to twist the speedometer on a Gazelle. Gazelle speedometer winder, winder, twister, winder
How to twist/unwind the speedometer on a Gazelle
Gazelle is rightfully considered one of the most popular cars on the domestic automobile market. Most often it is used for freight transportation of small-sized objects and bulk mixtures, such as sand, cement, crushed stone and clay.
Gazelle is a product of the Gorky Automobile Plant and was produced from 1994 to 2010. Now we’ll figure out how to twist/unwind/wind/wind the speedometer in the Gazelle. People have come up with many names for this - speedometer twister, winder, winder, winder, twister, etc.
That is, our Russian people are very inventive.
[y1]
Twist/unwind the speedometer on a Gazelle
The benefit and practicality of the Gazelle car is that you can buy spare parts for it at almost every car market or spare parts store. For example, if your speedometer is broken, you can go to the market and buy yourself a new one.
This is one of the main advantages of the Gazelle compared to imported truck models. Sometimes there are situations when it is necessary to reduce the mileage to a lesser extent. Most often this is done during the resale of a gazelle in order to get more money for it.
To twist/unwind the Gazelle’s speedometer, remove its box, get to the electric motor and start twisting it using a cable.
This is a very painstaking and lengthy procedure. So be patient and clock up the number of kilometers you need. Then remove the glass shield that protects the speedometer from mechanical influences, disassemble it and carefully twist the rollers showing the mileage manually to the value you need.
[y1]
If your gazelle has an electronic speedometer, then cheating using the method described above is unlikely to be possible. For this purpose, folk craftsmen have invented a special device that will help you solve this problem. Connect the plus and minus to the electrical circuit, run the signal wire directly to the speedometer.
Thus, you can speed up and slow down the speed of promotion. At the same time, the electronic speedometer on the Gazelle will not be damaged in any way and, with proper care, will serve you for many years. Be careful, as the use of such a mileage controller is contrary to the charter of some transport companies.
So you can not only be fired, but also sent to prison.
The vast majority of modern gazelles are equipped with electronic speedometers, so you still have to fork out money to buy a device that monitors mileage. Usually, the speedometer is increased with the aim of increasing or, conversely, decreasing the mileage that the car has traveled since the time of its purchase/sale.
How to make it yourself
Those who like to make tools with their own hands can easily make a flexible drive for a drill on their own.
Important! You won’t be able to make armor braiding yourself; this requires industrial equipment. It is also important to understand that a homemade flexible shaft for a drill will be inferior to a factory one, first of all, in terms of working life
And it’s better to use it occasionally - then it won’t let you down at a crucial moment. For professional work in large volumes, it is better to invest in a purchased extension cord.
You will have to buy a braided cable in a store and ask them to cut it to the length you need. All that remains for Samodelkin is to cut the ends, mount the outer protection, filling it with lubricants. The shank from a broken drill of a suitable diameter will work as a blank for the mounting unit in the chuck.
As an option, you can take a cable from a car speedometer, as well as a motorcycle gas or clutch control drive as a starting material.
One end of the armored braided wire will need to be welded to the shank of the broken drill using a nut of the appropriate diameter and a welding machine. A drill chuck or a hex adapter is welded to the second end of the cable for quick tool change. Remember that when operating such a drive, you need to hold it not by the rotating cartridge, but by the stationary braid. Such a do-it-yourself device will not only allow you to save money, but also make the drive exactly the length you require. Most factory drives are 25cm or 50cm long.
Electronic speedometer
Almost every modern car is equipped with an electronic speedometer. Perhaps after a certain time it will completely replace mechanical analogues, but for now they are still present even in new models. The operating principle of the electronic device is simpler than that of a mechanical speedometer.
Often, an electronic device has a magnet in its device, which is attached to the output shaft of the gearbox. The magnet rotates with the shaft, and an electronic unit is located nearby. At the same time, rotating in a circle on the gearbox shaft, the magnet periodically passes in close proximity to the electronics, transmitting a signal to it and thereby performing the function of a sensor.
And every time the magnet passes by the block, it sends an impulse to the speedometer. Inside the meter there is a so-called black box (notable for its increased intelligence), which calculates the speed using these impulses. To wind the speedometer, this knowledge will not hurt.
There is nothing easier to understand: the faster the pulse transmission frequency, the faster the box shaft rotates. All calculations are performed with maximum accuracy and have almost zero error.
CAN-Twister
Characteristics
- Increases mileage at speeds of up to 6,000 km/h, or 55,000 km. per work shift
- The device operates from inside the car via the OBD II connector and does not require installation.
- You can safely undergo maintenance at an official dealer, it does not affect the factory warranty
- Only our universal device can be configured for any other car
Advantages
- Warranty on all devices for 5 years without mileage limitation
- Free delivery by courier service on the day of application, payment after verification
- Mileage adjustment is legal and does not fall under Russian legislation
* — the price of the product is indicated taking into account the discount for pickup
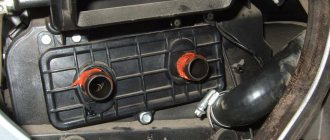
Design and diagram of the Gas 3110 speedometer
The electric-drive speedometer Gas 3110 is designed in the same way as all modern cars. The readings on the scale depend on the number of revolutions of the secondary shaft of the gearbox. It drives the speedometer gearbox, which has a built-in sensor. The sensor can be of several types and we will talk about it separately. The very basic electrical diagram of the speedometer operation is shown in the photograph.
Basically, it is structured as follows. The rotational speed of the secondary shaft of the gearbox is converted into electrical impulses, which the sensor transmits at a certain frequency to the actuator in the instrument panel. A precision servo drive converts the electrical signal into a mechanical one and, like a mechanical speedometer, drives the speedometer needle and odometer gears. There are also digital odometers, where the readings are displayed not in the usual analog form, but on a liquid crystal display. In principle, there is no problem with making the speedometer completely digital. It's just a matter of habit.
A person is used to evaluating data using a dial indicator, even if you have a stake on his head. That's why engineers have to complicate their lives by converting an analog signal into a digital signal twice and vice versa. Even the most sophisticated cars have painted instrument panel dials. This is how the tidy is organized on the penultimate generation BMW 7 Series. Moreover, depending on the speed of movement, the tidy can change color and appearance.
Detailed description of icons
Details about instrument combinations, decoding of symbols and pictograms are described in the GAZelle operating instructions.
The panel is a combination of instruments with sound and signal indication. The main meters that the driver focuses on are the speedometer and tachometer, located on either side of the signal sensors. The speedometer indicates the speed of the vehicle. Its scale ranges from 0 to 200 km/h. The tachometer shows the crankshaft rotation speed of the power unit per minute with a scale of 0-6.
On the left side of the speedometer there is a device that determines the amount of fuel in the fuel tank. Nearby is the “Reset” button, when clicked, the daily mileage readings are reset to zero. Mileage parameters can be read on the digital odometer, with the upper numbers indicating the total value, the lower ones indicating the daily value.
In the lower right corner there is a “Mode” button that turns on the ignition. Signal sensors are installed in the center of the panel.
Flashing red:
- STOP indicator, when activated, further movement is prohibited until the problems in the car are resolved;
- indicator of lack of battery charging, which operates when the ignition is turned on until the engine starts;
- indicator of low oil pressure in the engine;
- minimum fluid level sensor in the brake system hydraulic drive reservoir;
- engaging the parking brake.
The following are lit in green:
- left and right direction indicators;
- side light switch;
- Low beam headlight switch indicator.
Sensors flashing orange are responsible for turning on the rear fog lights, as well as for malfunctions of the anti-lock braking system and engine control mechanism. The high beam switch is blue.
In addition to the color display, an audible warning in the form of a characteristic signal has been developed on the instrument panel. It occurs in the following cases:
- when the fuel level drops to a minimum;
- when the engine temperature rises to 105° or more;
- when the handbrake is released and the car is moving at a speed of 2 km/h.
The disadvantage of the new panel is that it is difficult to install. The problem is solved this way: the pinout diagram is included in the package, you just need to add a few terminals, change the contacts so that all systems and components work correctly, connect LED lighting inside the devices and around the perimeter of the panel for better visualization.
How does a speedometer work?
There are two main modifications of speedometers:
- mechanical;
- electronic.
The principle of operation of a mechanical speedometer is to transform the shaft rotation speed into energy, which moves the needle. The speedometer drive is located in a manual or automatic gearbox and is connected to the indicator using a flexible cable protected by a metal casing. The tips of both sides of the cable are made in the form of a tetrahedron, due to which they effectively transmit rotation from the drive to the indicator. A mechanical speedometer is always connected to the odometer (vehicle mileage indicator) and forms a single unit with it.
The operating principle of an electronic speedometer consists of a sensor that produces pulses of a certain frequency and duration (depending on the speed of the car). The sensor is connected either to a separate electronic speedometer or to the on-board computer. Both the computer and the speedometer perform the same function - they count the number of pulses per unit of time and convert the value into understandable kilometers or miles per hour.
List for manufacturing a “device for winding run”:
- AZ-1 is an emergency ignition unit, previously sold for carburetor cars, but widely used in homemade products, it cost me 160 rubles. (there are also other modifications: az-2, az-3, they are also suitable);
- Block for Hall sensor - 35r;
- Plug into the cigarette lighter - 35 rubles;
- Crocodile - 15 rubles;
- Wires 5m - 44p-o.5 cross-section and there was no shorter length;
- I also had electrical tape and a soldering iron with solder; but you can also use twists.
Total: 289 rubles - but this is rough, some will have it cheaper or more expensive. But if you work on a “collective farm machine,” you must agree that it will pay for itself in one go. The device for winding mileage is quite compact; it can even be moved into the case of a mobile phone charger so that it is less noticeable.
By the way, if anyone wants to make a pulse generator on their own, here are photos of the insides of the AZ-1:
The device is still being produced, but due to low demand it cannot be found in all auto parts stores, so pick up the phone and call the stores in your city and you will definitely find it.
I took a photo of the inside in case you were unable to find the Emergency Ignition. Therefore, all these elements are sold in any radio equipment store and cost mere pennies; the circuit is very simple.
Therefore, making a device for winding mileage will not cause you more difficulty.
This also made me think, since the wires on the block were all the same color:
By the way, the cigarette lighter also has a central wire +. But it seems that the main points are all about production.
Why mail?
- There is a post office in any locality;
- fixed cost of shipping to any region;
- it is possible to pay for the purchase upon receipt;
- acceptable delivery times. According to experience (several thousand parcels), the parcel reaches any region of the Russian Federation within a week. Those. on average 5-7 days;
- safety of parcels - all first class parcels weigh no more than 2 kg, which eliminates mechanical damage during shipment. There was not a single case of mechanical damage to the spinner!;
Other delivery methods
We can also send the parcel via SDEK transport company. Its terminals are located in almost all major cities. However, it should be taken into account that this delivery method is only possible with 100% prepayment for the goods (which is not required for delivery by mail). Delivery time this way is 3-4 days. The cost of delivery, taking into account the weight of our parcel, is about 500 rubles, and here the cost depends on the region.
Other payment methods
If you want to pay for your order immediately, you can do this by making a transfer to a Sberbank card. To do this, you need to contact us - we will provide the details.
It is also possible to pay for your order with a credit card. To do this, also contact the manager.
We can also accept payment via Yandex wallet or Qiwi wallet. Contact us for details.
What does a speedometer measure?
What does the speedometer measure? If you delve into the name, speed is speed (English), and meter (we won’t burden you with the Greek alphabet) is measure (Greek), which almost literally speaks of the measurement of speed with this device. And this device is already many years old. Its debut was in 1901 on the Oldsmobile. And the patent was received by Nikola Tesla only 15 years later. Although there is information that the verstomer, an invention of the self-taught serf mechanic Yegor Grigorievich Kuznetsov, was created in the 18th century. It was installed on mechanical tracks. The arrows of the verstomer showed the distance traveled, and the bell measured each verst with its ringing. The invention can be viewed in the Hermitage in St. Petersburg. Over the past century, the average person has been shown many different modifications of the device, both in the type of information provided and in the method of measuring it. Pointer and digital instruments are the most common today; graphic panels have appeared, like a laptop monitor. Older people may remember the tape speedometer, like on the GAZ-24 before 1975. On pre-war cars there were often drum ones, where the speed values were marked on the drum, which, when rotating, showed them in the window. Now you can see this on Citroen. There are also many options for measuring speed. They can be divided into groups:
- Mechanical speedometers (centrifugal, chronometric, vibration);
- Electromechanical (electromagnetic, induction) and electronic.
There are devices that determine speed through a satellite positioning system (GPS or GLONASS). However, a GPS speedometer for a car is more of an option that increases driver convenience. They are not installed standard from the factory.
Checking and replacing the VAZ 2107 speed sensor
While the vehicle is moving, the VAZ 2107 speed sensor (injector) generates speed data sent to the electronic engine control unit. Its breakdown causes injection control errors and leads to a drop in engine power and an increase in fuel consumption. You can check and replace the sensor yourself. To do this, you will need a garage with an inspection hole, a slotted screwdriver, a 22 mm wrench and a multimeter or test lamp.
The principle of operation of the VAZ 2107 speed sensor
The operation of the speed sensor is based on the Hall effect, which describes the occurrence of electrical impulses when a conductor with direct current is placed in a magnetic field. The sensor generates pulses during the rotation of the output shaft of the VAZ 2107 gearbox. During the time the car travels a kilometer, the VAZ 2107 speed sensor generates about 6000 pulses, the frequency of which allows you to determine the current speed.
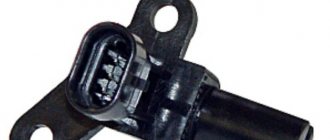
Where is the VAZ 2107 speed sensor located?
The sensor is mounted on the gearbox in the speedometer cable drive mechanism. To remove and check it, you will have to disconnect the gearbox speedometer cable.
Symptoms of a problem
The main sign of problems in the operation of the sensor is the issuance of the corresponding error code by the on-board computer. Malfunctions may manifest themselves in other signs:
- increased fuel consumption;
- poor engine thrust;
- speedometer not working or working with a large error;
- unstable idle.
Attention! These four symptoms may be caused by problems with other parts of the car.
Causes of sensor malfunction
The design of the sensor is quite reliable. The cause of the breakdown is usually oxidized contacts on the sensor or a break in the wires that go from the sensor to the engine ECU. The contacts should be inspected, if necessary, cleaned and lubricated with “Lithol”. It is better to start searching for broken wires from places close to the plug. There they bend more often and, accordingly, fray and break. At the same time, it is worth checking the grounding of the sensor. The resistance in its network should be about 1 Ohm. If no fault is identified, you need to check the speed sensor itself. To do this you will have to remove it from the car.
How to remove the speed sensor VAZ 2107
To remove the speed sensor, you must perform the following operations:
- install the car above the inspection hole;
- engage the parking brake;
- place wheel chocks under the wheels;
- from the inspection hole, using a slotted screwdriver, unscrew the nut of the speedometer drive cable;
- disconnect the cable from the gearbox;
- loosen the plastic clamp that tightens the wiring harness coming from the speed sensor;
- press the spring clips and disconnect the block from the speed sensor;
- Using a 22mm wrench, unscrew the sensor from the speedometer drive;
- remove the speed sensor.
The VAZ 2107 speed sensor can be checked using a multimeter or “control”. To install the sensor, you must do the above steps in reverse order.
Checking the speed sensor
The easiest way to check the speed sensor is to install a new one in its place. The price of the part is low, so this is the easiest and fastest way to make sure it is working or broken. If you don’t have a new VAZ 2107 speed sensor at hand, you should first check the old one, and then go to the store for a new one. To check the operation of the speed sensor, you will need a small plastic tube with a diameter corresponding to the thickness of the sensor axis, and a voltmeter (multimeter). The check is performed in the following sequence:
- connect a voltmeter to the sensor output that supplies electrical signals and to the vehicle ground;
- put the tube on the sensor axis;
- rotate the tube.
As the tube rotates, the voltage at the sensor output should increase in proportion to the rotation speed. If this does not happen, the VAZ 2107 speed sensor needs to be replaced.
Tip: In a similar way, you can check the speed sensor directly on the car. To do this, you need to hang up one of the drive wheels, connect a voltmeter to the sensor output and ground, and start rotating the wheels. If voltage and pulses appear, the sensor is working.
Instead of a voltmeter, you can use a test lamp. In this case, when checking the functionality, voltage must be applied to the “positive” output of the speed sensor. If the light flashes when you rotate the sensor, the problem is not with the sensor. You will have to check other components and parts of the “seven” that could affect the operation of the engine ECU.
The next step is to find the components for winding the run.
Mileage winding is in most cases a speed sensor simulator, i.e. the car seems to be moving at a certain speed.
In the store we will have to look for:
- AZ-2 or any similar device, this device was invented for carburetor cars, when their idle sensor failed so that they could continue driving. But in our time, when carburetors are reaching their end, they have found worthy use.
- The wires are about five meters long, 0.5 cross-section, the currents here are small;
- Plug into the cigarette lighter, you can do without it, but it’s more practical;
- Alligator clip for connecting to car wiring.
The diagram below shows how and which wires need to be soldered where:
Every city has an auto parts store that sells tuning parts, and most often you can find components there.
You must first connect to the line from the speed sensor, and then to the cigarette lighter. For a car, Gas on the electronic accelerator pedal is the green wire in the block next to the gas pedal. We make a neat cut with a knife in an inconspicuous place, exposing the wire so that we can hook the crocodile.
IMPORTANT! Do not rush to get upset if the speedometer needle lies flat after connecting, perhaps the car is in a position where the speed sensor hits the ground, so move the car forward or backward by 15 cm and the needle should rise. And also don't forget to turn on the ignition
When using this winding method, be extremely careful, because... the owner of the car may suspect that you are cheating, so I recommend not to be greedy, do everything evenly, and also reel in after the fact, i.e. every day, because so that a sudden check does not reveal any discrepancies between the waybill and the numbers on the speedometer. And if he finds out, it won’t hurt your pocket very much. Also, do not store the winding in a company car, because Your boss also has access to it; if he sees your device, he will definitely not envy you. And it’s not a bonus that will await you, but most likely a fine and a major audit.
When using this device, a drawback was identified: you need to leave the key in the ignition, which increases energy consumption. And it requires special control over the car, as it is susceptible to theft. Therefore, I suggest installing an adjustable time relay on the ignition. Those. so that we can set a timer and not be afraid for our car and the mileage.
Ps. : By the way, who is afraid to confuse plus with minus? In the AZ-1 and AZ-2 modules there is foolproof protection, i.e. If after inserting the plug into the cigarette lighter the light does not light, then swap the wires)))
Main malfunctions of the Volga speedometer
Most often, owners are forced to switch to mechanics by the frequent failure of the speedometer needle actuator. If the odometer shows mileage, but the needle drops dead or is already in convulsions, then that’s the problem. In this case, only replacing the block will save the situation. It is not recommended to disassemble the instrument panel and the arrow drive. Is it only for general educational purposes?
You can also check the integrity of the circuits in the electronic engine control unit, but you usually don’t go there with a soldering iron. Checking the computer is carried out only in a service station and in the presence of appropriate equipment and computer software specially adapted for Gas 3110. Replacing the device with a new one is the most common way out of the situation. Today they have learned to make them not only abroad, but also in Vladimir, so buying a dashboard for the Gas 3110 is not a problem.
As for the mechanical part of the Volga speedometer drive, everything remains the same, as in the mechanical drive.
The drive is located on the gearbox, attached directly to its crankcase, and from its visual condition one can conclude that both the sensor and the gearbox are working. Don't exceed the Greenwich speed limit, and good luck on the road!
Malfunctions and repairs
Common device defects:
- The speedometer periodically does not work, the needle drops to 0, and then the device is activated again. The reason is poor contact of the wiring coming from the sensor mounted on the crankcase box. The sensor connector may be defective or oxidized. Repair consists of checking the circuit, cleaning the elements from contamination and replacing faulty parts.
- Resetting the device readings at a mileage of 65-66 thousand km. The cause of the defect is a design flaw in the electronic module of the instrument cluster. The unit is changed by an official dealer or flashed with modified software.
- On some cars, the speedometer needle twitches when driving at a speed of 90-100 km/h. The malfunction is of a constructive nature; the unit cannot be repaired.
- Incorrect display of speed, the needle moves chaotically across the dial of the device. This causes the odometer reading to increase. The cause of the breakdown is the failure of the speed sensor, which needs to be replaced. The controller inside the instrument cluster may break down, in which case the entire assembly will need to be replaced.
- The arrow falls on the limit rod. The defect occurs due to a broken return spring; repair consists of installing a new instrument cluster.
Shafts for lawn mowers
Mechanical scythes with electric and gasoline drives use both flexible and rigid shafts.
Powerful brush cutters, capable of cutting tall, hard and dense grass and even small bushes, use all-metal rigid drives. Such devices are designed for long-term operation and have high torque. They are also large in size and weight and are worn on shoulder straps. The working tool is thick, rigid fishing line or powerful steel knives - two, three or four - bladed.
The flexible drive is used in lightweight, low-power and small-sized trimmers designed for mowing corners after a lawn mower or trimming grass on small lawns. These trimmers are held with one hand, and the flexible shaft is used to mow in the most comfortable position. The cutting element of such devices is a fishing line of small or medium thickness or a lightweight two-bladed knife. If the device is overloaded, the flexible shaft may become twisted. In this case, the rupture usually occurs near the shaft-to-engine attachment point. If you cannot buy a “original shaft”, then you need to select a suitable length from drives in the direction of the braid. Such drives can only rotate in one direction.
Before starting seasonal work and after changing the drive, remove any remaining old lubricant, rinse with gasoline or other solvent, and fill the cavity in the handle with new lubricant. The type of lubricant is specified in the user manual.
What devices are used to wind electronic speedometers?
Considering the variety of cars available and methods for processing data from the speedometer, several different options have been created that allow you to correct the distance traveled. The circuit of such a device can be made both on discrete elements and on microprocessor systems, but all finished products are divided into the following types:
CAN twister
This device is designed for use on modern machines. Here you need to know that CAN is a special bus through which data is exchanged between car electronics units. And its design implies the presence of a diagnostic connector, through which, knowing the exchange protocol, you can gain access to individual devices.
Accordingly, thanks to this, you can adjust the contents of the necessary memory cells, achieving the desired result. It is impossible to detect with diagnostic equipment that memory cells have been changed.
You can buy a high-quality spinner on the website https://can-podmotka.ru
Pulse twister for OBDII
This device is intended for use with foreign cars that do not have a CAN bus. This device is connected via a special OBDII diagnostic connector. In this case, the speedometer receives a sequence of pulses simulating signals from the speed sensor, as a result of which the readings of the distance traveled change.
Speed generator
This circuit simulates a speed sensor. Instead, the generator turns on and produces a sequence of pulses that arrive at the speedometer and cause its readings to change. Mostly suitable for electromechanical devices and domestic cars - VAZ, UAZ and others manufactured before 2006.
ABS speedometer knob
Suitable for cars equipped with ABS. Its work is based on controlling the speed and rotation of the wheel. A spinner connected to the corresponding connector simulates the operation of the wheels, and the controller, receiving this information, begins to change the speedometer readings.
You can make a winding device yourself or buy a ready-made one, but the most important thing is to determine whether it can be used on a given machine. If used incorrectly, you can simply burn the electronics.
As strange as it may seem, sometimes it becomes more important not to twist the speedometer, but, on the contrary, to wind it up. There are a number of reasons, both objective and subjective, that force one to do this. More than one device has been created that allows you to solve the problem, and you can choose a device that takes into account the production date of a particular car and allows you to carry out this procedure without consequences.
I like5I don't like2
Instructions for connection and operation. Preparing the device for operation
Winder via CAN bus.
Instructions for connection and operation.
Preparing the device for operation:
Before use, the device must be prepared for the vehicle with which it will be used. The device is initially supplied configured for mode 1. How to switch the operating mode of the device is described below: – Connect the rewinder to the vehicle’s diagnostic connector (Ignition off).
The device indicator will display the mode number. – Turn on the ignition. The device indicator will light up continuously. The odometer reading will begin to increase. Control the winding speed using the main or daily mileage counter.
If the winding speed is low or does not wind at all, switch the device submode (by briefly pressing the button) and again control the winding speed. In total, you can switch up to 8 modes. When switching submode, the indicator goes out briefly. Submodes are switched sequentially in a ring.
By switching submodes, you can choose the winding speed that is optimal for you. The last selected operating mode and submode are retained.
Description of use:
Connect the device to the vehicle's diagnostic socket. Turn on the ignition or start the engine, when the device indicator lights up constantly, monitor the winding speed using the odometer.
Do not use the winder on a moving vehicle!
Once you have received the required odometer readings, turn off the ignition and disconnect the device from the vehicle.
Description of work:
When the odometer winder is connected to the diagnostic connector, the winder indicator will light up for 3 seconds, indicating that power is present and it starts working. Then the indicator goes out for 2 seconds and begins to quickly display the operating mode number at intervals of 0.5 seconds.
The rewinder then checks the vehicle’s CAN data bus and does the following:
In total, the device has 8 submodes that switch in a ring; the last selected submode is remembered. By switching submodes, you can select the optimal odometer winding speed. The winding operation is controlled by the main or daily mileage. In Renault Fluence only for main mileage.
After 1-5 hours of total operation of the odometer winder, switching the vehicle type and operating submodes is blocked. To unlock the device if you need to use the winder on another car, you must contact the seller. Unlocking all winding devices requires a fee.
Switching modes:
In order to set the desired operating mode, you need to connect the speedometer winding to the car or apply power (4-pin ground and 16-pin +12V) and, while the indicator is on, press and hold the device button.
While holding the button, wait until the indicator starts flashing with a pause of 1 second. The number of blinks corresponds to the mode number. When the indicator flashes the required number of times, you must release the device button.
The odometer winder will reboot and display the operating mode number (vehicle type). The required operating mode is set according to the table.
Submode switching
:
The submode is switched by briefly pressing the button (only when the ignition is on and the indicator is constantly on). The switching of the submode will be confirmed by the indicator (it will turn off for 0.25 seconds). Winding uses up to 8 submodes that switch in a ring.
Setting for Renault Fluence:
Connect the winder to the diagnostic socket in the center console (ignition off, doors closed). Check that the indicator displays mode 13. Turn on the ignition (do not start the engine!!!) and monitor the increase in mileage using the main trip meter.
If the mileage does not increase or increases and returns to the same place, switch to the next sub-mode. Check the rewinder operation again. It is advisable to disconnect the negative terminal from the battery for 1 minute or drive 2-3 km between checks in each submode after winding.
Correctly configured winding should reliably increase the mileage of the car, and then during normal vehicle movement a slight rollback in mileage is possible.
Table of mode correspondence to the car:
1. Ford / Mazda
Focus – 2/3, Fusion, Fiesta, Transit, Tourneo, C-Max, Mondeo until 2007, Mazda – 2/3/6, CX-7, Scorpio
17. BMW
7 series E65-66-67, X5 E70, X6 E71, 3 series
2.Ford
Mondeo since 2007, S-Max, Galaxy
18. Hyundai
Santa Fe since 2010, Genesis, IX55
3. Ford
Transit Bus, Scorpio
19. Mitsubishi
Outlander XL, Lancer X
4.Ford
Maveric 2006
20. Volvo
since 2008
5.Toyota/Lexus
Lexus Lx570, Ls460 since 2007, RX350 since 2007, High Lander since 2008, Avensis since 2009, Auris since 2006, Camry since 2007, Tundra, Corolla since 2006, Land Cruiser 200, Prado since 2009, Rav4 since 2006, Verso 21.
Volvo
from 2005-2007
6.Nissan/Infiniti
FX-35/45, QX-56, G35, Pathfinder from 2007, X-Trail, Primera from 2005, Teana, Murano, Qashqai, Patrol from 2010, Navara
22. Volvo spd=250kbs
until 2004
7. Audi
A4, A6, A8, Q7, AllRoad
23. Land Rover
Discovery 3
8.VW/Skoda
Passat B6, B7, Golf V, Jetta, Caddy, Polo, T5, Touareg, Caravelle, Multivan, Octavia, Superb, Yeti
24. Suzuki
Vitara since 2007, Kizashi
9.Mercedes
Body types 164, 204, 211, 220, 221, 251, Vito, Viano, Sprinter, ML, GL from 2005
25. Ford
Focus from 2011
10.Honda
Civic from 2008, CRV from 2008
26. AudiVW
A6, A8, Touareg from 2011
11. Opel
Zafira, Astra, Vectra, Antara
27. Kia
Sportage since 2011
12. Renault
Scenic-2, Megan-2, Kangoo-2
28. Kia
Cerato
13. Renault
Fluence *, Megane-3
29. Chevrolet
Epica automatic transmission
14. Ssang Yong
Rexton-2 from 2007
30. BMW
5 and 7-series from 2010 (F-body)
15.Chevrolet/Opel
Captiva, Cruze, Opel Astra NEW, Saturn VUE
31. Peugeot
308
16. Hyundai
Tuscon from 2010, Sonata from 2011, Solaris, IX30, IX35
32. Peugeot
Boxer
In Audi ,
VW , Skoda , Mercedes , BMW , Mitsubishi
Volvo cars before 2004,
it is necessary to connect two wires from the engine CAN bus to the free contacts of the diagnostic connector. If necessary, contact specialists.
Trouble-shooting:
1. The indicator on the device does not light up.
- poor contact in the connector between the device and the car.
- malfunction of the supply circuit in the car connector
- device malfunction
2. The indicator lights up, displays the mode number and no longer lights up
- The ignition in the car is not turned on
- incorrect operating mode selected
- communication failure, poor contact, CAN bus not connected correctly
- wiring fault in the vehicle CAN bus
- the device is faulty
3. The indicator displays the mode number and then blinks briefly
- Incorrect operating mode selected (vehicle type)
- Car ignition is not turned on
- the device is connected to another CAN bus
- The device is not suitable for this vehicle
4. After turning on the ignition, the indicator is constantly on, but the mileage does not increase
- ignition not turned on
- the device operating mode or submode is not selected correctly
- The device is not suitable for this vehicle
Electronic
In an electronic speedometer, speed is measured in a non-contact manner. There are several options for the operation of devices using the optoelectronic principle, but the most common speed meters are meters based on the Hall effect
Therefore, most of the attention is paid to the latest devices. In the speed sensor, a cable connected to the gearbox driven shaft rotates a magnetic disk with a cutout or protrusion (reference point)
The magnet, depending on the rotation speed, changes the intensity of the magnetic flux, which affects the resistance of the energized metal sensor. The pulses enter the electronic circuit of the speedometer, which sets the angle of deflection of the needle on the instrument panel dial.
Malfunctions of the electronic speedometer and their elimination
With an electronic speed meter, failures manifest themselves in almost the same way as with mechanical analogues, with additional nuances. The device does not show the actual speed. Otherwise, the arrow freezes and does not drop to zero. It happens that the panel shows a jerky movement of the indicator.
Before you start disassembling the instrument panel if the speedometer has completely failed, you need to check the integrity of the fuses located in a separate block. Sometimes, repairs end with a banal fuse replacement.
In any case, it would not hurt to know how to check the functionality of the electronic speedometer. Speedometer malfunctions are mainly related to the speed sensor (DS). If the arrow drops down or freezes without moving, then check this device first. To perform diagnostics, you need to remove the device from the car. To do this proceed as follows:
- the car is driven into a pit;
- DS is found below. On most cars, sensors are installed in the gearbox housing;
- open the connector with a three-wire wire;
- use a spanner to unscrew the fastening bolt;
- the sensor is removed from the socket;
- On the response chip there are three contacts, one extreme one is “ground”, the other is plus (12 V). The middle contact is the signal source connected by wire to the ECU;
- Use a multimeter to check the voltage at one of the outer terminals. If there is no current, then check the integrity of the supply wire and its connection;
- a wire with a voltage of 12 V is applied to the central contact. If at the same time the arrow begins to move, this means a breakdown of the speed sensor;
- Once they are convinced that the DS is unusable, they replace it.
If the speed sensor turns out to be working, then all suspicions of a breakdown fall on the electronic control unit. It is almost impossible to repair the ECU in a garage. This peculiar computer is a rather complex electronic device and access to its contents is “prohibited” for amateurs.
A sign that the ECU is responsible for a speedometer failure is when the “Check Engine” sign lights up. A vehicle owner who professionally owns a laptop with special software can independently find out the specific cause of the “brain center” disorder. Otherwise, it is better to give up trying to repair the ECU with your own hands and contact a service station.
Signs of a twisted speedometer based on the condition of the car
When properly changing the mileage of a car, it is rarely possible to detect human intervention in an electronic device. Only in some car models is the distance meter duplicated in the electronic chip of the ignition key or in the on-board computer.
It is often possible to detect a sharp “rejuvenation” of a car based on a number of indirect signs.
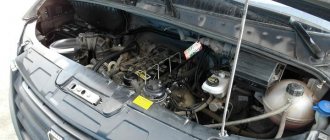
The discrepancy between the indicated mileage and the actual condition of the car can be determined by the brake discs. Heavy wear and tear with low mileage should raise logical suspicion. If there is any doubt whether the front discs have been replaced, their wear should be compared with the rear ones. The actual mileage can be determined by the wheels of the car. “Bald” tires or completely new tires indicate high mileage. The condition of the wheel rims also reflects the actual operation of the machine. Chips, dents, and traces of rust lead to unpleasant thoughts about the operation of the car. The sloppy condition of the interior may indicate both the untidiness of the owner and the high mileage of the car. Suspicion should be aroused by a worn steering wheel, erased inscriptions on buttons, shabby upholstery, and worn pedal pads. With a mileage of about 100 thousand km. so it’s almost impossible to tatter the interior from the inside. On the body of any car with high mileage, many small and large chips appear in the area of the hood and the left side of the body. Cloudy headlight lenses (glasses) also indicate long distances traveled. Under the hood of the car you can also find many interesting facts indicating a rewound odometer
The condition of drive belts, boots, oil seals, wiring, as well as mounted units, despite the dusty shell, should be almost ideal. If the owner has a service book, you need to pay attention to the date and odometer readings for the last maintenance. Then you can calculate what the average annual mileage was for the seller
Statements that the car was parked in a garage for a long time, that grandfather rode in it, etc. should be ignored. If the owner, even with the speedometer unscrewed, was able to keep the car in excellent condition (as confirmed by diagnostics at a serious service station), then you can safely buy such a car. He will faithfully serve the new car owner. Adjusting the electronic speedometer today has become a familiar procedure for specialists in the field of computer diagnostics, so you should not be afraid of any side problems with the car after “Unscrewing” the odometer in the opposite direction is possible on almost any car, but it is worth remembering that it is possible to detect fraud it is possible not only by technical means, but also by indirect signs.