Car rear wheel bearings are a type of bearing support that ensures the rotation of the rear wheel of a car and its rigid fixation on the axle. The bearing itself is located in the hub, to which the wheel is in turn attached. Bearings differ in design, size, and technical characteristics.
In this article we will consider the following questions:
- Methods for replacing rear wheel bearings;
- Causes and symptoms of malfunction;
- Types of wheel bearing units, numbers and sizes;
- Tips for use and replacement.
To begin with, we present 2 typical layouts of parts. In the diagram on the left is a non-separable hub assembly with HUB-3 (3rd generation bearing) - on the right is HUB-1 (1st generation).
How hard should you tighten the wheel nut on your car?
Torque standards are established for each car, since the tightening force for the locknut depends on the following factors:
- Bearing dimensions;
- Regulated axial clearance;
- Diameter and thread pitch.
The following are the force indicators for properly tightening the nut. The database will be gradually replenished.
Advice:
If you have not found the tightening torque values for your car (Skoda Octavia, Subaru models, Toyota Corolla), find the bearing you have installed and the same thread diameter or ask a question in the comments.
Step-by-step method for replacing the rear wheel bearing on a VAZ 2109, 2110
- stop the car from the front;
- tear off the wheel bolts;
- tear off the central nut (7) of the hub, having first removed the cap (9);
- jack up the side and set the trestles;
- remove the wheel;
- fill the brake drum mounting area with WD-40 or other special liquids (you can use diesel fuel or brake fluid);
- unscrew the guide bolts (it is advisable to lightly tap with a hammer);
- we try to carefully remove the brake drum (if it doesn’t work, we screw the appropriate bolts into a special thread on the brake drum, apply tension and very lightly try to knock it out with a hammer. In most cases, the result will be positive. There are special drum pullers on sale, just in case , if all else fails);
- unscrew the central nut completely (of course, it is possible to unscrew it immediately, and even remove the hub along with the wheel and drum, but then there is a high probability of damage to the brake pads);
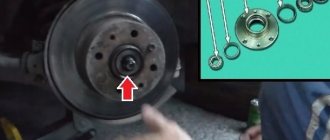
- we tighten the hub (if one of the inner races of the bearing remains on the axle, you need to use a puller or just a sharpened chisel to try to move it from its place);
- inspect the axle for signs of bearing rotation (if there are any, we replace it, it is advisable to replace the hub assembly);
- inspect the brake cylinder for leaks and pads for wear;
- remove the retaining ring from the hub using pliers and/or screwdrivers.
- Be sure to clean the edge from rust, moisten it with WD-40 or whatever you have on hand.
There are three options for pressing out the bearing:
- A special press (not everyone has one).
- A puller (not expensive, can be purchased, will be useful for the future).
- Using a heavy hammer (at least 2 kg) or a sledgehammer. AT first glance, the method may seem a little aggressive, but it is practiced by an overwhelming number of masters and service stations, and we will consider it.
- The hub must be firmly installed on a hard surface, and with several sharp blows through the mandrel, the bearing must be moved from its place. When this happens, you need to install the hub, for example, on a yew tree (so that there is a stop for the hub and free space for the bearing to exit)
Tightening torques for the front wheel bearing on a VAZ (LADA)
| No. | Automobile model | Force, N•m | Hub nut diameter/thread size |
| 1 | VAZ 2101 - 2107, OKA | 196 – 199 | M18x1.5 |
| 2 | NIVA VAZ 21213 and 21214 | 196 – 199 | |
| 3 | Kalina, Granta, Priora, Largus, Vesta | 226–247 | M20x1.5 |
| 4 | VAZ 2108, VAZ 2109 - 2110, 2111 - 2115 | 226–247 |
Table of tightening torques for threaded connections
When choosing a torque wrench, the required tightening torque should be 25-30% less
than the maximum for your key. Otherwise, working under maximum load, the key will quickly lose accuracy and fail.
Screw tightening table
| Bolt nut | Thread | Strength class | ||
| 8.8 | 10.9 | 12.9 | ||
| 22 | M 14 | 138 Nm | 194 Nm | 235 Nm |
| 24 | M 16 | 211 Nm | 299 Nm | 358 Nm |
| 27 | M 18 | 289 Nm | 412 Nm | 490 Nm |
| 30 | M 20 | 412 Nm | 579 Nm | 696 Nm |
| 32 | M 22 | 559 Nm | 785 Nm | 941 Nm |
| 36 | M 24 | 711 Nm | 1000 Nm | 1196 Nm |
| 41 | M 27 | 1049 Nm | 1481 Nm | 1775 Nm |
| 46 | M 30 | 1422 Nm | 2010 Nm | 2403 Nm |
| 50 | M 33 | 1932 Nm | 2716 Nm | 3266 Nm |
| 55 | M 36 | 2481 Nm | 3491 Nm | 4197 Nm |
| 60 | M 39 | 3226 Nm | 4531 Nm | 5443 Nm |
| 65 | M 42 | 3991 Nm | 5609 Nm | 6727 Nm |
| 70 | M 45 | 4992 Nm | 7012 Nm | 8414 Nm |
| 75 | M 48 | 6021 Nm | 8473 Nm | 10150 Nm |
| 80 | M 52 | 7747 Nm | 10885 Nm | 13092 Nm |
| 85 | M 56 | 9650 Nm | 13582 Nm | 16279 Nm |
| 90 | M 60 | 11964 Nm | 16867 Nm | 20202 Nm |
| 95 | M 64 | 14416 Nm | 20300 Nm | 24320 Nm |
| 100 | M 68 | 17615 Nm | 24771 Nm | 29725 Nm |
| 105 | M 72 | 21081 Nm | 29645 Nm | 35575 Nm |
| 110 | M 76 | 24973 Nm | 35118 Nm | 42141 Nm |
| 115 | M 80 | 29314 Nm | 41222 Nm | 49467 Nm |
| 130 | M 90 | 42525 Nm | 59801 Nm | 71761 Nm |
| 145 | M 100 | 59200 Nm | 83250 Nm | 99900 Nm |
The strength class marking is indicated on the bolt heads.
For products made of carbon steel of strength class - 2, numbers are indicated on the bolt head through a dot. Example: 3.6, 4.6, 8.8, 10.9, etc. The first number indicates 1/100 of the nominal tensile strength, measured in MPa. For example, if the bolt head is marked 10.9, the first number 10 means 10 x 100 = 1000 MPa. The second number is the ratio of the yield strength to the tensile strength, multiplied by 10. In the above example, 9 is the yield strength / 10 x 10. Hence, Yield strength = 9 x 10 x 10 = 900 MPa.
The yield strength is the maximum working load of the bolt!
For stainless steel products, the steel marking is applied - A2 or A4 - and the tensile strength - 50, 60, 70, 80, for example: A2-50, A4-80.
The number in this marking means 1/10 of the tensile strength of carbon steel.
Conversion of units of measurement: 1 Pa = 1N/m2; 1 MPa = 1 N/mm2 = 10 kgf/cm2. Limit tightening torques for bolts (nuts).
Table of bolt/stud diameters
| English measurement system ( inches ) | Metric ( mm ) | ||
| Bolt nut) | Thread | Bolt | Hairpin |
| 1.1/4“ | 3/4“ | 32 | M 22 |
| 1.5/16“ | 7/8“ | ||
| 1.3/8“ | 13/16“ | ||
| 1.7/16“ | 7/8“ | 36 | M 24 |
| 1.1/2“ | 1“ | ||
| 1.5/8“ | 1“ | 41 | M 27 |
| 1.11/16“ | 1.1/8“ | ||
| 1.3/4“ | |||
| 1.13/16“ | 1.1/8“ | 46 | M 30 |
| 1.7/8“ | 1.1/4“ | ||
| 2“ | 1.1/4“ | 50 | M 33 |
| 2.1/16“ | 1.3/8“ | ||
| 2.3/16“ | 1.3/8“ | 55 | M 36 |
| 2.1/4“ | 1.1/2“ | ||
| 2.3/8“ | 1.1/2“ | 60 | M 39 |
| 2.7/16“ | 1.5/8“ | ||
| 2.9/16“ | 1.5/8“ | 65 | M 42 |
| 2.5/8“ | 1.3/4“ | ||
| 2.3/4“ | 1.3/4“ | 70 | M 45 |
| 2.13/16“ | 1.7/8“ | 75 | M 48 |
| 3“ | 2“ | ||
| 3.1/8“ | 2“ | 80 | M 52 |
| 3.3/8“ | 2.1/4“ | 85 | M 56 |
| 3.1/2“ | 2.1/4“ | 90 | M 60 |
| 3.3/4“ | 2.1/2“ | 95 | M 64 |
| 3.7/8“ | 2.1/2“ | ||
| 100 | M 68 | ||
| 4.1/8“ | 2.3/4“ | 105 | M 72 |
| 4.1/4“ | 2.3/4“ | 110 | M 76 |
| 4.1/2“ | 3“ | 115 | M 80 |
| 4.5/8“ | 3“ | ||
| 4.7/8“ | 3.1/4“ | ||
| 5“ | 3.1/4“ | ||
| 5.1/4“ | 3.1/2“ | 130 | M 90 |
| 5.3/8“ | 3.1/2“ | ||
| 5.5/8“ | 3.3/4“ | ||
| 5.3/4“ | 3.3/4“ | 145 | M 100 |
| 6“ | 4“ | 150 | M 105 |
| 6.1/8“ | 4“ | 155 | M 110 |
| 165 | M 115 |
Tightening torques for the front wheel bearing on Ford
| No. | Automobile model | Force, N•m | Hub nut diameter/thread size |
| 1 | Focus 1 | 45 (further tighten another 90 degrees) | M18x1.5 |
| 2 | Focus 2 | ||
| 3 | Focus 3 | ||
| 4 | Mondeo | 35 (then tighten another 90 degrees) | |
| 5 | Fusion | 35 (then tighten another 90 degrees) | |
| 6 | Transit | 53 | M20x1.5 |
Adjusting Wheel Bearings
Home » Repair Tips » Adjusting Wheel Bearings
The bearings that are installed on car wheel hubs wear out over time. We will try to independently adjust these components and change products.
The bearing adjustment procedure involves the following stages:
- First, the car is placed on a level site, secured with a handbrake. At the same time, you can place anti-recoil devices.
- Then we lift the axle from behind using a jack.
- We remove the axle shaft of the car to clarify the rotation of the wheels. Having discovered difficulties, we find out the source of the disease. There may be “sticking” at the oil seal and contact at the brake pads.
- Next, unscrew the locknut and remove the stop washer. When we slightly unscrew the fastening nut on the bearing, we will re-check the rotation on the wheel. Adjustment procedures are permitted if the component moves easily.
- Let's use a torque wrench to tighten the nut. The force on the structure should not exceed 100 Nm (at the same time we turn the wheels). Then the rollers will be evenly placed on the bearings.
- Unscrew the nut again. To maintain the rotation angle, we make turns on the washer by a couple of positions and holes. We mount the stopper nut, controlling the entry of the pin into the slot.
- We tighten the locknut, maintaining a force of up to 200 Nm.
- When making adjustments, we control the free rotation of the wheel and the absence of axle play.
- We install the axle shaft with spring washers. We re-tighten our nuts to secure the studs.
- We lower the wheel until it touches the ground. We make a trip and test the equipment. Sometimes, when moving, the hub begins to heat up, reaching 700 degrees. Then the adjustment procedure will have to be repeated.
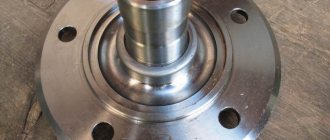
Now we try to pull out the hub on the rear wheel when we change the bearing.
We carry out the manipulations:
- Let's turn the flange by tightening the mounting bolts on the hub (in contact with the bracket). We act through the hole on the body part - we compare it with the bolts of the element.
- Then we remove the fasteners holding the mechanism.
We also advise you to read: Vote, did you like the article?
(2 votes, rating: 5.00 out of 5)
Tightening torques for the front wheel bearing on a Chevrolet
| No. | Automobile model | Force, N•m | Hub nut diameter/thread size |
| 1 | NIVA | 191 – 195 | M18x1.5 |
| 2 | Lanos | 184 - 204 (then weakens and tightens 15.3 - 18.4) | M20x1.5 |
| 3 | Aveo | ||
| 4 | Lacetti | 254–300 | |
| 5 | Cruz | 50, turn 40˚ | M20x1.5 |
Matiz replacement of front wheel bearing/hub/steering knuckle/brake disc
— Wear-to-failure, in other words, the regulated service life expires; — Moisture, and similarly dirt inside due to damage to the oil seals; — Drying or other leakage of lubricant, missing lubrication, wear from friction; — Improper repair of the front suspension, as it is also called a bad previous change; — Malfunction of adjacent parts of the front suspension on the Daewoo Matiz.
Preliminary operations when repairing the hub assembly:
- Place the car on a level surface, provide lighting;
- Engage first gear, release the handbrake;
- Install wheel chocks under the rear chassis;
- Clean the wheel or mechanism being repaired from dirt;
- Familiarize yourself with the structure and location of wheel roller bearings in the mechanism, and with the part numbers:
- Prepare a set of tools according to the list:
— A set of wrenches and sockets with a ratchet; — Pipe for extending the wrench; — Vise — Jack; — Screwdriver, pliers; — Mandrel or socket head with an outer diameter of 37-40 mm. - Hammer, chisel. — A torque wrench for tightening the hub nut to the required torque.
- First, loosen the wheel bolts, then remove the hub locknut.
- Later, we lift the car with a jack, install a support under the body, for the safety of work.
- We immediately move on to dismantling the brake caliper. Find the two caliper mounting bolts and unscrew them.
- Now we disconnect the brake hose, which is held on a special mount at the rack.
Tightening torques for the front wheel bearing for Renault
| No. | Automobile model | Force, N•m | Hub nut diameter/thread size |
| 1 | Logan | 175 | M20x1.5 |
| 2 | Megan 1, Megan 2 | 280 | |
| 3 | Sandero | ||
| 4 | Duster 4x4 | 280 | |
| 5 | Duster 4×2 | 175 |
How to change the front wheel bearing Matiz 0.8
Preparatory operations for repairing the hub assembly:
- Place the car on a flat surface, provide lighting;
- Engage first gear, release the handbrake;
- Install wheel chocks under the rear chassis;
- Clean the wheel or mechanism being repaired from dirt;
- Familiarize yourself with the structure and location of wheel roller bearings in the mechanism, as well as the part numbers:
- Prepare a set of tools according to the list:
— A set of wrenches and sockets with a ratchet; — Pipe for extending the wrench; — Vise — Jack; — Screwdriver, pliers; — Mandrel or socket head with an outer diameter of 37-40 mm. - Hammer, chisel. — A torque wrench for tightening the hub nut to the required torque.
Instructions for removing and replacing the old wheel bearing
- First, loosen the wheel bolts, then remove the hub locknut.
- Then we lift the car with a jack, install a support under the body, for the safety of work.
- We immediately move on to dismantling the brake caliper. Find the two caliper mounting bolts and unscrew them.
- Now we disconnect the brake hose, which is held on a special mount at the rack.
- We remove the ABS sensor plug (if equipped), then remove the brake caliper. Place it aside so that it does not interfere with further disassembly.
- Then unscrew the hub nut completely.
- We move on to the steering tip, using pliers, remove the cotter pin nut.
- Now unscrew the tip nut, having previously treated it with penetrating lubricant (WD-40).
- Then we will use a tip remover to press it out.
- Using the installed device, we compress the steering tip mount.
- Loosen the fastening of the ball joint with the pin.
- Now use a screwdriver to open the connection and disconnect the fist from the ball.
- The removed rotary housing contains our faulty roller bearing, which needs to be removed and replaced. First, use a screwdriver to remove the dirt seal.
- Now we knock the hub out of the rotating mechanism using a mandrel with a hammer. The internal components of the product (separator with rollers) will remain on the trunnion.
- We remove the small ring of the tapered roller bearing, clamp the hub in a vice, and then use a claw puller (or cage puller) to pull it off the axle.
- We remove the internal component of the second roller bearing, already from the rotary block, it can be removed easily.
- The external components of the product will remain in the rotating mechanism; they are clamped by the fit.
- If you don’t have a cup puller and a press, then use a chisel to remove the clips, trying not to damage the seating surface inside.
Installation and replacement of the front wheel bearing in the Daewoo Matiz hub
- Prepare spare parts for replacement. Next, clean and lubricate the hole to make pressing easier.
We place the outer ring on the hole, evenly, without distortions
CAUTION: ROLLER UP (CONE) ONLY. Next, we use the old outer element of the product as a mandrel for pressing. Place the mandrel on the end and carefully press the clip into the body.
- We perform the same operation on the other side.
- Avoid joint distortions. The pressing diagram is shown below.
- Now lubricate the small cage with thick grease and put it inside on one side.
- We insert the outer oil seal with the iron casing into the structure and press it inside the housing.
- We put on the brake disc. Now we move on to pressing the hub, first we attach the pin into the bearing hole. We do this without distortion.
- Then we turn the structure over with the axle shaft down and take a mandrel or socket head.
- Carefully press the axle shaft into the bearing according to the diagram.
- Next, we put the spacer ring on the hub axle (from the kit).
- Now we lubricate the small race of the second product and attach it to the axle shaft.
- We press in the clip using the method known to us.
- A correctly assembled structure looks like in the photo.
- An external oil seal with a casing is placed on top.
- We screw the hub to the brake disc and tighten it in a “cross” pattern.
- Now we move on to attaching the assembled structure to the strut and CV joint. We install the remaining elements in the reverse order.
How to tighten the hub nut to the correct torque
To tighten threaded connections, where it is recommended to maintain a certain torque, use special torque wrenches . Inside the tool there is a dynamometer with a scale or a special device with a limiter, which is activated when the required tightening force is reached. Keys also come with value intervals, for example 5-25 (minimum 5 N•m, maximum 25 N•m).
The threaded connection is tightened until the arrow shows the required value or the limiter operates. There are also expensive and exact analogues - with an electronic display, but for the operation and repair of passenger cars a mechanical version is suitable.
The photo shows the main types of such keys.
- With preset torque, not adjustable.
- With preset torque value, adjustable.
- With tightening force indicator.
- With digital display of applied torque.
Watch the video on how to use a torque tool:
How to use the torque wrench scale:
How to use a torque wrench:
Types of designs of rear wheel hub units
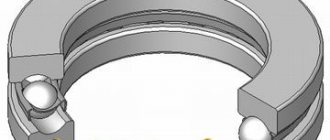
- HUB-1 has two rows of angular contact ball or roller assemblies enclosed in cage cells.
The factory seal reliably seals the internal parts from water and abrasive particles. The lubricant prevents friction forces. Operation under normal conditions reaches a mileage of 100,000 km.
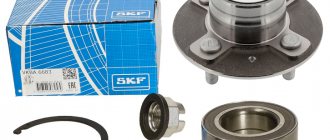
- HUB-3 is a prefabricated structure with a flange.
The flanges are attached: one to the fist - the second is connected to the brake and wheel disc. If it fails, after approximately 150,000 km of run under normal operating conditions, the whole thing is replaced. HUB-3 with splines is designed for drive wheels.
Also, built-in ABS/speed sensors are added to the design of these bearings.
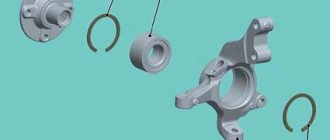
- Two single row bearings are pressed inside the hub.
They are pressed into the hub on both sides, the assembly is pressed onto the knuckle axle and secured with a hub nut. The design is typical for non-driving rear and front wheels of some car models. They are equipped with oil seals and, in some cases, an adjusting spacer ring.?
How to tighten a hub nut without a torque wrench
Many car enthusiasts, when repairing their car, consider it not advisable to purchase torque wrenches or other specialized devices (pullers, etc.). There is a good way to tighten the fastener to the required torque without using a torque gauge.
The following equipment will be required:
- Ratchet with a head for a lock nut;
- Pipe for extending the ratchet to create the required “shoulder”;
- Roulette;
- Marker;
- A load that can be hung on the “shoulder” (for example, a 32 kg weight).
The essence of the method is to calculate the moment using the formula from elementary physics classes:
M = P•l, where
P is the applied force, N; l is the distance from the hub to the point of application of force - the “shoulder”, m. The ready-made formula for our case will be as follows:
P1 = (M2•100)/(M1•10) (•10 (or •9.8) - translated into Newtons), where
P1 is the distance at which the sinker is attached to the “shoulder” relative to the torsion point, cm; M1—cargo mass, kg; M2—required torque, N•m.
Calculation example for a Ford Focus 2 car
P1 = (M2•100)/(M1•10) (•10 (or •9.8) = (45•100)/(32•10) = 4500/320 = 14 cm.
Conclusion: to ensure a tightening torque of 45 N•m, a sinker weighing 32 kg will be required, located on the pipe at a distance of 14 cm.
Sequencing:
- First screw on the locknut and tighten it slightly.
- We mark a distance of 14 cm, where the rod should hang;
- We hold the ratchet with one hand and hang the sinker with the other, thereby tightening the fastening;
- The operation continues until the fasteners stop tightening under weight, which means that we have achieved the required force. Accuracy +/- 5%.
Adjusting and checking rear wheel roller bearings
Changing the front wheel bearing on a Lada Kalina with your own hands
This procedure is performed in the following order:
- Raise the rear axle of the car, remove the wheel and axle shaft.
- We get to the bearing nut by removing the outer nut and lock washer, and loosen it by turning it a third of a turn.
- We turn the hub. It should rotate easily without touching the drum pads.
- Using a special spanner from the standard set, we tighten the bearing nut with a force of 7 to 10 kgf.m. In the process you need to rotate the hub. This will allow the rollers to fall into place.
- Next, you need to turn the bearing nut at an angle of 45 degrees and install the lock washer so that the pin located on the nut itself fits into its slot.
- Next you need to install and tighten the outer nut. The moment of force should be within 15-20 kgf.m. To twist, you need to use the same head. At the end of the procedure, the hub should rotate freely without making any extraneous sounds.
- Reassemble the wheel in reverse order and fill with oil.
Checking the quality of bearing adjustments is carried out in the field. To do this, you need to drive about 10 kilometers and check the hub. If it gets very hot (temperature over 70 degrees Celsius), then you should repeat the adjustment procedure and check the temperature again.
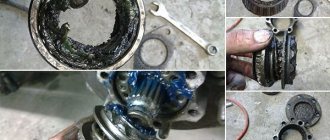
Wheel bearing. Causes of failure
Original wheel bearings (which are installed on the car from the factory) can travel more than 250 thousand km. with proper use. The bearings can withstand such mileage thanks to the durable and reliable materials from which they are made. The following will lead to earlier wheel bearing failure:
- Frequently falling into potholes at high speed. When falling into holes, the entire suspension of the car experiences enormous loads, the wheel bearing is no exception;
- Overheating of the wheel bearing , for example, due to a jammed caliper or excessive tightening. If you ignore a breakdown such as a jammed brake caliper, the hub will become very hot and lubricant will leak out of it. Further operation of the wheel bearing will become impossible;
- Loss of lubricant . A very common cause of breakdown. The manufacturer usually does not put enough lubricant in cheap wheel bearings; such a bearing will last no more than 30 thousand km. If you take a high-quality wheel bearing, then over time the lubricant from it simply burns out or loses its properties;
- Wheel bearing is not properly tightened When installing a wheel bearing, you must know at what torque to tighten it. It is very important ! Do not neglect this point under any circumstances. The bearing can either be over-tightened during installation or under-tightened. If the bearing is installed incorrectly, it can last no more than 1 thousand km.
- Improper pressing of the wheel bearing. When installing a new bearing, be sure to check for any distortions. If the bearing is pressed in crookedly, the loads will be distributed unevenly. It is easy to understand that such a bearing will not last long;
- Overloading the vehicle . If you like to load your car with a massive load, know that the first thing that takes the full impact is the wheel bearing. Rest assured, such operation of the car will definitely lead to the replacement of the wheel bearing;
- Installation of wheel rims with an offset not specified by the manufacturer or installation of spacers . Discs with a large offset will also lead to premature failure of the wheel bearings. When installing such discs, the load on the wheel bearing increases significantly.
Replacing the wheel bearing.
It becomes clear that you need to avoid large potholes on the road, buy only high-quality spare parts, trust your car only to trusted professionals and operate the car correctly. If you follow these rules, the wheel bearing will serve you for a long time.
Instructions for self-tightening wheel bearings.
- Set the vehicle to speed or set the parking brake. Place something under the wheels, such as anti-rollback devices. This is necessary to prevent the car from falling off the jack.
- Take the supplied balloon from the trunk (if equipped) and loosen the bolts holding the wheel. In this case, the car cannot be lifted.
- Prepare a place to install the jack (included in the kit). It should be firm and even. If necessary, you can put cards under the jack. Raise the wheel until it no longer touches the ground. Place a block under the lever just in case. Suddenly the jack is unreliable.
- Completely unscrew the bolts and remove the wheel.
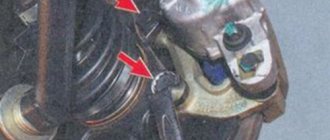
Remove the hub cap
Unscrew the old nut
you need to lock the tightened nut
- Fill the cap with new grease and replace it. Remember that if the wheel bearings are adjusted incorrectly, the toe-in of the wheels changes, as a result of which the vehicle's handling deteriorates, fuel and lubricant consumption increases, and tires wear out quickly and unevenly.
The described process can be clearly seen in the following video: Do not forget to periodically check the bearings. This guarantees your safety on the road. Best regards, PodshipnikTsentr.RU team
- ✅ Contents of the article:
- 1. What is the torque for tightening and adjusting the hub nut?
- 2. Tool for properly tightening the hub nut
- 3.Tightening method without torque wrench
- 4. Useful videos on the article
Front wheel bearing torque is the force with which the hub nut is tightened. The unit of measurement is N * M (or kgf * m). The front bearings have internal axial clearance necessary for proper bearing operation, namely:
In turn, the internal axial clearance of a double-row ball bearing is the amount by which the inner rings move relative to the outer one. To keep the end play within tolerance, the ball bearing (or roller) is adjusted by properly tightening the hub nut.
Become familiar with the front wheel bearing wiring diagram and location, as well as the ball bearing design.
The video also shows the process of adjusting the backlash depending on the tension level of the locknut:
Symptoms and diagnostics
The main symptom is excessive noise, which increases while driving. The second important sign is the presence of play in the wheel.
To more accurately determine the malfunction and understand on which side a new part will need to be installed, you must:
- At a speed of 10-15 km/h, sharply turn the steering wheel to the left, after which this extraneous noise will disappear, which means that the noise comes from the left wheel, or more precisely, from its hub bearing.
- If the noise disappears when turning to the right, then you will have to change the bearing on the right wheel.
To carry out 100% diagnostics, follow the instructions:
- Raise the car with a lift or jack.
- If the car has front-wheel drive, then start the engine and pick up speed at 70-80 km/h.
- Next, you should determine by ear which wheel is making the most noise.
- If the wheel is not driving, then you can spin it by hand.
- After stopping the wheel, you need to grab the upper part with one hand and the lower part with the other.
- Try to swing the wheel in a vertical plane.
- Even if there is slight play, the bearing will have to be replaced.
- Similarly, shake the wheel in a horizontal plane.