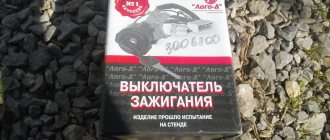
In some cases, domestic Lada Priora requires replacing the ignition switch, although this procedure is quite rare. I would like to add that this repair cannot be called complicated, everything is quite simple and clear, the main thing is to know how to remove such a device as the ignition switch with an immobilizer and follow the instructions step by step, but at the same time you need to understand that the matter must be approached responsibly.
Replacement on Lada Priora and any other car is always carried out if damage/wear occurs. The ignition switch with an immobilizer is replaced if the car does not start due to its fault, as well as if the electrical circuits of the car are faulty, because the ignition switch with an immobilizer is their starter. Let's give a simple example: you turn the key to one position, at this moment not only the car ignition system is alerted, but also other other functions of the Lada Priora, including:
- High/low beam headlights;
- Exterior/side lighting;
- Power unit cooling system fan;
- Dashboard lighting;
- Interior heating system fan.
It follows from this that a mechanism such as an ignition switch with an immobilizer must always be in full working order.
What is the Priora ignition switch return spring suitable for?
- To the beginning of the forum
- Forum Rules
- Old design
- FAQ
- Search
- Users
The return spring in the ignition switch broke on 2113.
And this is not the first time I have encountered something like this. I decided to restore the castle. I've been fiddling around for a couple of hours, I'm posting a report with photos. I apologize if this is a button accordion, but I didn’t find it. Use a curly screwdriver to unscrew the three coupling screws and two fastening screws of the steering column casing.
We remove the halves of the casing, and to remove the top one, you need to disconnect the hazard warning switch connector. We also disconnect the turn signal switch connector and the two wires going to the signal contact plate (black and brown). If you are lucky and no one has previously broken off the heads of the lock mounting bolts, then you can easily unscrew the four bolts. I was unlucky, the previous owner was for anti-theft purposes. in my opinion, it is an obstacle for amateurs, it broke off the heads. In our case, we unscrew the bolts with a small sharp chisel, but not applying force, but sharply, tapping with a small hammer. We apply the chisel to the perimeter of the remaining conical part of the bolt head at an angle, as in Fig. 3
I am sure that your bolts will unscrew as easily as mine, it took about ten minutes.
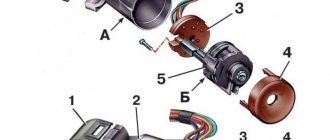
After disconnecting the connecting block, remove the ignition switch. Unscrew three screws, one is visible in Fig. 5 and two - inside the seating surface of the lock, in fact, you cannot make a mistake - there are simply no other screws there.
Carefully separate the parts of the lock, avoiding the loss of the locking ball (Fig. 8), which can jump out under the action of the spring. Most likely, this will not happen if you do not pull out the lock cylinder. Next we see that the spring, designed to automatically return the key position from the “start” position to the “ignition ON” position, is broken. Here it’s worth immediately remembering whether you have a faulty old lock lying around in the garage?
We remove the spring from the cylinder; it is not necessary to remove the cylinder itself. You can, of course, get creative and bend the spring so that by removing one turn you can make a new thrust bar. However, this is quite difficult to do; I made a new spring from a similar one, but softer and bendable. Figure 7 shows both - factory and homemade.
We insert the manufactured spring inside the cylinder, positioning the mustache as shown in Fig. 8.
We assemble everything in the reverse order of disassembly. Let's try. Everything should work. However, a softer spring deprives of some information content, I didn’t like it and I found a worthless old lock, by the way, not of the same modification as the one I had, took the factory spring from it, was not lazy, disassembled everything and installed it.
Source
Repair instructions
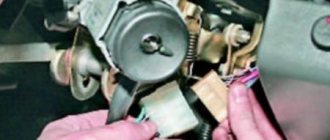
The location of the 3Z is known to everyone - this unit is located directly under the steering wheel. To properly replace or repair a device, you must follow the instructions:
- First, disconnect the battery and remove the plastic steering column cover, which is secured with bolts.
- Next, press out the fastening and disconnect the connector with the 33 wiring from the control panel wiring block. When unplugging, be careful not to damage the plug.
- Having done this, you will also need to disconnect the plug with the 3Z wires from the connector with the wiring of the immobilizer control system. Using a hammer and chisel or a drill, you need to remove the four breakaway screws and remove the assembly from the steering column. You can't just unscrew these bolts. VAZ engineers decided to use this method of installing the protection in order to protect car owners from possible thefts. This method of fastening, as you can guess, makes it very difficult to dismantle the protection, so at this stage you will have to tinker. In any case, the bolts can be dismantled or drilled out, but instead you will have to purchase new ones in advance.
- After completing these steps, you can bend the connector mount with wiring from the 3Z. The terminals with wires are removed from this connector. Next, you need to compress the latches again and dismantle the plastic cover of the device itself. If you plan to simply change the node, then this can be done at this stage. We suggest that you familiarize yourself with more detailed information on repairs - it is quite possible that simple steps will restore the unit’s functionality and save money.
- So, if you decide to repair the mechanism, then at this stage you need to press out two more plastic clips and remove the contact group from the cover.
- Next, it is necessary to carry out a thorough visual diagnosis of the contacts. If you notice that the contacts have oxidized or burnt, you can restore their functionality by cleaning them using fine-grained sandpaper. Get rid of oxidation and plaque, but do not go too hard so that the contacts do not wear off. If the damage to the contacts is too severe, then cleaning will not solve the problem - you will only need to change either the contactor itself or only the contact group.
- If everything worked out with the contacts, then you can assemble and install the protection. During assembly, pay attention to the position of the terminals with the wiring in the connector; under no circumstances should they be mixed up.
- After completing these steps, install the locking device back into place, while pre-sinking the locking rod of the anti-theft unit. To do this correctly, install the key in the 3Z and turn it to any position, the main thing is that it is not in the “0” position. If the key is replaced, then the transponders must also be changed - these are special electronic code components on the head of the key. If you do not do this, then you will also have to carry out the training procedure, as well as change the lock cylinder on the trunk and doors, and this is a rather labor-intensive process. Otherwise, you will have to use the old key to open the doors and trunk and the new one to start the engine. Agree, this is completely inconvenient, but this is only relevant for those car owners who have changed their license plate.
What is the Priora ignition switch return spring suitable for?
Added after 37 seconds You most likely have a 10-12 castle
Just put a button, and you don’t need to show off or repair anything))). To remove the old one - only an angle grinder will probably help (((.
Yes, - a button and a couple of relays. There are diagrams on the internet.
21104, and then the code (3704010, I think). I googled it - they write that this is a lock for 2113-2115 and Grants. In addition, it is almost twice as expensive as the Kalinovsky 1118 (although the Kalinovsky is not made by DAAZ, but by some other manufacturer, also supposedly Dimitrovgrad).
Life hack: Priora car ignition switch - malfunctions, replacement, price
The ignition switch on a Lada Priora car starts the engine. In order for it to start, the machine needs to be given a command. The price of a part for a Priora car is from 1,800 rubles. Replacing the ignition switch is a simple procedure that a beginner can handle.
The driver, turning the key in the lock with the immobilizer in several different positions, gives the command to turn on the ignition or start the engine. Only after this everything starts to work: the starter turns, the crankshaft begins to move, and finally the spark plugs give a spark for the first portion of the air-fuel mixture. But the operation of all these parts may not take place due to a malfunction of the ignition switch on the Priora.
If the car does not start, and you are sure that the components are working properly and the battery is charged, you will have to remove it in any case to inspect and identify the fault. Repairs can be done by anyone; it’s enough to understand all the steps in detail. If it does not help, then the ignition switch needs to be replaced.
How to change and remove it on a Lada Priora car and how many actions need to be performed, you will learn from the article.
Once the ignition switch is turned, the car remains in the ignition even when you remove the key. Unfortunately, Priora is not deprived of this; as the lock wears out, this happens.
How long it will work depends on how you use it. If you use force once, you can break the ignition switch.
Priora won't start, starter turns
Possible malfunction
| Diagnostics | Remedies | |
| There is no gasoline in the tank | On the instrument panel the fuel level indicator is at zero. | Pour gasoline |
| Battery is low | The voltage at the battery terminals without load is less than 12V. When trying to start the car, a crashing sound is heard from under the hood. | Charge the battery or replace it with a new one |
| Oxidation of battery terminals or wire terminals, their fit is not tight | When you try to start the engine, the voltage in the on-board network drops much more than at the battery terminals. In this case, a crash may be heard under the hood. | Clean the contacts, lubricate them with petroleum jelly and tighten the terminals |
| Unreliable connection of electrical circuits of engine control and power supply systems | Check the connections of the connectors and the reliability of the contacts in the blocks. | Fix faulty wire connections |
| Increased resistance to rotation of the crankshaft (scores on the shafts, bearing shells, cylinder-piston parts, deformation of the shafts, frozen engine oil, jammed generator, jammed coolant pump) | The crankshaft turns slowly. If the engine is started in severe frost, and the engine was working properly the day before, then most likely the engine oil has frozen. If you hear extraneous noise when starting the engine, check the free rotation of the pump and generator pulleys. | Use the recommended engine oil. Repair the engine. Replace the pump and generator. |
| Malfunction in the ignition system | Check for spark. | Check the circuits and devices of the ignition system. Replace faulty system elements. |
| The high voltage wires are connected in the wrong order or the wire is disconnected | Inspect. | Connect the wires in the correct order |
| The timing belt is broken or the belt teeth are cut off | Open the front timing cover and check. | Replace timing belt |
| Disturbed valve timing | Check the marks on the crankshaft and camshaft pulleys. | Set the correct shaft position |
| Malfunction of the computer (brains), its circuits, crankshaft position sensor or coolant temperature | Check the supply of +12V to the ECU, the sensor circuit, and the absence of damage to the sensors themselves. | Replace ECU, sensors. |
| The idle air regulator (IAC) or its circuits are faulty | Check the idle air control. When starting the engine, lightly press the gas pedal. If the engine starts and stalls when you release the gas pedal, the sensor is faulty. | Replace sensor |
| The fuse is blown or the main relay of the control system is faulty | Check fuse and relay. | Eliminate the cause of the blown fuse. Replace fuse and relay |
| Fuse blown, fuel pump relay. Circuit, relay or pump is faulty. | When the ignition is turned on, there is no sound of the pump running. Check the fuse. Apply voltage to the pump from the battery. | Clean contacts, replace faulty circuits, replace fuse, pump and relay. |
| The fuel filter is dirty, the water in the fuel line is frozen, the fuel line is damaged | Check the pressure in the fuel rail and the condition of the fuel lines. | Replace the filter, blow out or replace the fuel lines. |
| Insufficient pressure in the fuel rail | Check the pressure in the fuel rail, the pump strainer and the condition of the fuel lines. | Clean the filter. Replace pump, fuel pressure regulator |
| Faulty injectors or their power supply circuits | Check the injector windings with an ohmmeter. Check the chains for breaks. | Replace injectors, replace chains |
| Air leak into the intake tract | Inspect the joints and fittings of the hoses and clamps. During start-up, turn off the vacuum brake booster and plug the receiver fitting. | Eliminate air leaks, replace vacuum booster |
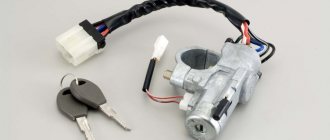
Standard ignition switch - article number, price, how it works, device
The module on Priora does not work directly with the components that initiate the engine start. For it to work properly, you need to wait a few seconds before starting until the fuel pump creates the required pressure. On the Priora, only wires are connected to it - the paths along which messages pass from the ignition switch to the electronic control unit.
The ECU of the Priora car just receives data about the position of the key and can crank the starter if this operation is “not blocked”. Due to a breakdown, it can only turn on the ignition, leaving the battery to work.
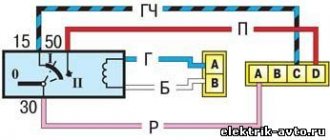
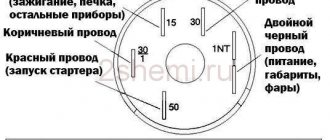
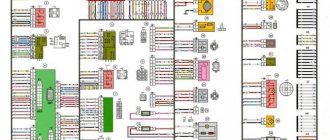
Diagram and pinout of the ignition switch on Priora
The diagram looks like this:
Using the diagram, you can track the presence of an immobilizer, as well as a blocker for excessive cranking of the starter. It starts from the battery - the pinout transmits voltage from it to point 30. Here the connection to K4 is a fuse relay. The contact group of the ignition switch of a Priora car will only work if the locking rod is in place and holds the key.
There are two positions in the diagram – I (ignition) and II (engine start). Replace the ignition switch of the Lada Priora in accordance with this diagram.
What is the device?
The ignition switch is a special device that supplies direct current to the starter traction relay. Such impulses come from the battery and are activated when the lock is turned on. Without the correct operation of the device, the car will not function fully.
Design Features
The mechanism includes two main parts. The ignition key is placed in the lock cylinder, which puts the car into operating mode and activates the lock itself. The second part is the contact group. It closes in a certain sequence, depending on the position of the key in the cylinder.
Why the system might break down
The need to replace the lock may arise for a number of the following reasons:
- wear and tear of individual parts. Burnouts or oxidation of the system drives are common;
- incorrect contacts. Violation of such circuits leads to combustion, oxidation and lack of working abilities;
- cylinder wear. The breakdown is manifested by difficulties when using the key;
- Lost car key. A trivial but compelling reason for replacement.
Basic faults
Usually the module is “sinned” when the battery is dead - nothing will turn on, even the ECU will not receive a signal. You can solve everything by charging the battery or installing a new one. But if you are sure that the key in the ignition switch has turned, but there is no “effect”, then the problem is in the module.
- Firstly, one of the dangerous problems is a faulty locking rod. As was said, it does not allow you to remove the key when it is in position I or II. If you accidentally notice that the key falls out, try to replace the block as soon as possible. It happens that replacement is taken due to an immobilizer error. This can only be done as a last resort, having accurately checked all possible “escape routes”, because reconfiguring the ECU will take a lot of time.
- Secondly, the wiring connected to the unit may become damaged, and it will become “cut off” from the Priora’s electronic control unit. It is necessary to ring all sections of the wiring and change it. In the same group of problems is the fuse relay. If the fuse is blown, the engine will not start.
- Thirdly, the spring may become deformed or break. This manifests itself in the fact that after cranking the starter and starting the engine, the key does not return to position I.
Elimination of breakdowns of the anti-theft system
Sometimes the Priora does not start due to the immobilizer - it simply does not “see” the key. An immobilizer is an electronic anti-theft device that prevents the engine from starting without the original key. The principle of operation of the mechanism is shown schematically in the photo.
The principle of operation of the immobilizer
In the body of the original ignition key there is a transponder chip 3, which contains a complex electronic code. When the driver inserts the key into the ignition, the immobilizer is activated and the electromagnetic waves 2 of the electromagnetic coil 1 begin to read the encoded code. If the codes in the memory of both the immobilizer electronic unit and the transponder match, the engine starts; if there is an error during reading, the engine will not be able to start.
In the event of a breakdown, an anti-theft device can become a serious problem for the car owner, since the location of the micro-immobilizer - a relay that ensures the functioning of the main vital systems of the car - is almost impossible to find. The mechanism can be disguised as a fuse or controller and installed in the most unexpected places, otherwise the entire anti-theft system becomes meaningless. It is possible to revive a car if the immobilizer fails, but it is quite troublesome. If the transponder is damaged, try using a spare key. If the chip is working, but the system still does not “see” the key, you need to buy another one and reflash the electronic control unit.
You will need a PIN code to reinstall the software. If it is not there, you will have to buy a new ECU.
The system may not respond to the key if the reading coil is damaged: in this case, the lock assembly with it will have to be replaced. To avoid causing problems with the immobilizer, you should not try to start the engine in severe frost or if the battery is discharged. It is not recommended to place keys near sources of strong electromagnetic waves (for example, a microwave oven). You cannot keep keys from different cars in one bunch, or remove the battery terminal while the ignition is on.
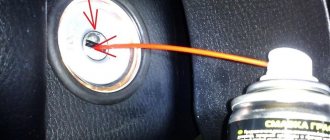
Lock lighting
Illumination of the ignition switch in a Priora car is a convenient modification in the dark. There are ways to tune anything inside your Priora. One of the most practical ways is to help yourself find the ignition switch by highlighting it. But getting a flashlight or phone out takes a long time and is impractical. Instead, you can put a backlight on this part, which will also be aesthetically pleasing to the car owner.
Such an upgrade can be purchased on Chinese websites - preferably only for Priora. To connect, climb under the steering casing, place the LED strip, and the wire soldered to it needs to be “powered.” When connected to contacts No. 8 or No. 9, when the dimensions are turned on, the backlight turns on.
Replacing the remote control battery
The remote control is equipped with a CR2032 lithium battery, the initial supply voltage of which is 3 V. If the remote control supply voltage is within normal limits, then each time you press any button on the remote control, the indicator lights up with a short flash. If, when you press any button on the remote control, the indicator lights up with two short flashes or does not light up at all, then you should replace the battery with a new one.
To do this, you need to unscrew the screw from the side of the case opposite the control buttons, separate the halves of the case, remove the board from the case, replace the battery with a new one, observing the polarity; insert the board into the case; snap the housing halves together and tighten the screw.
Button instead of ignition switch
As a replacement, the Lada Granta and many foreign car models have a START-STOP button. We can say that the start button is a matter of driver convenience, but if you want to make your car unique, you can use different options:
- removing the standard module - the steering wheel will not be blocked;
- The standard module remains, but the steering wheel lock does not work;
- The standard module remains in place, the steering wheel lock works.
You can supply a pre-formed kit, or assemble it yourself - it will be several times cheaper, but not faster.
The cost of the set will be from 1,300 to 1,800 rubles, individual parts in total from 300 to 500 rubles.
How to put
To place a button instead of a module, perform the following steps:
- Remove the negative from the battery.
- Remove the steering casing and the plastic panel to the right of the pedal assembly.
- In accordance with the instructions that came with the start button, connect the wires to the block.
- Connect the green cable from the central unit to the brake pedal switch connector.
- The wire from the button should be connected to the three-pin connector of the central unit.
- If you need to disable the steering lock, cut off only the part of the key that fits into the cylinder and leave it in the lock in the first or second position.
- Place the key at the junction of the casing.
- Test the Start-Stop button with a few presses.
Source
