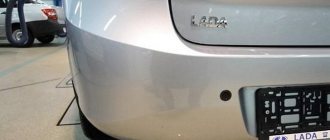
Installing parking sensors on Lada Largus
AvtoVAZ decided to equip the Lada Largus with a parking radar (popularly “parking sensors”), but only the “Lux” and “Cross” versions. Other modifications of the car do not have this useful option for a station wagon or van. Let's look at detailed instructions on how to install parking sensors on a Lada Largus yourself..
You will need : buy parking sensors, remove the bumper, prepare tools.
Attention! We mark the places for parking sensors according to the instructions from the kit. Some sensor models do not work correctly at the height indicated in the photo!
We drill holes in the bumper using a drill and a bit that comes with the kit. We fix the sensors in the holes made.
We hide the wires in a corrugation, which we fix with ties to the rear bumper amplifier. We lay the corrugation with the wires into the trunk through the existing holes in the body.
We place the parking sensor control unit in any convenient place in the trunk. You can secure it with double-sided tape, or use self-tapping screws for more secure fastening.
If you decide to place the parking sensor screen on the Lada Largus panel or mirror, then you will have to run the wires from the trunk to the front of the car (under the floor covering). And if you place the display in the trunk near the passenger’s seat belts, then all the wiring will be located only in the rear, and you can observe the sensor signals through the interior mirror.
Let us remind you that the trunk of the Lada Largus can be modified, for example, by making a flat floor.
Source
Refinement of the stove motor
This part, probably, would have been better called “Refinement of the heater motor activation mode”, since we will be talking specifically about eliminating a kind of “bug” - the operation of the interior heater when the ignition key is turned to the ACC position.
Indeed, the functionality of the interior heating system is in big question when the “stove” motor is turned on and the engine is not running - there is no circulation of coolant, and the coolant in the “stove” will quickly cool down and stop heating the interior.
The interior heating system of the Lada Largus can be modified in several ways
For Largus owners, there are two ways to change the operating mode of the heater motor. And both, unfortunately, require intervention in the electrical circuit of the car.
First
The first way to change the operating mode of the interior heater simultaneously with turning on the ignition is to move the wire that controls the heater relay from its standard location to any terminal that receives + 12V when the ignition is turned on. This could be, for example, a reverse switch or a fuel pump relay. That is, the thin yellow wire going to the “stove” motor relay is cut off and connected to any of the above locations.
For reference: all of the above actions are performed in the relay and fuse box located under the hood. The heater motor is controlled by a yellow wire, the reverse switch is controlled by a wire of a similar color, and the fuel pump has a beige marking.
Second
Almost similar to the first one, but the difference is that after all the manipulations we get a free fuse socket.
Again, we cut the thin conductor of the heater motor and connect it to the partially stripped yellow wire located nearby. After that, all damaged areas are isolated and fuse No. 39 in the interior fuse box is removed.
Lada Largus Namesake › Logbook › Multitronics CL-590 and its part sensors
Hello to everyone reading my meager blog)) Either the summer turned out to be hot, or laziness set in, and almost half of the summer spent outside the city... But I couldn’t write) It seems like even since May) Making up for lost time, I want To highlight a couple of fresh things in Namesake, which cannot be ignored. 1. On-board computer Multitronics CL-590
As a result, I took a computer without a voice, because there are usually enough commentators in the car))) To be honest, I don’t even remember when it was installed, like in early June.
In general, on the computer. What can I say) Until now, I have been riding on factory screen settings, because only now it became clear what exactly I want to see on three standard screens with 9 parameters.
The visibility of the display is excellent (but for some reason it’s better from the passenger side))), the computer copes with its task, the tank is calibrated in such a way that the computer starts yelling about a shortage of gasoline of about 15 liters of fuel in the tank) Why? With such a tiny expense, I forget to refuel on time and a couple of times I almost ended up with an empty tank)))) Let him yell earlier) He reads errors, but there are none yet. How do I know? During installation, there was a mistake in the form of failure to remove the battery terminal) Naturally, the car swore at me and gave an error, just like the computer. The computer erased it. Wow... I haven't gotten enough of it in a couple of months, I stare at it every day and actively use the computer))
2. Parking sensors Multitronics PU-4TC
I guess I'm becoming a lazy driver))) But I really wanted parking sensors. Two. Although the original reason was to restore the wife’s driving skills while maintaining the overall integrity of the car))) Parking sensors were purchased. One of them has already been installed back, thanks to the Sunday weather for not soaking us too much)))
Now I park without bothering and on the fly)) Of course, these parking sensors have a hefty price tag... But there is also a huge advantage, everything is displayed as it is configured in the bookmaker. Consequently, there is nothing superfluous either on the tidy, or on the glass, or on the mirror, or under it))) Complete amenities)) Towbar deduction, anti-underride, well, very nice) BC supports the connection of up to two parking sensors of its brand, the second one waits its turn. I hope it will be next weekend) For the first Namesake's BD)))
Let's finish here, things can't wait) Have a nice day and smooth roads, comrades))
Universal towbar coordination unit (TSU)
- RUB 1,990
- Description
- Reviews (0)
- Question answer
- Cost of delivery
The SMART Connect module is used to control the external lighting of a device paired with the vehicle, connected via the trailer hitch socket, without significant load on the vehicle's main network. Use and operation is possible only on vehicles with negative grounding to the vehicle body (ground), a nominal battery voltage of 12 Volts and an on-board voltage of 9 to 15 Volts.
The electrical coordination unit for the towbar and the vehicle is necessary when installing the towbar on modern cars equipped with new electronic systems to improve the comfort and safety of drivers (ABS, TSP, ESP, etc.).
In vehicles equipped with such systems, directly connecting a conventional socket to the trailer hitch will damage the vehicle. Installing a Smart Connect matching block eliminates additional load on the vehicle's electrical network and stabilizes the network voltage. The connector is resistant to voltage surges and short circuits, as it connects directly to the car battery through a 15 A fuse.
How to find out the cost of delivery of goods? Very simple!
Place all the desired items in your cart (via the green “Add to cart” button) and click the “Place an order” button.
On the ordering page, enter your exact address, after which the site will show all possible delivery methods with prices and terms.
The cost of delivery by Russian Post starts from 180 rubles, depending on your address, the weight of the parcel and its cost.
The cost of delivery by transport companies starts from 200 rubles, depending on your address and the dimensions of the parcel.
We recommend watching
Towbar (tow hitch) for Lada Vesta with installation kit. Towbar hook..
Towbar (tow hitch) for Lada XRAY with installation kit. Towbar hook (..
New items
Set of winter plugs for Lada Granta (sedan and liftback from 2015 to 2022, except Grant FL). The set consists of 2 parts..
Set of rear head restraints for Lada Granta cars (sedan, liftback). Includes 3 headrests. The headrests have 2...
Replacing the parking sensor
Another common cause of parking sensor malfunction is mechanical damage to the sensor mirror by a small stone, which, according to the “sandwich law,” falls precisely in the center of the sensor. There are two options here: contact the service, where you will hear the cost of a standard parking sensor, which will include delivery of the sensor from the USA, bonuses for the entire delivery department and a modest price for the sensor itself.
The second option is to buy a sensor that is suitable in size and operating parameters and install it instead of the standard one. In this case, if the replacement sensor is of a different color, then painting the parking sensors, which you can do yourself, can easily improve the situation. The body of the new sensor is degreased and coated with a thin layer of varnish of the color you require.
Basically, we have listed the “folk” methods and methods by which the parking sensor is repaired. The most effective way is to contact a specialized service, naturally at a reasonable cost of repair.
Basic faults
Parking sensors are in direct contact with the external environment, so the cause of most breakdowns will come from outside. The sensors are designed to help the driver assess the distance to the nearest objects behind them - therefore damage to the parking sensors is unlikely due to an impact. However, this happens more often than failure of the wiring or system control unit.
The main reason for the failure of Vesta’s parking sensors is simple dirt. The system itself will report the existing problem. You will hear a loud, long, continuous tone followed by a series of short beeps indicating the following:
- one short signal – the left parking sensor is faulty;
- two short beeps – center left;
- three high-pitched sounds – the central right parking sensor is broken;
- four – respectively right;
- Five beeps indicate problems in the control unit.
After this, the system turns off. You can try to clean the parking sensors with a soft cloth (in no case using sharp objects) and try to put the Vesta parking sensors back into operation. Usually, the system starts to operate in normal mode. If this does not happen, contact service or find the problem yourself. It could be:
- current leakage in the system, poor contact along the wire harness;
- the parking sensor control unit is broken;
- alarm unit is broken;
- sensor is damaged.
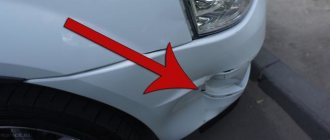
Lada Largus DA4A Mobile › Logbook › Installed parking sensors and two reverse lights
Good day to all.
On Saturday, my eldest daughter graduated from first grade. After the lineup we went to the dacha to celebrate, beer, barbecue. I decided to install parking sensors, otherwise it would lie idle for so long.
Process and photo report 1. I applied masking tape and marked the locations for the sensors. I found the middle and made the distance between the sensors 40 cm.
2. Drilled the holes. I removed the wheels and protection to remove the bumper.
Here is such a lopina in the right defense, the consequences of climbing on the floodplain.
3. I removed the bumper and installed the sensors.
4. I put the wires into the corrugation and secured them with ties
Device selection
Today, on the market for products in this segment for Renault models, you can choose a fairly large number of different parking sensors, both wired and wireless. The most popular and popular among owners are such models of wired kits as Masterpark 2-6, Masterpark 6-WN, CRS-9701, AIRLINE APS8L02.
After you have become familiar with the principle of operation and have chosen the appropriate parking sensor option for yourself (see the article “Parking sensor choice, reviews”), you will be faced with the question of installing it. You can simply install parking sensors by driving the car to a car service center, but the option of installing parking sensors yourself also has the right to life. Moreover, with the proper attitude, attention and skill, installing parking sensors is not such a problematic matter.
Rice. 1 Appearance of a kit for installing parking sensors with your own hands
The installation of parking sensors will be shown on a Renault Logan car, but the essence of installing parking sensors for all other car models is of course the same by default.
First of all, you need to prepare the installation site. The parking sensor unit itself is usually installed in the rear of the car. For example, on the “coat” of the wing using mounting tape. That is, you will need to remove everything from the trunk and remove the upholstery inside it. The bumper needs to be marked. In this case, it is best to do this after washing the car, that is, on a clean bumper.
The markings for the centers of the sensors must be done so that the installed parking sensors cover the maximum area of the rear of the car when moving backwards; they should not be installed in a line, thereby duplicating the readings of neighboring sensors. Space the outer sensors onto the radius parts of the rear bumper, and evenly install the remaining sensors between them. The height of the installed sonars should be about 0.5 m from the ground surface.
Marking is best done with a soft nib marker. It does not scratch the paintwork; accordingly, the previously planned installation locations for parking sensors can be adjusted without unpleasant consequences. The marker can be erased with alcohol or water.
Disconnect the battery from the on-board network, this will allow you to avoid unwanted short circuits during the installation of parking sensors.
We remove one of the rear lights, firstly, in order to pass the wires to the block and secondly, to connect to the power supply for the reversing light. The power supply for the reversing light will also simultaneously power the parking sensors itself when the car is moving backwards. The wire can simply be soldered to the conductive path of the flashlight. Red "+" and black "-".
Rice. 2 Solder the parking sensor power wire to the light track
Drill holes in the bumper. Often, parking sensor kits already include a cutter in the size for the installed parking sensors.
Rice. 3 Mill for drilling holes for parking sensors.
Engine range
Largus was initially equipped with Renault 8 and 16-valve engines - K7M and K4M. At the moment, these engines are no longer available; there are configurations only with VAZ power units.
For X Ray Cross there are 2 engine options:
- The Nissan H4M engine, also known as HR16DE, with a power of 113 hp is installed with the Jatko variator. With.
- There will also be configurations with a 1.8-liter VAZ engine producing 122 hp. With.
There are 2 engine options available for the Lada Vesta:
- Vazovsky 1.6 l, 106 l. With.
- 1.8 for 122 l. With.
- Nissan N4M.
There are 3 engine options for the Lada Granta:
- VAZ 8-valve.
- 16-valve.
- Paired with a Japanese automatic transmission, the Priorovsky 126 engine produces 98 hp. With.
Now all VAZ engines are equipped with a plugless piston. The wells in the pistons are designed for the full stroke of the valve, which eliminates the possibility of its deformation if the timing belt breaks. I consider this a significant advantage.
Tags: parking sensors, 2115
Comments 14
Of course he's handsome! Well done! I like it) where did you get it and honestly, how much?
BC 2600 + parking sensors 2100. I bought it in the online store www.ulmart.ru/ It’s cheaper and they deliver it in 1 day))
Thank you, this store is right next door to me)
Is this a trip computer with a parking sensor connection? Or a separate device?
Yes, and a compatible parking sensor for it must be purchased separately.
Maybe it seemed so in the video, but the feeling was that he was slowing down with distance! Tobish delay in distance reading.
No, I messed up a little with the video being out of sync. It doesn't lag, everything works smoothly.
Yes, it’s clear that this is cool) but it’s a pity to pay 2k for such crap
Well, of course there are cheaper Chinese ones))
these parking sensors cost a little cheaper than the BC itself)) 2 thousand or even more) IMHO the machine is not that big for installing this device) but sometimes it’s useful)
good show off is worth more than money
these parking sensors cost a little cheaper than the BC itself)) 2 thousand or even more) IMHO the machine is not that big for installing this device) but sometimes it’s useful)
I agree that it’s not mandatory, I’m already used to the dimensions. But honestly, it gives confidence in confined places, and also helps in the dark when it’s hard to see =)
Tips for motorists
For many car enthusiasts, the appearance of modern cars with parking sensors installed on them is still a novelty. The benefits of this device when operating a car in urban conditions are enormous. Parking in crowded parking lots becomes much easier. However, the novelty of this device frightens drivers of such cars. Many of them do not know how to use this device correctly, how to maintain it, and what to do if even minor problems occur.
A few words about the signs of parking sensor malfunctions
In most cases, failures of such a system occur due to failure of the sensors of this system or broken wires, oxidation of contacts and other similar issues. Much less often, failures occur due to problems with electronic components. One of these signs may be a rather prolonged squeak, for no apparent reason. Most often this happens when the installed sensors of this system are dirty.
Another reason for this phenomenon may be incorrect setting of the sensitivity of the sensor of this system. You can adjust the device yourself; for this, the system has a special trimming resistor. Often for such actions the system may be triggered by individual tall grass or something similar.
A little about troubleshooting such problems
Experts recommend starting the search for problems by thoroughly inspecting the wiring harnesses, their connectors, and the integrity of the sensors. Broken wires need to be connected, it is best to do this by soldering, followed by insulation of the connection point. The dirt that gets on the connector terminals leads to their oxidation. You can get rid of such deposits with rust remover, but not with sandpaper.
Car owners and repairmen note the failure of sensors; destruction often occurs from various objects falling on their lenses. Such devices cannot be repaired; they can only be replaced with new products. You can adjust and install such devices from other car models. Another reason for such failures may be a short circuit in the wiring from the sensors to the electronic control unit.
This can happen when the insulation of these wires cracks, shorting them out and causing the electronics to malfunction. Only restoring damaged insulation will not solve the problem; you need to diagnose and configure the control unit. Moisture getting into the connections also disrupts the operation of the parking sensors system, but after drying, in most cases, its operation is restored.
Parktronic or parking radar is a small device that not only makes parking a car easier. It also ensures road safety by signaling if an obstacle or another vehicle is too close. And if the car’s parking sensors are broken or simply don’t work, then for inexperienced drivers, as well as those who are accustomed to its constant prompts, this can become a real problem.
Work order
To install parking sensors on the rear bumper of a Renault car, you will need tools and materials such as a drill with a cutter of the required diameter, a screwdriver, pliers, insulating adhesive tape, and mounting tape. Moreover, depending on the manufacturer of the accessory, the mounting tape and cutter may be included with the main device.
At the first stage of work, it is necessary to uninstall the right rear light of the Renault Sandero, for which the decorative trim is removed and the electrical power supply cassette to the headlight unit is disconnected. Then the long screw that secures the rear light is unscrewed. You can unscrew it without any key thanks to its unique design.
TOWER / REMOVABLE SQUARE / LADA LARGUS C 2012
- Description
- Characteristics
- Benefits
- Reviews 2
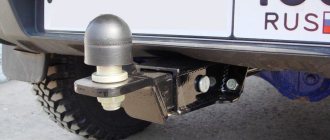
A towing device (towbar) with a removable square for a LADA Largus passenger car is used for towing trailers with a car (tractor). The PT GROUP company produces towbars, the installation of which uses the maximum possible number of standard (provided by the automaker) attachment points, which allows you to optimally distribute the load on the car body. Manufacturer: PT GROUP Car make: LADA Car model: LARGUS, LARGUS CROSS Year of car production: 2012, 2013, 2014, 2015, 2016, 2022, 2018 Functionality: The towbar is designed for towing trailers with a car Material: Steel (PPK) Weight: 13 kg Maximum towing force: 1300 kg Brand: Lada A square towbar or, as it is also called, an American towbar on the LADA Largus, is very easy to use, thanks to the quick-release part, while the towbar frame and bracket are hidden behind the rear bumper and do not protrude beyond the dimensions of the car . In our online store you can buy a tow bar for an American square, the frame of which is installed in the standard places provided by the manufacturer. The outlet from the frame is a thick-walled pipe with a square cross-section and a through hole for the locking pin of the towbar. The diameter of the ball is 50 mm.
Advantages of the quick-release towbar “American square” produced by PT GROUP
- The trailer hitch (towbar) / removable square is installed in the standard places of the car provided by the manufacturer.
- The hitch ball is made of stainless materials and has a presentable appearance even after several years of use;
- Unique multi-layer painting technology;
- Only galvanized hardware is used in the complete set of products.
Advantages of the tow bar design: removable square
- It takes no more than 10 seconds to remove/install the traction bracket;
- No special tools required for removal/installation;
- In the main unit it is possible to use other products with a “square” fastening;
- The ability to adjust the horizontal level of the hitch within the lowering of the tow bar by turning the removable bracket over;
- Possibility to replace both the entire removable bracket and the tow ball separately
Material
The towbar is made of high-strength steel ST3. The metal is powder coated.
Installation of trailer hitch (towbar) on LADA Largus
You can install the tow bar yourself; it is important to carry out the installation strictly following the detailed instructions for the product.
Equipment
The trailer hitch is equipped with everything necessary for installation on a vehicle. A complete list of parts is provided in the installation instructions. Attention! The electrical kit is not included in the towbar package. It is purchased separately.
Which model to choose
The operating principle of parking sensors is based on the reflection of an ultrasonic signal from an obstacle and its reception by the sensor. Their number determines the size of the controlled area. The more sensors, the fewer blind spots behind the car. Due to the fact that the power of the emitters is low, the parking sensors can detect an obstacle at a distance of 2-2.5 m. The change in the distance to an object for different models is fixed from 1 to 10 cm, and the minimum operating distance of the radar is 10-30 cm. The characteristics and quality of parking sensors depend on the manufacturer.
The best selling kit is Spark 8M. The optimal number of sensors with a diameter of 18 mm allows you to detect an obstacle at a distance of 2.5 m and stop 10 cm from it. The device has a high signal processing speed (0.15 seconds), which makes it possible to record changes in distance every 1 cm. The device has an initial learning function that minimizes the number of false positives. During operation, the device performs self-diagnosis and reports problems with an audible signal.
Parktronic ParkMaster 4-DJ-92, in addition to sensors, includes a rear view camera. The equipment is connected to the standard head unit, since the package does not include a display. The device has a voice notification function about detected obstacles and the distance to them. The high reliability of the device made it popular among car owners.
Anti-theft system BLACK BUG BT-82L Standard
price from: 10350 i
- Description
Anti-theft system Black Bug BT-82 is designed to protect your car from theft and seizure. A high level of protection against theft is provided by the remotely controlled relay HOOK-DZ or WAIT-D.
Purpose and principle of operation
Black Bug 82 was developed specifically at the request of insurance companies; installation of the system provides additional benefits for CASCO insurance with Ingosstrakh. In accordance with the current agreement with Ingosstrakh Insurance Company, clients are provided with a discount of up to 70% on the theft risk. The risk rate for “Theft” in this case does not exceed 1%. The specified discount applies to both new cars and used cars, and is also provided for re-insurance, provided that the VT-82 system is installed on the car.
System operation
The system uses transponder technology to identify the car owner. To control the system, no action is required from the car owner. You just need to have an electronic transponder tag with you, by which the system recognizes the owner of the car. Each time after turning on the ignition, BLACK BUG BT-82 begins to search for a tag and, if it is successfully identified, disables the engine blocking. After stopping the car and turning off the ignition, after 3 seconds the engine lock is activated, and after 20 seconds the condition of the hood is checked: if the hood is closed, the hood lock is locked; If the hood is open, locking is not performed. Then the system automatically switches to energy saving mode and is in the “ignition off, engine locked, hood lock locked” state until the next time the ignition is turned on.
Anti-theft protection
A high level of protection against theft is provided by the remotely controlled HOOK-DZ or WAIT-D relay, as well as the HOOK-HLD relay specially designed for the hood lock (depending on the configuration). This electronic anti-theft device, made in the housing of a standard car relay, is secretly installed in the car and blocks engine operation in the event of an attempted theft. To control the anti-theft device, dynamic coding is used, which eliminates the possibility of reusing signals to disable the engine lock. The transmission of dynamic signals from the system control unit to the anti-theft relays is carried out via the vehicle’s standard electrical wiring. This ensures increased secrecy of the installation, since the system components are not interconnected by additional wires. It is impossible to detect the HOOK-DZ or WAIT-D relay using diagnostic equipment, since all blocked circuits are closed on a stationary machine. They open only when there is an attempt to steal and the car starts to move. As soon as the car stops, all circuits will be closed again. When the theft is attempted again, the same thing happens. The signal for blocking the WAIT-D relay is the movement of the vehicle in space. The motion sensor is located directly in the anti-theft relay housing, which allows it to make an independent decision to block the engine. The HOOK-DZ relay blocks engine operation after 6 seconds. Even if the thief removes the system control unit, the engine will be blocked.
Protection against user errors
It is known that the notorious human factor often nullifies even the most cutting-edge security technologies. That is why the BLACK BUG BT-82 system has protection for changing any settings recommended by the manufacturer and the insurance company. There is also no Valet mode, which allows you to temporarily disable the system (usually this mode is activated in case of loss of a tag or for vehicle maintenance). There are cases when careless owners simply forgot to take the system out of this mode, leaving the car unprotected. You should not discount the possibility of selecting a secret code with which to launch such a mode. Here we can also add the fact that many owners use the most primitive combinations and even cannot keep them secret. The only way to avoid this is to eliminate the possibility of shutting down the system. If the car is handed over to a car repair shop, it is not necessary to disable the anti-theft system, since it does not interfere with the operation of standard electrical equipment. The car owner simply leaves the tag to the service center staff and then picks it up when the car is accepted. It is important to note here that the system uses DID (dynamic identification dialogue) technology, which eliminates the possibility of making an “electronic impression” from a transponder tag.
Parking sensor Lada Largus, RENAULT Logan, Duster.
Dear customers, in order to avoid errors when sending parking sensor 8450000983 used in conjunction with the parking safety system (SBP) alarm control unit, please indicate your car model and year of manufacture in the “Comment” line.
Based on the name, we can confidently conclude that parking sensors are an electronic device that helps the driver park his car. There are fewer and fewer places to park a car in cities, and if there are any, you need to have a fair amount of skill to squeeze your pet between other cars. Therefore, parking sensors become an indispensable assistant when parking a car. The parking sensors will promptly report the dangerous proximity of a parking post, which you may not see because it is in the “dead” zone, or some tree stump that you have not noticed. Parking sensors will inform the driver about the danger and indicate the distance to it. For this purpose, the parking sensors are equipped with sound and light alarms. Parking sensors are a useful device, especially in city conditions.
The control unit calculates the distance to the obstacle and provides this information:
— One element of the parking sensors is an audible alarm. It is configured in such a way that the shorter the distance to the obstacle, the higher the signal frequency.
— The second indicator showing the distance to the obstacle may be a light indicator. There are several types of them. The first type is an indicator that changes color depending on the distance to the obstacle. For example, green indicates a safe distance, while red indicates immediate danger. The second type of indicators are indicators with divisions; the more divisions are lit, the closer the obstacle. Indicators with two scales show danger on the right and left.
Parking sensors have a different number of sensors. The price of the system, but also its effectiveness, depends on this. The dependence here is direct. The more sensors, the more space is “surveyed” by sensors and the driver receives a more reliable picture of obstacles around the car. Parking sensors with two sensors are ineffective, since “dead” zones can form and obstacles can get into them.
There are different types of sensor installations. The most widespread are mortise sensors. Holes are drilled in the bumper and sensors are inserted there.
The second type is adhesive sensors. This method is simple and easy to install. But there is a possibility that the sensor may come off when washing the car under high pressure.
The liquid crystal screen included in the parking sensors system greatly facilitates the work with the parking sensors and the parking itself, but significantly increases the cost of the entire system. Recently, parking sensors have appeared with information projected onto the windshield. This is the most expensive parking sensor option. But maybe some people will like it. As you can see, there are many types of parking sensors and choosing one of them is your choice.
Parking sensors without a screen are good as a range finder when driving straight, in other cases it fails. Convenient as an alarm in case of sudden appearance of a person or animal.
Allows you to “by ear” estimate the distance to an obstacle. There is no exact information about the location of the object.
Lada Largus, RENAULT Logan, Duster.
With the online store Discounter AvtoAzbuka, repair costs will be minimal.
Don't forget to share the information you find with your friends and acquaintances, because they may also need it - just click one of the social networking buttons located above.
Lada cars with galvanized body
There is no specific data on the number of elements that have been galvanized and the domestic plant does not issue them. According to various media reports, Lada cars have the following levels of galvanization:
- VAZ-2110 - 31%;
- Niva 2121/2131, Lada 4X4 - no galvanized elements, cataphoretic priming;
- Kalina 1 - 51%;
- Kalina 2 - galvanized body, not counting the roof, hood, side members front and rear;
- Priora - samples from August 2008 - 28%, from next year - full galvanization;
- Largus - There are galvanized parts, but which ones specifically are not clear;
- Vesta - the outer layer of the body is entirely galvanized (sedans - the roof is not galvanized), the station wagon is completely galvanized, the sills and bottom have anti-gravel protection;
- XRay - all parts of the body are galvanized, except the roof.ADA Vesta
How to install
Parking radar sensors are installed in the rear bumper. Work can be carried out without dismantling the body part. To properly install the parking kit on Largus, you must adhere to the following requirements:
Failure to comply with the dimensions has a negative impact on the adequacy of the readings - many false positives will appear.
To correctly mark the mounting holes, apply masking tape to the bumper. If the installation location coincides with the reinforcement of the body part, then you can move the sensor or drill the entire structure. The holes are made using a complete cutter. The sensors are installed according to the markings from left to right - A, B, C, D.
Failure to follow the placement order may result in a malfunction of the control unit.
The sensor wires are assembled into a bundle and secured with ties inside the bumper. The cable is inserted into the trunk through the existing hole. The connectors are connected to the control unit. The kit receives power when reverse gear is engaged, which is indicated by a short signal. Parking sensors, correctly installed on Largus with your own hands, will make parking safer.
see also
Comments 23
The wire that goes from the body into the bumper has rotted
Served well for almost 2 years.
Good morning, the standard parking sensors are broken, when you engage reverse gear, one short (squeaking) sound, then a long one for 3 seconds, then one short one. What does it mean? Tell.
My connector in the body has rotted due to salt, it’s very flimsy, it should probably be inside the body, but it’s on the outside
The same tops. I climbed in to look - the left sensor chip was barely holding on. I sprayed the air with WD-40, pushed it into place - and here it is, happiness: it works
Worked with frets. In six months I only changed 1 sensor, and that was because the car was in an accident. Look at the rear wiring harness and parking sensor harness. It is located on the street behind the rear left wheel under the bumper. 99% is oxidized.
Yes, same problem, 2700 mileage, month of operation and the sensor no longer works
Take it to the dealer and let them decide what the squeak is.