The need to improve the engine starting system of some models of VAZ cars produced before the early 2000s was identified during operation, which showed relatively low operational reliability of the control circuit for turning the starter on and off. To solve this problem, the designers went to some extent to complicate the circuit solutions and introduced a forced limitation on the operating time of this unit. The modification consisted of introducing an auxiliary relay into the starting circuit, the contacts of which can withstand a current of 50 A and forcibly break the circuit 12 seconds after the starter starts operating
.
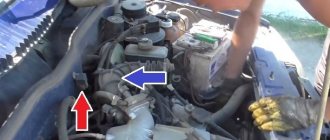
How to install an additional starter relay on a VAZ 2110 Assembly diagram
Until the year 2003, the ignition system of VAZ cars was one of the weakest points in the on-board electrical network. This is due to the generation of high voltage and the inability to unload the starter unit. To solve the problem of a weak starter, vehicle designers and developers adopted the VAZ 2110 auxiliary starter relay.
What exactly does installing an additional relay do?
- Relieves the contact group in the ignition switch
- Prevents sintering of starter contacts due to prolonged ignition
- Opens the electrical circuit when the engine has already started and the ignition key is in the “starter” position
Of course, the additional starter relay for the VAZ 2110 (diagram in the photo) is not a panacea for all the ills of on-board electronics. Experienced experts recommend modernizing the electrical network comprehensively. The list of work may include installation of capacitors, installation of an auxiliary battery, replacement of mass, and other, other work.
To this we can add that not even all the latest modifications of this car have a wiring diagram for the VAZ 2110 starter. If the on-board electrical circuit is well balanced and designed, then an additional relay is not needed at all.
How to check for the presence of an additional relay in the starter?
If you depress the gas pedal and turn the key to the “starter” position, after 12 seconds the starter will automatically turn off. This activates the cylinder purging mode. That is, fuel is not supplied to the working chamber.
If the starter does not turn off, then the relay is missing. In this case, it is advisable to install an additional VAZ 2110 starter relay (the connection diagram is noted in the instructions for this review).
What is needed to install an additional relay?
- Relay with 4 contacts with current strength from 30 to 40 (A). The most commonly used is the 30 amp relay.
- Reinforcement with a cross-section around 1.5 (mm2)
- Flat female connectors (5 pcs)
- Flat male connector (1 pc)
- Ring connectors for 6 and 8 (mm)
When the materials are prepared, let's look at how to connect the starter relay. By the way, there is an intelligible video on this topic:
Please note that car dealerships sell ready-to-install additional relay kits. This set contains both good wire and high-quality ring connectors
All elements are marked and made in the same style. It is easy and pleasant to work with such materials yourself.
Stories from our readers
“Fucking basin. "
Hi all! My name is Mikhail, now I’ll tell you a story about how I managed to exchange my two-wheeler for a 2010 Camry. It all started with the fact that I began to be wildly irritated by the breakdowns of the two-wheeler, it seemed like nothing serious was broken, but damn it, there were so many little things that really started to irritate me. This is where the idea arose that it was time to change the car to a foreign car. The choice fell on the melting Camry of the tenth years.
Yes, I had matured morally, but financially I just couldn’t handle it. I’ll say right away that I am against loans and taking a car, especially not a new one, on credit is unreasonable. My salary is 24k a month, so collecting 600-700 thousand is almost impossible for me. I started looking for different ways to make money on the Internet. You can’t imagine how many scams there are, what I haven’t tried: sports betting, network marketing, and even the volcano casino, where I successfully lost about 10 thousand ((The only direction in which it seemed to me that I could make money was currency trading on the stock exchange, they call it Forex. But when I started delving into it, I realized that it was very difficult for me. I continued to dig further and came across binary options. The essence is the same as in Forex, but it’s much easier to understand. I started reading forums, studying trading strategies. I tried it on a demo account, then opened a real account. To be honest, I didn’t manage to start earning money right away, until I understood all the mechanics of options, I lost about 3,000 rubles, but as it turned out, it was a precious experience. Now I earn 5-7 thousand rubles a day. I managed to get the car buy after half a year, but in my opinion this is a good result, and it’s not about the car, my life has changed, I naturally quit my job, I have more free time for myself and my family. You’ll laugh, but I work directly on the phone)) If If you want to change your life like me, then here’s what I advise you to do right now: 1. Register on the site 2. Practice on a Demo account (it’s free). 3. As soon as you get something on the Demo account, top up your REAL ACCOUNT and go to REAL MONEY! I also advise you to download the application to your phone, it’s much more convenient to work from your phone. Download here.
- The controller controls the on/off of the additional starter relay depending on the crankshaft speed and the time the starter cranks the engine.
- After setting the ignition key to the “Starter” position and the crankshaft rotation speed not exceeding 500 min1, the controller sends a signal to an additional relay and thus turns on the starter.
- After being turned on, the starter will work until the ignition key is in the “Starter” position for no more than 20 seconds, provided that the “correct” password has been received from the immobilizer and the crankshaft speed has not increased to 500 min1. This prevents the starter from turning on when the engine is running and its overheating during prolonged cranking.
Looking for a starter relay
If any devices on the car fail, then first of all you need to check the relay or fuse in the circuit. Therefore, as soon as after diagnosing them, it will be possible to draw conclusions about the problems as a whole.
As you know, on a VAZ-2112, even when the engine is not running, all devices are powered directly from the battery, and when it is started, the energy comes from the generator. And when the current in the circuit increases or there is a short circuit, the fuse simply blows, and a relay is provided for the most powerful devices.
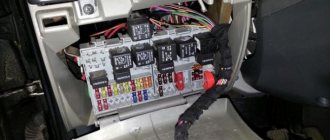
Photo of the starter relay in the fuse box
In order to get to the fuse and relay box in which the starter relay is installed, you need to find the cover on the underside of the dashboard. Then, press the locking button and fold it down.
The starter relay is marked with a red arrow
Replacing the old element with a new one must be done in the reverse order of removal.
Please note that in various vehicle configurations, additional relays can be installed on top of the unit, which are intended for certain groups of devices. But the starter relay is always installed second, on the right
Malfunction of the starter retractor relay
So, if, nevertheless, a shadow of suspicion after checking the ignition switch, battery, and also the starter switching relay falls on the starter itself, it is necessary to dismantle it for further “inspection”. Although it is possible to check the functionality of the starter and relay even before removal.
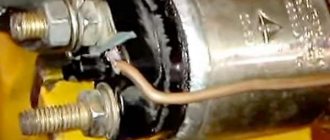
Using a screwdriver, you need to close the two contact bolts located on the back side of the assembly. In this way, voltage is supplied directly to the starter windings, bypassing the solenoid relay itself. In the case of rotation of the starter itself, the cause of the breakdown is really in the retractor. If the relay is working properly, after turning the key in the ignition switch, it will click, but the starter will still refuse to turn.
The operating principle of the solenoid relay itself is based on the phenomenon of electromagnetism. When voltage is applied to the coils of the solenoid relay, it attracts the armature. The latter pushes out the Bendix gear until it engages with the flywheel crown. At the same time, the contacts through which voltage is supplied to the windings of the starter motor are closed. Interestingly, all the above processes are carried out simultaneously. And the loss of any of them will cause the starter to become inoperable.
It is worth noting the main reasons why the starter solenoid relay malfunctions:
- Long service life of materials, and as a result their destruction;
- Burnout of the so-called nickels - contact plates located inside the retractor relay;
- Failure of the winding of the relay itself or the starter.
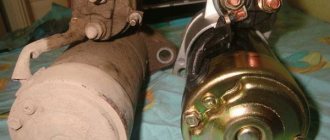
In any case, to correct the malfunction of the starter solenoid relay, it is necessary to dismantle it. Of course, you will first need to remove the starter itself from the car engine.
It is worth noting that in the vast majority of cases, the solenoid relay is made non-removable. In this way, manufacturers are trying to increase its reliability and extend its service life. Therefore, in such cases, the only way out of the situation can be a complete replacement of the solenoid relay with a new unit. This procedure is not at all complicated and will take a little time even for a novice motorist.
If the solenoid relay installed on the starter still has a collapsible design, then you can try to restore it. To do this you will need to remove it from the starter and disassemble it.
Three ways to close the car starter directly
How to make a spray gun for whitewashing with your own hands How to make a spray gun with your own hands Types of paint spray guns
Many motorists have encountered such a problem as starter failure. It can break at any moment. How to start a car if the starter does not work, but you need to drive? It is possible to start the car in this way by either closing the starter directly or starting without it. But before you do this, you should familiarize yourself with the main breakdowns of the starter and understand all the nuances.
Did you know? The starter lasts half as long as the engine, only 5-6 years. Therefore, starter diagnostics are relevant both for cars that have been in operation for several years, and for newly purchased ones.
Basic starter failures
The starter ensures the engine starts. It creates crankshaft torque at the required speed for the degree of compression and combustion of the combustible mixture. If the starter starts to work intermittently, you need to find out the reason for this behavior.
Important! The starter works with other machine systems in one starting circuit. Therefore, breakdowns can be mechanical and electrical.
If the starter does not want to turn or does it slowly, pay attention to the electrical circuit and battery:
- The battery is not charged;
- contacts are poorly secured;
- poor contact and broken wire from the solenoid relay terminal;
- damaged wire between battery and starter;
- mismatch of oil in the crankcase in terms of viscosity;
- The ignition switch contact group is not functioning.
If the starter armature rotates, but the starter cannot turn the crankshaft, this is: slipping of the freewheel or tight running of the screw thread drive.
There are times when the starter does not turn off after starting. The reasons may be: drives jamming on the armature shaft, jamming in the ignition switch, bearing wear. Such breakdowns can be corrected by replacing damaged parts.
If you notice that the starter has started to make noise. This could be: the drive gear is out of mesh, the fastening or the starter poles are loose.
The starter is subject to heavy loads, since it has to rotate a large flywheel and drive the engine piston group. Therefore, you should treat it carefully and carry out diagnostics to avoid breakdowns.
Close the starter from the pushrod
Before starting the car directly through the starter, you should find out why the starter failed.
If the reason is a malfunction of the relay, solenoid relay, or starter winding, then you can start it from the pusher. For this you will need a couple of assistants. They will rest against the trunk of the car and accelerate it, and you turn on the ignition key and first gear. The faster the assistants push the car, the faster it will start.
Did you know? Acceleration from a pusher is the most popular method of starting a car without a starter among car enthusiasts.
Towing a car
Another method to start a car if the starter does not work is towing. To do this you will need another car and a cable. If a breakdown occurs on the road, just stop any car and ask for help to start it. It won’t take much time, but you will continue on your way.
Important! Don't forget the fact that when your car starts while towing, it will accelerate, don't forget to stop when the car in front stops, don't turn off the engine when you get out of the car to release the cable
Closing with a screwdriver
Closing the starter with a screwdriver can only be done if the cause of the breakdown is the solenoid relay. You can recognize such a breakdown by the clicking sound coming from under the hood when you turn the key. This means that the retractor relay is turned on, but the drive gear does not turn the crankshaft. In such a situation, nothing can be done other than jumping the starter with a screwdriver and thus applying voltage to the windings.
To close the starter using a screwdriver, you need to set the gearshift lever in the neutral position and tighten the brake. Under these conditions, the screwdriver will act as a pull-in relay. We insert a screwdriver between the power terminals, closing them.
In order to start the car directly through the starter, it is best to resort to the help of an assistant. So this will make things easier. One will insert the screwdriver, the other will close the contacts. With an assistant, everything will go much faster and easier.
Subscribe to our feeds on Facebook, Vkontakte and Instagram: all the most interesting automotive events in one place.
Was this article helpful?Yes No
Sequence of work performed when replacing a relay
First, you should turn off the power from the battery, because while the electrical circuit is connected, it is prohibited to dismantle or disassemble the starter, otherwise a short circuit may occur and you will burn all the wiring.
- Before disassembling, thoroughly clean the starter from dust and dirt so that dirt does not get inside.
- Unscrew the brush assembly nut from the traction relay bolt and remove the contact from the bolt.
- We unscrew the coupling screws securing the relay to ground and pull it out.
- Unscrew the nuts from the end and divide it into two parts
- We take out the old core and replace it with a new one
- Reassemble everything in reverse order and install the retractor
- We check the entire mechanism and install it on the car
After all the parts have been installed on the car, we check them again for functionality, to be sure that we did everything correctly and everything is working properly for us.
Characteristics
Despite its simplicity, the UAZ-469 already in those years had an autonomous heater, two fuel tanks and excellent cross-country ability. It was possible to overcome fords, obstacles and bad roads on this SUV without any modifications, but today tuning of various UAZs, including the 469 model, is becoming increasingly popular. Amateurs equip cars with larger wheels with mud tires, lift the car and install more powerful engines. True, with the latter option, all the simplicity of the design fades into the background, because you have to completely redo the entire electrical wiring of the cars. Nevertheless, the popularity of the car is only growing.
Purpose and principle of operation of the solenoid relay
On most vehicles, the retractor is mounted in the same unit with the starter, and is designed to control the freewheel. At the end of the clutch there is a gear that rotates the engine flywheel at the time of starting, but during its operation such rotation is not allowed, as it leads to breakdown of the starter or on-board electrical network if the starter starts working in generator mode.
To do this, the retractor extends the clutch only when it is necessary to start the engine, after which it returns to its original position, removing the gear from engagement with the flywheel. The peculiarity of the solenoid relay is that the starter can only operate when it is activated. This is done to prevent tooth fractures when the rotating gears of the clutch and flywheel meet.
Inside the relay there is a coil with an armature, which is acted upon by current after the circuit is closed. The magnetic field that arises around the coil moves the armature towards it, compressing the return spring and pushing the lever, which moves the freewheel. When the engine starts, the electrical circuit of the coil opens, the magnetic field force disappears, and the return spring pushes the armature with the clutch to its original position.
UAZ starter circuit
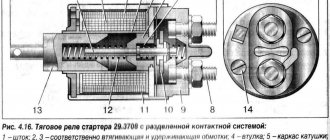
Starter 42.3708: 1 – cover on the drive side; 2 – drive ring; 3 – thrust ring; 4 – locking ring; 5 – drive; 6 – anchor; 7 – body; 8 – brush; 9 – traverse; 10 – thrust washer; 11 – adjusting washer; 12 – lock washer; 13 – cover from the collector side; 14 – contact bolt; 15 – contact plate; 16 – relay cover; 17 – return spring; 18 – rod; 19 – relay anchor; 20 – compensating spring; 21 – buffer spring; 22 – gear; 23 – M5x14 screw; 24 – tie rod nut; 25 – M6x16 screw; 26 – M8 nut; 27 – input of relay coils; 28 – M6x30 screw; 29 – lever; 30 – M8 nut; 31 – lever axis
VR device
As it becomes clear, it is the VR that directs the bendix into engagement with the flywheel crown. The entire cycle of actions is based on the principles of electromagnetism.
The VR design includes a housing, an armature, a magnetic winding, contacts and a spring.
The anchor sits inside a hollow tube (core). The armature winding is a coil of wire. It enters the tube after an electromagnetic field is created in the bobbin. If the current stops flowing, the armature moves unhindered.
The magnet inside the VR is a pair of coils. One of them performs the function of a retracting element, the other - purely retaining functions. The first retractor coil is connected directly to the electric motor and the control terminal, and the second, the holding coil, is integrated with the fuselage and the control terminal.
It is clear that a magnetic field appears in the coil after a pulse arrives at the control terminal from the battery. As mentioned above, the armature begins its work from this, compresses the spring and at the same moment the bendix is pushed out, which engages with the flywheel crown.
After the engine starts, the power to the starter stops, and the armature returns to the initial exposure under the influence of the spring. The contacts open and the bendix disengages from the flywheel.
Removing and replacing the starter relay
Before disassembling the starter relay, it must be removed along with the starter itself. In some cars this can be done from the hood side. Sequence for removing the starter relay:
- put the car on the parking brake;
- disconnect the negative terminal of the car battery;
- provide access to the starter;
- remove the conductors connected to the starter located on the relay;
- unscrew the three (usually) starter mounting bolts;
- remove the starter;
- unscrew the screws holding the starter relay to the housing (usually also 3, located at the end of the relay);
- Carefully disassemble the starter relay while holding the plug.
The starter relay is installed and connected in the reverse order. Before connecting the starter to the car, it is necessary to check the serviceability on a stand, or simply on a table, by connecting a battery to it and briefly applying positive voltage from the battery to the solenoid relay. After this, the starter is installed in its regular place and connected to the on-board equipment.
Checking with the starter removed using a multimeter
This test of the solenoid relay allows you to very accurately perform internal diagnostics and determine the condition of the windings and contacts. Dismantling the starter, depending on the make of the car, is carried out in various ways. For VAZ 2110, this procedure is carried out from below from the pit. Before unscrewing the fasteners, remove the wires (it is better to mark the terminals so as not to confuse them during assembly); you may need to remove the crankcase protection.
How to check the starter solenoid relay
As mentioned above, the operation of the solenoid relay, as well as the starter itself, is based on the principle of electromagnetism. When voltage is applied to the windings, the relay acts on the armature. This, in turn, changes the position of the Bendix gear so that it engages with the flywheel ring. At the same time, the contacts close, providing voltage to the starter windings. In order for the car engine to start, all this must happen very quickly. If at least one of the elements does not work correctly, you will not be able to start the car.
To check the starter relay, you do not need to remove this element from the car. Experts advise closing the contact bolts located on the back of the relay using a piece of wire or metal.
As a result of this, you will ensure the supply of current to the starter windings. If this caused the starter to rotate, you can conclude that the starter is working normally, and the problem lies in the relay itself.
If the retractor clicks and the starter does not turn, this indicates that the relay is probably working, and the cause of the breakdown must be looked for directly in the starter.
What does it mean “the starter takes over the current”?
The main reasons why the starter can take on current are:
- Lack of good contact on electrical wiring and elements of the ignition system;
- Sufficiently low electrical or high mechanical resistance;
- Failure of the constituent elements (due to the deterioration of the bushings, the armature begins to touch the starter when rotating). This leads to strong heating and destruction of parts. The gearbox also needs to be checked, because it may also need additional lubrication.
Your actions
To understand the true reason, it is necessary to carefully study the mechanism and check all its elements. The first step is to determine the location of this mechanism. Access to it is usually very limited, but you can get it by hand. It is also important to make sure that the battery is charged, since drivers often leave the car with the headlights on, and their work greatly drains the battery.
If the battery is in perfect order, then you should check the starter, for this you will need a power class=”aligncenter” width=”600″ height=”402″[/img] So, a thick wire is supplied from the battery to the starter, which is connected to a large bolt on relay (this is the positive terminal). You need to connect the positive contact of the multimeter to it, as a rule, this is the red wire. And the black wire with a negative contact must be connected to the ground of the car. And when you turn the key in the ignition, check what the instrument display shows. If the battery is working well, the voltmeter will show twelve volts, and the starter will make characteristic clicks. If clicks occur and the display shows less than twelve, then perhaps the reason is not in the starter, but in the battery or ignition switch.
To check the malfunction, you need to purchase a long screwdriver with a well-rubberized handle. Next, you need to disconnect the wire that comes from the ignition switch from the solenoid relay. Next, you need to short-circuit the positive terminal with the bolt from which the wire was removed, using the metal part of the screwdriver. This operation will allow current to be supplied directly from the battery to the relay. The car should start. If you managed to do this, then this means either the lock or the relay is faulty.
If you were unable to perform such a manipulation, this check did not produce any results, then you will have to remove it and deal with it. Before checking the relay, it must be cleaned of various contaminants. Next, connect the starter to the battery. We connect the positive contact of the battery to the relay output, and the negative contact to its body. As a result, a click should occur and the gears should begin to move. This way we know that the relay is working properly. If this operation does not produce results, then the relay must be repaired yourself or purchased a new one. The cost of the relay is not high. If you buy a new one, do not forget to buy the same one (go to the store with the old relay).
After checking the relay, I recommend checking the starter itself. There is a terminal in the place where the relay was; you need to connect the positive alligator clip from the battery to it, and the negative one to the housing. If the gear works, then the reason is in the relay. The second element that may cause poor starter performance is its armature.
The fact is that in a situation where the bendix rotates very slowly, and the battery is fully charged, it is necessary to remove the armature. Next, you need to check the housing winding and the winding short circuit - these are the main reasons for the failure of the starter armature. To check the functionality of this element, you need to use a tester and check the voltage between the windings and the rotor housing. The tester should show at least a million ohms, or even more. If the data is lower, the anchor needs to be replaced.
From my experience I know that checking the bendix, brushes and windings play an important role in the good performance of the machine. If the relay does not work, then it is necessary to check the brushes and the winding. To check, you need to use a regular light bulb (12 Volts) with two wires that are connected to the brush holder and to ground. When checking, the starter must be connected to the battery. If the lights come on, this means that the brushes are faulty. In the same way it is necessary to check the winding.
It is important to remember that if several starter elements break down at the same time, it is advisable to purchase a new one rather than try to replace one part at a time.
If one part fails, then it needs to be replaced. The new part must be identical to the part being replaced. It is not advisable to purchase analogues; this may lead to undesirable consequences in further work.
Video “Checking current leakage”
The recording shows how you can check at home whether there is a current leak on a JEEP car.
Signs of relay failure and their causes
The relay fails due to mechanical wear and jamming, burning of contacts, breaks in current-carrying circuits. The following indicates a malfunction of this unit:
- when trying to start the engine, the starter spins without turning the engine crankshaft;
- an attempt to start the engine is accompanied by a characteristic click without rotation of the starter, or the starter does not develop the speed required for starting;
- After the engine starts running, the starter does not turn off and again operates with a characteristic high-pitched sound.
Reasons for starter relay failure:
- breaking the current transmission circuits to the pull-in and holding windings;
- the return spring has weakened;
- burnt contacts;
- the winding is damaged;
- destruction of the hull.
How to make a start button instead of an ignition key in a car with your own hands
In older cars, often the wires from the starter itself are connected directly to contacts inside the contact group, which close when the ignition key is turned. When the starter is activated, a very large amount of energy is consumed, which means a large current flows (the contacts strike a spark). Over time, a burnt deposit forms on the contacts or they completely burn out, no longer providing reliable contact. Newer vehicles have a separate relay that closes the starter contacts when the ignition key is turned.
The main advantages of using a relay in the starter power circuit:
- Such a system is more reliable, since the relay is designed for high currents and lives much longer. - The relay can always be replaced - The contact group behind the ignition key works for a very long time, since it turns on only the relay that takes the main load.
Regardless of whether your starter is turned on by a relay or directly by a contact group, all operations to connect the starter are still performed by turning the key.
First you need to determine which contacts are responsible for the start and connect them to the start button.
To do this, you need to disassemble the plastic protection under the steering wheel of your car. Very often, a connector with all the necessary wires is connected to the contact group of the key well at the back. There should be locking tabs on both sides of this connector. You need to press on them and pull out the connector.
Historical reference
Traditionally, the UAZ 469 was produced in two versions:
- Cargo-passenger version - 7 seats and 100 kg of luggage;
- Commander version - 2 seats for passengers and 600 kg of luggage.
For reference: regardless of the version, the UAZ 469 can tow a trailer with a total weight of 850 kg.
Industry standard 1945
According to the old vehicle classification system, in force since 1945, the UAZ 469 was produced under this name, using an alphanumeric name:
- The letter abbreviation UAZ stood for Ulyanovsk Automobile Plant;
- 469 is a serial factory index assigned by the enterprise itself to its models and developments.
For reference: according to the industry standard of 1945, each automobile plant was assigned a specific numbering. For MZMA, which produced Moskvich 408 and 412, these are numbers from 400 to 449, for the Ulyanovsk Automobile Plant these are numbers from 450 to 484, etc.
1966 Industry Standard
Although at the time of the release of the UAZ 469 (1972) a new industry classification system was adopted (industry standard OH 025270-66), the car plant continued to use the name according to the old standard.
Installation process
- We prepare the wiring. We crimp the connectors.
- The new VAZ 2110 starter relay must be mounted under the hood in a place so that it is definitely not flooded with water from puddles and rain. Many specialists install the relay on the stud of the washer reservoir.
- We bring the wire from the relay to the starter and connect it to the place of the red wire (it is with the “dad”). This is the connection point for the traction relay. This way we energized the coil of the new relay.
- We put a new wire with an 8 (mm) ring connector onto the positive terminal of the starter and tighten it tightly with a bolt. This wire goes to pin 87 in the new relay. I hope the VAZ 2110 starter connection diagram is clear to everyone.
- From the new relay on pin 30 we pull a wire with a “female” connector to the starter, to the place where the traction relay is connected.
- We connect the lead from pin 85 on the new relay to ground.
- We cover all wiring with a corrugated sleeve and thoroughly insulate it so that the wiring and contacts are not exposed to moisture.
- We do a test drive.
That's it, the additional VAZ 2110 starter relay (diagram attached) has been successfully installed.
Where is the Starter Relay for VAZ 2115 Injector?
Starter relay VAZ 2115
The most likely cause of starter failure is electrical damage.
When the engine starts unsuccessfully for the first time, most people look for a problem in the starter, which is not always correct. The operation of the starter directly depends on the relay, contact connections and the availability of the necessary electricity. To check if the electric starter is working, it can be powered directly from the battery by connecting the positive wire from the terminal.
This way, you can start the engine to continue driving with a faulty starter power system. Many people try to find a VAZ 2115 starter relay in a car, where there is a component of the car’s electronic system, but the search does not produce results. This happens for the simple reason of its absence.
Perhaps the VAZ manufacturer is already equipping the new series of cars with a starter relay, but previous versions of these cars were manufactured without it. This is not critical, since the cost is negligible and the benefits are immediately visible; you can install it yourself, without the skills of an electrician.
Why is it necessary to install an additional VAZ 2115 starter relay? An additional relay ensures more stable operation of the starter with additional electrical equipment. Thus, the starter works even with a weakly charged battery, the backlight on and at low temperatures.
VAZ 2115 does not turn the starter, fix the problem
Installing the relay
for
starter
and 2110.
Do not confuse the VAZ 2115 starter relay with the repeater, which is located on the starter and performs the function of pushing and retracting the mechanism for engaging the starter teeth and the flywheel. Thus, a normal car start. Retractor malfunctions are expressed in the following manifestations:
- After the engine has started successfully, you may hear the starter whirring.
- Turn the ignition key with a simple click, the starter does not work
- try to start the engine with the key
Such manifestations are characterized by a violation of the starter and replacement of the relay.
Repair of the retractor starting relay VAZ 2115
First remove the starter by unscrewing the mounting bolts and before disconnecting the battery. Remember. The main thing. ensure the safety of repairs. After successfully removing the electric starter, you need to unscrew the solenoid relay bolts.
In most cases, the relay relay will not fold, but it can still be repaired. To do this, you will need a screwdriver, a soldering iron, a copper winding, a core, which, if you look, may turn out to be intact. In this case, you don't need to change it.
When soldering the wire with a soldering iron, you can move on to expanding the coil body. By separating the coil, you can determine its damage and replace the necessary elements.
Read the same, other reviews
- Replacing a VAZ 2114 cluster starter
Every 32,000 km of the vehicle, perform the following maintenance work on the starter:
1. Remove the starter from the engine. 2. Check the condition of the commutator and brushes. Make sure that the brushes do not jam in the brush holders. If the brush height is less than 6 mm, replace them. 3. Disassemble the starter. Replace worn parts. 4. When assembling, lubricate the bearings and shaft journals with engine oil. Lightly lubricate the splined part of the shaft, drive outlet bushings, pins and lever axis with Litol-24 grease.
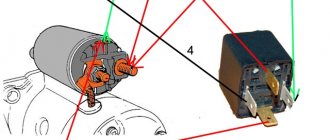
When I was looking for why the starter might not work, I found this picture from the instruction manual for UAZ vehicles.
And so today, while my girlfriend was riding a SOKA and stalled, our ignition stopped responding, since it all started in the morning, after washing the engine, a new relay was purchased in advance, the seller said that all relays are the same, I believed him and bought a standard one five contact relay.
But that was not the case, the circuit of the standard relay is completely different. And when I tried to turn on the mass, the starter simply started spinning, at that moment I compared the diagrams on the relays. I installed the dead relay, pushed it, started it, and drove around the clock. There, in response to my request, give the required relay and after showing a photograph of what was needed, with a detailed explanation of the operation diagram:
They looked at me like I was crazy and said that the factory produces the same relays for everyone and they gave me the relay as in the first picture. In response to my attempts to explain that the circuit is not the same and that when the ground is turned on, the starter begins to spin, they gently hinted to me that, my hands are growing out of my ass, I am a useless electrician. I didn’t argue, I just turned around and drove to a store that was much further away; they immediately understood me and gave me what I needed. I connected it according to how the wires were plugged into the old relay. If anyone is interested, I found a wonderful diagram on the Internet that, even without the color of the wires, you can understand what and how.
Since I have long been faced with the problem of the color of my wires not matching some circuits, here are the contacts that the colors of my wires correspond to (UAZ 31519, engine 421800)
30 - orange+violet 85 - red 86 - black 87 - violet 87b - white
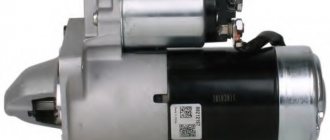
The UAZ starter is a mechanism that is necessary to start the vehicle’s power unit.
Communities VAZ Repair and Modification Blog Installing an additional starter relay
I read on the forums, I’m not the only one with a similar problem, maybe it will help someone else. I suffered for a long time with the problem of starting the car while it was hot. The problem was especially noticeable in the summer. At times the starter simply refused to turn, you turn the key, there’s a click, the instrument panel dims a little and that’s it... the starter is silent. The problem is not constant, this can happen once a week, maybe every other day. You can drive the car all day, turn it off, start it, everything works, and at some inopportune moment it stops responding to the key. You stop at a gas station or at a store and that’s it. You start running with a screwdriver into the hood and closing the contacts on the retractor, and it starts with a screwdriver. If you start it with a screwdriver and then turn it off, you can start it with the key without any problems and again you can drive for an unknown number of days or hours, etc. To. The problem is floating and intermittent. During the search for the cause, I went through the starter, changed the brushes, installed a new retractor (but in vain), cleaned all the contacts, cleaned the contact group of the ignition switch. I did all this in stages because After each action, the problem seems to disappear, but only for a while, you drive for a month and again it’s unexpected. As I found out, the problem arose at the slightest drain of the battery, like turning on a Carlson, when the engine warms up or listening to music with the engine off. After that, there was simply not enough voltage through the ignition switch, somewhere there was apparently a voltage loss from bad contacts, perhaps the contact group needed to be changed and not cleaned (but it’s not a fact that a new one would have lasted a long time). I decided to install a starter relay and at the same time I made additional mass .I bought a 4-pin 30A relay, five female connectors, one male connector and a couple of ring connectors.
I took out the BPVL 4.0 cable from the cradles. I made it in three layers, crimped it and tinned the contacts and covered everything on top with corrugation. I threw the mass onto the generator and onto the starter. I also replaced the original mass of the body, it was too flimsy.