Malfunction of the lights themselves
If during the check from the fuse box to the limit switch no problems are found, then you should move on.
Now you should test the wiring from the second limit switch connector to the stop connectors with a tester. If it is working, then you need to check the board. The printed circuit board on which the taillights are mounted is not ideal, and is one of the biggest problems of all VAZ cars. Its tracks often burn out or peel off, causing the lights to stop working. This problem can be solved in two ways - either re-solder the tracks (which can be done with a regular soldering iron, although not in road conditions) or replace the board with a new one (most motorists choose the second option).
Another reason why the VAZ 2114 brake lights do not work may be oxidation of the lamp sockets. In order to eliminate this problem, it is enough to clean all contacts from oxides that have appeared on them.
This is best done in one of the following ways:
- small grit sandpaper;
- WD-40 solution;
- kerosene;
- purified gasoline (“galosh”).
You should absolutely not use gasoline or other solvents to clean contacts.
The last option for faulty stops is the light bulbs themselves. It makes no sense to give any detailed advice here - you just need to replace the burnt out light bulbs with new ones.
By following all the tips listed above, the car enthusiast gets the opportunity to check the entire electrical circuit of the brake lights, starting from the fuse box and ending with the bulbs in the lamps. Thanks to this, the guarantee that the fault will be accurately detected and eliminated is 100%.
Additional Tips
Before each trip, especially over long distances, you should check the functionality of all lighting equipment, including brake lights. In order to reduce the likelihood of breakdowns along the way, you need to periodically check the condition of the sockets and bases of the rear light bulbs, and periodically clean them of oxides and dirt.
In case a breakdown does occur, you should always have an additional set of light bulbs and 10 amp fuses in your car, as well as a multimeter to check them.
Possible causes of signal failure
1) Fuse blown
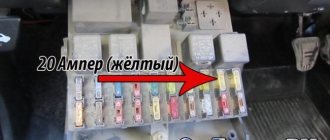
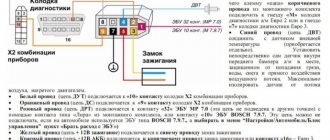
A voltage surge in the vehicle's on-board network can damage any electronic element, therefore, to avoid such a problem, fuses are provided, incl. and on the sound element. A blown fuse is a common situation, so when attempting to carry out repairs on your own, you should first check its condition. The fuse responsible for the sound supply in the VAZ 2114 is located in the mounting block. You can study the exact location of the element in the diagram below of the new sample mounting block. The fuse for monitoring and turning on the sound signal in the new type mounting block is designated by the combination F5 and is located in the left column of fuses (fifth in a row). The fuse current installed in the block socket should be 20 Amperes. Almost any car store or gas station sells kits, including 20 Ampere fuses.
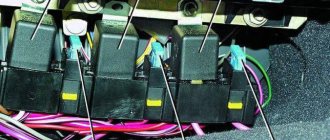
2) Failure of the electrical relay
The second most common problem is the burnout of the main relay, which is responsible for the operation of the car’s horn. This relay is located in the same mounting block along with the fuses. Unlike fuses, relays can be replaced without using a paperclip. The diagram below shows the relay responsible for the signal. To select a new relay, just visit any spare parts store for domestic cars, where they will provide you with a suitable relay. For self-checking, you can replace the failed switching device with an adjacent heated rear window relay, marked in the diagram with the combination K7.
3) Signal button failure
In addition to electrical elements, the circuit of the entire signal structure also contains mechanical parts, which over time can break or completely wear out. A button is just one such element. In the design of the VAZ 2114, this button is a plate that, when the steering pad is pressed, closes and voltage is sent to the signal itself under the hood. Periodically checking these elements for contamination can save you from sticking of the plates and their premature wear. It is worth noting that the steering pad on the VAZ 2114 can be removed quite easily using a Phillips screwdriver.
4) Wear of the slip ring
The problem due to slip ring wear occurs on cars with high mileage, or on cars where low-quality structural parts were installed. The photo below shows two slip rings, one of which is worn out. Even from the photograph you can see that the ring on the left has a large hole, due to which the sound supply may work every once in a while or not work at all. This problem is solved by replacing the ring with a new one.
5) Oxidation of contacts on the steering wheel
Moisture getting into the steering wheel housing or the age of the car are the two main reasons why the contacts on the steering wheel become oxidized. Poor contact at the junction of the wires and the plate may cause the signal to fail. To solve the problem, remove the steering wheel pad and the top plate, then clean the wires from oxides. Lubricants can also be used to seal out moisture.
6) Horn failure
Failure due to wear or sticking of the membrane is rare, but still possible. The design of the VAZ 2114 signal itself is quite reliable, but it also periodically fails. This “snail” is located right under the hood near the car’s radiator. Sometimes, to “unstick” the membrane, it is enough to hit the body. If this does not help, you can always disassemble the case and clean the mechanism. As a last resort, you can buy a new “snail”, since its cost is 300-400 rubles.
7) Broken wiring
The last reason for a possible failure of the mechanism is a broken wiring. Often this problem occurs after work has been carried out to install an alarm system, additional devices or other implementation into the standard wiring of the machine. Wiring rotting is also a common situation. The problem is solved by completely replacing the wiring of the electrical circuit. In general, almost any reason for a non-working signal from the list above can be eliminated quite easily (and on your own), so you should not worry and look for all the design elements in the store.
Help anyone who has encountered this. The horn started beeping on its own when you take the key out of the lock, you turn on the ignition and it stops, what the hell is this, I did absolutely nothing in the car.
1.9. Replacing light bulbs
| GENERAL INFORMATION |
Low and high beam bulbs
Low and high beam bulbs, as well as side lights, are accessible from the engine compartment.
| EXECUTION ORDER |
| 1. Remove the housing from the rear of the headlight by turning it counterclockwise. |
| 2. Disconnect the electrical connector (B). |
| 3. Remove the light bulb mounting spring (A). |
| 4. Turn the bulb holder counterclockwise and remove it from the headlight. |
| 5. Replace the light bulb. |
| 6. Insert the light bulb holder into the headlight socket and secure it by turning it all the way to the right. |
| 7. Install the mounting spring and wire connector. |
| 8. Check that the light bulb is functioning correctly. |
| 9. Attach the housing to the back of the headlight. |
| Warning Do not touch the glass part of light bulbs, especially halogen ones, with your fingers. Otherwise, before installing the light bulb in the socket, it should be washed with an alcohol solution. |
parking lights
| EXECUTION ORDER |
| 1. Remove the housing from the rear of the headlight. |
| 2. Remove the bulb holder (under the low and high beam bulb holder). |
| 3. Replace the light bulb. |
| 4. Insert the holder into the slot. |
| 5. Make sure the light bulb socket is securely seated. |
| 6. Check the installation and operation of the light bulb. |
| 7. Attach the housing to the back of the headlight. |
High beam headlight bulbs
Some vehicle versions are equipped with high beam headlights with halogen bulbs.
| EXECUTION ORDER |
| 1. Remove the cover mounting bracket (A) and remove the headlight cover. |
| 2. Compress the spring (B) securing the light bulb and move it away. Remove the bulb (C). |
| 3. Disconnect the wire connector. |
| 4. Connect the new bulb to the electrical connector and insert it into the headlight. |
| 5. Install the light bulb mounting spring. |
| 6. Install the cover and mounting bracket. |
Front direction indicators
| EXECUTION ORDER |
| 1. From the rear side of the bumper, move the fastening clip outwards. |
| 2. Remove the front turn signal bulb from the bumper; on the Ghia version, the front turn signal bulb is held by a lever located under the upper bumper mount, which must be pushed outward to remove the bulb. |
| 3. Turn the front turn signal bulb holder to the left and remove it. |
| 4. Press the light bulb, turn it to the left and remove it. |
| 5. Install the new bulb in the holder by turning it to the right, and then secure the turn signal, performing the above steps in reverse order. |
Back light
The tail light bulbs are located in a holder assembly accessible from inside the trunk.
| EXECUTION ORDER |
| CARS WITH BERLIN AND SEDAN BODIES |
| 1. Remove the holder assembly by moving the fastening stopper located at the end of this assembly. |
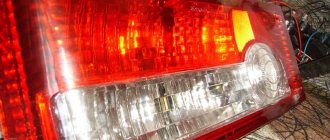
| 2. Each holder assembly contains four light bulbs: brake light (1), reverse light (2), parking light and rear fog light (3), and rear turn signal light (4). |
| 3. Press the bulb to be replaced, rotate it and remove it from the holder assembly. |
| 4. Install the new bulb into the holder assembly, rotate it, and then press the holder assembly until the mount lock locks. |
| CARS WITH COMBI BODY |
| 1. After opening the trunk, use a screwdriver to turn the fastening stopper and remove the rear light housing. |
| 2. Push back the mounting plates of the holder assembly (A) and remove it. Each holder assembly contains five light bulbs: reverse light bulb (1), tail light bulb (2), rear turn signal light bulb (3), rear fog light bulb (4), brake warning light bulb (5). |
| 3. Press the bulb to be replaced, rotate it and remove it from the holder assembly. |
| 4. Install the new bulb into the holder assembly, rotate it, and then secure the holder assembly. |
License plate light
EXECUTION ORDER
1
Using a thin screwdriver, carefully remove the license plate light assembly from its socket in the rear bumper. 2. Turn to the left and remove the bulb holder. 3
Replace a light bulb that is pressed into the holder
Replace the light bulb that is pressed into the holder.
4. Install the holder and secure the license plate lamp assembly in the rear bumper.
Trunk lighting
In some versions of the Berlin and Sedan body types, there is a trunk light bulb.
EXECUTION ORDER
1
Using a screwdriver, carefully remove the light bulb cover. 2. Turn the socket counterclockwise to remove it from the lamp shade, and then remove the light bulb from it.
Interior lamps
Interior lamps
| EXECUTION ORDER |
| 1. By setting the switch to the middle position (lamp off). |
| 2. Using a screwdriver, remove the light bulb socket and then remove the light bulb. |
Fault localization
Understanding the operating principle allows you to determine exactly why the brake lights may not light up:
- The fuse has blown. In the diagram, the fuses are marked with the letter F (from English - Fuse) and the serial number of the seat in the fuse block, for example, F3;
- poor contact at connectors;
- the light bulbs have burned out, but since the lights are connected in parallel, the likelihood that 2 lamps will burn out at once is extremely low;
- poor contact on the negative terminal of the lights. In this case, problems may begin not only with the feet, but also with the lighting of the remaining lamps in the lanterns;
- Damage to the negative track in the lamp board. From the total mass directly to the brake light lamp, the minus goes along a special path on the board. The path may collapse from water or mechanical impact;
- malfunction of the brake light switch, the so-called frog;
- broken wiring, oxidation of contacts.
Troubleshooting algorithm
To detect a fault in the electrical network, you will need a multimeter or a tester, which you can make yourself
Previously, we told you how to use a multimeter, so we won’t focus on that.
The sequence of searching for the cause of the breakdown:
- Check the fuse for the brake light circuit. The location diagram of the fuse links can be found in the repair and operating manual for your car; often the symbol of the protected circuits is located on the back of the cover covering the fuse mounting block. If the installed fuse of the required rating immediately blows, there is a short circuit (short circuit) in the circuit. Please note that the fuse can protect not only the feet, but also other circuits. Installing a fuse with an increased rating is fraught with the risk of a car fire;
- If oxidation is detected on the terminals, clean the contacts mechanically or use an aerosol contact cleaner.
- Having turned on the ignition first and holding the brake pedal depressed, check whether there is power on the positive wire that goes from the limit switch to the rear light connector. If there is power, there is a malfunction in the lights themselves;
- check whether the positive signal is coming from the mounting block to the limit switch. If + comes, but when you press the brake pedal it does not appear on the second terminal of the limit switch, then the problem is in the “frog”;
- If there is no + at the limit switch terminal, examine the circuit up to the mounting block. If the wire is intact and securely fastened in the connectors, then the problem is in the mounting block.
Malfunction of LED brake lights
If, after carrying out the measures described above, it is not possible to determine the reason why the brake lights do not light, you should clarify the type of lamps used. They can be made using LEDs. Their installation has a number of features. Typically, LED lamps have a certain polarity for connecting to the vehicle’s on-board network.
Manufacturers always take this into account when developing. Incorrect connection results in the lamp not lighting up. In some cases, such inclusion may lead to damage. If a connection polarity violation is detected, this indicates that the repair on the vehicle was carried out by an unqualified person.
Common causes of malfunctions
1) check the presence of incoming mass or voltage on the signal itself (on old systems, “plus” is constant, but the signal was controlled by “minus”). If there is a plus and a minus that appears, when you press the horn, replace the signals themselves (the signals are non-separable and must be replaced if they fail);
2) Check the supply voltage (fuse, relay, mounting block);
3) Power button on the steering wheel (contacts, adjustment of switches and three-lever), presence of mass on the steering column;
1) Incorrect adjustment of the steering column switch (too much “pressed” towards the steering wheel);
2) Ground circuit on the steering column (signal control wire);
All that remains is to talk about why such situations arise and what the motorist himself needs to do in order to restore the functionality of the horn.
Since a car signal consists of a fairly large number of components, the reasons must be looked for in them. To do this, it is good to understand the device, design and principle of operation of the warning system.
- Blown fuse. A trivial but common problem. The fuse is located in a special block. Look for information in the instruction manual. Sometimes simply replacing the fuse is enough;
- Burnt out relay. Since the horn is powered through a fuse and a relay, the latter is also necessarily checked in the mounting block, and changed if the problem is with it;
- Broken horn. If everything is fine with the relay and fuse, the problem may be in the device itself. To check, you can take the element and directly supply power through the battery. When the horn is working, the signal appears;
- Short circuit. The place to start your search is with the safety socket. And then move along the chain;
- The contact ring on the steering wheel is worn out. It will need to be replaced if necessary;
- The clamping contacts on the column are worn out. A characteristic feature of domestic cars;
- The contacts have oxidized. Check the contact group for rust or signs of oxidation;
- The winding on the horn has burned out. The problem is solved by replacement;
- Violation of electrical contact;
- The cable on the steering wheel where there is an airbag is broken.
In the vast majority of cases, and if desired, most of the possible problems can be solved on your own.
In the worst case scenario, you will have to carry out a comprehensive replacement, or even install a new horn or a new steering wheel. But this happens quite rarely.
Most often, motorists are faced with banal oxidation and contact failure due to rust. The problem is resolved by stripping the contacts and then reconnecting them.
If for some reason you cannot find the problem yourself, or do not dare to take on the task of correcting the current situation yourself, contact experienced specialists. They will quickly carry out diagnostics, find the source of trouble, and fix the breakdown. But directly for your money.
https://youtube.com/watch?v=57YYBhpnBl0
Have you ever encountered a failure of the steering wheel signal? How did you troubleshoot the problem and what was the cause of the problem? Did you manage to do it yourself?
How to Change the Dimensions Light Bulb on a VAZ 2110
Installation, repair and replacement of front and rear dimensions of the VAZ 2110
The SDA clearly states that it is not possible to drive in the dark or in poor visibility conditions without the dimensions included on both the front and rear of the vehicle. Today we will look at how the dimensions are placed on the VAZ 2110, what could be the cause of the breakdown, and how to fix them.
Vas 2110 with markers and DRLs
Business date, meeting
The front dimensions are called headlights and are found in the headlights in front of the car on either side of it. They are extreme on the sides of the lighting system and their name comes from the fact that they show the size of the car and the width of oncoming cars.
Various options for side and daytime lights
The rear dimensions are designed for the same mission. for you to move on. This is especially true when overtaking if you don't want someone who didn't make the real size hit your Swallow.
Adjustable position of rear lights
This is an important tip: if you suddenly have to go at any cost and you get burned, the flask cannot be replaced with a new one in the left dimension, due to its absence, do not be lazy and move it to the right. And we will tell you how to do this.
READ How to Start a BMW If the Battery is Dead
device
Headlights (front dimensions) are part of the headlight. The rear dimensions are part of the rear light of the VAZ 2110, this is one of its sections. Nearby are the rear fog lights, tail lights, turn signal, reflector, brake light and size.
Causes of breakdowns
There can be many reasons for malfunctions. The most common is that the lamps are on, which naturally prevents the side lights from turning on. Particularly unreliable in this regard are the lamps brought to us from the Middle Kingdom.
Detailed description of the submersible lamp High beam, rotation and dimensions
Do it yourself.
REPLACING HEADLIGHT BLANKS BASED ON VAZ 2110, 2111, 2112
REPLACING TUBERS
Front side lights VAZ 2110
, 2111, 2112. REPLACEMENT OF LAMP
OVERALL DIMENSIONS
OF LADA.
Although they attract more than the “democratic” price, and at any wholesale outlet, you cannot encounter them. Therefore, it may be worth mentioning the saying that we are not such rich people that we buy cheap things twice.
READ Change Timing Belt on Ford Focus 2
Good branded light bulbs will last several times longer, and you won't have to change them forever.
Bulb Dimensions
Sometimes the dimensions “blink” or the instrument panel lights flash when they turn on the parking lights. Many blame this size on the relay but can't find it. The VAZ 2110 carburetor does not have a side relay, there is only a relay for high and low beams.
For a vehicle with an injection relay, locate all fuses in the mounting block. Moreover, if the relays light up one after the other, you should immediately contact an electrician as this indicates a short circuit somewhere in the circuit and therefore a burnt out vehicle.
Mounting block and relays and fuses
Never, under any circumstances, replace a blown fuse with a larger one, or one that is not a “fault” at all.
Repair
As already mentioned, it is prohibited to move the car in the evening or at night unless it is on fire. parking lights so we will look for the cause and then fix it.
If you are sure the electrical paths are working, first make sure the bulbs haven't burned out. And if they need replacement, do it.
READ How to Change the CV Joint Boot on a Renault Logan
For the headlight, the replacement procedure is as follows:
- Open the lid;
- Disconnect the battery, or better yet, remove it. We're talking about electricity, which is dangerous;
- From the engine compartment, take the lamp with your hand, disconnect the wires going directly to the lamp from the unit;
- Remove the rubber cover;
- Move the lock to the side by unhooking the spring using the hook;
- Take this flask;
- We replace it with a new one and put everything back together.
When replacing, make sure the main lights are on.
Rear marker lamps on the VAZ 2110 are installed as follows:
- Turn off the car;
- Remove the contact part from the body side (open) the epiphany with the lamps. To do this, press the latches;
- Take this flask, replace it with a new one.
Remember that bare hands cannot touch the halogen lamp. Replace gloves. The fact is that when you touch the light bulb there will be dark spots. Moreover, this has been proven. This bulb burns out much faster.
VAZ 2114 (2113) stops do not work
There are few reasons why the brake lights of a VAZ 2114, 2113 car do not work. Let's list them all and try to figure out this problem ourselves.
Stop lights (brake lights) of VAZ 2114 (2113) do not work, reasons
Either one brake light or two at once may not work.
The brake light bulb in the rear light is burnt out.
Most often, only one lamp burns out, but sometimes two lamps burn out.
In this case, you will have to replace the lamp with a new one or a known good one. The brake light uses a P21W lamp. Similar lamps for the turn signal, reverse light, and fog light are in the same rear light. They can be used to check the brake light by replacing it.
The contacts in the stop lamp socket have oxidized
In this case, a “break” occurs in the electrical circuit of the lamp. Most often, in this case, one brake light will not work, while the other will be on.
To restore contact, you need to turn the light bulb in the socket several times, or remove it and clean the oxidized contacts with fine-grained sandpaper.
The wiring block for the rear light is faulty (chip)
Either it is not securely fastened, or the contacts have oxidized. In any case, there will be an open circuit in the electrical circuit.
It is necessary to remove and put the block on the terminals of the rear light board several times to restore oxidized or unreliable contact. Subsequently, you can clean the pins on the board and the wire tips in the connecting block.
The fuse in the mounting block has blown
If the fuse is blown, both brake lamps in the taillights will not light.
The electrical circuit for turning on the brake lights of the VAZ 2114 (2113) is protected by fuse F3 (7.5A) in the fuse and relay mounting block. Check the integrity of the fuse. If faulty, replace with a new one. If the fuse is blown again, you should look for a short circuit in the circuit. According to the connection diagram shown below.
The track in the rear light board has crumbled
As a result, the electrical circuit will be broken (“open”), and the brake light lamp will not light up.
It is necessary to remove the rear light board where the brake light is not illuminated and inspect it for damage to the tracks. If you cannot visually detect the location of the damage, you should “ring” the tracks with a multimeter or test lamp. Wiring is soldered to the damaged track and the board continues to function. For details, see the article “Checking the rear light board.”
The rear light ground is missing
In this case, one or two lights may not work. The negative wire of the lamp of each of the rear lights comes out of its connecting block of wires (chips) and is attached to the body next to it. Over time, this connection oxidizes and the contact disappears (the circuit opens).
It is necessary to unscrew the nut securing the tip of the negative wire to the body. Clean the pin and tip. After which the contact will be restored and the stop will light up.
Brake light switch faulty
If it malfunctions, both brake lights will not light up. The switch is located under the brake pedal and, after pressing it, closes the contacts of the electric stop circuit.
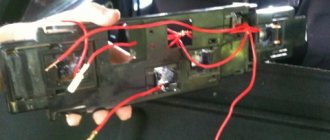
We remove two wires from it - white-red and pink-red, and connect them together with a piece of wire. The brake lights are on fire - we change the sensor, no, then we check the electrical circuit. In addition, we check the adjustment of the free play of the brake pedal, since the position of the switch may be broken, it does not work completely and the contacts do not close.
“Open” in the electrical circuit of the stop lamps
The cause of the “break” may be insecurely fastened wire harness chips, oxidation of the contacts in them, breaking of the circuit wires or their damage as a result of repairs.
Using a multimeter in voltmeter mode, you can check the presence of voltage in various parts of the electrical circuit and determine the damaged area. The best way to do this is to use a diagram.
First of all, we check the presence of voltage at the tip of the red wire in the rear light blocks to understand the malfunction in the lights or circuit. Then we check for voltage at the tip of the white-red wire of the brake light switch under the brake pedal.
Notes and additions
Before carrying out a detailed diagnosis of a malfunction of the VAZ 2114, 2113 stops, it is necessary to visually inspect the accessible sections of the brake light switching circuit and its elements, and also remember whether any repairs have been carried out on the car, since often the solution to the problem is on the surface.
TWOKARBURATORS VK -More information on the topic in our VKontakte group
The instrument panel backlight has disappeared, what should I do?
Therefore, it is worth understanding that if the instrument panel does not light up, then this problem must be eliminated immediately, but not all car enthusiasts are capable of this.
It is worth understanding that if the backlight disappears, then the problem lies somewhere in the electrical circuits. This is where you need to look for the problem. This will require design knowledge of the vehicle's on-board circuit, a tester and related tools, such as electrical tape, a soldering iron or more. Of course, it is not always possible to eliminate the problem locally, and faulty products have to be replaced completely.
Causes of malfunction
Where does the problem lie? As mentioned earlier, it is worth looking for problems in electrical circuits. Let's look at the main locations where problems may be hiding:
- Fuse.
- Backlight bulbs and their electrical circuit.
- Wiring.
- There is a fault in the fuse box.
- Damage to the board.
Solutions
So, when all the main reasons are, so to speak, “in the face,” you can try to determine the exact location of the breakdown, and also fix it yourself. As always, it is worth noting that if a motorist does not know the design of the car or is not confident in his abilities, then it is recommended to contact a specialist car service center.
Fuse
General view of a blown fuse
This is where you should start troubleshooting. To find out which fuse is responsible for the instrument lighting, as well as its location in the mounting block, you should refer to the technical documentation. Also, on the fuse cover it is written which element should be checked. If the fuse is found and replaced, but the problem does not go away, then you should look for the source in another place.
Light bulbs
Recently, it has become fashionable to install LED lighting for the VAZ dashboard with your own hands. However, not all car enthusiasts correctly connect it to the on-board network. This can cause the light to go out at the most inopportune moment. So, it’s worth checking the contacts of the entire backlight circuit.
The same applies to standard incandescent light bulbs that come with the car from the factory. Thus, a break or burnout of one of the light elements can lead to the fact that the entire backlight stops working. If you run the tester through the entire circuit, you can easily find an open circuit.
Wiring
So, a broken wire can cause the dashboard lights to stop receiving power and therefore not light up.
In order to eliminate the malfunction, you need to use a multimeter to test all the wires that are responsible for the car’s instrument panel lighting. So, any, even insignificant, wire that breaks can cause the light in the dashboard to go out.
Oxidized contacts in the mounting block.
Accordingly, there will be no contact, and not only will the light in the instrument panel not light up, but the other indicators located here may also not work. To fix the problem, you will have to disconnect the wire block on the fuse block and the parting panel itself. After this, clean the contact group and connect everything back. If everything worked, then the reason was found.
Safety block
Thus, burnout can occur directly in the branches of the block itself or in the mounting socket. To eliminate the malfunction, you will have to remove the part from the car and check it sequentially using a tester.
Many auto mechanics do diagnostics directly without removing the safety block. But only professionals can do this, but the average car enthusiast will have to remove the product. If, after all, the mounting block “died”, then the element will have to be replaced, since it is almost impossible to repair it.
Check the contact group of fuses for malfunction.
The board is damaged
Repair and diagnostic operations of the dashboard board.
There is only one way out - replacement, but many car enthusiasts manage to resurrect such elements using a soldering iron. Although, as practice shows, in 50% of cases it does not last long.
The main reason for board burning is a short circuit. In this case, often the place where the wiring is connected and the most vulnerable point – the backlight – is on fire. If incandescent lamps are installed, they will be dark or black, but the LED backlight burns out in the places where the solder is connected to the board.
How to troubleshoot?
The most common reasons that the brake light on the VAZ 2114 does not work are the following factors:
- Fuse failure.
- Broken wires in one of the sections of the circuit.
- Limit switch faulty.
- Bulbs burn out.
- Oxidation of contacts in lamp sockets.
- Damage to the contact board.
The most common and at the same time the most easily removable of the above reasons is a blown fuse. To identify such a malfunction, you need to examine the fuse box. A 10-amp fuse F3 is responsible for the brake lights, which also protects the ignition switch, computer and interior lighting.
Malfunctions in the operation of the latter may also indicate a malfunction of the stop fuse (and in this case, troubleshooting should begin with the block). If it turns out that the fuse has blown, then you should replace it with a new, similar one.
The problem may also be in the fuse block itself - sometimes the tracks on its printed circuit boards burn out or the contact legs oxidize. In order to check its serviceability, it is enough to measure the voltage at the contacts of the newly installed fuse.
Another common reason why the brakes of the VAZ 2114 do not light up is a malfunction of the limit switch that turns on the signals. It is located on the brake pedal bracket and is always in working order, regardless of whether the car engine is turned on or not.
It works automatically when you press the pedal. In order to check its serviceability, it is enough to see whether the power supply is suitable for its contacts (on one of the contacts the presence of power must be constant). In addition, if you press the pedal and thus turn on the limit switch, you can measure the voltage at its connectors.
If there is no current at the switch contacts, you should check the wire going to the limit switch from the fuse box. If the test shows that the wire is faulty (there is a break), then it should be replaced with a new one and the test repeated.
Otherwise (if everything is in order with the wire), you should disconnect it (as well as the other wire suitable for the second connector) from the switch and connect directly. If after such an operation the brake light works, then the limit switch itself has failed and should be replaced.
How to get to the right fuse
VAZ 2114 fuse box
Almost the entire electrical circuit of the VAZ 2114 is protected by knife-type fusible elements. The most powerful consumers such as headlights, electric fuel pump, etc. are already mounted via a relay. Most fuses can be found in the so-called. fuse box VAZ 2114. However, this diagram has exceptions:
- Next to the battery in the engine compartment there is a fog light relay;
- The fuses for the injection system are mounted under the instrument panel.
No special tools are required to dismantle VAZ 2114 fuses. Therefore, first of all, look at the VAZ 2114 fuse box, which is located under the hood of the car opposite the driver next to the left pillar. In order to open the fuse box, protected by a plastic cover, you need to lightly push a couple of cover latches towards you, lift it and remove it. After this, you will immediately be able to see the modules responsible for the electrical safety of various vehicle systems.
Problems with the sound signal device
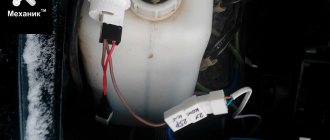
The signaling device mechanism is not protected from moisture getting inside. Why contacts and membrane oxidize. If the external contacts of the wire connecting to the signaling device are oxidized, there is no need to remove it. It is enough to remove the connector and clean the contacts. If this procedure does not help, you will have to remove the alarm device by unscrewing the screws to check the condition of the membrane. Sometimes it is enough to wash the membrane with kerosene or clean it with fine sandpaper. But if a crack or other defect is found on the membrane, then you will have to buy a new signaling device and install it.
The strength and timbre of the sound of the signaling device is regulated by rotating the adjusting screw on the front wall of its body.
https://youtube.com/watch?v=35urnLX24oA
What else are they checking?
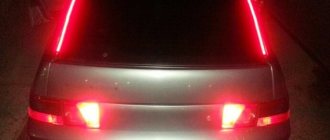
With the brake pedal depressed, check the voltage supply to the rear light connectors. Their design is far from perfect and often creates problems for owners of this model. The printed tracks at the connector connection points oxidize, which leads to a loss of power supply to the lamps. Some owners take a soldering iron and resolder the connectors, others change the rear light board assembly.
The sockets for connecting electric lamps are also not very reliable. Quite often it is necessary to disassemble the taillights to eliminate contact oxidation or troubleshoot other problems. Rarely, but sometimes the problem can be a break in the wires of this circuit, which break off at the places where they bend.
Malfunctions of the electrical signal circuit:
1) check the presence of incoming mass or voltage on the signal itself (on old systems, “plus” is constant, but the signal was controlled by “minus”). If there is a plus and a minus that appears, when you press the horn, replace the signals themselves (the signals are non-separable and must be replaced if they fail);
2) Check the supply voltage (fuse, relay, mounting block);
3) Power button on the steering wheel (contacts, adjustment of switches and three-lever), presence of mass on the steering column;
– the signal wheezes or disappears:
– the sound signal appears spontaneously when turning the steering wheel:
1) Incorrect adjustment of the steering column switch (too much “pressed” towards the steering wheel);
2) Ground circuit on the steering column (signal control wire);
It should be noted that on some KALINA and PRIORA models the signals are connected to the anti-theft system (signals the opening or closing of doors, acts as a security system and alarm), and some reasons for the malfunction of the signals may be associated with it.
Lamp burnout
This reason occurs quite often, since the light source for the rear running lights in 2114 is a conventional incandescent lamp, which during operation is subject to various vibrations, which negatively affects the lamp spiral, and it can break. This situation leads to the lamp not working.
As a rule, with such a breakdown, one of the lamps most often comes out. The chance that both lamps will fail at the same time is quite small, but it still happens. Therefore, if a malfunction of the reversing lights is detected, first of all it is necessary to check the integrity of the incandescent lamps.
Checking the lamp
The lamp must be checked after removing it from the vehicle. To do this, just take the lamp, wipe it with a dust cloth, then point the lamp at the light so that the spiral is clearly visible. There should be no breaks in the spiral; it should be intact from beginning to end.
Why the signal on the VAZ 2114 does not work: we solve the problem
Sometimes a driver may encounter such a nuisance as a faulty signal on a VAZ 2114. Such a breakdown, of course, may not seem serious, but this is only at first glance.
Driving on a highway with a non-working sound alarm device can cause a serious accident - after all, the motorist will not be able (he simply will have nothing to do it with) to signal another driver or an inattentive pedestrian.
For this reason, you should treat a faulty sound signal very carefully and try to restore it as quickly as possible. We will talk about how to do this in this article.
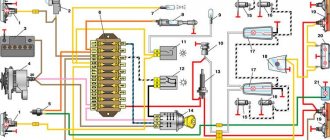
Signal diagram
Before you start talking about finding and fixing this malfunction, you should first talk about the electrical circuit of the signal (after all, without knowing it, it will be difficult to carry out repair work).
It is immediately worth noting that the electrical circuit of the sound signal is quite simple and includes:
- switch mounted on the steering column;
- fuse;
- electrical relay;
- sound signal device;
- connecting wires.
You can study the circuit diagram of the device in more detail using the following drawing:
troubleshooting
If you notice that the signal on the VAZ 2114 does not work, then the search for a breakdown should begin by checking the fuse. To do this, you will need to find fuse F7 in the common block and replace it with a new one, designed for the same amperage. If after this simple procedure the signal works, then the reason was precisely in the fuse. If not, then you should continue your search.
The next element that needs to be checked will be relay K6. It is located in the same general block. It should also be replaced with a new one (the cost of the relay is low - just over 150 rubles), and then the signal’s functionality should be checked.
After replacing the relay has not yielded results, you should proceed to checking the sound signal itself.
There may be several reasons for its failure:
- The contact of the wire going from the signal to ground has oxidized.
- The contacts inside the signal have oxidized.
- The membrane is stuck.
In the first case, you should check the wire going from the signal to the housing and, if necessary, clean its contact. Very often, such a simple operation helps restore the signal’s functionality without any additional manipulations. If, after cleaning, the signal to the VAZ 2114 still does not work, you will have to look for the reasons inside.
Sometimes it happens that moisture that gets inside the device condenses inside the signal and causes oxidation of its contacts. To eliminate this malfunction, you will need to unscrew the fastening screws, flare the cover and clean the contacts with fine sandpaper or kerosene. If you have no desire to perform such an operation, you will have to buy and install a new signal.
The third reason why the alarm device may not work is souring of the membrane, caused by moisture getting inside the housing. If this happens, then in most cases you will have to acquire a new signal, since it is almost impossible to restore the membrane.
If repair or replacement of the signal is unsuccessful, then all that remains is to check the functionality of its switch. To do this, check the position of the steering column switches. Sometimes it happens that they slide down, resulting in the contacts not touching their tracks.
In addition, if the signal to the VAZ 2114 is lost, you should “ring” all the wires in its circuit, namely:
- from the switch to the common block;
- from a common block to a signal;
- from signal to ground;
- from the switch to ground.
By following all the steps listed above, you can be guaranteed to find and fix the problem with your car's horn. It is also worth noting that if the signal works, but poorly (“wheezes”), then it can be adjusted by smoothly rotating the adjusting screw located on the front side of its housing.
Useful video
You can get more information on this issue from the video below:
How to properly replace a burnt out element
Removing the fuse box
You need to pull the fuses out of the corresponding sockets using special plastic tweezers, which can be found here, in the upper right corner of the VAZ 2114 mounting block. You cannot pry fuses on non-energized circuits with any metal objects due to the risk of a short circuit. It should be taken into account that the electrical circuits of the sound signal, alarm, etc. are always energized. To ensure safety when repairing the circuits, the circuit must be de-energized - you just need to disconnect the wire from the “negative” terminal.
It is not always possible to visually accurately determine the performance of fuses. It will be possible to make a clear decision only after the “ringing”. To do this, you will need a regular tester, which will need to be set in advance to the “dialing” mode. After this, it will be enough to simply attach two terminals of the tester to the terminals of the suspicious fuses. If a characteristic sound is heard, the fuse is good - the cause of the malfunction of the car’s equipment is not in it, but probably somewhere further in the wiring or in the device itself.
Lastly, never use copper “inserts” or fuses that are not rated for amperage. Using an inadequate replacement designed for a higher current, there is a risk of damage to the “track” of the unit’s printed circuit board and even failure of the electrical appliance. Insufficiently powerful fuses will not be able to ensure long-term and uninterrupted operation of the current consumer in the vehicle's electrical network.
What to do if the sound signal on a VAZ 2106 does not work
Car horn not working. very terrible problem. The worst thing is that they will find out about this breakdown precisely at this moment, when the signal is needed most. in an unsafe situation on the road. What could cause the signal to fail?
A malfunction such as a non-functioning sound signal on VAZ 2106 and VAZ 2114 cars is not at all difficult to diagnose and repair in the process, just study the connection diagram and follow the instructions that you will receive by reading the article to the end.
The main reasons for the non-working sound signal of the VAZ 2106. 2114 car include
Fuse failure. The very first and easiest check that can be performed if the sound signal is not working. fuse integrity. If it turns out to be Burnt, it means there may be a short circuit in the car. Try to insert a whole fuse corresponding to the rating (How to choose a fuse. Colors and ratings). If it burns out in the same way, it means there is actually a short circuit
If not, then maybe the fuse has simply exhausted its resource and you should pay attention to other conditions. The horn button does not work. The signal in most cars is turned on by a button in the center of the steering wheel
There are options with a button in the steering column switch or a certain position of this switch, but this is unique. Inside the control wheel there are essentially a whole bunch of places where contact can be lost and this will lead to the failure of the beeper. To understand where exactly they can be located, you need to understand how the sound signal in the car is generally turned on. Let's look at the diagram. Worn contacts. The pressing contacts on the steering column rub into the contact ring with any movement of the steering wheel and wear out over time. At some point, Nastya, there may be a moment when they will NOT reach the slip ring on the control wheel and then pressing the signal button will NOT lead to anything. To avoid this, when removing the steering wheel for any repairs, you need to lubricate the contacts and the ring on the steering wheel with conductive lubricant, for example, graphite. Similar treatment will reduce the friction of the contacts in the ring and extend their service life. Worn slip ring. Exactly the same malfunction can occur in the conductive ring in the steering wheel. It can also wear out and lead to signal failure. The way of fighting is the same. lubricant The wear of the pressing contacts or slip ring has a tricky property: due to uneven wear, the contact can disappear only at certain steering wheel positions. For example, when driving straight the signal works, but when turning. available. Such symptoms almost always accurately indicate problems in the “steering column” contact pair. steering wheel". Oxidized contacts inside the steering wheel. Another “steering” problem. oxidation of internal contacts. Due to the huge amount of oxides, a sufficient amount of current cannot pass through the contacts inside the steering wheel and the sound signal is silent. It is necessary to disassemble the control wheel and clean the contacts.
What to pay attention to
The brake light in the bumper must perform its function as correctly as a regular VAZ-2114 brake light. This kind of tuning can attract attention with its unusual animation. Drivers and other road users may pay more attention to this animation than to the actions of the driver himself in terms of actual braking on the highway. Therefore, not everyone has time to immediately assess the situation and may confuse turning with braking. In this case, a traffic accident may occur.
When you press the brake pedal, all the brake light bulbs should light up at the same time in order to attract the attention of the driver behind as much as possible, and only then you can turn on the necessary animation for visual display. Basically, for drivers, the brake light performs a completely different function.
If the driver makes a turn, he must first slow down before turning in the direction he wants, after which the brake light comes on. For safety, it is recommended to turn on 2 animations at once for at least 2 seconds, so that other drivers understand that the car will first slow down and only then turn. Many people act differently: first they turn on the turn signal, then they brake, so it is not always clear that the driver will brake or turn, because the flashing turn signal is difficult to see on the LEDs, although it is on.
Why the sound signal stopped working: where to look for the reason
Hi all! I can’t say that car horn malfunctions occur very often and everywhere. But we cannot exclude a situation in which the signal does not work.
Car horns are safety features. Moreover, they must be present in all vehicles and be in good condition. This will allow you to give a timely signal to other road users, inform about the approach, and prevent collisions and other dangerous situations.
But at some point it happens that the sound signal located on the steering wheel suddenly stops working. It is necessary to address the issue of diagnostics as soon as possible, since it is dangerous to continue operating the car with a non-working horn.
Troubleshooting
Below are examples of how to fix basic problems and how to easily find them.
Fuse
This is the most frequently damaged element in brake light failures, and also the most easily repaired. To eliminate the breakdown, you just need to replace the fuse on the mounting block.
The fuse responsible for the operation of the VAZ 2114 brake lights is located on the fuse block under number F3 and has a fuse-link current of 10A.
To make sure that the fuse has blown, you need to turn on the interior lighting. If the brake light fuse is faulty, the light in the car interior will not light up because This fuse F3 is responsible for lighting the interior and the on-board computer.
Below is a diagram of the VAZ 2114 fuse box.
Brake pedal sensor
The brake pedal switch is responsible for turning on the brake lights when you press the brake pedal. This sensor is located on the pedal assembly of the car and is a kind of limit switch. When you press the brake pedal, the contacts on the sensors close the power supply circuit of the brake lights and light up their lamps, signaling that the car is braking.
Quite often, the spring that pushes the contacts to close on this sensor breaks, thus the sensor does not close the contacts when the brake pedal is pressed and the brake lights do not light up.
Replacement is carried out using a set of keys.
Lamp burnout
Often, the culprit of brake light malfunction is burnt-out lamps, but it should be noted that the likelihood of two lamps burning out at the same time is very small. Most often, when a brake light bulb burns out, one light fails.
The lamps are replaced from the luggage compartment of the car.
The type of lamp installed in the rear brake light of the VAZ 2144 is P21W – 12V.
Cartridge oxidation
Over time, due to moisture, the contact on the socket into which the light bulb is inserted can oxidize and the contact between the socket and the light bulb will disappear, which will make it impossible for electric current to pass to the lamp, thereby making it impossible to light it.
This problem can be eliminated by cleaning the contact using sandpaper and the lamp contact.
Connector oxidation
Just as with oxidation of the cartridge, due to exposure to moisture, the contacts on the connector oxidize, thereby blocking the path of electric current to the lamp. With such a breakdown, most often the entire lamp suffers and not only the brake light stops lighting, but also the turn signal, clearance signal, and reverse signal.
The problem is eliminated by cleaning the contact with sandpaper and treating with alcohol.
Stop lights do not light (Page 1 of 2)
To post a reply you must log in or register.
Posts 1 to 20 of 33
1 Topic by krim 2009-02-28 13:51:24 (2009-07-31 02:57:10 edited)
- krim
- User
- Offline
- Registered: 2009-02-03
- Messages: 12
- Reputation: [ 0 | 0 ]
Topic: Stop lights don't light up
The feet stopped working! I have already changed the lamps and the frog and even the circuit boards! I checked the fuses, but based on the fact that the light in the cabin is working, it is alive! The problem remains in the wiring. I don’t know where to go anymore! I don’t want to drive without stops and cause inconvenience to others! What else could be the problem.
2 Reply from maxx_shpil 2009-02-28 14:55:37
- maxx_shpil
- User
- Offline
- Registered: 2008-11-10
- Messages: 111
- Reputation: [ 0 | 0 ]
Re: Stop lights don't light up
The feet stopped working! I have already changed the lamps and the frog and even the circuit boards! I checked the fuses, but based on the fact that the light in the cabin is working, it is alive! The problem remains in the wiring. I don’t know where to go anymore! I don’t want to drive without stops and cause inconvenience to others!
Apart from stops, does everything else work? If not, then most likely the chip with the wires just fell off, under the carpet at the driver’s feet.
3 Reply from krim 2009-02-28 14:57:06
- krim
- User
- Offline
- Registered: 2009-02-03
- Messages: 12
- Reputation: [ 0 | 0 ]
Re: Stop lights don't light up
No more problems! Everything blinks, everything lights up.
4 Reply from Diman 2009-02-28 16:48:22
- Diman
- User
- Offline
- Registered: 2009-02-13
- Messages: 54
- Reputation: [ 0 | 0 ]
Re: Stop lights don't light up
The feet stopped working! I have already changed the lamps and the frog and even the circuit boards! I checked the fuses, but based on the fact that the light in the cabin is working, it is alive! The problem remains in the wiring. I don’t know where to go anymore! I don’t want to drive without stops and cause inconvenience to others! What else could be the problem.
I haven’t changed the connectors themselves yet, I also suffered for a long time
5 Reply from krim 2009-02-28 16:54:49
- krim
- User
- Offline
- Registered: 2009-02-03
- Messages: 12
- Reputation: [ 0 | 0 ]
Re: Stop lights don't light up
Where are the connectors? I don’t think there is a problem with the wiring, some kind of crap, but where is the answer?
6 Reply from Diman 2009-02-28 18:08:09
- Diman
- User
- Offline
- Registered: 2009-02-13
- Messages: 54
- Reputation: [ 0 | 0 ]
Re: Stop lights don't light up
Where are the connectors? I don’t think there is a problem with the wiring, some kind of crap, but where is the answer?
IN CHYA. From the lights it comes to connector Sh9 12 pin, and from the frog one comes to Sh4 10 pin, and the second to Sh2 3 pin. First, check with a tester whether it comes to the connector to the lamp itself (the left one, because the right one is parallel), if not, look at the Ш9 connector, pin 12.
7 Reply from krim 2009-02-28 18:26:11 (2009-03-01 06:10:54 edited)
- krim
- User
- Offline
- Registered: 2009-02-03
- Messages: 12
- Reputation: [ 0 | 0 ]
Re: Stop lights don't light up
Thank you, we'll decide!
8 Reply from krim 2009-03-01 10:20:46
- krim
- User
- Offline
- Registered: 2009-02-03
- Messages: 12
- Reputation: [ 0 | 0 ]
Re: Stop lights don't light up
Why should I sort it out? Today I still called everything, it doesn’t come to the frog or to the fee! I removed the CYA, I want to look inside the board, but one screw is so rusty that it will be difficult to do this! I’m suffering. If I buy a new PR, will there still be options that the feet will not work?
9 Reply from Evil 2009-03-01 22:15:08
- Evil
- User
- Offline
- Registered: 2008-11-08
- Messages: 2,120
- Reputation: [ 6 | 0 ]
Re: Stop lights don't light up
If I buy a new PR, will there still be options that the feet will not work?
Even if you buy a new car, there is a possibility that your feet will not work.
If you are already planning to buy, it is better to either take it from someone, or so that you can return it later. I also remember that I bought a new one just like that.
10 Reply from krim 2009-03-03 15:26:17
- krim
- User
- Offline
- Registered: 2009-02-03
- Messages: 12
- Reputation: [ 0 | 0 ]
Re: Stop lights don't light up
I didn’t buy it, I turned to electricians, I don’t know what to do anymore.
11 Reply from Igor84 2009-03-06 13:07:16
- Igor84
- User
- Offline
- Registered: 2009-01-13
- Messages: 13
- Reputation: [ 0 | 0 ]
Re: Stop lights don't light up
I didn’t buy it, I turned to electricians, I don’t know what to do anymore.
Did you solve your problem?
I have the same problem.
12 Reply from kope'ech 2009-03-07 06:46:41
- kope'ech
- User
- Offline
- Registered: 2008-11-11
- Messages: 101
- Reputation: [ 0 | 0 ]
Re: Stop lights don't light up
I also had the same problem, it was solved by soldering the CYA
13 Reply from Igor84 2009-03-07 09:49:09
- Igor84
- User
- Offline
- Registered: 2009-01-13
- Messages: 13
- Reputation: [ 0 | 0 ]
Re: Stop lights don't light up
I solved the problem: I checked the rear lights again. I discovered that the red wire of the right brake light had come off and was shorting to ground.
14 Reply from Lexa62 2009-05-07 17:23:01
- Lexa62
- User
- Offline
- Registered: 2009-01-12
- Messages: 212
- Reputation: [ 0 | 0 ]
Re: Stop lights don't light up
Knowledgeable people help. If the interior lighting works, but the stoppers do not (they are on the same fuse), does this mean that everything is in order in the ChY regarding non-working stoppers?
15 Reply from Lexa62 2009-05-08 10:43:54
- Lexa62
- User
- Offline
- Registered: 2009-01-12
- Messages: 212
- Reputation: [ 0 | 0 ]
Re: Stop lights don't light up
I figured out why my feet weren’t burning. If you're interested, I can tell you. The problem was that when I removed the CY jumper (control relay), I inserted it incorrectly. Changed it and everything worked out.
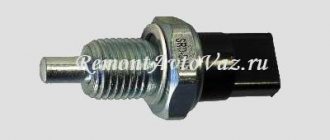
Sensor failure
The VAZ 2114 gearbox has a special sensor responsible for turning on the rear running lights. When reverse gear is engaged, a contact closes in the sensors, which sends a signal to turn on the rear lights. It often happens that this part is to blame for the breakdown of the rear running lights.
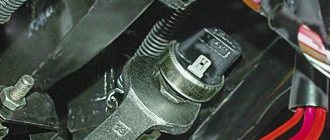
Location
The sensor is located on the gearbox housing, and it is screwed into it using a threaded connection. A connector with wires is put on the sensor to connect the sensor to the lights.
Below in the picture you can see the location of this part.
If you have problems with the rear lights, you need to look under the bottom of the car. Perhaps the problem is not even in the sensor, but in its connector, because the connector from the sensor can easily fall off, especially if you drive in deep snow.
Replacing the sensor
Replacing this part is quite simple; such work does not require special skills in car repair. You just need to prepare a 19mm open-end wrench.
- To replace, you will need to crawl under the car;
- Remove the connector from the sensor;
- Unscrew the sensor itself;
- Install a new working sensor;