Cars admin26.02.2020
Dear car owners! The other day I encountered, at first glance, a simple, but for me not obvious problem: the lights on a VAZ 2114 do not light up. The problem bothers me regularly, a year ago the lights and feet stopped lighting up, I cleaned the contacts and ground, it seemed to help for a while. Then it worsens again! Today only the turn lights are on, that's all. Where could the cause of this unpleasant problem for me be hidden?
Hello! I myself recently dealt with side lights, I had to do a lot of work, but in the end I solved my problem. I'll help you too. First check the lamps, perhaps they are simply burnt out, which is why the side lights do not work (corny, but it happens so often!). Another possibility: the fuse has blown. It needs to be replaced if this is exactly what happened. You need to climb into the mounting block and find F10 there. When it burns out, both side lights do not light up, as well as the license plate lights.
Nothing complicated, I hope you can figure it out. Go ahead. We check the contacts. They could have oxidized, which is why the dimensions do not work. We carry out a visual inspection of all the pads, take them out and put them back in. This is exactly how I solved my problem. I cleaned the contacts and everything was fine. If cleaning does not help, then we check the button itself. It may not work, unscrew it and look. Has the wire fallen off? So it doesn't work!
The most serious reason is a short circuit. But even here you can cope on your own. We take a regular light bulb and connect two wires to it: plus and minus. Next, we take out the fuse and connect the wires from the lamp in place of its contacts. If it starts to burn, it means there is definitely a short circuit somewhere. The only way to find the short circuit is to turn off everything connected to the fuse in order.
Possible causes of malfunction
1. The lamp is faulty. The most common reason why the rear lights on a VAZ 2114 do not light up is that the lamp in the lamp has burned out. This diagnostic sign is relevant if only one gauge does not work. In this case, it is enough to replace the burnt out lamp. 2. The fuse has blown In the case when several dimensions fail at the same time, the reason for this may be problems in the mounting block, to be more precise, in fuse F10. The breakdown of this fuse often leads to the fact that the dimensions of the VAZ 2114 do not light up. In this case, there may also be problems with the lighting of the interior and license plate lights, as well as the dashboard. 3. The contacts are faulty or oxidized. To exclude this cause, you will have to check the entire fuse box. In particular, you should carefully inspect the bus terminals leading to the fuse and relay box. It happens that they oxidize or become detached and therefore make poor contact. Here you will need to disconnect the contacts, clean them and connect them. If after this the rear lights of the VAZ 2114 or 2109 still do not light up or if there is a problem with the front lights, you will need to check the contacts on the headlight unit. Maybe the contacts have oxidized there. 4. The power button has stopped working. The reason why the rear lights of a VAZ 2114 or 2109 do not work may be a completely typical problem: a breakdown of the switch (button) itself. If everything is fine with the button, you should check whether the wire is oxidized. Otherwise, the contact will need to be cleaned. 5. The size fuse is on. If the fuse is constantly burning, it is possible that there is a poor contact in the fuse box or a wire is shorted somewhere. In this case, you should check it: connect a 12 Volt light bulb to its contact (via + and -). If the lamp lights up, it means there is a short circuit somewhere. To find it, you will have to turn off all devices operating in conjunction with this fuse one by one. To do this, you will have to check the wires going to the license plate illumination on the trunk roof. Usually these contacts are frayed and shorted. Another weak point, which is why the dimensions of the VAZ 2114 or 2109 do not work, may be in the cable located at the driver’s left foot on the back side of the wing under the mat. By disconnecting this cable, the license plate and interior lamp lighting are also disconnected. If after disconnecting the loop the lamp on the fuse goes out, it means there is a short circuit in this loop. In this case, you will need to inspect the entire wiring circuit in this node.
What lamps are in the dimensions of the VAZ 2114
The standard equipment of VAZ 2114 cars includes installation of the following lamps in the dimensions and front/rear headlights:
- Front dimensions – W5W;
- Stop lights/side lights – P21/5W.
Recently, users are increasingly replacing standard light bulbs in the dimensions of the VAZ 2114 with LED ones, since they have a much longer resource, consume less energy and shine with a beautiful color. In order for the diodes to produce spectacular side lights with a bluish tint, weak 1-5 diode lamps are not suitable. It is better to use 12-15 diodes.
They will give a bright white glow in the daytime, and in the dark this glow will be blue-white. It is advisable to replace all side lights, or at least the front or rear lights on both sides, with such lamps at the same time. In this case, the car looks organic, and the difference in the shades of the glow of the dimensions will not mislead other road users.
What is especially important to control at the rear dimensions
If the control light on the key does not light up, but the dimensions work, then first look at the panel wiring. Remove the key block from the socket, then wipe the contacts with alcohol. If the dimensions on the right side do not work simultaneously with the warning lamp, then check the fuse. It is worth noting that they rarely fail, since the VAZ-2114 began to install wide options that have a reliable contact pad.
If F10 or F11 still breaks down frequently, then it is necessary to check the mounting block; it may be faulty. If this unit is in working order, then check the entire electrical circuit. Sometimes constant failure of fuses indicates a short circuit in the wiring, which can lead to a car fire for no apparent reason.
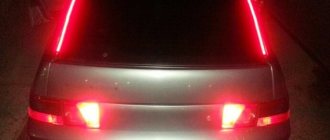
Side lights are lamps that let another car know about your dimensions. For example, stopping at the side of the road on the highway and turning off the ignition, the low beam goes out, but the dimensions remain. And according to traffic rules, for your information, parking on the side of the road is allowed only with the lights turned on.
In this article we will look at the main reasons why the lights on the VAZ 2114 do not light up. This article is suitable for all samar owners, both the first generation and the latest.
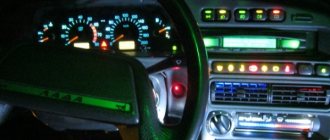
Replacing the panel backlight
In order to improve the state of light radiation and reduce the wide color variety, you need to place new LEDs in the panel that meet the wishes of the car owner and create optimal conditions for improving the lighting of the device. You can read the designation of the icons on the instrument panel of the VAZ 2114 in our other article.
Before changing the instrument panel lighting on a VAZ 2114, you need to buy a new set of LED lamps and calculate the correct number of diodes for each sensor, for example, for the brake sensor - you need 3 pieces. etc.
After removing the block, the resistor and light bulbs are attached to the VAZ 2114 dashboard in pre-designated places, sockets, according to the strict polarity of the location of the LED heads, which are carefully ground off. After completing the work, power is supplied and the functionality and quality of the backlight is checked.
Next, complete assembly is carried out, all the wiring from the diodes is brought out to the board and carefully attached so that they do not interfere with the installation of the panel.
It is important to carefully monitor the location of the instrument needles so that the drives do not bend or become deformed. The entire structure, lighting of the VAZ 2114 dashboard is fixed with screws
The power supply of the LEDs is connected to the lamp one, the arrows are put on, and the zero indicator is set.
Now you can monitor all sensors and instruments using the on-board computer. If all control identifiers are normal, the panel returns safely to its normal place.
Circuit breakers
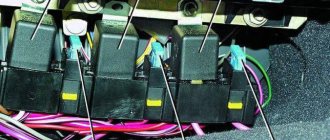
To protect against voltage surges and other influences on the electrical component, a side light fuse is also included in the circuit along with the light bulbs and the button. At the moment of overvoltage, it burns out, but due to this everything else in the circuit remains intact. It is usually located in the engine compartment, where in the VAZ 2114 there is a place for a whole fuse block for all electrical networks in the car.
Since all of them have markings, we can easily find the parts that we need: F10 is responsible for the safety of the lamps on the left side of the car, and F11 for the right. Thus, in the event of a failure of one half, for example, when the rear left indicator does not light up, the right side of the car will remain operational and will do its job. And if the size fuse blows, then replacing it is, in principle, quite simple - this is considered the simplest malfunction of this kind.
Diagram and location of fuses on the VAZ 2114 (also on 2113 and 2115)
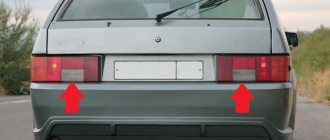
One or all vehicle license plate lamps do not light up
The design of any car provides lamps for illuminating the rear registration number. These low-power bulbs turn on together with the side lights and are designed to ensure the readability of the vehicle’s license plate at night. At the same time, there are no lamps for illuminating the front license plate. It’s good when all the car’s devices are working as normal, but we are interested in the question of which motorist will be fined for non-working license plate lamps.
Let’s say right away that if a lamp burns out while driving, but the owner is physically unable to control the operation of the rear light devices from the passenger compartment, this will not be a reason for not bringing the driver to administrative responsibility. Therefore, there is no particular point in proving to the traffic police inspector that the malfunction appeared two minutes ago.
Replacing headlight bulbs
- Disconnect the on-board power supply. To do this, you need to disconnect the negative terminal from the battery.
- Open the engine compartment.
- Unscrew the two fasteners from the back of the headlight.
- Remove the protective cover.
- Disconnect the electrical connector.
- Unclip the spring securing the lighting element to the seat.
- Remove the lamp.
After the new part is installed, you need to connect the negative terminal to the battery and check the functionality of the headlight.
Types of lighting fixtures
For installation in the headlights of the VAZ 2114, double-filament lamps with an H4 socket are used, the power of which is 60/55 W. They perform simultaneously the functions of high and low beam. This allows you to reduce the size of the headlights and reduce heat. However, such versatility also has negative sides. If one thread burns out, the other can still work. But, since it is impossible to drive without low or high beams, you have to change a partially working lamp. At the same time, headlight bulbs are always installed in pairs to obtain the same glow mode on the left and right sides. It turns out that because of one burnt-out filament, you will have to change two lamps, which is uneconomical.
Halogen lamps are installed at the manufacturer's factory. This is a modification of conventional incandescent lamps, the bulbs of which contain pairs of halogens - iodine and bromine. This makes it possible to increase the heating of the coil and increase the brightness of the glow. However, the temperature of the flask, which has to be made of quartz glass, also increases.
In addition to halogen lamps, the following are installed in the headlights of a VAZ 2114 car:
- incandescent lamps. They are cheap, but dull and short-lived. Currently practically not used;
- xenon lamps. They have increased brightness because the plasma arc glows. They do not have filaments, therefore they are more resistant to stress. The disadvantage of xenon is the need to use an ignition unit, which takes up extra space;
- LEDs. These are relatively new lamps that have managed to win the preference of most car enthusiasts. They are safe, the supply voltage is only 12 V. The service life is up to 50,000 hours (halogen - up to 2000). Practically do not heat up. The disadvantage is the directional emission of the light flux. While halogen or xenon samples shine evenly in all directions, LED lamps emit in one direction, so several crystals mounted on a cylindrical base are used at once. In addition, the LEDs are equipped with diffusion lenses that evenly distribute the flow in all directions.
Despite the clear advantage of LED lamps, it is recommended to choose halogen designs. This is required by regulations that prohibit tampering with the vehicle's structure. Unauthorized replacement of lamps can result in a high fine or deprivation of your driver's license. Bulbs in the VAZ 2114 headlights should be installed only standard ones, which are installed at the manufacturer.
Why doesn't the VAZ 2115 reverse? The reverse light doesn't light up - what to do?
biathlonmordovia.ru → Electrical appliances
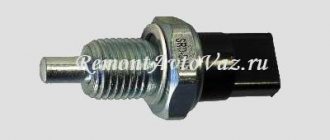
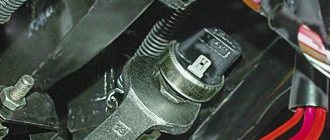
Reverse sensor
(DZH) - is a device that activates the reversing lights (white) when you engage the appropriate gear and start moving in reverse. In this way, you notify motorists (pedestrians) standing behind you of your intentions, that is, that you are going to drive in the opposite direction.
Today we will talk not only about what this sensor is, but also how to check it if it malfunctions and replace it with your own hands, if necessary.
Tips for motorists
According to these Rules of the Road, on any moving vehicle, including the VAZ-2114, the headlights must be turned on, along with which the side lights must also be turned on. In addition, they must be turned on when the car is stopped or parked on the road in the dark and in conditions of insufficient visibility. Therefore, they must always be in good working order.
The electrical circuit of the side lights of the VAZ-2114 is not so complicated and, if desired, any self-respecting driver will be able to find a malfunction associated with the failure of its operation. To do this, you need to know that terminal No. 1 of the side light switch is always supplied with positive voltage from the battery, bypassing the ignition switch. If the side light switch key is in the on position, then electric current flows to two fuses F10 (7.5A) and F11 (7.5A), which respectively protect the electrical circuits of the left (F10) and right (F11) side lights. The further path of the current lies to relay K4 (lamp health monitoring relay), and then to the front and rear side lamps.
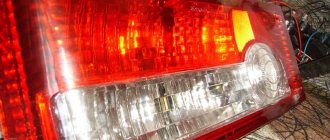
When only one of the side light bulbs does not light, then we check whether it has burnt out. If it burns out, then we replace it with a new one of similar power, but if it is intact, then we will have to look at the condition of the contacts of the cartridge in which it is inserted. In the rear lights, due to moisture getting into them, oxidation is possible, both of the tracks and the pads through which voltage is transmitted to the terminals of the side light lamp.
Another reason why the headlight lamp does not light up may be the lack of voltage at the corresponding terminals of the rear light blocks or headlight blocks. Then, using a tester, you will have to ring the corresponding wires:
- The right front marker does not light up (check the yellow wire from terminal No. 4 of the headlight to terminal No. 8, block X6 of the mounting block);
- The right rear light does not light up (check the yellow wire from the right rear light block to terminal No. 9, block X9 of the mounting block);
- the left front marker does not light up (check the yellow-black wire from terminal No. 4 of the headlight to terminal No. 10, block X6 of the mounting block);
- the left rear light does not light up (check the yellow-black wire from the right rear light block to terminal No. 17, block X9 of the mounting block);
If both lamps on the right or left side of the car stop working, then troubleshooting should begin by checking the corresponding fuses located in the mounting block under the hood of the VAZ-2114 car, since the simultaneous burnout of two dimensional lamps at once is unlikely. The blowing of fuse F10 is very easy to determine, since it will lead to the cessation of combustion of the backlight lamps of the instrument switches. Also, the reason for turning off the side lamps may be the failure of relay K4.
3 comments
When you press the brake pedal, the rear turn signals turn on. When you turn on the turn signals, the rear lights begin to switch and shine like garlands?
When connecting to the board in the chip (connector), the wires were not connected correctly. And the chip itself is apparently not original, but was attached by someone illiterately, despite the diagrams. You have the wire that is responsible for the turns - in place of the dimensions. It is easy to treat. You need to transfer the wires from the wiring to the chip. You need to find the ground on the rear stopper board (there is a green stripe on the board that runs under each light bulb socket); see which wire is connected through the chip and connect to the black wire from the rear wiring. Then we take the wire on the chip below and connect it in the following sequence: 1 wire in the chip with black (ground), 2 - blue (turn signal), 3 - red (stopak), 4 - yellow (marker)
How to replace all lamps on a VAZ 2113-VAZ 2115?
Note! Before you start, be sure to keep one thing in mind: under no circumstances should you touch the glass bulb with your fingers, otherwise this could cause your light bulb to fail much faster, so we recommend that you replace the light bulbs with clean gloves, but if If you have already touched the glass flask with your fingers, then before installing the lamp, wipe the entire flask from grease and dirt with a clean rag soaked in alcohol!
Replacing the low and high beam lamp
1) As was said earlier, there is only one lamp for the low and high beam, but it is two-filament, so to replace it you will need to first open the hood of the car and then find two bolts on the back of the headlight unit (Bolts are indicated by arrows ) that secure the headlight cover, after these bolts come out, unscrew them completely by hand and then, as shown in the small picture below, remove the plastic cover from the headlight block.
2) Now that the car is de-energized, disconnect the wire block from the terminal of the halogen lamp and then take it aside.
3) Then take a closer look at the terminals of the halogen lamp, there will be a spring clamp that holds the light bulb while driving so that it does not fall out of the headlight, so using your hand, fold this spring clamp down, as shown in the small photo below and then pull it lamp leads (For clarity, the leads are indicated by red arrows), remove it from the hole in which it is located.
Note! The new halogen lamp is installed in the headlight unit in the reverse order of removal, but when installing, always remember that you cannot touch the glass bulb with your fingers, otherwise your lamp will quickly burn out and will not work!
Replacing the side light bulb
This lamp is replaced very simply, in order for you to be able to remove the old lamp, you will first need to open the hood and remove the same plastic cover that was discussed just above, in the section “Replacing the low and high beam lamp”, so first remove this completely roof and simply pulling the wires that fit the side light lamp, pull it out of the hole in which it is located and then, holding the lamp itself with your hand, simply remove it from the hole, thereby you will remove it from the chamber, as shown in the small photo slightly below:
Note! In some cars of the Samara family, the optics are slightly changed, so on some cars there are side light headlights that are held simply by tension, and there are those that are specifically fixed in the chamber, those that are held by tension do not need to be turned anywhere, you just need to pull it by force it will come out (This lamp is shown in the small photo above), but those that are specifically attached to the chamber must be turned counterclockwise and only then removed, so before pulling it, try turning it counterclockwise!
Replacing the turn signal lamp
1) Replacing this lamp will also not be difficult, so as always, first you will need to open the hood of the car and then find the socket that goes with the lamp and is built into the turn signal itself, so after finding the socket, take it with your hand and turn counterclockwise as shown in the figure below, and after turning the socket, pull it and thereby remove it from the turn signal along with the lamp.
2) And finally, when the socket and the lamp are in your hand, press the light bulb itself and turn it in the same way as the socket counterclockwise and then completely remove the lamp from the socket.
Note! This lamp is installed in the reverse order of removal, but only during installation will you pay attention to the two side slides (One of them is indicated by an arrow in the photo below) that are on the lamp, so install it in such a way that these slides fit into the grooves on the chamber and then Turning the lamp, make sure that it is fixed with these two side slides!