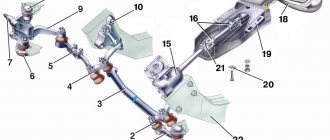
Design of the rear suspension of the VAZ 2107: 1. Lower longitudinal rod; 2. Lower insulating gasket of the suspension spring; 3. Lower support cup of the suspension spring; 4. Compression stroke buffer; 5. Bolt for fastening the upper longitudinal rod; 6. Bracket for fastening the upper longitudinal rod; 7. Suspension spring; 8. Compression stroke buffer support; 9. Upper spring gasket ring; 10. Upper spring insulating gasket; 11. Upper support cup of the suspension spring; 12. Pressure regulator drive lever support; 13. Rubber bushing for the pressure regulator drive lever; 14. Shock absorber mounting stud washer; 15. Rubber bushings for shock absorber eye; 16. Rear shock absorber mounting bracket; 17. Additional compression progress buffer; 18. Spacer washer; 19. Spacer sleeve of the lower longitudinal rod; 20. Rubber bushing of the lower longitudinal rod; 21. Bracket for fastening the lower longitudinal rod; 22. Bracket for fastening the upper longitudinal rod to the bridge beam; 23. Spacer sleeve for transverse and longitudinal rods; 24. Rubber bushing for the upper longitudinal and transverse rods; 25. Rear shock absorber; 26. Bracket for attaching the transverse rod to the body; 27. Brake pressure regulator; 28. Protective cover for pressure regulator; 29. Pressure regulator drive lever axis; 30. Pressure regulator mounting bolts; 31. Pressure regulator drive lever; 32. Clip of the lever support sleeve; 33. Support sleeve; 34. Cross rod; 35. Cross bar mounting bracket support plate
↑ Rear suspension diagram
1 - spacer sleeve; 2 — rubber bushing; 3 — lower longitudinal rod; 4 — lower insulating gasket of the spring; 5 — lower spring support cup; 6 — suspension compression stroke buffer; 7 — bolt for fastening the upper longitudinal rod; 8 — bracket for fastening the upper longitudinal rod; 9 — suspension spring; 10 — upper spring cup; 11 — upper insulating gasket of the spring; 12 — spring support cup; 13 — rod of the rear brake pressure regulator drive lever; 14 — rubber bushing of the shock absorber eye; 15 — shock absorber mounting bracket; 16 — additional buffer for suspension compression travel; 17 — upper longitudinal rod; 18 — bracket for fastening the lower longitudinal rod; 19 — bracket for fastening the transverse rod to the body; 20 — rear brake pressure regulator; 21 — shock absorber; 22 — transverse rod; 23 — pressure regulator drive lever; 24 — holder of the lever support sleeve; 25 — lever support sleeve; 26 — washers; 27 - spacer sleeve.
Replacing ball joints on a VAZ 2107
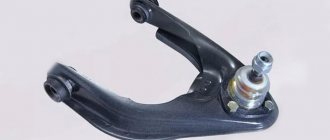
Ball joints are the most short-lived parts of the AvtoVAZ classic suspension. Considering the state of domestic roads, the ball joint on a VAZ 2107 is the first part that has to be changed after a certain mileage of the car. Novice car enthusiasts have questions about how to replace ball joints and which ball joints are best to install on a VAZ 2107. Design and purpose of ball joints The design of the front suspension ...
The question is quite common; often beginners do not know how to lubricate the ball joint before installation or when replacing the boot, so that it lasts as long as possible. There are several options, here are the most proven ones, the first is Litol-24 (recommended by AvtoVAZ)
- Read more about How to lubricate a ball joint?
- Login to leave comments
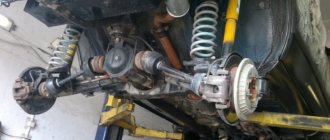
Today we will tell you about the nuances, tips and secrets that VAZ classic owners use when replacing torque rods and rubber bushings of rear suspension rods. This entire article is based on both my personal experience and the experience of forum members. We have simply combined the main points on replacement and problems that you may have to encounter into one article and present it to you. If you still have any questions, you can ask us on the forum in the appropriate topic in the “Chassis” section. So - diagnostics. What can make us climb into the rear suspension?
- Read more about Replacing rear torque rod bushings on a VAZ classic
- Login to leave comments
In this article I want to share with you my experience of creating a rear anti-roll bar! Those. We are not looking for easy and expensive ways, but believe me, it’s worth it, the savings are obvious.
Why you need a rear stub and what it gives is a separate topic, but here I will tell you how to make and install it, but decide for yourself whether it is necessary or not.
I’ll start with the fact that there are descriptions of this process on the Internet, so I’m not discovering America and I’m not reinventing the wheel. However, existing descriptions are unclear and not entirely clear.
I know of two that helped me (you can easily find them by searching). But they are not specific.
↑ Removing the rear suspension
- Raise the rear of the car and place it on stands. Remove the rear wheels.
- Disconnect the driveshaft from the drive gear flange.
- Disconnect the hydraulic brake hose from the steel tube installed on the axle and take measures to prevent fluid from leaking from the brake system.
- Disconnect the rear parking brake cable bracket from the body, remove the front cable release spring and, by unscrewing the locknut and adjusting nut, release the rear cable branch.
- Disconnect the rear brake pressure regulator drive rod from the bracket on the bridge beam.
- Disconnect the upper ends of the shock absorbers.
- Place a hydraulic jack under the rear axle beam. Disconnect the longitudinal and transverse rods from the brackets on the body, lower the jack and remove the axle.
Books and operating manuals for LADA (VAZ) 2107
LADA (VAZ) 2107 is a sedan with four doors, rear-wheel drive and a carburetor engine. Car class - “C”, this is a Russian, Soviet and Egyptian vehicle. Production and operation have been established since 1982 at the KrASZ and ZAZ automobile enterprises. People call the car “Seven” after the last digit of the model number. Small class car of strict assembly. For its design, in the warm countries of the former USSR the car was called the “Russian Mercedes”. Engine types: internal combustion engine capacity 1.5 liters; engine capacity carburetor type 8 cl.
The car was created based on a modification of the Fiat 124 and has the same design. What are the differences between the LADA (VAZ) 2107 and the VAZ 2105? These models are distinguished by a radiator grille coated with chrome paint, plastic bumpers and a spacious interior. Families prefer to buy cars for household needs.
You can view information on the LADA (VAZ) 2107 car repair manual and download service books on our website. A wide range of VAZ 2107 repair books are available in various formats, including PDF. Sections of the books include carburetor maintenance, suspension, and brake systems. Color illustrations of repair books will help you quickly understand the details of electrical circuits.
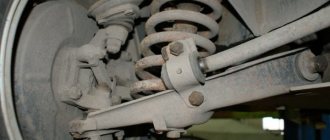
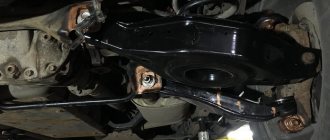
↑ Rear suspension parts
1 — lower longitudinal rod; 2 — rubber bushing; 3 — bracket for fastening the lower longitudinal rod to the body; 4 — spacer sleeve; 5 — upper longitudinal rod; 6 - additional compression progress buffer; 7 - spring; 8 — upper spring cup; 9 — suspension compression stroke buffer; 10 — upper insulating gasket of the spring; 11 — shock absorber; 12 — lower insulating gasket of the spring; 13 - transverse rod.
Improvement of levers
On the lower suspension arms of classic series cars, the studs rust, which is why they often break off. And the most annoying thing is that this happens during the assembly process, when you tighten the nuts. When repairing the VAZ-2107 suspension, this often happens; before disassembling all components, it is necessary to carefully treat the threaded connections with penetrating lubricant. Before installing new levers, you need to:
- Lubricate the studs with lithol before tightening the nuts.
- Plastic caps must be installed on threads that protrude beyond the nuts.
Caps are made from tubes of suitable diameter; ballpoint pens can be used as material.
The studs will be protected from rust as much as possible, so you won't damage it during your next repair. In the same case, if the studs suddenly break, they must be completely removed. In their place, drill holes into which you install bolts and nuts. But the best option is to cut a thread and screw a bolt into it.
↑ Installing the rear suspension
Installation of the rear suspension is carried out in the reverse order of removal. In this case, install class A springs (with yellow markings) on the suspension. In exceptional cases, when there are no springs of this class, the installation of springs of class B (with green markings) is allowed.
To prevent damage and over-tightening of the elastic bushings of the rod hinges and shock absorbers:
- load the rear of the car so that the distance from the axle beam to the body side member, measured 100 mm from the crossbar bracket, is 125 mm;
- Using a torque wrench, tighten the nuts on the bolts securing the longitudinal and transverse rods, as well as on the pins securing the shock absorbers to the bridge beam and to the body.
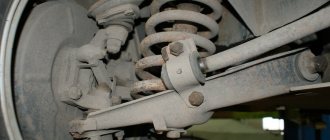
How to check the chassis on the "seven"
Self-checking the chassis of a VAZ is a relatively simple and quick procedure. No special tools are required, but you need to drive the car onto an overpass or pit.
Checking the chassis involves a visual inspection, so you will need to take care of good quality lighting
During the inspection, it is necessary to carefully examine all suspension components, paying special attention to:
- the condition of all rubber elements - they should not be dry or cracked;
- the condition of the shock absorbers - there should be no traces of oil leakage;
- integrity of springs and levers;
- presence/absence of play in ball joints.
This check is quite enough to find the problematic part in the chassis of the car.
Video: chassis diagnostics
The chassis of the VAZ 2107 has a fairly simple structure. An important fact can be considered the ability to independently identify chassis faults and ease of diagnosis.
Effect of Caster Angle on Handling
The size of the tire contact patch with the road depends on the wheel camber. The purpose of camber adjustment is to achieve maximum contact area. Wheel camber affects mainly the wheels located on the outside of the turn, which bear the main load. The caster angle provides a change in the camber of the wheels during a turn. The wheels lean into the turn and are in better contact with the road, counteracting the buoyant centrifugal force.
The smaller the deviation of the wheel's turning axis from the vertical, the more pronounced the car's steering is; the maximum possible steering is achieved at zero caster angle. This is explained by the fact that when the steering wheel is turned, the wheel turns to a larger angle. At the same time, the suspension works as efficiently as possible, because all the levers move up and down in a vertical plane. The shock absorbers also operate at maximum efficiency, better absorbing road imperfections.
With a small caster, there is a possibility of the car's front axle drifting when accelerating out of a corner. This happens because the center of gravity shifts back during acceleration, the front axle is unloaded, and the wheels grip the road worse. Also, a low caster angle impairs wheel self-centering because the force forcing the wheels to remain straight is reduced.
Large caster threatens to demolish the front axle when coasting or braking at the entrance to a turn, since the wheels deviate less to the side. At the exit of the turn, on the contrary, the understeer improves, because The wheels lean more towards the inside of the turn, increasing the contact patch with the road.
How to check the chassis on the "seven"
Self-checking the chassis of a VAZ is a relatively simple and quick procedure. No special tools are required, but you need to drive the car onto an overpass or pit.
Checking the chassis involves a visual inspection, so you will need to take care of good quality lighting
During the inspection, it is necessary to carefully examine all suspension components, paying special attention to:
- the condition of all rubber elements - they should not be dry or cracked;
- the condition of the shock absorbers - there should be no traces of oil leakage;
- integrity of springs and levers;
- presence/absence of play in ball joints.
This check is quite enough to find the problematic part in the chassis of the car.
Video: chassis diagnostics
The chassis of the VAZ 2107 has a fairly simple structure. An important fact can be considered the ability to independently identify chassis faults and ease of diagnosis.
Source