The air filter of the Priora car (16 valves) ensures the purity of the air that is used to create the fuel-air mixture. The air on the road is not entirely clean, which is caused by dirt and dust, so the air filter on a Priora car is changed every 15-20 thousand kilometers - the price of this element is 200 rubles and more. (in city traffic it is usually changed every 30 thousand kilometers). You can change the air filter of a Priora car yourself - in short, the replacement is to unscrew 4 bolts, remove the air filter pipe and install a new part - for this it is not at all necessary to contact a technical center. In the article below you will find the article number of the factory part. Read the article to the end and you will learn everything about light machines!
Why change the air filter
The fuel-air mixture, which is created in the injector, enters the combustion chamber. In four strokes, all particles of dust and dirt that are mixed with air leave microcracks and small scratches on the walls of the chamber and on the piston. They basically “scratch” everything that comes their way. The air filter on the Priora is not installed for “beauty”: air flow passes through it. Its task is to contain the largest possible amount of dust and dirt and prevent them from getting into the engine. Those. it does not stand simply to allow air to pass through; he cleans it up to working condition.
Every time a worn consumable made a “mistake” when dirt penetrated inside the cylinder, the injector sent commands to increase the proportion of fuel in the fuel-air mixture. It became oversaturated, consumption increased. Not only is the engine life reduced due to such “impacts”, but the owner’s wallet is also thinner. Practice shows that timely replacement is cheaper than the cost of gasoline.
Replacing the Priora cigarette lighter video
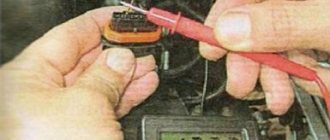
If you use the cigarette lighter too often, it will quickly break. Today, the cigarette lighter socket is used to connect to the power source of a navigator, video recorder, etc. Mobile gadgets are also often charged through it. This is why the cigarette lighter and the compartment for its fastening quickly break down. Before you dismantle the old one and install the new one, you need to find out exactly the cause of the breakdown. As a rule, they are like this:
- faulty contacts;
- backlight burnout;
- fuse blown.
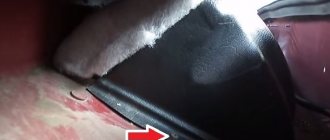
If we talk about replacing the cigarette lighter, then we must take into account that the tunnel is removed first. If there are no tools nearby, you will have to remove the seat.
How to replace the air filter on a Lada Priora - instructions
For Priora, this is an ordinary “consumable”. You need to know its location and be able to replace it, because this is the simplest operation for maintaining any car. To replace the air filter in question, you only need to follow a few steps:
- Open the hood. Find the black plastic box to the right of the engine; this is the housing. For your own convenience, you can remove the negative terminal from the battery and remove the wire block from the mass flow sensor (mass fuel flow sensor).
- The air filter housing cover is secured with four screws - unscrew them with a Phillips screwdriver and remove the cover.
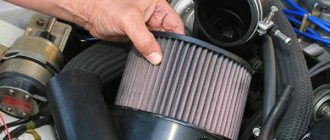
- Slightly move the corrugated air duct and remove the used consumable. Do this carefully: it is held in place by a rubber seal, so all movements should be smooth. Even if it seems clean and you don’t want to change it, do it: all the dust and dirt will not be visible to the naked eye.
- Vacuum the housing housing from sand and dust. Insert the new part tightly in place of the old one, making sure that the rubber is adjacent to the plastic casing.
- Place the cover and tighten the four screws. Connect the wire block and the negative terminal to the battery.
Now the fuel-air mixture will contain fewer dust and dirt particles. Priora will again be dynamic, fuel consumption figures will be encouraging, and the engine will not suffer any damage from the operation of the new consumables.
Instructions for removing the front headlight unit on a Priora without dismantling the bumper: step-by-step description with photos
Having prepared the necessary tools for the work, you can begin the corresponding manipulations. It’s worth noting right away that to remove the headlights on a Priora, you don’t need to dismantle the bumper, but you need to loosen its side fastenings to move it to the side, and thereby gain access to the light fastenings. The process of removing the headlight unit on a Priora looks like this:
Disconnect the battery terminal. In fact, it is not necessary to do this at all, since the probability of closing the circuit is extremely low. However, if the left headlight is being removed, it is recommended to remove the battery in order to gain access to the plug or power supply, which is connected to the lamp to disconnect it. Next, use a Phillips screwdriver to unscrew the four fasteners that secure the plastic protective cover. The smallest one is a self-tapping screw, and the three largest ones are bolts with a head for a Phillips screwdriver. We remove the trim and move on to the process of loosening the side of the front bumper. To do this, use a Phillips screwdriver to unscrew the three screws that secure the plastic fender liner to the bumper
For ease of work, you can turn the wheels in the opposite direction. Using a screwdriver, unscrew the two bolts securing the upper part of the bumper. Use a screwdriver to unscrew the three screws at the bottom of the bumper (the photo below shows both sides). These are the same screws, only in an approximate form. After this, the bumper needs to be disconnected from the body part. It is very important to emphasize here in order to perform the manipulations correctly. Few sources indicate how to do this correctly, so let’s look at it step by step.
Many people start pulling on the bumper, which ultimately leads to damage, so there is no need to do this
To disconnect the front bumper from the body on a Priora, you will need to use a screwdriver with an extended shaft. With its help, you need to carefully pry the bumper (starting from the edge) in order to disconnect it (disengage it). It is fixed at three points. The photo below shows what the grooves in which the Priora front bumper is fixed look like. After disconnecting the bumper, we gain access to two headlight mounts (one on the bottom and the other on the side). First, don’t forget to disconnect the power supply from the headlight. This is done using a slotted screwdriver, which you need to press on the latch and then remove the plug. To disconnect the plug, it is important to pull it by the plastic part, but not by the wires. If the left light (on the driver's side) is removed, but the battery is not removed (this is not necessary), then access to the power supply will be limited. To simplify the process of disconnecting the plug, you first need to disconnect the headlight, and then, by moving it forward, disconnect the chip. To remove the headlight, unscrew the bottom bolt to “10” (it is located under the lamp behind the bumper when it is moved down). Another mounting screw for a Phillips screwdriver is located on the side. The remaining mounting bolt is located at the top. We unscrew it with a key to “10”, and then remove the headlight.
Next, the necessary manipulations are performed with the part, after which it is installed in the reverse order of removal. The process takes no more than half an hour.
This is interesting! The headlight mounting bolts are tightened during assembly without observing torque.
Below is a video of how to remove a headlight on a Priora with the bumper removed.
And the process of detaching the bumper on a Priora.
In conclusion, it is worth noting that the procedure for dismantling the headlight unit is not complicated, and even a beginner can cope with this task, but only if he has the necessary tools. Take a responsible approach to preparing the necessary materials so that no difficulties arise during the manipulations.
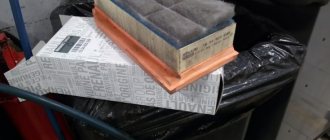
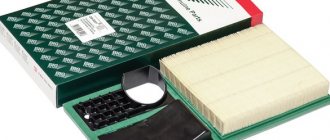
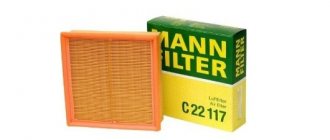
Filter models - analogues
Air filters produced by the following manufacturers are suitable for the VAZ 2170 Priora:
- Nordfil - AN1014;
- TSN - 9140;
- Filtron – УТ000072199;
- Motor-superUT000072199;
- Bosch - 1 457 429 061;
- Knecht (Mahle Filter) - LX 220;
- Fram - CA3399;
- Kolbenschmidt - 50 013 059.
Filters from these manufacturers are sold at the same price. Their quality can be assessed by the “mesh”: if it is too dense, it will create air resistance, and the volume entering the injector will noticeably decrease - fuel consumption will increase again, Priora will not be so fast and dynamic.
What tools are needed to remove headlights on a Priora?
The process of removing the headlight unit on a VAZ-2170 is not complicated, and for all modifications of this car model it is identical. In order to correctly perform the dismantling procedure for the purpose of subsequent repair or replacement of the front lights, you will need to first prepare the following tool:
- The key is "10". For convenience, it is better to use a head with a ratchet.
- A Phillips screwdriver (preferably several screwdrivers with different tip diameters) for unscrewing self-tapping screws and mounting bolts.
- A slotted screwdriver with a long shaft (preferably at least 20 cm). It is needed to disconnect the bumper from the body part. You can use a screwdriver with a shorter shaft length, but in this case the likelihood of damaging the paintwork on the bumper or car body increases.
To carry out work, the car does not need to be placed on an inspection hole or jacked up. For safety reasons, it is recommended to only disconnect the negative terminal from the battery, after which you can begin performing the planned manipulations.
This is interesting! Many people are wondering how to remove the headlights on a Priora without removing the bumper. This is almost impossible to do, since it is under the bumper that the fastening elements of the device are located. However, it is not necessary to completely remove the bumper, especially if the headlight is removed only from one side.
Are the valves bending?
In LADA Priora cars, even in a 16-valve 126 power unit, valves can often bend. The reasons causing this defect lie in non-compliance with operating rules, in case of violation of the regulations for replacing the following components and parts:
- rollers;
- timing belt;
- water pump.
Replacing the air filter on a Lada Priora car
If one of the listed components breaks down, the pistons, exerting mechanical stress on the valves, can bend them. The design features of the engine are the reasons why the engine can bend valves. Valve deformation necessitates a major overhaul of the Priora engine.
To avoid this defect, the car owner needs to timely check the timing elements. Of particular importance is the belt, which is subject to thorough inspection after 50 thousand kilometers. When checking, the following faults are excluded:
The rollers and timing pump 126 must also be inspected, because The motor bends the valves even when they malfunction.
Signs of wear on the belt and other timing components are vibrations and an unpleasant grinding noise in the engine compartment. In this case, it is necessary to urgently repair or replace the broken elements to avoid deformation of the engine valves.
Zero resistance filter for Priora
This is where it’s worth talking in detail about air resistance. All mentioned consumables operate with a resistance of 5-7%. That is, they suck in and process air not at such a high speed as the injector “would like” to receive it for a good saturated fuel-air mixture.
A zero-resistance filter reduces the considered indicator to 0 - and the dynamics increase, the engine operates “at full”, almost at 100% efficiency, the maximum speed becomes higher than that declared by the manufacturer. In real life, there is no fairy tale without bitterness: you will have to pay for choosing this option.
It is made of several layers of cotton fabric, the structure of which contains many pores; paper content is minimal. The fabric is attached to an aluminum body. Available dry or impregnated (the impregnation is an oily composition). In the second version, you have to get a spare part every 3 thousand kilometers.
“Nuleviki” are installed either in a regular place or separately. If the “zero” standing in its regular place still brings some benefit to the use of engine power, then standing alone does not contribute to this at all.
First of all, it creates a real clutter under the hood, located just above the engine. According to the law of physics, the air temperature above (just above the engine) is always higher than below. This hot air absorbs and removes the fuel-air mixture. The problem is: hot air is more rarefied, the molecules are located at a greater distance from each other. The injector, receiving rarefied air, again forms a fuel-air mixture with a huge proportion of fuel. Consumption increases, and for good acceleration you will have to burn a lot of gasoline. There is no benefit from this.
When choosing a spare part for your Priora, you should be guided by common sense and the “Do no harm” principle. This part is not that expensive, so if the manufacturer suits you, purchase several consumables at once and you can put them aside for storage. If the filter is good, does not become dirty ahead of time, you see that the engine is not harmed by dust and dirt coming from the air flow, then the consumable is good.
Filter care
To maintain optimal engine performance, filter elements must be replaced periodically. The regulations established by AvtoVAZ recommend installing a new cleaner every 30,000 km of the Lada. But the factory figure is slightly different from reality. With intensive driving on dirt roads, dusty cities, rough terrain, the filter on the Priora may not be enough for 30 thousand km. This is an approximate number, and the frequency of changes on a particular Lada depends on operation.
You can slightly extend the service life by removing and cleaning the filters manually. But at the level of micropores, particles still remain on the curtains. After manual washing, water particles may remain on the cardboards, even if it seems to you that everything has been wiped dry. In this case, an attempt to extend the life of the purifier leads to worse fuel combustion.
Cleaners are produced by different companies, and accordingly their quality. You should not buy a device in a nameless package without a manufacturer's mark. It's better to spend a little more, but be sure that the device will last a long time.
The highest quality filters: Bosch, SCT, Mann, BIG. They are also the most expensive. The domestic Nevsky and Salyut are not much inferior in quality. But the price is more reasonable.
The stove on the Priora does not turn on
Solving the problem of poor heating by the stove on the Lada Priora
If the stove in the car does not heat well (we are most interested in the Priora at this moment), then this situation causes a lot of inconvenience to the driver and passengers.
In the summer, this problem is not relevant, because no one really worries about the condition of the heater.
And only with the onset of cold weather does the overwhelming number of motorists become puzzled by the problem of a non-working heating system.
Why doesn't the heater work on the Lada Priora?
The Lada Priora is in many ways similar to its progenitor, the VAZ of the tenth family, including the design of the heater.
The manufacturer decided to leave the operating principle of the stove, replacing only some elements with new ones. At the same time, Lada Priora also inherited familiar problems, for example, when the stove does not heat and blows cold air. Heater assembly (2170-8101012 or 2111-8101012-10).
Air flow distribution gearmotor (2170-8127100).
The stove does not work on the Lada Kalina (reasons and repairs)
Most owners of Lada Kalina cars, who have previously encountered other VAZ models, note that its stove heats much better compared to its predecessors. Unfortunately, it sometimes breaks.
In this article, we will try to figure out why the Lada Kalina stove does not work (reasons and repairs).
The most common cause of malfunction of the Lada Kalina heating system is problems with the engine cooling system.
Repair of the VAZ 2110 stove control unit
The SAUO receives information from:
- – cabin air temperature sensor (No. 6), which has a built-in small-sized fan.
- – MMR (micromotor reducer) (No. 9), information about the position of the heater damper.
Damper control.
Based on the information received and the set air temperature, the controller controls the position of the heater damper, sending appropriate signals to the damper drive micromotor.
Fan speed control.
The stove doesn't heat.
Either the radiator is clogged or something, I don’t know.
First, I changed the thermostat. Then people advised to install email. pump for the gazelle stove. Well, I bought this miracle (650 rubles), installed it in front of the stove and powered it for ignition.
I mean, I went. It's so crazy warm in the car that you can't even breathe.
When the heater is turned off, the fan comes on if there is a traffic jam. Question: Who did this, what difficulties did they encounter, what is the risk of it all?
The stove does not heat, six main reasons
Today a very relevant article (especially in winter) is that the car’s heater does not heat, or heats very poorly!
Why does this happen and what are the main reasons for this?
After all, a normal working car should warm up the interior within 10 - 15 minutes (unless, of course, you have a turbocharged engine, there is a partial solution for that here). If after 15 minutes you have barely warm air (or not at all), and all the glass inside is frozen, then this is not “good”! Read my tips below... First, let's think about how a car warms up?
As we all know, during operation the internal combustion engine heats up very much, this happens from the friction of the pistons against the cylinder walls, as well as from the combustion of the fuel mixture.
Hi all! I went to a friend’s car service center and they determined that the engine itself was not working. The price of a new one is 1500 rubles. I have a Conder Halla. When removing, the condenser tubes, the cup or whatever it is called, or where the support is attached, get in the way.
Thanks to the designers of AvtoVAZ!
Dima. Panasonic has the same canoe) there is information on the Internet on how to do this from Panasonic without disassembling the entire heater, it turns out that you cut the casing in the engine compartment and on the motor itself, which does not violate the integrity of the structure and serves more as a boot)) it can be attached back without problems))
How to repair the heater mode switch in Lada Priora
Lada Priora is a product of the domestic automobile industry.
This car has earned people's love for its low cost, good quality, and the availability of parts when repairs are needed. Despite good reviews from owners, the car is not without a number of shortcomings.
For example, it happens that the Priora stove only works at speed 4. You can go to a service station to find out why the Priora stove switch is not working.
Replacing the oil filter Priora 16 valves
Welcome! Motor oil is an integral component of the lubrication system, thanks to it the crankshaft, as well as the camshaft and other parts are lubricated, thanks to this lubrication the friction coefficient is reduced, which ultimately leads to the fact that the parts of the car engine last longer than if If the car were without oil, besides, oil also cools the car’s engine, although the cooling system is the basis, but oil also helps it a little, otherwise the engine would heat up much more in too hot weather.
When should you change your oil? What cannot be said here is that all cars require a certain oil change period, for example, the replacement period declared by the manufacturer is 15,000 thousand km. on a LADA Priora car, but for another car of the same brand, this oil change can be done at a completely different time and with a radically different mileage, so no one will tell you the exact numbers for changing the oil, we can only hint to you that you need to change the oil depending on your driving style, that is, if you drive in difficult conditions for a car (severe frosts, for example, or extreme heat, the same constant traffic jams, all this applies to difficult conditions), then you will have to change the oil much more often (Approximately every 10,000 thousand . km), and you can’t hesitate to replace it, because it plays a very important role in the car’s engine.
Note! If you want to learn in more detail about all the timing of oil changes, as well as find out why the engine needs engine oil in general, then read the article called: “Frequency of engine oil changes and its selection”!
Step-by-step instructions for high-quality dismantling
The air filter on the Priora is connected to the mass air flow sensor. This component is necessary in a vehicle to determine the correct amount of air flow. Based on such information, the electronics unit responsible for control calculates the correct proportions for fuel preparation. The air filter is attached to this unit using wires. To remove the wiring harness, lift up the special clamp. Most often it is colored yellow.
Next, using a screwdriver, you need to loosen the steel clamp that tightens the outlet tube from the filter. With leisurely movements you can disconnect it from the box. The air filter on the Priora has three rubber supports that are connected to the metal body of the car. During dismantling, they can also be pulled out. To prevent this, the air filter mount (rubber supports) can be lubricated with automobile oil or a silicone mixture.
If the air filter mounts in the form of rubber supports have come out of their grooves, you can return them to their place using pliers. Use pliers to pinch the ends of the supports and place them in the grooves.
Air flows enter from below through a special pipe. During the dismantling process, carefully pull the housing upward until the input element appears. Pull the pipe and it will detach from the body.
The instructions on how to correctly install the air filter after changing the component are characterized by the reverse sequence of actions.
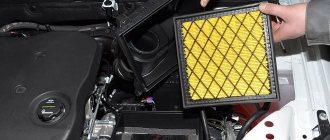
Changing the cleaning element
To change the cleaning unit, you do not have to completely remove the housing. The air filter is installed after removing the terminal from the battery.
Removing the cover to change the filter
The air filter is attached to the housing cover, which can be removed simply by unscrewing 4 screws. After dismantling the cover, pay attention to the corrugated air duct; it must be slightly bent. The filtration element is attached to the body with special rubber seals.
Once separated from the seals, you can begin cleaning and replacing. Cleaning work is carried out using a vacuum cleaner. In addition to the block, the seat also needs to be cleaned.
Replacing components is a simple process; any car enthusiast without experience or specialized knowledge can handle it.