The engine of every car needs a lubricant to prevent increased wear of rubbing parts. It is motor oil that reduces their enormous friction force during operation. And oil filters are used to retain foreign parts. Their replacement on Lada Vesta is carried out together with an oil change according to the maintenance schedule.
Types of oil filters
Oil filtration systems are available in full-flow, partial-flow and combined types.
In a full-flow system, all the oil passes through the purifier. The cleaning speed is high, but if the filter element is clogged, the bypass valve directs the lubricant into the system without cleaning. This is exactly the oil filter found on the Lada Vesta.
In a partial flow system, only a portion of the lubricants passes through the filter element. Filtration is higher quality, but also slower.
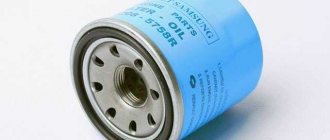
Oil filter "Mann" for Lada Vesta. Photo source: https://stars-auto.com/catalog/i_14725
In a combined system, two filters are installed: full-flow and partial-flow. This system provides good oil cleaning and engine protection.
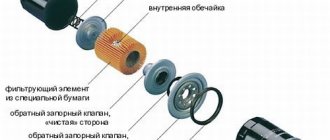
The Vesta full-flow oil filter consists of the following parts:
- Metal housing with several inlet holes and one threaded outlet.
- Cardboard filter element. To increase the filtration area, it is made corrugated or rolled into a roll.
- The bypass valve redirects the oil past the filter element. This can happen in winter when the oil is too viscous, or when it is very dirty and cannot be cleaned. In this case, contaminated lubricant reaches the parts, but this is better than working dry.
- The anti-drain valve prevents the oil from draining completely from the filter. This is necessary to supply lubricant to the line immediately after starting the engine.
- The sealing gasket ensures the tightness of the system.
There are also non-removable and serviceable oil purifiers. If the former are completely changed during maintenance, then only the filter cartridge is replaced for the latter.
Cost of service in auto repair shops
As a rule, replacing the MF in auto repair shops is an inexpensive procedure, regardless of the make of the car. The final cost of the service depends on the type of brand, region, prestige of the auto repair shop and other parameters.
In general, the oil filter for the Lada Vesta is an element that is necessary to perform high-quality cleaning of the engine system from metal shavings with waste products, contaminants, and impurities that reduce pressure, viscosity and oil quality. The consumable has its own unique design features and long service life. It must be replaced independently according to the step-by-step instructions given above or with the help of specialists in order to avoid damage to the entire motor system.
How to change the oil in a Lada Vesta engine yourself
The oil that is poured into the engine is intended to create a special protective film that creates optimal conditions for the functioning of all moving parts in the Lada Vesta engine. In addition to lubrication, oil flushes the engine, cleans it of accumulated dirt and carbon deposits.
The more often this consumable in the engine is replaced, the longer the car will last, it is also important what kind of oil you fill
In order for car owners to know when to change the oil, the plant provides recommendations on this matter. On Lada Vesta, the first engine oil change is performed after 30,000 km have been traveled. A new car can go much longer without replacement compared to other AvtoVAZ products. After the first replacement in the Lada Vesta engine, the oil should be updated every 15,000 km. Depending on the load on the motor, the timing of changing consumables may vary.
Preparatory stage
First of all, you must decide what kind of oil you will pour into your engine. Then the Lada Vesta is driven onto an overpass, so you can easily get to all the necessary components of the system.
You will need:
- the specific oil depends on your preferences and manufacturer’s recommendations;
- hexagon designed for unscrewing the drain plug;
- device for dismantling the filter;
- the container into which you will drain the waste;
- funnel for filling oil;
- filter.
Lada Vesta shows a lower level of oil consumption compared to other previous models.
Oil Change Guide
Regardless of what oil you choose, what engine size you have and how much it contains, the following steps are performed:
Remove the engine crankcase protection; to do this, unscrew the lower mounting bolts of the shield. The protection of the Lada Vesta has a special hole, so you do not always have to unscrew the shield bolts. However, during operation the cover becomes stuck or becomes covered with a layer of corrosion. In such cases, you may need some additional equipment, including pliers and a hammer.
- Place the prepared waste container under the drain hole of the Lada Vesta; such a container should have a volume of over 4 liters.
- Unscrew the drain plug and drain the contents of the tank.
- Clean and wipe the lower part of the Lada Vesta engine compartment.
- Using a special filter removal device, remove it and install a new one, it is recommended to do this at the same frequency as you use to change the oil.
- Install the drain plug with a vulcanizing plug, which ensures maximum sealing and eliminates the possibility of leakage. If the cover is deformed or other defects appear on it, it should be replaced.
- Fill in the oil in the amount required for the engine type of your Lada Vesta. More details about the volumes will be written later in the article. Make sure the system is filled, as some old oil may remain in the engine, resulting in inevitable overfilling. Close the lid. As a rule, all the latest VAZ models, including Vesta, include about 4 liters.
Start the engine at idle speed. Let it run until the oil level sensor stops lighting, then add as much as needed. Screw the plug, this must be done as tightly as possible. After which it is necessary to carefully check the space of the compartment in which the motor is located for leaks.
Required oil volume depending on engine model
Vesta may require different amounts of oil to be filled, depending on the engine model.
VAZ-21129
- This engine has a volume of 1.6 liters. At the same time, Vesta equipped with such an engine with a robotic gearbox holds 3.2 liters of oil.
- The same engine with a manual transmission holds 2.9 liters.
VAZ-21179
- The engine has a volume of 1.8 liters, with an AMT transmission it has a volume of 4.4 liters.
- A similar manual engine requires 4.1 liters per full fill.
HR16DE
This motor was developed by foreign factories and holds an oil volume of 4 liters.
Changing the oil on a LadaVesta is a simple operation that is no more complicated than similar actions on other Russian cars, so you can do it yourself without any risk.
DSC_(Copy)
...disconnect the harness block from the sensor connector and move the wiring harness away from the filter.
...disconnect the harness block from the sensor connector and move the wiring harness away from the filter.
Next, you can use different types of pullers to unscrew the filter, but due to the extremely limited space, it is better to remove the crankshaft position sensor.
Stages of replacing lubricant Lada Vesta
Changing the oil on this model is the same as on most cars. But there are always some nuances, which will be described in the article below.
This LADA model is equipped with 1.6 liter VAZ-21129 and 1.8 liter VAZ-21179 petrol engines.
Both of them have 16 valves, like other modifications:
- Lada Vesta;
- Lada Vesta Cross;
- Lada Vesta SW (Lada Vesta SW);
- Lada Vesta SW Cross.
The replacement process for these engines and modifications will be the same. But we will make a reservation that the described instructions are carried out on a car with a volume of 1.6 liters.
Draining waste fluid
To drain oil from a Lada Vesta, it is advisable to have a pit or overpass, since the main actions will take place from below the car. Therefore, we place the car above the technological ditch, go down into it and remove the engine protection from below. To do this, you need to unscrew the 13 head bolts by 10mm.
When everything is ready, we proceed directly to the drain:
- Raise the hood, then find the filler neck on the engine and unscrew the plug.
- Now we go down under the car and place a waste container in the drainage area. You can use a cut canister or an old bucket.
- There are many complaints about the original drain plug regarding unscrewing, so it is better to prepare a new one for replacement (order code 21120101106100). The old one can be unscrewed with a 8mm hexagon, but there is a high probability that the splines will be torn off. Therefore, first you can take a hammer and gently tap it through a wooden plank. After this, the plug should come out easier. If the plug does not fit anywhere, you can use a gas wrench; it is located below the pan, so there is a place to grab it.
- On cars with an automatic transmission, the pan has a different shape, as well as a plug that can be unscrewed with a regular key or a 17mm socket.
- Now you need to unscrew the oil filter. You can try to do this from above from the engine compartment. There seems to be access, but the filter often gets stuck, I don’t have enough hand strength, and I can’t get to it with a puller.
- Another option is to do it from below; installing a puller here will not be difficult. But before that, it is advisable to unscrew the crankshaft position sensor using a 10mm wrench. We also remove the wires going to it. Now you shouldn’t break anything, you can unscrew the filter itself.
To unscrew the filter element, it is advisable to have a special puller. If it is not available, you can try to unscrew the filter using improvised means. For these purposes, you can use, for example, an old alternator belt, a regular belt, a bicycle chain or a simple screwdriver.
This method will allow you to drain as much of the used oil as possible, after which you can proceed to further actions. The main thing is not to forget, everything that we unscrewed must be put back in place.
Flushing the lubrication system
Engine flushing on a Lada Vesta car should only be carried out in exceptional cases, which include:
- Purchasing a used car when you cannot be sure of the quality and regularity of lubricant replacements.
- During operation, the service replacement interval was repeatedly exceeded.
- Engine operation with constant frequent overheating, which contributes to coking and other deposits.
- In cases of switching to another type of oil, for example from synthetic to semi-synthetic.
There are several types of flushes for the Lada Vesta engine:
- Five- or seven-minute, capable of cleaning even the most difficult deposits. They must be used very carefully and strictly follow the instructions printed on the packaging. It is recommended to use them only when absolutely necessary. Since there is a high probability of causing premature wear of the sealing seals. And also clog the oil channels with particles of washed away carbon deposits.
- Special compounds that are added to the oil several hundred kilometers before the expected change. They are more gentle, but there is also a possibility of clogging of the oil channels.
- Flushing oil is the most gentle method of cleaning the engine from the inside. This composition is poured after draining the waste, the engine runs for 15-20 minutes, after which the liquid with deposits is drained. The absence of aggressive additives in the wash composition gently cleans the engine, but is not able to remove heavy contaminants.
- Regular oil that you are going to use when changing. This method is not so popular due to its high cost.
Which filter element to choose
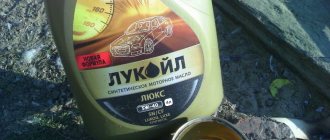
The choice of filter element is not affected by the engine size of a particular Lada Vesta car. It only affects the amount of lubricant purchased during replacement. The factory installs a domestically made filter. However, some owners are faced with the problem of leakage along the contour. The original spare part is produced by Big Filter and costs almost 2 times more.
Other common brands include the following:
- MANN is a popular German manufacturer. Features high quality paper and a well-functioning check valve. Additional protection against counterfeiting is provided.
- FRAM. The oil undergoes additional purification thanks to the special design of the filter element.
- Products The valve design is able to protect the system in case of too low pressure.
The lubricant filtration element is one of the most common consumable components. It can be easily purchased at any store that sells auto parts. They can also be ordered in the online store and you won’t have to wait long for most types of such products.
About the replacement process
The first engine oil change should be done after 1.5-2 thousand kilometers. The lubricating fluid filled in at the factory is designed only for the engine break-in period. The second and subsequent replacements proposed by AvtoVAZ should be carried out every 15,000 kilometers. However, experience and expert advice boil down to the fact that it is better to fill in new lubricant after 8-10 thousand. The savings here are insignificant, but the engine will always be grateful to its owner for this.
Changing the oil in a Lada Vesta engine should ideally be done by professionals in a car service center. But this procedure can also be performed by an ordinary car enthusiast. Follow the step-by-step instructions and you will succeed:
- Open the hood and unscrew the filler cap;
- Unscrew the drain plug on the engine crankcase; Change of oil
- Drain the contents into a previously prepared container;
- We dismantle the old oil filter to replace it with a new one;
- After the waste fluid has completely stopped flowing, screw the drain plug into place on the crankcase pan. A wide watering can will help drain the waste and also add oil. This will prevent spillage on the floor or ground and keep the engine clean.
- We fill in synthetics and after two or three minutes check the oil level with a dipstick. Top up if necessary. It is not advisable to use oil other than the brand poured into the engine as a top-up. Modern lubricating fluids have a very complex chemical composition and therefore changing oil in Lada Vesta from different manufacturers, as well as combining different formulas, can have a detrimental effect on the performance of the mixture.
- Screw on the filler cap and start the engine. If all points are completed correctly, the level control indicator should go out. The machine is ready for use.
Under normal operating conditions and in the absence of force majeure situations, changing the oil in a Lada Vesta car is the most frequent and very important part of maintenance.
The correct choice of oil and accurate execution of the operation itself is the key to ensuring that the car will serve you for a long time and will not bring unpleasant surprises. We hope that this article did not leave any open questions, and therefore turned out to be useful.
DSC_(Copy)
Unscrew and remove the engine oil filler cap.
Unscrew and remove the engine oil filler cap.
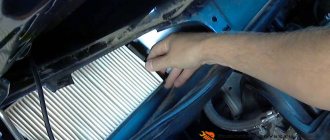
There is no access to the oil filter from above, so to replace the filter from below it is necessary to remove the mudguard of the engine compartment.
Oil change on a penny
Now, directly, instructions for changing the oil on a VAZ 2101 car.
Changing the engine oil
After the car has warmed up and all the tools and oil have been prepared, you can begin to change the engine oil. So:
- First, drain the old oil. For this purpose, we need a 12mm hexagon. They need to unscrew the oil drain plug in the engine oil pan. Place the oil container under the hole and leave for about five minutes so that the oil drains well.
- In the meantime, while the oil is draining, you can not waste time and replace the oil filter. You can, of course, unscrew it by hand if you have the strength - there are craftsmen like that, but we will consider the option with a puller.
Another filter remover option
Take a pre-prepared oil filter puller and put it on the filter itself. With a sharp movement of the hand, the filter breaks off and can then be freely unscrewed by hand. There are times when the filter is so stuck to the block that it cannot be unscrewed even with a puller. In this case, it is broken through, a knob is inserted and unscrewed in this way. Or you can show your imagination and invent your own method. So:
- After this, install a new filter and tighten it with the same puller.
- Next, you need to screw the drain plug back into the pan and start pouring oil.
- Now you need to unscrew the filler plug, which is located in the cylinder head cover. We adjust the watering can to make it easier to get in and fill in the oil.
Watering can for easy filling of oil on VAZ 2101
When adding oil, be sure to check the engine oil level on the dipstick.
- Once the required level is reached, tighten the plug.
- Start the engine for the first time. Don't be alarmed that it will be a little noisy right away - this is normal. The car needs to pump oil into the system and after a few seconds the noise will subside.
- A sign of a successful oil change is the absence of leaks in the block and drain plug, as well as a non-lit oil indicator on the instrument panel.
The oil change on the VAZ 2101, or rather in the engine, has been completed.
Changing the gearbox oil
Now let's go further through the car and consider the process of changing the oil in the variable gearbox. By the way, if you were unable to get a special syringe for changing the oil in the gearbox, then you can use a watering can with a long hose.
- We take a 12mm hexagon and unscrew the drain plug, which is located in the bottom lid of the box.
- If there is oil there, give it time to completely drain from the gearbox housing, and then tighten the plug back. Don't break the thread!
Oil change VAZ 21013
- Now we will also need a key for 17. We use it to unscrew the gearbox filler plug.
- Now we take a syringe or insert the end of the hose into the filler hole of the box, and take the watering can higher - for example, into the engine compartment.
- We fill the syringe with oil and squeeze it into the box. In the case of a watering can, we simply pour oil into it.
- Fill the oil with a syringe several times. It will require 1.4 liters.
- The filler hole serves as the oil level. The conclusion is to fill the oil until it flows out of the hole. Then quickly screw in the plug.
- Wipe off any remaining oil on the gearbox housing with a cloth and check for leaks. If there is a leak, it must be repaired.
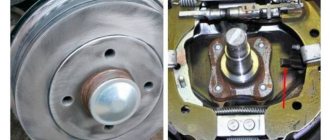
This is roughly what a checkpoint should look like
This is how the oil in the VAZ 2101 gearbox is changed.
Changing the oil in the rear axle of a VAZ 2101
Here the essence of the process is practically no different from changing the oil in the gearbox:
- Use a hexagon to unscrew the drain plug.
- Drain the oil into a container.
- We screw the plug back, having first cleared it of metal shavings.
- Unscrew the filler plug.
- Fill the oil with a syringe or a special homemade device. About 1.3 liters of oil will be required.
- Add to the level and tighten the cap.
- We wipe and check the tightness.
Changing the oil in a VAZ 2101
Functions and principle of operation of the device
The oil filter is an important component of the car's lubrication system. This system supplies lubricant under pressure or by gravity to the contacting parts of the motor. The lubricant forms a thin film on the surface of the parts, reducing the friction force.
When the engine is running, oil passes through all its main components and mechanisms. It flushes contaminants into the oil pan or into a separate oil tank in dry sump vehicles. To reuse such a lubricant, it is important to clean it to prevent impurities from re-entering the system.
The oil filter works very simply. After the engine starts, the oil pump supplies oil to the filter element. There it passes through the pores, is cleaned of impurities and enters the discharge line.
How to properly replace the oil filter?
It is not difficult to replace the MF correctly in the Lada Vesta SV Cross, following simple rules. Before installing a new MF, it is necessary to check the pressure of the bypass valve. This information is written on the body of the equipment. Oil filters for many cars are compatible in terms of mounting threads, but the pressure varies. If you put an MF with a pressure of 1.5 bar into the system, where the valve should open at 1.7 bar, then the efficiency of the filtration process will be sharply reduced. As a result, oil will constantly flow.
It is also worthwhile to inspect the landing surface under the MF. There should be no burrs on it. If they are, you should remove all defects using sandpaper. Otherwise, the oil will flow as well as in the previous case.
The third recommendation is that the filter needs to be firmly screwed into place.
It should not be unscrewed under any circumstances. But you shouldn’t squeeze with all your might either. So there is a possibility of damage to the gasket or breakage of the threads from the MF.
Recommendations for choosing a new filter
The new oil filter must meet the temperature conditions of the engine, a high level of purification of oils with different viscosities, and the ability to retain solid particles with different structures. It must also have chemical resistance to aggressive environments. The product body must have sufficient strength, a high-quality sealing edge and valve. It must be certified. Have appropriate tightness and quality workmanship of parts.
Preparing tools and supplies
To install a new oil filter, you need to take:
- chain puller;
- head at “10”;
- hexagon on “8” and “17”;
- new oil cleaner;
- a rag;
- an empty container for draining waste material;
- synthetic motor oil;
- flashlight (if necessary).
You may also need step-by-step filter replacement instructions.
Step-by-step change process
To install a new MF, you must perform the following steps:
- Secure the rear wheels with wheel chocks for safety purposes;
- Warm up the car engine to operating temperature and turn it off;
- Remove the metal protection from under the bottom of the car, unscrew thirteen screws along the car perimeter;
- Clean the bottom plate from dirt and oil;
- Unscrew the drain plug using an "8" hexagon, drain the waste oil into a prepared container (4 liters in total for manual transmissions and 3 liters for automatic transmissions), screw in the plug;
- Using a chain puller, twist the cleaner, wipe the perimeter from oil and dirt;
- Pour 120 milliliters of oil into the new MF, put the cleaner in the place where it was;
- Tighten gently, with moderation;
- Pour oil into the part of the filler neck of the valve cover, depending on the type of gearbox (the quantity indicated above);
- Start the engine and look at the dashboard indicator (there should be no symbols).
Note! At the end, be sure to check if there are any smudges or lubricant leaks. Carry out a control measurement of the oil level.
When to change
In accordance with the manufacturer's regulations, scheduled replacement is every 14,000 km, not including the first maintenance at around 3,000 km.
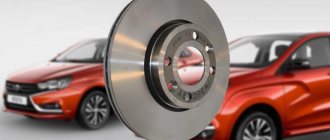
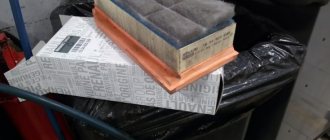
The box describes the models for which the part is suitable.
In practice, few owners adhere to the specified interval. Reasons for this:
- climatic conditions;
- increased dustiness;
- gas pollution;
- low quality of fuel, motor fluid, and the cleaner itself.
The average interval is 10 – 12 thousand km. The recommendation is for informational purposes only and is not a mandatory norm. If you love your car, you will still listen to the opinion of professionals.
Signs that replacement is needed
- an indicator on the dashboard indicates a malfunction in the engine;
- a mechanical sensor, if present, shows pressure below normal;
- The metal body of the purifier is damaged or deformed. Depressurization or fluid leakage has occurred;
- the scheduled replacement date has arrived;
- individual decision of the car owner about replacement.
Factors affecting replacement time
- quality of motor oil, its class, viscosity coefficient, API marking;
- driving style;
- temperature conditions of use;
- tightness of the cooling system, integrity of the cylinder head gasket;
- quality of manufacture of the purifier.
Do-it-yourself oil change in a VAZ 2109 engine
Required tools and materials:
- Set of wrenches;
- Screwdriver (slotted and Phillips);
- Container for used oil;
- Workwear;
- Fresh lubricant;
- Flushing fluid (if necessary).
The volume of engine oil according to the operating instructions is 3.5 liters. In practice, it only holds 3 liters. It is recommended to pour semi-synthetic or synthetic from popular brands (Castrol, Shell). It is possible to use domestic analogues that have an affordable price.
To properly drain the oil, the engine must be warmed up before replacing.
Changing the oil on a VAZ 2109 carburetor and injector
Replacing the oil fluid on a VAZ 2109 carburetor and injector does not require special knowledge from the car owner. The oil change procedure is similar for both the carburetor and the injector:
- Warm up the engine. Hot oil is less viscous. This allows it to drain into the container more quickly and efficiently.
- Place the vehicle on a level surface and apply the handbrake.
- Remove the engine protection (if present).
- Place a container for used oil fluid under the engine crankcase and unscrew the drain plug with a 17 mm wrench.
- Wait 10-15 minutes. The oil will be poured into the prepared container.
- While the lubricant is draining, remove the oil filter to replace it. A special wrench or screwdriver is used. A new filter element is installed.
- Is the oil completely glassy? Screw the drain plug back into place.
- Pour some motor oil into the new filter. Wipe the sealing rubber with a rag. Reinstall the filter. It is twisted by hand.
- Pour engine oil through the filler neck. It is located on the engine. Pour carefully, slowly.
- Pour in about 3 liters of liquid. Wait until it spreads through the internal mechanisms.
- Slowly add another half liter of motor oil. At the same time, monitor the oil level through the dipstick. If the system has not been flushed, then, as a rule, less than 3.5 liters of oil will enter the engine.
- Screw on the cap and start the internal combustion engine in neutral gear. Wait 5 minutes. During this time, all channels and the oil filter are filled with liquid.
- Turn off the power unit. Recheck the oil level. If necessary, top up.
- Check the system. There should be no leaks or other traces of oil.
Changing the oil in the VAZ 2108 engine
Changing the oil in a VAZ 2108 engine is no different from changing the oil in a VAZ 2109. These cars are equipped with the same carburetor and injection engines. Therefore, the replacement process is similar to that described above.
The choice of oil in the VAZ 2108 should be left to domestic manufacturers. Good quality, affordable price and operating time are the basis for choice. Recommended viscosity 5W-40, 10W-40, 15W-40.
Components
- Glass-shaped shell;
- Filter device in the middle. It is made of a kind of thick cardboard. It is folded a large number of times into an accordion and rolled into a “roll”. The material is treated with an absorbent substance;
- Spring;
- Two valves: bypass, non-return;
- Several entrances and one exit from the opposite side;
- Sealing material on top that prevents liquid from spilling.
Car owners should note that if one component of the filter element breaks down, the entire part must be replaced. Its further operation is impossible.
DSC_(Copy)
...and remove the oil filter.
...and remove the oil filter.
If there is no puller, we pierce the filter housing with a screwdriver (closer to the bottom, so as not to damage the engine fitting) and unscrew the filter, using the screwdriver as a lever. We clean the filter seat on the cylinder block from dirt and oil drips. Fill the filter with new engine oil to approximately half the filter volume and apply a thin layer of oil to the filter O-ring. We wrap the oil filter by hand until the sealing ring comes into contact with the cylinder block. Turn the filter another 3/4 turn to seal the connection. Pour 4.4 liters of oil into the engine through the oil filler neck.
Attention! If your car is equipped with AMT, then the engine lubrication system capacity is approximately 3.2 liters.