Window lifters on the VAZ 2107, as on other cars, are a necessary element of comfort and climate control in the cabin. The standard power windows on the front and rear doors are not very flatteringly called “crutches” by the people. Their plastic handles tend to break off if the car is not used very carefully; the edge of clothing can get caught on the handle, and then parts may need to be replaced. For tuning the interior, electric windows have long been used, even for the front doors. Their installation is highly desirable. While the passenger is looking for the handle, the driver proudly points to the button. We will definitely tell you about the connection diagram for electric windows in the following articles.
The structure of the window lifter is simple, but there are differences in the design of the mechanism on the front and rear doors. From the front, its schematic diagram is as follows:
The scheme can be divided into:
- internal parts, which include handle 1, lining and latch 2, socket 3;
- window lift mechanism, which includes the star winding mechanism itself 4, brackets 5, lower rollers 11, tension roller 13, bolt 12;
- cable 10 is the only flexible structural element;
- glass fastening mechanism – screws 6, pressure plates 7.
It should be noted that, unlike older “classic” models, the front glass on the VAZ 2107 is not a quadrangle in the form of a parallelepiped, but a pentagon, since the “seven” does not have a separate window. Therefore, on the “seven” the installation, feed, and location of the cable have been changed. Additionally, as can be seen in the figure, the glass connection mechanism on the VAZ 2107 has a fourth tension roller, unlike three rollers on other “classics”. Therefore, in order to remove the window regulator, you need to know these differences. In this case, the repair will be simple.
The operation of the window lifter is adjusted at the factory; independent installation and replacement is possible, but it must be done correctly. Otherwise, the mechanism will jam, or additional sounds, such as crunching and crackling, will occur during operation. Therefore, before performing repairs yourself, you need to carefully study the device.
This is what the main part looks like - the window lifter mechanism. To remove it, you must first remove the door trim.
Layout of parts for the rear window lifter mechanism.
The rear windows, unlike the front ones, do not go down completely, but about 5 cm remains. The layout of the rear windows does not differ from that on other Zhiguli models. This mechanism is installed not only on the VAZ 2107 for the reason that the rectangular shape of the rear windows is the same for all “classic” models. If an electric window lifter is connected to the rear windows, this 5 cm is retained.
One of the most common breakdowns is the breakdown of handle 1, both on the front and rear window lifters. If it breaks, it needs to be replaced, since repairing a broken handle is impractical.
Replacing the handle is as follows: removing the window lifter control handle is very simple, just first free it from the plastic retainer, which can simply be pryed off. To do this, use a flat-head screwdriver to move the outer ring away from the inner ring. After this, the retainer, also called the retaining ring, is removed. After this, the handle can be easily removed and another one can be installed. How this is done is shown in the video:
As you can see, in order to simply change the handle, it is not at all necessary to contact a car service. Anyone can carry out such simple repairs themselves; all you need is a screwdriver.
A simple operation at first glance - replacing a VAZ window regulator
- requires knowledge of certain subtleties. Otherwise, the lift will not work or will work with a bang, which will constantly irritate the owner of the car and further reduce the service life of the window lift.
For your information
The cable is tensioned according to the following procedure:
- lower the window all the way;
- turn the mechanism handle all the way in the direction of lowering the glass;
- adjust the cable tension by moving the corresponding roller;
- tighten the roller mounting bolt.
You should prefer the optimal tension force of the cable drive: the cable should not be overtightened, but should not dangle.
After installing a new window regulator, a squeaking sound may occur. To eliminate it you need to:
- loosen and remove the cable from under the rollers;
- cross the upper and lower branches of the cable coming out of the lift drum;
- repeat the procedure for installing and tensioning the cable.
Common faults and solutions
Over time, the window lifting mechanism becomes unusable - it is impossible to raise or lower the glass.
There may be several reasons for a device malfunction:
- cable break;
- foreign objects entering the mechanism;
- gearbox wear.
There is no point in repairing window regulators, since their cost is low; it is easier to buy a new device and replace it.
Device assembly diagram
Electric lifts may have the following faults:
- All power windows do not work: the fuse is blown, there is no connection to ground, the wiring is broken. The repair consists of replacing fuses, restoring ground connections and electrical circuits.
- The lift on one of the doors does not work. The switch is faulty, the reverse current relay is broken, the electric motor is broken, the wiring is broken, the connector is disconnected. Faulty parts should be replaced, the wiring restored, the connector connected.
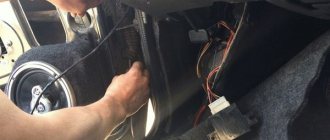
Installation of electric windows on a VAZ 2107
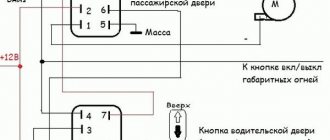
Wiring diagram for the power window button
The standard delivery package for power windows (ESP) includes:
- two ESP;
- two power window control buttons;
- wiring harness with installed connectors for connecting buttons and ESP motors;
- washers, bolts and washers for fastening mechanisms;
- decorative plugs for closing holes in the door trim.
The procedure for installing electric windows on a VAZ 2107 is as follows:
- study the ESP instructions;
- disconnect the car battery to avoid the possibility of a short circuit;
- lift the glass up and secure it with tape;
- remove the stock window regulator;
- install and secure the electric motor;
- lay the cable in its original place;
- prepare installation locations for control buttons (on door handles or “beard”);
- lay wires from electric motors to control buttons;
- connect buttons and electric motors according to the instructions;
- put the buttons in place;
- connect the battery and check the operation of the ESP;
- assemble the door trim.
A week ago, the window lift cable broke again. For a long time I didn’t want to change it, because on sevens there’s a whole system, damn it. I wanted to buy an electric one, but the finances were a waste) It was decided to change it after all. By the way, this is the second time the same one is torn on the driver's side. The first time I couldn’t change it myself, I resorted to the help of my uncle. Now out of boredom I tried it myself and it worked.
In general, we need: - Window regulator - Head for 8 / key for 8 - Head for 10 / key for 10 - Spare door trim clips - Hands. Experience. Skills.
We disassemble the car trim, everyone knows how to do it, so no photos. We remove the old window lifter by unscrewing 3 nuts to 8.
Then, after taking it out, unscrew the 4 screws that secure the glass to the cable
Open the window regulator box. We untangle it, but under no circumstances remove the iron fastener. and put it on the rollers. I started from the top right. Here is the sketch drawn
Once we have put the cable on the rollers, we put the window regulator itself in place, removing the iron retainer. We tighten the cable with the lower right roller and do not forget to tighten the glass guide. Perhaps without experience you will not be able to immediately install everything as it should be, because it is difficult to adjust the cable perfectly. Putting the door trim in place
Important points
- The sequence of installing the Granat ESP in the rear doors of a VAZ 2107 is similar to that described above, since the rear doors differ from the front doors only in the location of the window lifter handle: it is shifted 4 cm to the left. Accordingly, the drilled mounting holes will be offset by the same distance.
In addition, if a car owner wants to install ESP on all 4 doors, he will have to buy not one, but two sets of ESP “Granat” (since 1 set is designed for only 2 doors); - The ESP installed in the door must, firstly, be completely assembled, and secondly, the ESP mechanism itself must be in the lowest position, at the very end of the vertical rail. Otherwise, the ESP simply will not pass through the technological hole in the door;
- when unbending the lock washer on the window lifter handle with a screwdriver, you should not make much effort: this is a fragile part that breaks easily;
- This rule also applies to the plugs on the door trim: they also break easily when removed. And finding new door plugs for a VAZ 2107 on sale today is almost impossible;
- When checking the operation of the ESP, special attention should be paid to the smooth movement of the glass and the sound it makes. If the moving glass creaks piercingly, it means that it is necessary to loosen the mounting bolts on the vertical rail. If the creaking does not disappear, you need to unscrew the bolts on the rail, place a couple of 2 mm high washers under them and screw the bolts into place. If the problem does not go away even after this, you should apply silicone grease to the seal from which the glass extends. Moreover, it is recommended to lubricate only the inner half of the seal (the one located in the cabin);
Installing electric windows is a task that is quite within the capabilities of the average car enthusiast, provided that he has not yet forgotten his school physics course and has an idea of what an electrical circuit is. Then there should be no problems with installing and connecting the ESP, especially since each kit is supplied with very detailed installation instructions. Well, if you had problems with physics at school, there is only one way out: contact specialists at the service center. But in this case, the car enthusiast will have to fork out a fair amount.
Every driver of a budget car wants to make it a little more comfortable. Basically, this decision concerns the car interior, where functionality and convenience only attract attention. In this article we will tell you how to install and describe this process in as much detail as possible.
Electric windows on the VAZ 2107 installation features
Panther alarm, useful information, how to install. Panther car alarm connection diagram Pantera alarm diagram
Classic models from the Volzhsky Automobile Plant have a minimum of amenities as standard. Electric windows mounted on the VAZ 2107 significantly increase the level of comfort and allow the driver and passengers to open and close the windows without exerting excessive effort. The installation of this type of equipment also opens up new possibilities: automatic closing of the windows when the car is armed.
The standard design of the window lifters on the VAZ 2107 model is cable-based and is not highly reliable. Moisture entering through the gap between the glass and the seal can cause the mechanism to jam. There are two options for installing and connecting ESP kits:
- While maintaining the standard mechanism and installing an electric motor, there remains a high risk of failure of the entire system.
- With the installation of a set of ESP equipment designed for the VAZ G8 with a more reliable hinge design.
Preference should be given to the second option, especially since the difference in the cost of equipment sets is insignificant.
To perform this operation, you will need a mechanic's tool: wrenches, screwdrivers, pliers, etc., and a set of two or four ESPs for a VAZ 2107 car. It is more convenient to carry out the work in a garage or closed box; it is usually impossible to install window regulators quickly without having the appropriate experience. . During installation, malfunctions may be identified, the elimination of which will require the purchase of additional spare parts.
When the mechanism breaks down, what are your actions?
If the window regulator in a VAZ 2107 breaks down, it will not be difficult to fix it. The nature of the failure depends on the type of mechanism. Most often, regardless of the design, it is the teeth of the rotating gear that break. To carry out repairs, carefully remove the car door trim and card, as well as all the elements that are placed on it. After that, remove the window regulator itself and take it to a car dealership. If your mechanism is based on a cable, then with the window completely lowered, place marks on it near the gears. This will greatly simplify reassembly after repairs and will save you from lengthy glass height adjustments.
If the electric window regulator in a VAZ 2110 car fails, everything is much more serious. In this case, there may be many possible breakdowns. First of all, you need to check the power supply control unit. In all VAZ 2110 models, the operation of electric windows is controlled by a fuse, which is located in the mounting block under the hood of the car. You can see its serial number on the block cover. If it fails, replace it.
If everything is fine with it, then you need to proceed to the block itself, in which the power windows are controlled. If the electrical contact is poor or the transistors fail, the power window drive located on the passenger side will also not work, because this system is looped together.
If the window in your car does not go down or up completely, this is due to the glass being skewed or pinched. In this case, it is necessary to more accurately set the glass clamps and adjust their positions as accurately as possible. In some cases, replacement of glass rubber seals is required. When exposed to moisture, they expand and prevent the canvas from moving.
The windows in the VAZ 2110 car in some models have glass closers. This is a modern device that allows you not to hold down the button of the electric unit when pressing, because the glass will lower or rise on its own. Very often, glass closers are connected to the car alarm, which allows you to close the windows when you press the lock button on the remote control. If for some reason the glass closers in your car are not working correctly, then the first thing you need to do is check whether the control unit buttons work well. If the problem is in them, then replacement will save the situation. Do not try to disassemble or repair them, it will simply be a waste of time.
It also happens that the reason for poor performance of the glass closer is poor lubrication of the mechanism. To eliminate it, it is necessary to lubricate the drive gears, as well as other elements, depending on the type of window lifter device.
If the electric drive in the mechanism does not work, then it needs to be replaced, while the drive in the driver's door card must work. For the VAZ 2110 car model, buying the required electric drive will not be difficult, since it is available in all car stores. In order not to bother yourself with markings, simply remove the failed part and go to the store with it - this will make choosing the right model much easier.
If the cause of the breakdown of the electric window in the VAZ 2110 could not be determined, then you will have to contact a service center for a more detailed diagnosis. Since VAZ 2110 cars have electronic “brains”, the cause of the breakdown may be a failure of the controller or a failure in the firmware.
The first stage of replacing the front door window regulator on a VAZ 2107, removing the defective unit
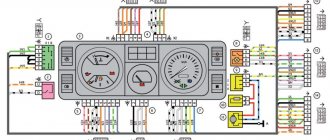
Generator warning lamp connection diagram
The installation of a new glass movement mechanism is preceded by an operation to dismantle the worn window regulator. Before implementing it you should:
- unscrew the three screws securing the door handle;
- remove the door handle;
- remove the door trim.
glass Before removing the original window regulator, it is recommended to tie two branches of the cable with a small piece of wire in the immediate vicinity of it.
This move will not allow the cable to jump off the grooves in the drum, which makes it possible to reuse the mechanism. Dismantling of the structure is carried out in the following sequence:
- lower the glass until the cable fastening brackets to the glass brackets are accessible through the door's technological windows (within 1 turn of the window handle);
- completely unscrew one screw and loosen the second screw of the bracket securing the cable to the supporting bracket; remove the cable (do it alternately for one and the second bracket);
- raise the glass to its highest position and fix it using available means (in the process of replacing the front window regulator of a VAZ 2107, the following technique is most often used: insert a screwdriver into the hole on the inner door panel);
- loosen the tension roller mounting nut (located in the center at the bottom of the door) using a “10” wrench;
- remove the cable from the tensioner, guides of the lower (in the lower left corner) and two upper rollers;
- unscrew the three nuts securing the window lift mechanism relative to the door;
- unscrew the two nuts securing the guide groove and move it to the right;
- remove the window regulator and remove it from the door.
After removing the mechanism, you should check the ease of rotation of each roller.
Window lifter malfunctions
In the summer, on a VAZ 2106, one of the devices that allows you to somehow cope with the stuffiness in the cabin is a window lift. If this mechanism does not work, then driving becomes a real pain. Therefore, Zhiguli owners should know what problems can arise with window regulators and how to fix them.
Glass fell
Mostly, glass falls due to loosening of the cable attachment to the glass itself. As a result, the cable slips, and the lowered window cannot be raised. If the problem lies in a loose fastening, then it will be enough to remove the door trim and tighten it, adjusting the relative position of the glass and the cable.
The glass does not respond to the rotation of the handle
If on your car, when you turn the window lifter handle, you cannot lower or raise the window and at the same time you feel that the mechanism is not working, then the main reason for this phenomenon is the licked slots on the handle itself. It is connected to the gearbox shaft through splines, but due to the soft material of manufacture, the splines on the handle wear out over time. In addition, premature wear is possible due to the tight movement of the glass, which can be caused by misalignment of the guides, the presence of a foreign object in the door, or problems in the gearbox itself.
When erasing the slots of door handles, problems arise with glass movement
Broken cable
One of the malfunctions of a mechanical window lifter is a broken cable. It manifests itself in the same way as when there is a problem with the handle, i.e. in the form of free rotation of the handle. Since the cable is not sold as a separate part, the window regulator in this case will have to be completely replaced. Attempts to restore the break will require a lot of time and effort, and the low cost of the device in question, amounting to about 200–300 rubles, indicates the inexpediency of repair.
Gearbox failure
The design of the window lifter is such that the gears of the gearbox can wear out over time, that is, their teeth simply wear out due to the softness of the metal. As a result, the mechanism runs idle, while the cable and glass do not move. It is possible to replace the worn gear by removing it from the old window lifter, but it is better to install a new product that will last much longer than a restored one.
Mechanism grinding
Sometimes, when the glass is raised or lowered, the device may make sounds similar to grinding. The reason may be a lack of lubrication or damage to one of the tension rollers, which is simply rubbed by the cable, causing the cable to jam inside the roller. In this case, the latter will have to be replaced. If the grinding noise is caused by a lack of lubricant, then you simply need to apply lubricant, for example, Litol-24, both to the gearbox itself and to the cable with rollers.
At the first sign of a grinding noise, the window regulator must be lubricated.
Glass creaks
During vehicle operation, the windows are exposed to various types of contaminants (dust, dirt, sand, etc.). When the door glass is lowered, the abrasive substances on it act on the surface, scratching it and producing a characteristic squeak. Although the doors are designed with special velvets (glass seals), which are designed to protect the glass from scratching by dust and sand, over time they wear out and do not perform their functions well. Therefore, if a characteristic squeak appears, it is better to replace the glass seals.
If a squeak appears while the glass is moving, then most likely the velvets have become unusable
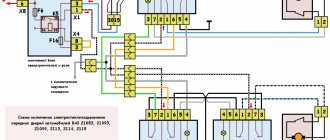
Installation of electric windows on VAZ-2104, 2105, 2107
It is clear that VAZ “classics” will be driven for a long time. Moreover, if you see in a car not only an addition to a tie or handbag, but also an assistant in everyday affairs, then “oldies” like the VAZ-2104 station wagon will outlive many. We helped one of the owners of such a utilitarian vehicle replace conventional cable windows with electric ones - let this practical, but not particularly comfortable car become at least a little more convenient.
They have been trying to install electric windows on Zhiguli for a long time. Initially, the idea looked brilliantly simple - the entire cable “ideology” was preserved, the coil was simply rotated by an electric motor. Alas, it didn’t catch on. The upper roller created difficulties: if it fails, the whole device is dead! And it was precisely on the roller that rainwater dripped from under the glass seal.
Then window lifters from different manufacturers began to appear on sale, but the problems of the “classic” doors remained. First of all, the internal volume is cramped - not everything that is on the market will fit here. Whether it’s the doors of the “eighth” and subsequent families that gave free rein to imagination - bet what you want. For these cars, reliable, durable, and fast window lifters quickly appeared on the market!
Is it possible to adapt one of them to the “classic” 2104...2107 - at least here there are no windows, the glass is longer, more stable...
Not everyone will decide to buy a pig in a poke for two and a half to three thousand. But the owner of the Quartet was lucky enough to get a set of Ural ones for almost nothing! True, the mechanism is intended for the VAZ-2108, but if you try it? The lock on the right door just got jammed - this is the reason for in-depth work. Details in the attached pictures. Note that for the right door of the VAZ-2104 the left window lifter from kit 2108 is better suited, and for the left door - its right brother
Pay attention to the orientation of the M6x5 bolts that secure the shortened brackets of the “four” glass to the 2108 bar - they should only be installed with their heads inward, otherwise they will cling to the mechanism parts in the narrow space of the door. Longer bolts are also not suitable: if they rest against the door panel from the inside, they will limit the height of the glass.
Connecting electric motors and control buttons to the electrical circuit of the machine is a simple job that only requires care.
So, the cable is dismantled, the glass is removed. Trying on the mechanism, we connected the power, lowered the bar to the level of the electric motor and inserted structure 1 inside the door. To do this, we pulled the inner panel slightly elastically - it worked! How are we going to attach it? Glass 2104 was placed on bar 2, and the previous brackets 6 were shortened so that when lowering the glass they would not rest against the levers. We lifted the glass up to the stop and in this position determined the places for two points 3 of fastening the upper bracket 4 to the inner panel. We drilled holes with a diameter of 6.5 mm and tightened the nuts. What to do with the bottom bracket hanging in the air? From the electric lock, which is secured in the door with screws 7, there remains a strip 5. This was adapted for installing a window regulator - we received a third attachment point.
Electric window regulator VAZ "Electromash": 1 – glass fastening bar; in the middle is the glass fastening unit 2108 - we don’t need it, but it doesn’t interfere either; 2 – levers with teeth; 3 – upper bracket with two attachment points to the inner door panel; 4 – electric motor assembly with gearbox; 5 – bottom bracket with attachment point to the door. A powerful electric motor, designed for a large window 2108, controls the glass of our “Quartet” very easily: raising or lowering takes no more than four seconds.
Source
How to install a power window?
Installation of electronic window regulators with a gear unit, motor and control keys is done as needed to replace or repair an old lift. As mentioned earlier, on VAZ 2110 cars, lifts are a weak element that sometimes needs repair. But repairs do not always help get rid of problems.
If the repair did not help in your case, the device does not work and you decide to replace it, then installation and connection is carried out as follows:
- The battery is disconnected, from the wiring for connection, which is included in the kit, you need to assemble a harness that will be connected to the on-board wiring of the VAZ 2110 according to the diagram.
- It is necessary to connect the block with wires to the connector on the mounting block to the reverse side of the power supply in accordance with the diagram.
- After that, the devices themselves are installed with a gearbox, a motor and control keys in the door in accordance with the diagram. First, the components are installed in the door. After installing the fixing studs in the special holes of the frame, the nuts should be very tightened.
- If the repair was unsuccessful and you received lifts for the VAZ 2110 with a gearbox unit and control keys, then the connection diagram should be included in the kit. Compliance with the diagram is very important, otherwise you may encounter device inoperability. In accordance with the diagram, the block with wires is connected. After you have connected all the wires according to the diagram, connect the battery and check the operation of the lifts.
- Display control buttons.
- Then lower the mechanism with the gearbox until the fastening holes of the cage are aligned with the holes in the clamp. The entire clip must be secured with bolts.
- Using the control buttons, check whether the lifts with the gearbox unit operate correctly. If you did everything correctly in accordance with the diagram, then you should not have any problems. If something is done incorrectly, you will have to immediately repair and check the circuit.
- put in the hole in which the lift handle was located . Installing the door trim is done in reverse order.
When noises start, it’s better to do something!
Diagram of how to install a window regulator on a VAZ 2107
Using an 8 mm socket or socket wrench, unscrew the three nuts securing the window lift mechanism. If we remove the window regulator not for replacement, then in order to prevent the cable from coming off the guide grooves of the drum, we tie two branches of the cable with wire in the place indicated by the arrows. Lubricate the window lift cable with grease. Installing the window regulator is performed in the reverse order.
Before adjusting the cable tension, untie the wire securing the cable.
Replacement window on vases 2104 2105 2107 Niva (Lada classic).
Removing the front door window lifter on a VAZ car 1. Remove the cable pressure plates and lower the window until it stops, see. Remove the window lifter cable from the other three rollers. Before adjusting the cable tension, untie the wire securing the cable. Lifting the glass, remove the window regulator from the technological hole in the inner panel of the door.
Using a 10 mm socket wrench, loosen the bolt securing the tension roller, move the tension roller and remove the cable from the roller.
Removing the front door window lifter on a VAZ car 1. Using an 8 mm socket or socket wrench, unscrew the three nuts securing the window lifter mechanism. Using a 10 mm socket wrench, loosen the bolt securing the tension roller, move the tension roller and remove the cable from the roller. By moving the roller, we tighten the cable and check the smooth operation of the drive.
Remove the cable clamping plates and lower the glass until it stops, see.
By moving the roller, we tighten the cable and check the smooth operation of the drive. Installing the window regulator is performed in the reverse order. Lubricate the window lift cable with grease. Lifting the glass, remove the window regulator from the technological hole in the inner panel of the door. If we remove the window regulator not for replacement, then in order to prevent the cable from coming off the guide grooves of the drum, we tie two branches of the cable with wire in the place indicated by the arrows. Removing the front door window regulator on a VAZ 1 car.
By moving the roller, we tighten the cable and check the smooth operation of the drive. We prepare the VAZ car for operations, see Installing the window regulator is performed in the reverse order. Lubricate the window lift cable with grease. We remove the cable pressure plates and lower the glass until it stops, see. If the window regulator is not removed for replacement, then in order to prevent the cable from coming off the guide grooves of the drum, we tie two branches of the cable with wire in the place indicated by the arrows.
Lifting the glass, remove the window regulator from the technological hole in the inner panel of the door.
Remove the cable pressure plates and lower the glass until it stops, see. Before adjusting the cable tension, untie the wire securing the cable. Removing the front door window regulator on a VAZ 1 car.
By moving the roller, we tighten the cable and check the smooth operation of the drive. If we remove the window regulator not for replacement, then in order to prevent the cable from coming off the guide grooves of the drum, we tie two branches of the cable with wire in the place indicated by the arrows. Using an 8 mm socket or socket wrench, unscrew the three nuts securing the window lift mechanism.
Using an 8 mm socket or socket wrench, unscrew the three nuts securing the window lift mechanism. Installing the front door window regulator on a VAZ 1 car.
We remove the cable pressure plates and lower the glass until it stops, see. If the window regulator is not removed for replacement, then in order to prevent the cable from coming off the guide grooves of the drum, we tie two branches of the cable with wire in the place indicated by the arrows. Installing the window regulator is performed in the reverse order.
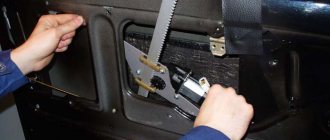
Window lift repair
Since repairing a window regulator in most cases involves replacing the mechanism, it is worth considering the step-by-step process from removal to installation. To do this you will need the following list of tools:
- heads or keys for 8 and 10;
- extension;
- ratchet handle;
- flat and Phillips screwdrivers.
Removing the window regulator
The procedure for removing the device from the car is as follows:
- Use a screwdriver to pry up and remove the plugs on the armrest. Use a screwdriver to pry the armrest plugs out
- Using a Phillips screwdriver, unscrew the fastening of the armrest to the door and remove it. Unscrew the armrest fastening and remove it from the door
- We remove the trim of the window lifter handle by inserting a flat-head screwdriver between the socket and the trim element. Use a screwdriver to pry off the window handle trim
- We dismantle the handle and socket. Remove the window handle and socket from the door
- Use a flathead screwdriver to pry off the inner door handle trim. To remove the door handle trim, pry it off with a flat screwdriver.
- We start the slotted screwdriver and push out the 7 clips that hold the door trim on the sides. The door trim is held in place with clips that need to be pryed off with a screwdriver.
- Slightly lower the upholstery and remove it from the inside door handle. We remove the upholstery from the door, lowering it slightly
- Lower the window completely and unscrew the cable clamp with a Phillips screwdriver. The cable is attached to the door glass using a suitable clamp
- We unscrew the tension roller fastening, then move it and loosen the tension on the window lift cable. To release the tension roller, unscrew the nut with a 10mm wrench.
- Remove the cable from the remaining rollers.
- We unscrew the fastening of the mechanism and remove it from the door. To remove the window lifter, unscrew the 3 fastening nuts.
- If the tension roller has become unusable, which can be determined by its external condition, then completely unscrew its fastening to replace it with a new part. To replace the tension roller, you must completely unscrew its fastening.
Replacing rollers
Window lifter rollers fail over time. Since replacing the top element is the most problematic, we will dwell on this process in more detail. The part to the door is fixed with hooks at the top, and with welding at the bottom. To work you will need the following set of tools:
- set of drills;
- electric drill;
- flat screwdriver;
- hammer;
- new video.
The upper roller consists of the roller itself and the mounting plate
The replacement procedure consists of the following steps:
- To remove the roller, we drill out the metal at the place where the plate is attached with a 4 mm drill.
- We drive a flat screwdriver inside the door under the roller plate and knock it down with a hammer, dismantling the roller. Over time, the window lift rollers wear out with the cable.
- Using the hole in the new plate, we drill a mounting hole in the door.
- We install a new roller and secure it with a rivet or bolt and nut. The new roller is secured with a rivet or bolt and nut.
Video: replacing the upper window lift roller
Window lifter installation
Before installing a new window lifter, you must check whether the rollers rotate freely. If necessary, lubricate them with Litol. The bracket that secures the cable should not be removed in advance so as not to confuse the mechanism, since returning everything to its original position will be quite problematic. We carry out installation as follows:
- We install the window regulator in place, securing it with nuts.
- We remove the bracket and place the cable on the rollers according to the diagram. The window lift cable must pass through the rollers according to a certain pattern.
- We adjust the tension of the cable with the appropriate roller and tighten the fastening of the latter.
- We fix the cable to the glass. Use a Phillips screwdriver to tighten the fastening screw of the clamp.
- We check the functionality of the mechanism.
- We install the upholstery and door handle, as well as the window lifter handle.
We recommend: Replacing the pump on a 16-valve Priora
Repair of VAZ 2101 Zhiguli Window lifter adjustment
- Repair manuals
- Repair manual for VAZ 2101 (Zhiguli) 1970-1985.
- Window adjustment
| EXECUTION ORDER |
| 1. To adjust, remove the door trim and lower the glass down. Loosen the screws 3 of the cable pressure plate 4. Then lower the glass all the way into the rubber buffer 2, turn the axis of the window lifter handle in the direction of lowering the windows to the limit, and then half a turn in the opposite direction (1 – clip). | |
| 2. With the glass and the cable in this position, secure the cable in the glass holder; This ensures precise movement of the glass from the lower to the upper position. | |
| 3. The smooth operation of the window lifter mechanism is regulated by the tension of the drive cable, for which the tension roller moves. |
Download information from the page
↓ Comments ↓
1. Technical data 1.0 Technical data 1.1 Main overall dimensions of the VAZ-2101 car 1.2 Main overall dimensions of the VAZ-21011 car 1.3 Main overall dimensions of the VAZ-2102 car 1.4 Technical characteristics of cars 1.5 Controls and monitoring devices 1.6 Ignition switch 1.7 Ventilation and heating controls salon
2. Operation and maintenance 2.0 Operation and maintenance 2.1. Vehicle operation 2.2. Vehicle maintenance
3. Engine 3.0 Engine 3.1 Features of the device 3.2 Possible engine malfunctions, their causes and methods of elimination 3.3 Removal and installation of the engine 3.4 Disassembly of the engine 3.5 Assembly of the engine 3.6 Bench tests of the engine 3.7 Checking the engine on the car 3.8. Cylinder block 3.9. Pistons and connecting rods 3.10. Crankshaft and flywheel 3.11. Cylinder head and valve mechanism 3.12. Camshaft and its drive 3.13. Cooling system 3.14. Lubrication system
4. Fuel system 4.0 Fuel system 4.1. Power system 4.2. Carburetor
5. Ignition system 5.0 Ignition system 5.1 Setting the ignition timing 5.2 Gap between the breaker contacts in the ignition distributor 5.3. Checking ignition devices on a stand 5.4 Possible ignition malfunctions, their causes and methods of elimination
6. Starting and charging system 6.0 Starting and charging system 6.1. Battery 6.2. Generator 6.3. Starter
7. Transmission 7.0 Transmission 7.1. Clutch 7.2. Gearbox 7.3. Cardan transmission 7.4. Rear axle
8. Chassis 8.0 Chassis 8.1. Front suspension 8.2. Rear suspension 8.3. Shock absorbers 8.4 Possible malfunctions of the chassis, their causes and methods of elimination
9. Steering 9.0 Steering 9.1 Features of the device 9.2. Inspection, check and adjustment of steering 9.3. Steering mechanism 9.4. Steering rods and ball joints 9.5. Pendulum arm bracket 9.6 Possible steering malfunctions
10. Brake system 10.0 Brake system 10.1. Features of the device 10.2. Checking and adjusting brakes 10.3. Clutch and brake pedal bracket 10.4. Main cylinder 10.5. Front brakes 10.6. Rear brakes 10.7. Rear brake pressure regulator 10.8. Parking brake 10.9 Possible brake malfunctions, their causes and methods of elimination
11. Electrical equipment 11.0 Electrical equipment 11.1. Electrical circuit diagrams 11.2. Lighting and light signaling 11.3. Sound signals 11.4. Windshield wiper 11.5. Heater electric motor 11.6. Control devices
12. Body 12.0 Body 12.1 Features of the device 12.2. Repair of the body frame 12.3. Paint and varnish coatings 12.4. Anti-corrosion protection of the body 12.5. Doors 12.6. Hood, trunk lid, bumpers 12.7. Body glazing and windshield washer 12.8 Instrument panel 12.8. Removal and installation 12.9. Seats 12.10. Heater
13. Features of repair 13.0 Features of repair 13.1. Car VAZ-21011 13.2 Cars VAZ-21013 13.3. Car VAZ-2102 13.4 Cars VAZ-21021 and VAZ-21023
14. Appendices 14.0 Appendices 14.1 Tightening torques for threaded connections 14.2 Tools for vehicle repair and maintenance 14.3 Used fuels, lubricants and operating fluids 14.4 Basic data for adjustments and control
Window lifter malfunctions
In the summer, on a VAZ 2106, one of the devices that allows you to somehow cope with the stuffiness in the cabin is a window lift. If this mechanism does not work, then driving becomes a real pain. Therefore, Zhiguli owners should know what problems can arise with window regulators and how to fix them.
Glass fell
Mostly, glass falls due to loosening of the cable attachment to the glass itself. As a result, the cable slips, and the lowered window cannot be raised. If the problem lies in a loose fastening, then it will be enough to remove the door trim and tighten it, adjusting the relative position of the glass and the cable.
The glass does not respond to the rotation of the handle
If on your car, when you turn the window lifter handle, you cannot lower or raise the window and at the same time you feel that the mechanism is not working, then the main reason for this phenomenon is the licked slots on the handle itself. It is connected to the gearbox shaft through splines, but due to the soft material of manufacture, the splines on the handle wear out over time. In addition, premature wear is possible due to the tight movement of the glass, which can be caused by misalignment of the guides, the presence of a foreign object in the door, or problems in the gearbox itself.
If the handle is damaged, you only have to replace it, and it is better to choose a part equipped with a reinforced metal insert.
Broken cable
One of the malfunctions of a mechanical window lifter is a broken cable. It manifests itself in the same way as when there is a problem with the handle, i.e. in the form of free rotation of the handle. Since the cable is not sold as a separate part, the window regulator in this case will have to be completely replaced. Attempts to restore the break will require a lot of time and effort, and the low cost of the device in question, amounting to about 200–300 rubles, indicates the inexpediency of repair.
Gearbox failure
The design of the window lifter is such that the gears of the gearbox can wear out over time, that is, their teeth simply wear out due to the softness of the metal. As a result, the mechanism runs idle, while the cable and glass do not move. It is possible to replace the worn gear by removing it from the old window lifter, but it is better to install a new product that will last much longer than a restored one.
Mechanism grinding
Sometimes, when the glass is raised or lowered, the device may make sounds similar to grinding. The reason may be a lack of lubrication or damage to one of the tension rollers, which is simply rubbed by the cable, causing the cable to jam inside the roller. In this case, the latter will have to be replaced. If the grinding noise is caused by a lack of lubricant, then you simply need to apply lubricant, for example, Litol-24, both to the gearbox itself and to the cable with rollers.
Glass creaks
During vehicle operation, the windows are exposed to various types of contaminants (dust, dirt, sand, etc.). When the door glass is lowered, the abrasive substances on it act on the surface, scratching it and producing a characteristic squeak. Although the doors are designed with special velvets (glass seals), which are designed to protect the glass from scratching by dust and sand, over time they wear out and do not perform their functions well. Therefore, if a characteristic squeak appears, it is better to replace the glass seals.
Installation of VAZ 2107 window regulators with video and connection diagram
In our country, a large number of car enthusiasts choose the VAZ 2107 model due to its low price and good reliability. Some components and systems of this car are poorly automated, including mechanical window lifters, which often fail or malfunction. Installing automatic windows does not require any special skills; there are many inexpensive kits for the VAZ 2107 on sale.
Pros and cons of factory power windows on the VAZ 2107
On this model, mechanical window lifters have 4 rollers for tensioning the cable. Now there are no front windows that were installed on previous versions. If the lifting mechanism breaks down, the glass will jam and it will not be possible to open the window.
Among the advantages of factory window regulators it is worth noting:
- simple operating principle;
- quick repair;
- low cost of components.
But the design has a number of negative aspects:
- short service life;
- when moisture gets inside or frequent temperature changes, metal parts wear out;
- Over time, rubber seals cease to perform their function;
- the appearance of an untidy squeak when opening a window;
- the appearance of scratches on the glass.
Modern automatic window lift kits allow you to open windows with the simple press of a button. In recent years, many car enthusiasts have been replacing this part of the car, especially since doing such work is not at all difficult.
Installation instructions
Before installing a new set, you need to deal with dismantling the old window regulator. Having understood how the entire structure works, it will be easier for you to install the automation and configure it correctly if necessary.
Tools
To work you need to prepare:
- a set of keys;
- flat and Phillips screwdrivers;
- pliers;
- tape for fixing the glass in the desired position.
How to install (step by step with photo)
The factory mechanism must be removed in the following order:
- We lower the glass down.
- To remove the side handle, you need to remove the lock washer. Use a flat-head screwdriver to push the edges of the washer apart and disengage it. We carry out this work carefully, without using brute physical force. To dismantle the decorative door panel, you must first remove the handles using a flat-head screwdriver
- To gain access to the inside of the door, remove the decorative panel.
- To loosen the tension roller mounting bolt, use a Phillips screwdriver. Loosen the mounting bolts using a Phillips screwdriver
- We move the tension roller, loosen the cable and remove it.
- Unscrew the 3 nuts securing the lifting mechanism with a wrench. Nuts are removed using an R8 wrench
- We pull the entire mechanism through the opening.
Tip: Attach wire to the ends of the cable - this will reduce the time required to reassemble the entire mechanism.
Connection diagram and installation
Despite the fact that there are several kits on sale from different manufacturers, not all of them are suitable for the VAZ 2107. This is due to the design of the window lifters and the shape of the door; we recommend purchasing a kit from SPAL. It fits well and installs quickly. Before installation, carefully read the instructions and understand the connection diagram.
- Disconnect the negative terminal of the battery.
- We lift the glass up and secure it in this position with tape. You can fix the glass in the upper position using regular tape.
- We choose a place to install the electric motor and mount it. We fix the electric motor in the door space using self-tapping screws or bolts
- We lay the cable between the rollers.
- For control buttons, you need to make mounting holes in a convenient place.
- We connect the electrical wiring as shown in the diagram. We connect the wires according to the diagram, isolate the connections
- We isolate the connections and put the decorative door panel in place.
- We connect the battery.
Video: how to install electric windows on the “seven”
Installing automatic window lifts does not require any special skills. Even novice car enthusiasts can install and connect the new kit according to the instructions. Modern devices are highly reliable and eliminate the main disadvantages of mechanical lifts.
What can be useful when installing an ESP?
First of all, you need to purchase a set of various devices, including: controls and an actuator. It follows in advance, their quantity and price. Naturally, if you choose better and more efficient lifts, the price will be significantly higher.
Conventionally, the following types of electric windows can be distinguished:
Once you have decided on the type of window lifters you want, you need to decide on the manufacturer. To do this, you can use various tests and reviews, of which there are quite a lot on the Internet. Differences in design also have a big impact on the installation process, as many vehicles are already equipped with mounting hardware to install the appropriate devices, while others will need modifications to the inside of the door. However, redesigning the fastening parts does not seem difficult.
Step-by-step installation process
Having in his own arsenal the necessary set of tools, every car owner will be able to independently upgrade the car window lift. It is quite simple to purchase such a mechanism by contacting specialized stores. But in order for the ESP to serve faithfully for a long time, the choice should be given to reliable and trusted manufacturers. According to experienced drivers, the highest quality window lifters are:
- Forward;
- Pomegranate;
- Golden eagle.
For work, you can use either slatted or rack-and-pinion window lifters, or those operating with a cable.
When installing an ESP on a VAZ-2107, it is best to purchase a rack and pinion version, which is suitable for both the left and right front doors. The assembly diagram, which can be found on the Internet resource, will help you accurately assemble the entire mechanism.
We install the ESP in the following sequence:
- the front door from the inside of the cabin should be disassembled;
- Using a screwdriver, remove the window lift handle;
- the fixation of the car lock relaxes;
- 3 fasteners holding the armrest are unscrewed;
- both the door and the upper part of the trim are removed;
- using a size 8 wrench, unscrew all the fixing bolts;
- the glass guide strip is removed;
- The car door is completely removable;
- using a screwdriver, unscrew the 4 fasteners that secure the mechanism to the glass;
- the nut that controls the tension of the lift cable loosens;
- the window regulator is removed from the cell;
- 2 holes are drilled in the car door, the diameter of which is 6 mm;
- the holes are located on the same plane;
- The gearmotor must be fixed in place of the removed factory lift. For fixation, fasteners are used that come complete with the ESP;
- using standard fasteners to the electric lift, the car window holders are fixed;
- the wires are carefully routed through the installed lift. The power button can be installed both on the door panel and in the center of the armrest.
At this point, the stage of installing the ESP on the VAZ-2107 can be considered complete. Car owners will only have to assemble the door components in the reverse order.
As you can see by reading this article, the process of installing an ESP is quite simple and understandable. If any difficulties arise during work, car owners will come to the aid of video instructions in the virtual world, conducted by real professionals in their field.
Removing the window regulator
After the door trim is removed, you can proceed directly to removing the window lifter. For this you will need:
- crosshead screwdriver;
- two heads ( 10 and 8
); - hammer or ratchet handle;
- extension.
The first stage of work
To remove the window lifter, you need to unscrew the fastening of the window lifter cable clamp, which is held on by two bolts: to release the cable in this place, you just need to loosen one of the bolts and the clamp itself will fall down. After the clip is removed, you need to go to the left side of the door and loosen the roller nut
, after, the window lift cable can be completely removed from the door.
The window lifter fastening mechanism is held on by three bolts
; removing them is not difficult at all - you just need to take the necessary tool and unscrew all the bolts one by one (when unscrewing the last bolt, you need to hold the window lifter mechanism from the outside so that it does not fall out and damage something).
Further
Once all the bolts are unscrewed, the car enthusiast will only have to remove and unscrew just one nut, which is located on the inside of the door under the window lifter fastening mechanism, and after this nut is removed, all that remains is to carefully pull the mechanism to the right and pull it out of the door entirely. {banner_content}
How do rack and pinion electric windows work on a VAZ 2107?
As for the principle of operation of this device, the “Seven” in this regard is practically no different from other models of the VAZ family and other foreign cars that use electrically driven lifting mechanisms. And power windows only work when the car's ignition is turned on. If you remove the key from the ignition, the window can only be raised.
The main role in the operation of the power window mechanism is played by the controller. It is this device that closes all the locks on the doors when the car is set to alarm and automatically closes all open windows, also performing the function of a “closer”.
What’s most interesting is that when the lift stops operating, the controller does not absorb energy from the battery at all, going into standby mode. If necessary, this device automatically supplies current to the ESP mechanism.
Also, the mentioned device controls the operation of the gearbox, namely, monitors the number of its revolutions. Thanks to this, the battery practically does not lose energy in vain, and accordingly, the battery holds a charge longer.
By the way, some models of electric windows have a closer that controls the operation of only two windows, and since the VAZ 2107 model is a four-door, drivers often install controllers on all 4 windows at once. But again, it all depends on the specific ESP model.
Design and technological nuances
For owners of other classic Lada models, replacing a window regulator on a VAZ 2107 may seem unnecessarily complicated. The cable is connected to the solid glass brackets in two places, which necessitated the introduction of one more roller - there are four of them: one tensioner and three guides.
The repair operation is completely feasible on your own if you have a small amount of equipment:
- open-end wrenches for “8” and “10”;
- Phillips head screwdriver.
Serial connection diagram
We connect the output of additional button 1 in the driver's door to input 6, and output 7 to input 3 of the main button on the passenger door. We cut the wires in the block connecting contacts 5-6 and 6-3. The minus of contact 5 now goes only to the backlight, and contacts 6 and 3 now take output from additional buttons 1 and 7 of the driver's door. Installation in parallel will result in short-circuiting during lifting and lowering. Power wires are highlighted in bold.
When using trigger buttons, connect all ESP motors only through a relay. When using a conventional door closer, relays are also needed, since they are not in the long-press closer block and all the current flows through the buttons and wires from them.
Briefly about the change procedure
A simplified process for replacing a defective window regulator in the front door of a VAZ 2107 looks like this:
- remove the door trim;
- disconnect the cable from the clips securing the glass;
- loosen and remove the cable from the rollers;
- dismantle the guide chute and the window lift mechanism;
- install the housing of the new glass lifting mechanism;
- thread the cable along the contour;
- fix the glass brackets relative to the cable;
- pull the cable;
- install door trim.
Manual for diagnosing and replacing the ignition switch on Lada 2114
Technology for replacing and diagnosing the ignition switch on a VAZ 2114 in a garage.
Guide to replacing front and rear struts on Lada 2109
Methodology for replacing struts on a VAZ 2109 car and the essence of diagnostic measures in relation to the suspension.
Diagnostics and technology for changing ball joints on a VAZ 2107
The process of replacing the upper and lower ball joints of a VAZ 2107, diagnostic measures, symptomatic features.
How to pull out vehicles on your own. Types of winches and rules of use
Drivers who often ride their iron horses off-road are sure to encounter their vehicles getting stuck in the mud. This is inevitable, because confusion is an unpredictable thing. Stuck - you need to get out. If there is no other car nearby, you will have to act independently.
Gear shift system on modern bicycles.
Today it is impossible to imagine a modern bicycle without gear shifting and other devices. Sometimes it seems to a simple user that it is impossible to figure it out. Such settings are mainly carried out by specialists in bike shops. In this article we will try to prove that
A lifeline designed to help you and those around you
Helping people is a noble cause, and doing it on the road is extremely useful. You will help, and in difficult times they will help you too, because no one has canceled the “golden rule of life”.
Installing a new window regulator
The new mechanism must necessarily have a bracket that secures two branches of cables. It cannot be removed until a full installation has been completed.
In general, the installation process looks like this:
- Installing and fixing the case in its “own” place.
- Installing cables around the rollers.
- Fastening the glass clips with a cable. It is fixed with screws using 2 brackets.
- Installation of the guide groove.
- Cable tension.
- Now the bracket that secures the branches of the cable is removed.
- Installation of door trim and handles.
The cable can be routed around the rollers in two ways through the rolling support (upper or lower). If the line goes through the lower roller, then the cable is routed as follows:
- Left guide roller (lower).
- Left guide support (top).
- Central tension reel (bottom).
- The guide element is at the top right.
If the front window regulator is being replaced, then you can loop it through the upper coil in the reverse order.
- Lower the glass to the down position.
- Turn the handle all the way in the direction of lowering the window.
- Adjust the cable tension by moving the required roller.
- The bolt clamp that secures the roller.
Please note that the tension should be sensitive. The cable should not be overtightened, but it should not be allowed to dangle either.
If a creaking noise appears after installing the new mechanism, then do the following:
- Loosen and remove the cable from under the rollers.
- Cross the lower and upper branches that come out of the mechanism drum.
- Repeat the installation and tensioning procedure.
Brief instructions for replacing the mechanism
In general, the procedure for replacing a window regulator looks like this:
- The door trim is removed.
- The cable is disconnected from the clips that hold the glass.
- The cable is removed from the rollers.
- Next comes the removal of the guide chute and the lift mechanism.
- Installing a new window regulator.
- Threading the cable.
- Fixing the glass brackets and tensioning the cable.
- Reinstalling the door trim.
To summarize, we note that the process of replacing a window regulator on a VAZ-2107 is a completely feasible task for the car owner. During the repair process, the main thing is to carefully follow all the recommendations and installing a new mechanism will not be a problem for you.
There is a special offer on our website. You can get a free consultation with our corporate lawyer by simply submitting your question in the form below.
You might be interested in
You watched
I got confused again and typed a lot of books in response to a question from one of our customers.
It will be a pity for the time spent if you then have to do this work again, and even if you just have to search for a long time where I answered this, when a similar question is asked again.
Therefore, I decided to publish this answer here, for all visitors to our site.
The question was asked on YouTube, in the comments to one of our videos:
Actually, the question itself:
Well, now my answer to it (well, maybe with some notes):
Firstly, I understood practically nothing from what you wrote - commas still need to be used.
Well, really, let’s respect each other, use the knowledge gained at school and write, if not absolutely correctly, then in such a way that you can understand what you wanted to say or ask
Secondly, I’m not sure that you call a spade a spade and are not confusing the glass guide and the window regulator adapter plate. Because we did not demonstrate any manipulations with the glass guide in this video.
Thirdly, window regulators require qualified installation, and we strongly recommend that you contact a specialist for this.
If, in spite of everything, you decide to install electric windows yourself, then be prepared for the fact that it will be exactly as difficult as your qualifications differ from the skills of the installer of additional equipment.
Before you begin installation, check how difficult it is to raise and lower the window using the power window. If at the same time you have to make a noticeable effort, and the handles of the standard window regulators on your car are broken, get ready for the fact that you will have to work hard.
After removing the mechanical window regulators, check how the glass moves. Ideally, it should go down under its own weight and go up with two fingers. If so, great, further installation will proceed without any problems.
If everything is different, solve problems, the scope of which depends only on your car (and not on the electric windows that you are going to install). And I recommend starting with studying the structure of the door (using the catalog of parts and assembly units and the car repair and operation manual).
Here, by the way, is a sheet of the catalog of parts and assembly units of the VAZ-2107 (it is better to view it in full size by clicking on the image).
You can achieve normal glass movement in approximately the following order:
How to install a window regulator on a VAZ 2107
We all understand that we will have to earn money for a good imported car for a long, long time, so sooner or later we decide to buy our own VAZ. And here we begin to change everything to suit ourselves - this also applies to electric windows. If this is your first car, then the question arises, how to install power windows on a VAZ 2107? First, we will understand how the VAZ 2107 window lifter works.
Window lifter device for VAZ 2107
- Window lifter handle;
- Called a facing sleeve with a seating groove for the window lifter handle;
- Called the window handle rosette;
- Called the window lift star mechanism;
- Top rollers;
- Bolts for fastening the pressure plate;
- The pressure plate itself;
- Bracket that fixes the glass;
- Glass;
- The cable itself;
- Bottom roller;
- Nut and bolt that secure the lower roller;
- Tension roller;
A distinctive feature of the VAZ 2107 from other predecessors is that the glass lift design includes a 4th additional bearing for tensioning the cable. This change occurred due to the fact that the side glass has a solid structure and is absent, the so-called “window” among drivers.
Now the device of the VAZ 2107 window lifter is more or less familiar to you, so we will move on to dismantling.
Mechanism design - how does it all work?
The VAZ 2107 window lifters are quite simple devices in terms of their design. It is based on a mechanism to which the glass is attached using special clamps. The VAZ 2110 glass is lowered and raised by turning the handle on the interior side.
The window lift system of the VAZ 2110 car has already moved far ahead in technical progress. The operation of the device is based on an electric drive, with the help of which the glass moves. This type of window lifter is controlled by buttons located on the door cards of the VAZ 2110 car.
The electric window lifter drive of the VAZ 2110 consists of an electric control unit, a lifting mechanism, which can be different depending on the vehicle’s configuration and, of course, the drive itself. The VAZ 2110 window lifter drive consists of a worm and gear drive, which interact with each other using an electric motor. The worm gear prevents spontaneous lowering of the glass and fixes it at the desired level. The operation of the electric drive is to raise and lower the glass due to the force exerted.
Design Features
Most owners of the seventh new generation model are confident that the process of replacing a window regulator is somewhat complicated. This is because the glass is connected to the supports and cable in not one, but 2 places. This decision required adding another video. Now there are 4 of them used (three for direction, one for tension).
It is quite possible to make the replacement yourself if you have simple tools:
- Keys (8, 10).
- Phillips screwdriver.