Mounting block. If you are not confident in your abilities, then seek help from an experienced electrician. In addition, you will not need to pull 2 extra thick wires to the motor from the driver's door to the passenger's door. A parallel connection for power buttons is preferable, since the main passenger button does not need a relay; the wires here are short, and we thereby eliminate unnecessary clicking of the relay when the main button on the passenger door operates. Depending on which company produced the product in question, it can be installed in the car door as standard, or, if it does not fit in size or other technical characteristics, it can be altered without unnecessary problems. Electric windows Forward. Installation on a VAZ 2107 When choosing window regulators for a VAZ, you should focus on several main criteria: Possibility of use in winter, when the temperature drops below zero degrees. After this, it is necessary to cut a circle of the required diameter from a 2-mm steel plate and mark suitable stiffeners on it.
Replace the fuse with a new one. To ensure good operation of the entire mechanism, it must be lubricated very often. Find the guide, it is secured to the door with 4 nuts. It is imperative to use electromagnetic relays to save buttons from switching high current. The VAZ power window button breaks very often. Electric windows in the VAZ 2110! Through a relay!
Connection instructions
To connect the button of the mechanism that raises the glass, you will need a whole set of tools and materials. If the installation is carried out on several doors, then you will need the same number of kits as there are doors.
- female-male block having two contacts;
- connection connector;
- 2 male terminals;
- 2 large female terminals and 7 small terminals;
- beet lifting mechanism key;
- glass and key connector;
- 4 meters of wire with a cross section of 0.75;
- 7 pistons for the door.
Electrical connection diagram
If the key for raising the glass is installed directly in the door, then its installation will consist of the following steps:
- Before work, you should turn off the power to the car by removing the negative terminal from the battery.
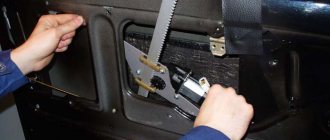
- To access the glass lifting mechanism, the trim must be removed.
- The power window button is installed on the driver's door; you need to run wiring from it to those doors where the same keys will be installed.
- There is a black and white 12 V wire on the power window relay. Connect 2 red 12 V wires to it.
- On the car door there are blue and gray wires connected to the window lift motor. The prepared wires need to be connected to the block connector: black and white to the blue wire, and black to the gray.
- There should be 5 wires connected to the button. The black wire is responsible for ground; red receives 12 V; black and white goes to blue; white — illumination of power window buttons; The black one is connected to the gray one from the block.
Switch connection pinout
It is necessary to connect wires with terminals using the following diagram:
- red 12-volt connects to hole #2;
- black and white (from blue) – hole No. 3;
- white (backlight) – hole No. 4;
- black (“ground”) - hole No. 5;
- black (from gray) - hole No. 6.
It is important to correctly connect all wires to the appropriate sockets of the connector, otherwise the control buttons will not work. Then you need to take black and black-and-white wires of the appropriate length and insert the black one into socket No. 1, and the second into socket No. 2
The loose ends should be crimped using large female terminals and connected to the new connector. In this case, you need to make sure that the connected black and white wire is directed to blue, and the black wire is directed to black
Then you need to take black and black-and-white wires of the appropriate length and insert the black one into socket No. 1, and the second into socket No. 2. The loose ends should be crimped using large female terminals and connected to the new connector. In this case, you need to make sure that the connected black and white wire is directed to blue, and the black wire is directed to black.
At this stage, the connection is considered complete. All that remains is to install the glass and the window lifter button, securing them with sealant in a specially made connector in the door trim.
Thus, you can connect the switches for raising the glass yourself, if you use the connection diagram and have experience in electrical work. This will give you the opportunity to improve your car without resorting to the help of a car service.
Sorry, there are no surveys available at this time.
Glass closer Pandora DWM
Connection diagram for the passenger door button in series through a duplicate button on the driver's door. Contacts 1-6 and 7-3 are always normally closed. When you press the up button, contacts 1-6 open and 1-2 close (window rises). When you press the down button, contacts 7-3 open and 7-2 closes (window down). The 30th contact of a 5-pin relay, without supplying voltage to the winding contacts, is constantly shorted to contact 88, which gives us the necessary negative contact (works like a switch). If voltage is applied to the winding, then contact 30 is disconnected from contact 88 and connected to contact 87. Contact 86 of the winding is connected to ground.
Installation, wiring diagram for electric windows
Connection diagram and pinout of VAZ power window button
Rack and pinion windows are sensitive to glass freezing
In the vast majority of cases, there is no need to drill anything additional into the doors. Standard mounting points for the manual mechanism are quite suitable for attaching the electric window regulator. Install new equipment as follows:
- The window lifting unit is placed through the largest door opening. In this case, the entire structure must be assembled.
- For fastening, there are a pair of studs on the body of the unit, which ideally fit into the holes freed from the mounting bolts. These holes are located in the central part of the door. Align the studs with the holes, screw and tighten the nuts.
- Now you need to align the window regulator mount with the glass itself. Since the mechanism is in the “fully open” position, you need to activate it and raise the seat close to the glass. The ideal option would be to temporarily connect the equipment directly to the battery.
- Having brought the lift element to the metal strip of the door glass and thereby connecting the mounting holes, secure everything with two bolts that come with the window lift.
- Do not forget to thoroughly lubricate all friction points of the window lifter parts.
The electrical wiring is connected as follows:
- Measure the length of the future wires that will be laid from the window motor contacts to the button installation points on the front panel. The plugs for the activator buttons (2 - one per door) in the case of cars with a “tall panel” are located to the right of the “cigarette lighter”.
- To pull the wiring into the rack and then under the panel, you will need to use a cable holder. For such purposes, an ordinary steel wire with a loop at the end will do - to capture and pull the wiring through the channels.
- When purchasing wires, make sure that the cross-section is at least 1 mm. sq.
- The simplest and most convenient option for chain tables is to connect the window regulators to the cigarette lighter. However, some motorists recommend preferring power supply directly from the battery. There is also a standard connection diagram provided by the factory.
Articulated-lever ones are considered the most reliable window lifters
After completing the work, you can put the door trim in place, close the resulting holes with decorative plugs, which usually come with window regulators, and connect the battery terminals to try out the new equipment.
Programming and adjustment: features
After the unit is installed, you need to program the power windows. The unit registered in the ECU memory will work more efficiently. Training window regulators depends on the vehicle they are installed on, so there is no universal instruction for this process.
Let's look at an example of how to register an electronic signature using the example of a Ford Focus car:
- First, you need to press the ES control button and wait until the glass in the door rises all the way.
- Next, press the same button again and hold it in this position for several seconds.
- Now you need to lower the window; to do this, press the corresponding button until the electric valve lowers all the way. When the glass is in its lowest position, release the button.
- Then you will need to raise the glass again until it is in its highest position.
- After that, simply lower the window and try to raise it in automatic mode by pressing the button once rather than holding it down. If these steps do not help you, then repeat the entire process again. It should be noted that if this procedure is carried out on Focus 2 cars assembled in Russia, then such an operation will make it possible to train the electronic control system if the car is equipped with all four power windows. If your car only has 2 ES, then this algorithm will not work.
Connecting the power window button
Diagram of the rear window heating button
Look at your button, it should have 5 contacts:
- + 12V
- 1st power window wire
- + 12V
- There is no 4th contact
- 2nd wire from power window
- Weight
From personal experience, I advise you to connect + from the audio system to the first contact of the power window button. The thing is that rarely does anyone use this wire, but it receives +12V when the car’s ignition is turned on.
Next, you can treat the door seals with silicone grease. After all the above steps have been completed, you can check the operation of the power windows. Let's also add that on some cars there may be minor discrepancies in the connection diagram, and the advice here is this - look where which contacts are located on the power window connection button.
We hope our instructions will help you correctly connect the power windows on your car. We also suggest that you read another article on the general topic of Car Structure.
Well, even more information about cars is contained in our Auto section.
Let's sum it up
As you can see, installing and connecting power windows, as well as power window buttons, is not the easiest procedure to install, but it is quite possible to do all the work yourself in an ordinary garage.
The main thing is to choose the right window regulator (and, if necessary, a window closer), and the diagram of the window regulators should be studied in advance in order to avoid errors when connecting.
We also recommend reading the article on how to connect a subwoofer in a car. From this article you will learn about the available ways to connect a subwoofer to a radio, as well as what subtleties and nuances you should pay attention to.
Finally, we note that there are a large number of different window lift mechanisms, blocks, buttons, etc. on the market. In practice, it is recommended to buy complete and ready-made kits from trusted manufacturers rather than assemble a window regulator from individual elements.
Of course, high-quality components are also sold separately. However, this option is more suitable for repairing window regulators. If you assemble the entire kit, it may turn out to be significantly more expensive than purchasing a ready-made solution right away.
Electric drives
Panther alarm, useful information, how to install. Panther car alarm connection diagram Pantera alarm diagram
Drives with electric motors are much more advanced. But they were installed on “classic” VAZ cars exclusively by car owners - this option was not provided at the factory. The main thing (according to those who have been producing these cars for almost 30 years) is wheels on an iron body and some kind of motor, as long as it drives this entire structure.
If you take a closer look, you will see that the designers did not bother themselves with comfort; they only thought about how to save on production. And in the car circuit there was no provision for connecting power windows. Therefore, you have to install all the wiring yourself.
But many car owners took on the responsibility of the factory and began installing power windows themselves. Most often, the choice falls on hinged lever mechanisms, which have several advantages:
- Quite low cost of the kit.
- Electric windows are easy to install.
- There is no need to look for components - everything needed for installation is already available, including wires and buttons.
- The devices are highly reliable, work quickly and do not make noise (the latter advantage is more relevant for modern Vesta than for the “seven”).
Getting ready for installation: necessary tools
In order for the installation of power windows to go smoothly, you will need certain tools and materials. Here is a sample list:
- Electric drive kit for a specific vehicle. Please note that kits vary for all vehicles.
- Flathead screwdriver.
- Ruler.
- Calipers.
- A set of open-end and spanner wrenches.
- Marker.
- Set of socket wrenches or sockets.
- Electric screwdriver and metal drills.
- Silicone and CV joint lubricants.
Having prepared all these tools, you can begin installing the drives on the car.
Wiring diagram for a VAZ 2114 car
Electrical wiring components
A single-wire circuit (used for all electrical wiring) has negative terminals of the consumer and the source, which are closed on the car body. The VAZ 2114 body is the second connector.
Complete circuit with electronics in VAZ 2114
Electrical wiring includes the following components:
- Block headlight.
- Anti-fog headlight.
- Temperature indicator.
- Mounting block housing.
- Electric fan motor in the engine cooling system.
- A block connected to the ignition system wiring group.
- Engine compartment light switch.
- Rear wiper motor connector plug.
- Devices.
- Car signal connection block.
- Electric motor for windshield wipers.
- Loudspeaker signaling device (SSU) housing.
- An indicator showing the volume of water in the glass washer.
- Front brake pad mode indicator.
- Oil quantity indicator.
- Generator and starter housing.
- Reversing headlight switching device.
- Lubricant pressure warning light indicator.
- Windshield wiper gear motor housing.
- Light housing under the hood.
- Engine coolant temperature indicator. 2x h16
Circuit breakers
In fact, the VAZ 2114 wiring is always connected to fuses. Such fuses do not protect only the circuit of the generator and charging device, the mechanism for switching on the power unit of the machine, as well as the winding of the backlight cut-off relay.
Before replacing a failed electrical circuit fuse, you need to find out exactly the reasons for the wiring overload, as well as its elimination. Finding the cause will be much easier if you first read the following materials. Below is a list of fuses and their purposes.
The data (the name of the fuse and the electrical circuit protected by it) shows a complete list of all possible wiring fuses. For each car, their number may differ.
- F1. Wiring diagram for the rear fog lights, electric motors for the headlight wipers, housing for the control lamp and its shutdown, electric motor for the headlight cleaner.
- F2. Turn signals and turn signal relays, hazard warning lights, hazard lights.
- F3. The wiring of the lamp illuminating the interior is customized depending on the personal preferences of the car owner, the ignition switch light, the car trunk light, the engine functionality check indicator, the on-board computer, the brake light indicator, and the clock.
- F4. A plug for connecting a portable lamp, a plug that connects the heating of the stern and rear windows.
- F5. Connection diagram for SGU, radiator propeller electric motor, VIP signal relay.
- F6. Power window relay, power window connection circuit. Fuse box in VAZ 2114
- F7. Wiring of the electric motor of the VAZ 2114 stove, electric motors for the headlight wipers and windshield washer, cigarette lighter circuit that illuminates the glove compartment, light bulb, relay for connecting the aft glazing heater winding.
- F8. Wiring diagram for the right fog lamp.
- F9. Left fog lamp diagram.
- F10. Electrical wiring for the side lights on the left side, an indicator that shows whether the side lights are on, a circuit for the engine compartment lamp, illumination of license plates, heating system levers and ashtrays, a cigarette lighter, a circuit for illuminating the switches.
- F11. Side lights located on the left side.
- F12. Right low beam design.
- F13. Left low beam design.
- F14. High beam device and left bulb. It is also an indicator for switching to high beam.
- F15. Right high beam design.
- F16. Wiring of turn signals, hazard light relay, relay responsible for the state of the lamps in the headlights, rear traffic indicator, lights signaling the following: low oil and brake fluid levels, whether the parking brake is on, low battery charge. Also a clock, an on-board computer and a generator excitation winding circuit during the start of the power unit of a VAZ 2114 car.
In addition to all the fuses listed above, which are located in the mounting block, there are 3 fuses. These fuses are located under the magazine shelf. The controller and relay circuit are also located here, with the help of which the VAZ 2114 power unit is controlled.
Which window lifters are more popular - Forward or Garnet?
In October 2022, on PartReview, Garnet window lifters were generally more popular than Forward.
In terms of the ratio of votes, the Garnet window lifters surpassed the Forward:
- For Forward, the ratio of positive votes (77) to negative votes (20) was 57 votes.
- For Garnet, the ratio of positive votes (125) to negative (14) was 111 votes.
In terms of the number of reviews, Granat window regulators surpassed Forward:
- There are 30 reviews written on Forward window regulators: 21 positive, 7 neutral, 2 negative.
- There are 45 reviews written on Garnet window regulators: 39 positive, 4 neutral, 2 negative.
Typical faults
Keys are used to control the power windows. Over time, it may fail. You need to know what malfunctions can occur and how you can fix them yourself.
Causes
The reasons why the power window key may not respond to pressing may be different:
- glass froze during severe frost;
- glass lift failure.
It is almost impossible to detect a breakdown without disassembling the window lifting mechanism. Therefore, you need to remove the casing and disassemble the mechanism.
Removing door trim
When removing each part, you should check it for integrity.
The main causes of breakdowns can be divided into two groups:
- Problems with the key's power supply.
- There may be situations where everything is fine electrically, but the power window switch still does not work.
Remedies
If problems arise due to the power supply, then first of all you should check the fuses. If they are in good condition, the next step is to carefully inspect the motor of the beet lifting mechanism and check what voltage is supplied to its terminals. The test can be done using a multimeter or a regular 12 V light bulb. If there is no voltage, you need to check the relay, wiring and control unit.
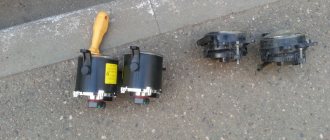
Removing the Switches from the Door
If the button works periodically (it works, then it gets stuck), the problem is most likely in the button itself. It is necessary to disassemble the window regulator, remove the button and clean the contacts if they are oxidized.
Adviсe
Let's give some advice.
In addition to calculating the load on the equipment in a specific connection, it is important to correctly select the wires that match the resistance in the circuit. Preference can be given to acoustic wires, which give the purest sound at the output, or to ordinary wires with R not lower than 4 ohms. To avoid damage and short circuit, the polarity of the contacts + to - should be strictly observed. When you turn on the radio for the first time to check, the volume should be minimal
If the sound is distorted, the equipment should be turned off immediately. This effect occurs when the polarity of the connections is not observed, which will have to be corrected.
Electric windows for VAZ 2109
Nowadays, you won’t surprise anyone with window lifters controlled by an electric drive, and yet, until now, even the new VAZ 2109 “Samara” of some modifications are not always equipped with this useful device. This state of affairs cannot but upset the owners of such cars, and in this case the situation can be corrected by installing electric windows on their own.
It should be noted that on store shelves you can find quite a few options for such devices, and, as a rule, they are intended for installation on specific car models (there are options developed specifically for Samara). Window lifters also differ in their design. Thus, among the general variety of electric windows (ESP), three main types can be distinguished, each of which has its own advantages and disadvantages:
- With cable control - the cheapest, however, they are slow and rather weak, which creates certain problems in frosty weather;
- Rack and pinion ones are also rather weak and, according to reviews from experienced motorists, are very critical of the presence of lubricant;
- Articulated-lever - have sufficient power, speed and low noise during operation.
As can be seen from the above, the most optimal option is the extreme option and the installation of a power window lifter of exactly this type will be discussed below.
It should be noted that installing an ESP with your own hands is not particularly difficult and it is recommended to do it in the following sequence (shown using the example of one door):
-First of all, as with other work related to tampering with the electrical equipment of the car, you should disconnect the negative terminal of the battery;
-Next, all the necessary dismantling work is carried out, which includes removing the door pocket, door handle with socket and, of course, the window handle itself, along with the decorative trim. After performing these operations, it becomes possible to remove the door trim (you will have to overcome the resistance of the pistons);
-To remove the mechanical window lifter, we need keys with heads “10” and “8”, with which we unscrew the screws securing the glass frame, as well as four nuts securing the window lifter mechanism itself. The window regulator is removed through the technological hole in the plane of the door, and if the mounting pins are in the way, they can be pressed out with a screwdriver;
-When installing the electric lift mechanism, you must ensure that it is first in the folded position and to achieve this, you can apply voltage to the gearmotor from the battery. The mounting pins are inserted into the corresponding holes and secured with nuts at “10”. In order for the guide holes to align with the holes on the glass frame, we again forcibly apply voltage to the window lift motor. Having fully secured the electric lift mechanism, apply lubricant to all rubbing parts.
After completing the purely mechanical assembly operations, electrical connections begin. You don’t have to rack your brains too much to find places to install control buttons - on the VAZ 2109 they are already provided and for the time being covered with plugs (located to the right of the cigarette lighter). Despite the presence of special technological holes, the most labor-intensive part is to lay the wires from the door to the pillar and then extend them to the dashboard. To facilitate this procedure, you can use a piece of fairly stiff wire. The wires must be laid in such a way that they do not touch various moving parts and, in particular, elements of the ESP itself. To avoid possible troubles, the cross-section of the ESP connection wires must be at least 1 square meter. mm. As is already clear from the above, the general power supply for the window regulator is easiest to take from the cigarette lighter. To make your work easier, below is a typical diagram for connecting electric windows on a VAZ:
After completing the work, all that remains is to reconnect the battery and check the ESP in action - the glass should move smoothly, without noticeable jerks. If the backlight of the ESP control buttons does not turn on the first time, you need to swap the wires suitable for key contacts 2 and 3.
What to pay attention to
On domestic VAZ cars, the installation of rear window lifters is approximately the same as the front ones. One difference is the location of the control knob. Therefore, you will have to drill holes in the door with a slight offset. And one more thing - one set of ESP, which can be found on sale, is designed for installation in two doors. Therefore, if you want to install equipment in all doors, you need to buy four sets. And connect the power windows according to the diagram given in the article. It includes a window closing system when arming - this doubles the ease of use of the car.
It is also recommended to completely assemble the kit in advance and then place it in the door. And the entire mechanism must be placed in the lowest position. If this is not done, then it will not be possible to install the drive through the technological hole.
Pay attention to the wiring diagram for the power window button; check it several times to avoid mistakes. When checking the mechanism, you need to look at how the glass moves and whether there are any extraneous sounds or creaks.
Wiring diagram for power windows. Installation of electric windows at News4Auto.ru.
Our life consists of everyday little things that in one way or another affect our well-being, mood and productivity. I didn’t get enough sleep - my head hurts; I drank coffee to improve the situation and cheer myself up - I became irritable. I really want to foresee everything, but I just can’t. Moreover, everyone around, as usual, gives advice: gluten in bread - don’t go near it, it will kill you; A chocolate bar in your pocket is a direct path to tooth loss. We collect the most popular questions about health, nutrition, diseases and give answers to them that will allow you to better understand what is good for your health.
Wiring diagram for VAZ-2110 power windows with instructions
Electric windows are very convenient devices that are controlled by a special button and make it possible to lower or raise the side windows without rotating the previously used handles. Unfortunately, this option is provided only in some modifications of the VAZ-2110 car. Therefore, in this article we will tell you how to install it yourself and ensure maximum comfort in controlling the side windows.
Selecting window regulators for installation on a VAZ-2110
If you want to install electric windows on your car, you will first need to choose the most reliable device that will serve for many years without causing any problems. On the modern market you can find the following options:
- traditional cable structures, which are relatively easy to install, but differ from others by not having a very long service life, wear out quickly;
- strip devices that are not very convenient to use;
- rack and pinion window lifters, which are deservedly recognized as the most suitable and reliable in operation.
When choosing devices suitable for your car, pay attention to factors such as:
- the speed of raising and lowering the glass, which largely depends on the gear motor installed on the car;
- the ability to use the device in the cold season;
- noise level during product operation.
Taking into account all these factors, you will be able to choose window lifters that will not only work flawlessly, but also will not create any problems in specific operating conditions.
How to install and connect power windows on a VAZ-2110
The most preferred devices are rack type, so we will describe the installation process as an example. The connection diagram for the window regulator on a VAZ-2110 car is as follows:
- remove the negative terminal from the car battery to stop the supply of voltage to the on-board power supply network;
- we take the wires that come standard with rack-and-pinion window lifts and make a kind of harness out of them that makes connection easy;
- remove the car mounting block, which will require unscrewing the self-tapping screw that secures the special latch;
- turn the block over and carefully install block Ш1 of the pre-prepared wiring harness into the corresponding connector;
- dismantle the door trim;
- we pull the wires to the electric window drive. To do this, you will need to carefully pass them through the holes in the door itself and the body pillar on the desired side.
After this, buttons or keys are installed that will be used to control the power windows. Depending on your desire, they can be attached either to the door trim of a VAZ-2110 car, or to an existing control panel. In the first case, you will need to use an additional wire, which will allow you to equip the key backlight.
Installation process of electric windows
In addition, it is necessary to install the power windows themselves. The procedure is performed in the following sequence:
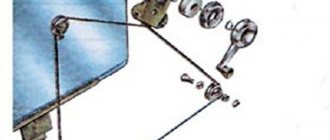
- temporarily remove the glass seal located on the inside of the door;
- remove the glass, and then dismantle the window regulator fastening mechanism;
- we install devices that will operate from an electric drive;
- connect the negative terminal to the battery and check the operation of the new window regulator;
- We install the glass in place and trim the door.
Our instructions in pictures will help you understand the installation procedure in more detail.
Features of connecting power windows
Unlike conventional mechanical devices, power windows are not equipped with traditional gear reducers, but with a special drum. The shaft of a DC electric motor is inserted into its hole located in the center. In this case, the motor is only a component of the gearmotor, on which, as we found out earlier, the speed and quality of raising and lowering the windows depends.
Before installing a new power window, you must select the correct device based on its technical characteristics, and also make sure that the product is in a fully folded state. Otherwise, you are unlikely to be able to install the product efficiently and ensure its flawless operation after connecting it to the vehicle’s on-board network.
Electrical work
Remember that using a power window fuse can protect all important components from short circuits.
The electrical setup procedure looks something like this:
- The electric motor must be supplied with voltage directly from the battery. In this case, the rotor should rotate and the entire mechanism should rise up. And you need to wait for the moment when the holes in the fasteners of the mechanism are aligned with those located on the glass carriages. Only after this can the glass be fixed.
- If there is no wiring (the installation of ESP is not provided for by the manufacturer), then it must be laid through the technological holes that are located in the door and body. You need to run wires to the instrument panel.
- You can place the control buttons in any convenient place, but it is best to place them in the door handle. But on domestic cars they are more often installed in the cigarette lighter area or near the handbrake.
- All moving parts of the electric drive must be lubricated - a CV joint type compound is suitable.
- Apply voltage to the entire system through the power window fuse and check operation.
- If there are no faults, you can install the casing and recheck.
The article shows a wiring diagram for the power window button. It is recommended to switch all power circuits using relays to maintain the integrity of the buttons.
Lada 2114 SnowMan Logbook Window lifters without ignition
You stop, turn off the engine, take the key out of the ignition, press the power window button to close the window, BUT IT WAS NOT THERE
. When the ignition is turned off, the window switches do not work. Now, in order to close the window, you have to reinsert the key into the ignition...
I think you are all familiar with this situation.
I overcame this “illness” in the first days of using the car, long before I registered to drive. Due to the fact that during the drive I was asked more than once how I did it, I decided to post a detailed report.
And then I started by studying the materiel.
Electrical wiring diagram for VAZ 2114 electric windows
A little theory:
From the diagram it can be seen that the positive power window power wire passes through the K5 window relay and is open (pins 30 and 87). When you turn the ignition key, a plus is applied to the 85th contact of the K5 relay, the relay electromagnet turns on and closes the 30th and 87th contacts, after which a plus appears on the power window buttons.
Conclusion:
In order for the power windows to work without an ignition key, you need to bridge contacts 30 and 87 of relay K5 as in the figure below.
The red line indicates the jumper.
Let's move on to practice:
I will not impose on you any specific method of making a jumper; I will describe only the most common ones; you can choose any of these methods that seems most simple and convenient to you.
Method No. 2
Here I will describe another method of making a jumper. We will need: - 6.4mm MALE detachable terminal - 2 pcs - 5cm of wire We strip 5-7mm of insulation from each edge of the wire. Using a crimper, we crimp the connector terminals at the ends of the wire.
This is what should happen
We insert the resulting jumper instead of the K5 power window relay in the mounting block (the jumper is inserted between contacts 30 and 87).
Method No. 3
In this version, the role of the jumper will be performed by the K5 window relay itself with minor modifications. We take out the K5 relay from the mounting block, turning the relay over we will see the markings of its contacts. We take a piece of wire without insulation and wind it around relay contacts 30 and 87 (see figure below). We return relay K5 to its place in the mounting block.
Wire marked in red
Electric windows of the front doors of VAZ 2115, VAZ 2114 (connection diagram): 1 – mounting block; 2 – power window switch for the right front door; 3 – gear motor for the electric window of the right front door; 4 – motor reducer for the electric window lifter of the left front door; 5 – power window switch for the left front door; 6 – ignition switch; K5 – relay for turning on electric windows; A - to power supplies; B - to the external lighting switch
Many cars produced recently are equipped with electric windows. Often, power windows are installed only on the front doors. But previously, VAZ 2114 and VAZ 2115 cars were not equipped with electric windows at all. Such cars were equipped with conventional mechanical
lifts for both front and rear windows.
In the window lift mechanism, instead of a gear reducer used in mechanical window lifters, there is only a drum into the hole of which the output shaft of the gear motor is inserted. The gear motor consists of a worm gearbox and a DC electric motor with excitation from permanent magnets. Its design is similar to that of the windshield wiper gearmotor. The gearmotor is reversible, the direction of rotation of the output shaft depends on the direction of the current in the armature winding. To protect against overloads, it has a built-in thermobimetallic fuse.
Above is a diagram for switching on electric windows on VAZ 2114 and VAZ 2115 cars. Gearmotors 3 and 4 are switched on by switches 2 and 5 located on the armrest handles. The supply voltage is supplied to the switches when the ignition is turned on through fuse F6 and the power window relay K5, located in mounting block 1. If the power windows do not work, then it is necessary to remove the door trim and check whether voltage is supplied to the gearmotors, check the fuse and the power window relay, and restore broken connections in the wires, replace the faulty gearmotor with a new one.
Add a comment to the article
Diagnosis of faults and repair of window regulators
Electric windows usually last quite a long time and rarely fail; this can happen no earlier than after 4-5 years of operation. Very often, breakdown occurs due to the fact that a large amount of dirt and dust accumulates in the mechanism or on the window lift cable; sometimes the cause is the lubricant that has dried out in the device. Therefore, as soon as you notice the slightest evidence of a malfunction of the electric window drive, do not delay and immediately have the mechanism diagnosed at the appropriate car service centers. A failed part of this mechanism should be replaced with a new one.
If you wish and have some skills, or, as it is now fashionable to say, if you have “direct hands,” you can diagnose the power window control mechanism yourself. For example, if the glass does not lock in the desired position when lowering, this may mean that the brake spring of the mechanism has become unusable, or the fastening of the strap of the cable itself has become loose. In the first case, you will have to replace the spring brake. If the fastening of the mechanism cable strip is loosened, you can simply try to adjust the accuracy of the movement of the glass itself.
If the glass is unable to either rise or fall, we can conclude that the cable tension has weakened or the spring brake has broken; as an option, we can also consider a break in the glass bracket. If you have the first option, you will only need to adjust the cable tension. However, if your spring brake or window bracket fails, they will need to be replaced with new ones, even up to and including replacing the power window itself.
It happens that the power window, for some reason, does not perform any action at all, in which case, you should check the condition of the corresponding mechanism circuit breaker or fuse. In the event of a malfunction of the rear door power windows, you need to check the switch lock for continuity in the lowered position. When the window regulator operates at the command of only one of the two switches, it is necessary to check the serviceability of the switch itself, from which the window regulator does not operate. If the switch is faulty, replace the switch.
Remember, careful treatment and proper operation will not only extend the life of any automotive component, but also save your hard-earned money, and also save you from unpleasant situations and lengthy repairs. Use power windows for their intended purpose, and they will save you more than once in the summer heat, and in the winter cold they will honestly guard the warmth and comfort of your car.
Standard windows
On domestic cars of the “classic” family, only manual power windows were installed. For example, the first “sevens” had rack and pinion ones, and the “nines” and “kopecks” had cable ones. Why were such mechanisms installed? It’s just that domestic designers tried to reduce the cost of the car, so for the sake of economy, devices with plastic gears were installed. And they fail quite quickly.
In the early 90s, the designers who developed the “sevens” realized their mistake and began installing cable-operated windows on the cars, but the drive was still manual. The peculiarity of such structures is that they are repairable. If in rack-and-pinion gears when a plastic gear breaks, the entire mechanism needs to be replaced (and it is very difficult to find it on sale), then if the cable system malfunctions, it is more than possible to carry out repairs.
The principle of operation of all mechanisms (both cable and rack and pinion) is the same - the system on which the glass is attached rotates with a handle. Depending on the type of window lifter, either the gear moves along a toothed vertical rack, or the cable is tensioned.
Power rack-and-pinion windows
Rack and pinion window lifters are considered one of the most “long-lasting” compared to others. Rack-type ESPs operate on the principle of transmitting rotational motion from an electric motor to gears, with its subsequent transformation into linear movement of racks that perform lifting. In addition to reliability, window lifts of this type lift windows much faster and quieter than cable counterparts.
But, like everything in this world, rack and pinion windows are not perfect and have their drawbacks. The main disadvantage is that the gears need lubrication; without it, they very soon begin to wear out, and the power windows themselves cease to function normally. The second drawback especially concerns those devices whose manufacturers decided to “save” on metal parts and gave preference to plastic. The fact is that this material is fragile and is noticeably inferior in strength to aluminum, as a result of which the service life of such ESPs is reduced. Among other things, the rack and pinion mechanism is more bulky, so they are installed mainly in “large” car doors.
Cable-type electric windows
The main advantage of cable window lifters is their high maintainability. In the event of a malfunction, you can easily repair the mechanism, and spare parts can be found in almost any auto store
This advantage, at first glance, is insignificant, but as practice shows, most motorists choose this type of ESP without paying attention to the disadvantages of the cable mechanism. The fact is that the cable wears out or stretches over time; in addition, due to the low strength of the plastic guides, they often fail, and the electric motor is very prone to overheating
Lever type electric windows
Lever-type ESP successfully combines compact dimensions and a high degree of reliability. In such power windows, the motor turns a gear, which transmits rotation to one or more levers. In turn, the levers move the plate on which the glass is mounted. The main disadvantage of this mechanism is the uneven speed of glass movement; the higher it is, the slower the lifting will occur.
As for glass, regardless of the type of mechanism, it moves along guide channels or special rails.
Impulse and non-impulse windows?
In addition to the type of lifting mechanism, ESPs are divided into pulsed and non-pulse. The former are capable of operating in pulsed as well as normal mode. By “normal” we mean that the power window operates only when you directly press and hold your finger on the control key. The term “pulse” means a short touch, after which the glass itself will completely lower or rise.
Pulse power windows are most often equipped with five-position control keys; the lever is set in neutral mode, from which there are two speeds of lifting up and down. By moving the slider up one position, the window lifter will operate in “normal” mode, and the glass will rise exactly as long as you hold your hand on the key. The second position will allow you to fully raise or completely lower the window.
Apr 14, 2015
Let's get started
Before you start connecting the window lifter to the VAZ-2106 or VAZ-2107, and even the VAZ-2109, keep one nuance in mind. Actually, you should have encountered this even when purchasing a window regulator. The fact is that on these models there is no “window window” and the glass is lowered across its entire width. Because of this, the most common models of window lifters are not suitable: there is simply not enough space. So the connection diagram for the window regulator on the VAZ-2106 and two other models is slightly different from the standard one and requires different equipment. Fortunately, sellers are well aware of this and usually offer a suitable solution.
First of all, read the instructions. It is written very clearly and understandably how exactly to install the electric motor and what to attach it to. According to the holes, the fastening bar coincides with the three bolts that we unscrewed during dismantling, so there will be no difficulties. After installing the window lifter mechanism, connect it to the brackets on the glass. Now, again in accordance with the instructions, lay the wiring to the battery. There is a special technological tunnel in the door for this, so run the wire inside it. This will protect it from chafing and protect it from atmospheric moisture. Which by no means eliminates the need for proper, intact insulation! The wires are connected using four-pin connectors, but if you have any problems with this, you can use the old fashioned method: strip, connect and wrap with electrical tape. But this is still not recommended.
After that, we begin to find a place for the button. As practice shows, it is not very convenient to install it on a door in 2106 or 2107; the optimal solution is to install it on the dashboard. There is space there and it is relatively easy to run wires there. Having made a hole (or if you have free ones, simply remove the plug), insert the seal and the toggle switch itself, and connect the wiring. Actually, all that remains is to put the door back together and this is where the connection of the window lifter on the VAZ-2107, VAZ-2106, VAZ-2109 ends. Unless you can, before putting the casing in place, connect the negative terminal and check the functionality of the assembled system.
Scheme for any number of buttons and doors
Here you can place any number of buttons in parallel and simultaneously press them in different directions - a short circuit is impossible from the circuit design. In a situation where we press the up button on the main button, and the down button on the backup button, it will simply stop, since both power lines will have the same potential. The advantage of the circuit is that the power switching is in one place, there are no losses in the harnesses and on the buttons, there is a minimum of “pulling” of wires - 2 in total per channel + ground.
Window lifter options
According to their design, electric windows (ESP) are divided into three main types:
- rack and pinion window lifters. The devices are not very powerful, plus they require systematic lubrication. If this is not done, their service life is significantly reduced;
- Cable window lifters. Their main advantage is their low price. In addition, changing the motor on such a window lifter will not be difficult (since it is easy to find on sale). They are inferior in power to rack and pinion lifts, which is especially noticeable when the glass freezes to the door in winter;
- finally, the windows are lever operated. Among car enthusiasts they are considered the best option: powerful, fast and almost silent during operation. These are the ones that will be discussed below.
The most popular among lever ESPs are the “Granat” lifts. Their popularity is due to two factors: a fairly affordable price and good equipment. Along with the ESP, the driver receives wiring, fasteners, cuffs and plugs.
Lever window lifters "Granat"
Which window lifters to choose?
Before installing and setting up power windows, as well as registering them in the ECU memory, you must select an ED.
Types of devices that can be found on sale today:
- Cable. Such devices are quite weak and they work much slower than other types. But installing window lifts of this type will require less financial costs, since the cost of the system as a whole is lower. The service life of such electric motors is shorter, but if the electric motor of the system fails, it can be replaced without any problems.
- River systems. Installing electric windows of this type will take a little more financial investment, but they work faster than cable ones. It should be noted that such electric drives are also not particularly powerful, and they also require periodic maintenance, in particular, lubrication.
- Articulating-lever systems. According to many experts, it is precisely these electronic devices that need to be installed and configured, since they work quite quickly, the noise during their operation is low, and they are also quite powerful.
ES kit for installation on a car
Step-by-step replacement sequence on the front door
To install a new window regulator, you must first dismantle the old mechanism.
- Remove the three bolts that secure the handle to the door.
- Remove the handle.
- Remove the door trim.
Before dismantling the factory lift, tie the two branches of the cable with wire.
This is necessary so that the cable does not fly out of the grooves in the drum, and the mechanism can be reused.
Removal of the structure is performed as follows:
- Lower the glass within one turn of the glass lift handle so that you can reach the cable clamp and the glass supports through the technological door openings.
- One fixing screw needs to be unscrewed completely, and the other one should be slightly loosened at the bracket securing the cable to the supporting protrusion. Take him out.
- Raise the glass to its highest position and secure it using a regular screwdriver. You can use other available means for this.
- Take a 10mm wrench and slightly loosen the nut that secures the tension roller. It is located at the bottom center of the door.
- Remove the cable from the tensioner and three guide reels.
- Remove the three nuts that secure the window regulator to the door.
- Unscrew the 2 nuts securing the guide groove and move it to the right.
- The final stage is the removal of the window regulator from the door.
I am replacing the window regulator on a VAZ 2107
. similar to 2104 2105 and Niva
Window lifter
how to replace a manual window lifter yourself with keys [draft VAZ
2104]
After the mechanism is removed, you can check how the rollers rotate.
DIY repair
If after checking it turns out that the entire mechanism is working, then repair of the window lifter button is necessary (the author of the video is Nik86 auto-construction).
You need to know how to remove the power window button to repair it.
To disassemble you need to perform the following sequence of actions:
- First, the door panel is dismantled.
- Next, you need to disconnect the connector and unscrew the fastener that holds the key board.
- There are four contacts on the board. If they have oxidized, they should be carefully cleaned.
- When a key is pressed, it presses on a plastic pad, which in turn presses on its rubber shell. As a result of these actions, the contacts on the board are closed. It is also advisable to check the springs and each part for serviceability.
- Next, you should apply conductive glue to the surface of the rubber key shell in the place where the contacts and the printed part of the board come into contact.
- After waiting for the glue to dry, you need to reassemble in reverse order.
During repairs, it is important not to mix up the contacts when connecting switches.