Hi all! Reversing with non-working lights, especially at night, can be fatal for the driver of a faulty car and the cars moving behind. You need to understand that if the reverse light is not on, this is a serious problem that needs to be fixed.
The only question is to find the reason for such a situation. If the car's reverse light suddenly stops working, it is recommended to immediately begin diagnostics.
There are several potential problems. Once you find out exactly why the light does not turn on, you can take appropriate measures to eliminate the problem.
Possible reasons
If the reverse lamps do not turn on when shifting into reverse gear, whether it is manual or automatic, you need to look for the reason.
The light must be on. This will not only result in a fine, but can also lead to a serious accident or accident.
- Sensor malfunction
. It is also a reverse switch, limit switch or frog. This controller is quite reliable and durable. But still, the possibility of its breakdown cannot be ruled out. Especially if the car was hit from behind, the headlight was broken and the lights were changed; - Burnt out light bulb
. Or maybe everything is outrageously banal. Over time, the light bulb has used up its resource, and therefore no longer works. It will have to be replaced; - Fuse
. Also, the signal may disappear if the sensor responsible for these lights burns out. This is a fuse link that burns out when the permissible voltage is exceeded. Since this fuse is responsible for several devices at once in most cars, in parallel with the reverse gear, other lamps, dashboard lights, etc. may not light; - Open circuit
. Here pins can break off, wires can fray, and more; - Oxides and corrosion
. Formed in places where the contacts of the circuit leading to the rear lights are connected; - Ground contact
. If the ground is bad, reverse gear may not function. This is also one of the reasons why the brake lights on a car do not light up.
Unlike the situation when the lamp is constantly on, there are many more potential causes.
But still, the most common problem is the failure of the reverse switch. It is also called a frog.
What tasks does the tail light perform?
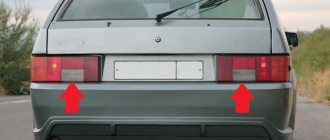
There is hardly a single motorist who can do without driving in reverse. In order for such movements to be as safe and comfortable as possible in situations with insufficient road illumination: in the evening, at night, in foggy or rainy weather, it is necessary to ensure that the reversing lights work properly at full power, do not malfunction or are broken.
The main function that these lighting devices should perform is illuminating the road while driving in reverse gear. Of course, in addition to their main task, these devices also act as signalers that notify other drivers on the road that you plan to reverse. Often, car owners are faced with the need to install additional reverse lamps, since those that come with the basic configuration of the car simply cannot cope with the responsibilities assigned to them at the required level.
Location
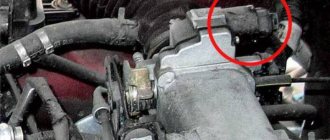
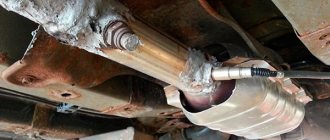
The location of the switch or frog largely depends not on the make and model of the car, but on the transmission with which the vehicle is equipped.
If it is a manual transmission, then the switch will be installed directly on the gearbox housing. When reverse gear is engaged, the switch button is pressed, the frog contacts are bridged, and current flows to the rear lights.
As for automatic transmissions, instead of a standard limit switch (frog), a selector position sensor is used. Depending on the change in the position of the automatic transmission handle, the corresponding signal is transmitted to the power unit control unit, which transmits it to the unit that controls the light.
How to replace reverse lights?
Replacing lamps in rear lighting depends on the type of car. For example, on a Lada Kalina with a station wagon, you need to unscrew 2 bolts holding the lamp in the opening of the tailgate. Then the housing is forcefully removed from the mounting socket (the design provides additional plastic clamps) and the cartridge is removed along with the wiring. On cars with a sedan body, to remove the courtesy light, you need to fold back the flap on the trunk trim and unscrew the fastening nuts with a long-head wrench.
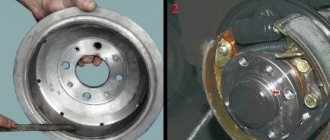
On a VAZ-2105 or 2107, the rear light is covered with a plastic cover located in the luggage compartment. To dismantle the casing, you need to unscrew the nuts and then remove the printed circuit board with the lamps from the lampshade. The faulty element is removed from the socket for replacement, and at the same time the condition of the tracks and contacts is visually checked. Detected oxides must be removed.
On the Kia Rio sedan, you need to remove the handle on the trunk lid, and then partially dismantle the trim, which is attached to the pistons. After bending the casing, access to the flashlight opens; to remove the cartridge, you need to turn the element counterclockwise. The lamp is removed from the socket by the bulb (no thread is provided); the lamp body is marked with a marking indicating the type and power of the lamp.
Checking the functionality of the sensor
Replacing the fuse is not difficult. But checking the condition of all wiring, ringing it and replacing it if necessary is a much more difficult task.
If we talk about restoring the functionality of the reverse lamps with our own hands, then we mainly have to deal with the switch.
To check it you need to do the following:
- remove the rear lamp switch chip;
- turn on the ignition;
- Using a piece of wiring, close the contacts of the sensor and the reverse gear to each other.
If at the same time the lamp lights up, then the reason lies directly in the limit switch.
In this situation, the simplest and most logical solution would be to replace a completely faulty sensor. Indeed, on many cars, replacing it is impractical, too complicated and virtually useless. It is not always possible to restore the functionality of the device. Although there are a number of examples when the sensor was simply disassembled, the contacts were cleaned, and everything returned to normal operation.
It is very difficult to say how long the restored switch will work. This could be for many years, or just a few days.
If everything is fine with the frog, then you will have to ring the circuit and look for the area where the voltage disappears. For these purposes, you will need to use a test light or a multimeter. The task is not for beginners, since we are talking about electrical circuits and working with car electrical systems. Here, for many, it will be more profitable and safer to turn to specialized specialists.
What to do if the flashlight fails?
In general, the reasons that led to damage to the lighting device may not only be related to electrical issues. There are often cases when the problem lies in a strip of a special sensor located in the box. Of course, both of these problems will require you to replace faulty parts. However, it also happens that the reversing light switches fail. To replace a tail light, you will have to route the break through the engine compartment or through the underbody of the car. But do not rush to immediately begin dismantling the element; first make sure whether the cause of the breakdown is actually related to it.
To check this, you need to release the part, start the car and engage reverse gear. After this, close the contacts and see if the lights come on. Then pull out the switch and use a multimeter to check whether the contacts close when turned on. If there is no short circuit, you will have to resort to flaring. To do this, cut out the flexible contact of the relay to the length you need and press it in place of the old one. Double-check the soldering reliability, reassemble the switch and test it. If the short circuit is OK, install the element in its original place.
VAZ 2112 fuse diagram
With an 8-valve and 16-valve engine, it is equipped with a main mounting block, and since 2008 an additional console has been added. A diagram with element markings is printed on the left side of the main block cover and placed below.
The designations of all elements are presented below. You can find the transcript in the table.
| Circuit breakers | Power, A | What protects |
| F1 | 5 | Lamps for turning on the license plate lighting, instruments, side lights, trunk, left side. |
| F2 | 7,5 | Low beam |
| F3 | 10 | Further |
| F4 | 10 | PTF |
| F5 | 30 | Door windows |
| F6 | 15 | Portable lamp (socket) |
| F7 | 20 | Engine cooling fan. Sound signal. |
| F8 | 20 | Rear window heating element. Relay for turning on the heated rear window. |
| F9 | 20 | Recirculation valve. Cleaners, windshield and headlight washers (wiper fuse). Relay for turning on the heated rear window. |
| F10 | 20 | Spare |
| F11 | 5 | Starboard side marker lamps |
| F12 | 7,5 | Middle left |
| F13 | 10 | Far left. Power indicator lamp |
| F14 | 10 | Left PTF |
| F15 | 20 | Electrically heated seats. Trunk lock lock |
| F16 | 10 | Turn signals and emergency lights. |
| F17 | 7,5 | Interior lighting. Ignition switch. Stop signal. Watch. |
| F18 | 25 | Glove compartment lighting. Heater controller. Cigarette lighter fuse. |
| F19 | 10 | Locking door locks. Relay for monitoring the serviceability of brake light lamps and dimensions. Direction indicators. Reversing light. Generator excitation winding. On-board control system display unit. Instrument cluster. Watch. |
| F20 | 7,5 | Rear fog lamps. |
- K1 - lamp health monitoring;
- K2 - windshield wiper;
- KZ - direction indicators and emergency lights;
- K4 - switch on low beam;
- K5 - high beam;
- K6 - additional relay;
- K7 — heated rear window;
- K8 - rear PTF.
Starter fuse and relay
Installed on the device itself between the engine and the fan radiator. If signs of a malfunction appear, it is better not to delay replacing the element and install a new relay.
Fuel pump fuse and relay
Located in the additional interior installer - No. 3. Responsible for the fuel pump relay No. 5.
Relay and fuse for cigarette lighter
No. F18 is rated at 25 Amps.
Stove
The 25 A element F18 is responsible for protecting the operation of the electrical circuit of the heater motor.
Turn signals
The elements are marked as F19 and are rated at 10 Amps.
Brake lights
Located in the main block - No. F17. Its power is 7.5 A.
Where is the alarm fuse located?
Cooling Fan
The F7 element with a power of 20 Amperes is responsible for its protection.
Which fuse goes to the radio?
Window lifters
Fuse and relay for central locking VAZ 2112: where is it located
They can be found in a separate box behind the main mounting block.
Ignition
The main relay is located in the additional cabin unit, where it is number 6.
Reverse
F19 with a rating of 10 Amperes is responsible for the lamps.
Fogs
Protected by three inserts: right - F4, left - F14, and rear - F20. The power of all PTFs is 10 Amps. In case of tuning, you may need to replace them with new ones along with the fog lights. The connection occurs via switch K8.
Lamp health monitoring relay
Marked as K1 in the main block of the VAZ 2112.
Brake
Installed under the brake pedal.
Relay and fuse for injectors
The additional element F3 is rated at 15 Amps.
Fuse for interior light
The F17 element with a power of 7.5 A is responsible for the safe operation of the VAZ 2112 interior lighting lamp.
Number plate illumination
Corresponds to F1 with a rating of 5 Amps.
Generator
A three-level relay voltage regulator is located on the device. It is better to replace the factory element with a new one, since three-level voltage regulation often leads to a short circuit.
Heated rear window
Relay K7 is responsible for turning on. Protects the F8 electrical circuit with a rating of 20 Amps.
Seat heating
It is protected by a 20 Amp F15 insert.
Wiper relay
This is a K2 and without its stable operation there will be no washer supply to the windshield, and the wipers will not be able to do their job.
Charger
They placed it next to the device - one of the few elements of this kind under the hood of a car.
Low and high beam VAZ 2112
It is protected by fuses F2 and F12 (left and right headlights), and the high beam is protected by F3 and F13 (left and right). The first has a rating of 7.5 A, and the second has a rating of 10 A.
Fuse for the dashboard of VAZ 2112
Located in the wiring harness leading to the instrument panel from the battery.
Dimensions
There are 2 fusible elements - F1 and F11, left and right. The power of both is 5 Amperes. Factory fuses require replacement due to the fact that the dimensions often burn out due to their malfunctions.
Heated seats
It is protected by an element marked F15 for 20 Amperes.
VAZ 2112 speedometer fuse: where is it located?
Opening the trunk
This is an F1 and is rated at 5A.
Fuse F6
Responsible for protection against burnout of the car socket. Its rating is 15 Amperes.
VAZ 2112: fuse F17 blows
Most often, this element, which is responsible for interior lighting, fails due to a battery failure. Its power is 7.5 A.
Fuse F19
Responsible for protecting the brake light, reversing lights and dimensions.
Relay K1
An element of lamp serviceability, which in older versions is replaced by a jumper.
Relay K6
Speed sensor
Located on the wiring harness leading to the device.
Checking the electrical wiring
If the current does not reach the lamp socket, you should check the rest of the electrical circuit in reverse order.
- Check your repair manual for the color and route of the reversing wires.
- Probe each wire along its entire length.
- In most cases the wire will disappear into the cable where you can't reach it.
- In this case, you should be extremely careful, because you risk damaging the working wire.
- Once you have identified the faulty section of the wire, remove it and install a piece of new wire in its place.
Important! Be sure to provide high-quality insulation at the wire connection points. The quality of the insulation primarily determines the reliability of the contact and the safety of the driver. You can also eliminate the possibility of a short circuit.
Video - Reverse gear does not light up on VAZ 2108, 2109, 21099. We are looking for the reason
Because You are not logged in. To come in.
Because you are not a trusted user (phone number is not verified). Enter and confirm your phone number. Read more about trusts.
Because The topic is archived.
Replacing the fog light fuse
Proper operation of the fog lights is ensured by a fuse, which is located separately from the fuse box. Its location in a VAZ 2107 car is under the console central panel, next to the fog light button on the panel next to the radio.
To carry out work to check or replace the fog lamp circuit fuse, perform the following sequence of operations:
- Turn off the car's power;
- You need to use a screwdriver to disconnect the switches from the console in the place where the radio is installed, ensuring free access;
- Pull out the plastic insert on the console by squeezing it with a screwdriver to gain access to the fog lamp fuse housing.
- Remove the housing and check or replace the fuse.
- Reassemble all the elements and switches in the reverse order to make sure the fog lights are working.
Additional fuses and relays
Location
Additional fuses and relays are installed behind the side trim of the console, secured with two screws, on the right side of the instrument panel.
Circuit breakers
- Canister purge valve
- Vehicle speed sensor
- Oxygen sensor (heating)
- Air flow sensor
- Fuel pump relay
- Fuel pump
- Injectors.
- Main relay (ignition relay)
Source
How to get rid of a noisy car trunk lid
A reverse light that doesn't come on is just as potentially dangerous a problem as a reverse light that stays on all the time, even when the car is moving forward.
Therefore, such a problem cannot be ignored under any circumstances. Just like installing a flashing brake light for the sake of beauty. It may look impressive, but it confuses drivers significantly.
In some cases, you can find and eliminate the cause yourself. And without any problems. But there are also situations when the best solution is to visit an experienced auto electrician.
Source
Main unit
The main block with fuses and relays is located in the cabin, on the left side, under the control panel. To access, press the latch switch.
Photo - diagram Option 1
Scheme Option 2
Scheme Option 3
Description of fuses
p, blockquote 15,0,0,0,0 —>
| F1 | 5A Lamps for license plate lights. Instrument lighting lamps. Side light indicator lamp. Trunk light. Left side marker lamps |
| F2 | 7.5A Left headlight (low beam) |
| F3 | 10A Left headlight (high beam) |
| F4 | 10A Right fog lamp |
| F5 | 30A Electric motors for glass door lifts |
| F6 | 15A Portable lamp |
| F7 | 20A Electric motor of the engine cooling system fan. Sound signal |
| F8 | 20A Rear window heating element. Relay (contacts) for turning on the heated rear window |
| F9 | 20A Recirculation valve. Windshield, rear window and headlight cleaners and washers. Relay (coil) for turning on the rear window heating |
| F10 | 20A Reserve |
| F11 | 5A Starboard side marker lamps |
| F12 | 7.5A Right headlight (low beam) |
| F13 | 10A Right headlight (high beam). High beam warning lamp |
| F14 | 10A Left fog lamp |
| F15 | 20A Electric seat heating. Trunk lock lock |
| F16 | 10A Relay - turn signal and hazard warning light switch (in hazard warning mode). Hazard warning lamp |
| F17 | 7.5A Interior lighting lamp. Individual backlight lamp. Ignition switch illumination lamp. Stop lamps. Clock (or trip computer) |
| F18 | 25A Glove box lighting lamp. Heater controller. Cigarette lighter. |
| F19 | 10A Door locking. Relay for monitoring the health of brake light lamps and side lights. Direction indicators with warning lamps. Reversing lamps. Generator excitation winding. On-board control system display unit. Instrument cluster. Clock (or trip computer) |
| F20 | 7.5A Rear fog lamps |
Fuse number 18 at 25A is responsible for the operation of the cigarette lighter.
The fog lamp fuse is installed separately in the instrument panel niche behind the main unit.
Relay purpose
p, blockquote 19,0,0,0,0 —>
- K1 - lamp health monitoring relay
- K2 - windshield wiper relay
- KZ - relay-breaker for direction indicators and hazard warning lights
- K4 - relay for low beam headlights
- K5 - headlight high beam relay
- K6 - additional relay
- K7 - rear window heating relay
- K8 - rear fog lamp relay
Checking and replacing the VAZ 2107 relay
A very important role in the proper operation of the system is played by relays, which periodically perform operations to turn on or off the necessary functions in the car.
An electromagnetic relay consists of a coil, which is supplied with power through a circuit and making contacts.
To check the functionality of the relay or to replace it, you must perform a number of sequential operations:
- The ground wire in the car is disconnected from the battery.
- The relay can be easily pulled out by hand.
- A visual inspection of the relay contacts is carried out, the contacts are cleaned of oxidation, and the reliability of the pin fastenings of the contacts is checked.
- Checking the functionality of the relay is carried out by supplying 12V power to the relay winding using two pieces of wire.
- When power is supplied, the coil should operate and the contacts should close, which can be checked using a multimeter in vertebrae or resistance measurement mode.
- If the relay or its contacts do not work, the relay should be replaced with a new one. Since their repair is not provided.
The performance and technical condition of the car, electrical systems, comfort and safety depend on the proper operation of the fuse and relay box of the VAZ 2107 car.
That's all! If you didn't find what you were looking for, please leave your question in the comments. Thank you!