Reasons why the rear view camera does not work and troubleshooting instructions
If the rear view camera does not work, first of all it is necessary to carry out a visual diagnosis of the device, and then make sure that there is power and the integrity of the wires. If a breakdown is detected due to poor contact or incorrect installation, you can solve the problem yourself by reinstalling the gadget or replacing the electrics.
If this does not help, the camera will have to be dismantled to repair or replace damaged elements, for example, a burnt board or swollen capacitors. Table: why the rear view camera stopped working
How to fix: removing the camera and repairing it yourself
Video: how to fix a factory defect in the rear view camera
Instructions for setting up a rear view camera
Video: visual guide to device repair
Comments and Reviews
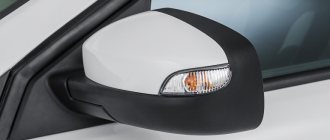
Repair of rear view mirrors in a car
An indispensable attribute of any vehicle is rear-view mirrors. Even a novice in the automotive environment will be able to tell why this equipment is needed - ensuring safety while driving. Only with the help of mirrors can the driver assess the situation behind the car. Despite the fact that the element is designed for the entire life of the vehicle, in some cases the owner is forced to seek repair or replacement.
Another reason for replacing rear view mirrors is damage to the cables.
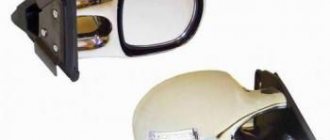
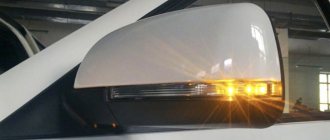
Reasons for replacement . The most common reason for replacing a rear view mirror is cracking due to damage. Very often, side mirrors are exposed to other cars in the parking lot. In some cases, car owners use a decorative coating to fix a crack. But this method is controversial. For example, if there is a strong blow, then not a single decorative coating can cope with the consequences. Another reason for replacing rear view mirrors is damage to the cables. In order to install new ones, you need to completely disassemble the structure. Not only the side mirrors, but also the interior mirror can break. The mounting legs may move away from the surface over time, which is why the car owner is forced to make new adjustments more and more often.
The mirror can be mounted on the ceiling in the salon
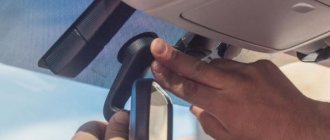
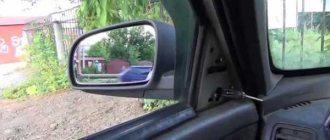
Repair . Before you begin replacing or repairing rear-view mirrors, you need to clarify what they are attached to. For example, the interior mirror is located above the dashboard and can be mounted in different ways - it depends on the car model. As a rule, special suction cups are used for these purposes. In addition, the mirror can be mounted on the ceiling in the cabin. There is a third option - fastening with bolts or self-tapping screws. Unscrewing such a connection yourself is not always easy, especially if the panel itself is installed above the ceiling cladding. Side rear view mirrors are installed on the door pillars. If we are talking about a vintage car, its exterior mirrors can be mounted near the radiator on the front fenders. Changing the position and adjusting the mirrors can be done in different ways. For example, for budget class cars this must be done manually. In modern expensive cars, the rear view mirrors can be adjusted remotely.
During the procedure you need to be careful, since an incorrectly installed mirror cannot be detached and glued to another place
On almost all domestic cars you can independently debug the rear view mirrors. The interior mirror can be attached to the windshield with glue. When exposed to UV rays, the adhesive base must be firmly fixed if it is of good quality. You should not use household glue, as it will not be able to cope with this task. The material must include 2 components - an activator and adhesives. They allow the glue to instantly set on any surface. During the procedure, you need to be careful, since an incorrectly installed mirror cannot be detached and glued to another place. First of all, you need to apply glue to the metal surface of the holder and wait 4-5 minutes. After this, you should spray the activator onto the surface of the windshield and immediately glue the holder. You need to press the element against the glass for at least 10 seconds. Immediately remove any remaining glue from the mirror so that it does not have time to dry.
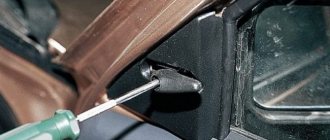
Repairing exterior mirrors is also not very difficult. The first step is to remove the plugs from the inside of the door, remove the fastening screws and remove the mirror. If the element is adjusted remotely, during its removal you need to pay attention to the cables and microcircuits to eliminate the possibility of damage.
Bottom line . Repair of rear view mirrors can be carried out for various reasons. You can install new elements yourself.
Table: why the rear view camera stopped working
The camera shows blurry
- to repair a breakdown, you need to check the quality of contact on the wire of the standard camera or one installed in the mirror;
- make sure the cables are intact and there is no damage to the insulating layer; you will also have to check the operation of the electrics.
Visualization problems:
- the device sometimes shows a blue screen;
- the image on the monitor turned black and white;
- The device stopped taking pictures
How to fix: removing the camera and repairing it yourself
If the rear view camera constantly or periodically does not work, repair is carried out as follows:
- Before starting repairs, you need to check the voltage supply to the device. After the user has connected the cable, a multimeter is taken and the power of the wire is checked. The red plug of the tester is inserted into the cable itself, and the black one is connected to its metal part to provide ground. If the connection shows 12 volts of voltage, then power is supplied to the device, and accordingly, further dismantling of the camera is carried out.
- The power cable is disconnected from the camera.
- A screwdriver or wrench is used to remove the trim (it all depends on the design features of the car). First, the rear trunk door trim is removed, then the nuts securing the device are unscrewed. Usually the camera is attached using two self-tapping screws, which are unscrewed with a screwdriver.
- The camera is wiped with a clean and dry cloth. Traces of rust on the surface of the device must be removed, and oxidation from the power connector must also be removed.
- Then the screws that secure the component parts of the body are unscrewed. These elements are susceptible to oxidation, so you need to be careful when unscrewing them.
- If moisture gets on the body, dry it.
- In case of wear or damage, the seals are replaced. The devices use two rubber seals (gaskets). One of them is located on the gadget’s lens, the second is at the junction between the plastic elements and the body.
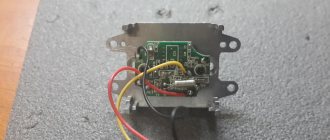
- The internal elements of the device are visually inspected. If swollen capacitors or other damaged elements are visible on the working board, they must be replaced by resoldering. Before carrying out repairs, clean and remove all traces of debris and dust.
- The camera is assembled in reverse order. To ensure high tightness, it is recommended to treat the joints with silicone.
Video: how to fix a factory defect in the rear view camera
The “Bought in China” channel in a video talked about what to do if the rear view camera does not work
How to repair a side mirror?
If the mirror does not fold, cannot be adjusted, or is constantly knocked down, the side mirror mechanism has broken down. In order to eliminate it, our specialists take the following actions:
- dismantle the mirror, disconnect its contacts from the vehicle’s on-board system, dismantle the unit;
- using a special hair dryer, heat the surface in order to soften the sealant and dismantle the mirror;
- dismantle the mirror engine;
- disconnect the body from the fixation leg to the door;
- Having reached the mechanism for folding/unfolding the block, check all connections and repair existing damage;
- carry out all the steps in reverse order in order to assemble the element and install it in its rightful place.
After this, repeated testing of the finished part is carried out, which allows you to be confident that the repair work has been carried out correctly.
"MBS-services" is always a guarantee of quality service! Contact us!
Instructions for setting up a rear view camera
According to the instructions, the main task when setting up is to adjust the parking lines that the camera should show first.
- Take a standard block of wood. It is desirable that the length of the product is 2 meters and its width is 2-3 cm.
- The blank is placed at a distance of about 1 meter from the central part of the rear bumper. It is important that the edges of the wooden beam extend beyond the sides of the vehicle at approximately the same distance.
- Then the driver gets into the cabin and enters the service menu for camera settings. In some cars, you will have to perform additional actions, for example, activating and disabling the side lights.
- The make of the vehicle is selected.
- After turning on the device, the steering wheel is twisted: first all the way to the right, and then to the left.
- The “Next” button is pressed and an automatic rectangular outline will appear on the device screen. The buttons are used to move the bar image to the center of the screen. Then the selected action should be confirmed.
Let's start our review with the pros
- The main advantage, of course, is the absence of a suction cup on the windshield. This mirror is held by rubber ties to the standard car mirror and therefore does not fall off at the most inopportune moment.
- It does not block the driver’s view of the windshield and, as a result, traffic police officers do not have any questions or complaints.
- The anti-reflective coating of the mirror does not blind the driver at night with the light of the headlights on behind a moving car.
- Possibility to connect a rear view camera, but it is sold separately from the seller on Alik and in this case there is a favorable condition. I didn’t notice such a bonus when purchasing, I really regretted it. Now you know.
Here's a quick overview of the pros, you can read more on the seller's page.
DVR Specifications
You can see all the characteristics of this device in the product description, here is just a short list.
Now let's move on to the disadvantages of the gadget.
Cons of a DVR mirror
There are few downsides, don't be alarmed.
- The presence of a display in the mirror, although not very large, is still a minus, although after a relatively short period of time you easily get used to it and don’t even pay attention.
- The power wire, which if you do not secure it around the perimeter of the glass, will hang from the mirror to the gearbox, is also one of the minor, but disadvantages. This can be fixed though.
- But the most important disadvantage, which no one talks about, but which interferes with photography the most, is when your car has a sun strip pasted on the windshield, and the more tinted and wider it is, the worse it is for you. The rear view mirror, and most importantly the camera of this recorder, is located in this very area.
Why do you need a mirror video recorder?
First of all, a mirror-video recorder with a camera will help you prove your innocence in a controversial emergency situation. For example, if a car suddenly jumped out in front of you and braked (the so-called “teacher” on the road). Here everything will be against you, since it was you who drove into the rear of another road user. However, if your car has a very inconspicuous DVR in the form of a mirror, then you can prove your innocence during the registration of an accident or in the analysis group.
Additionally, the mirror-video recorder can be equipped with a rear view camera, which ensures safe parking. This is especially valuable for novice drivers, and simply for those who recently purchased a new car with unusual dimensions. The image from the rear view camera will show not only the remaining distance to the nearest obstacle, but also any dangerous object located in the parking area.
Some models of mirrors with recorders have additional security functions on board that allow you to record video clips while parked. This way, if your car is damaged in a parking lot, you can show authorities video evidence of what actually happened and who damaged your property.
The most advanced mirror recorders are equipped not only with cameras, but also with a GPS receiver. Together with the Android operating system, this allows you to use the rearview mirror as a full-fledged navigator in the mirror. Such mirrors are capable of supporting a telematics system that will allow you to view the location of the car in real time using a smartphone or tablet computer, take photos remotely from dashcam cameras, and also talk to the person in the car through the speaker and microphone built into the mirror.
The new trend in smart rearview mirrors is the so-called “streaming” mirrors. These devices are distinguished by a large screen that occupies almost the entire area of the mirror surface, and are designed to work constantly with the screen on. The main advantages of streaming mirrors with DVR are:
- a wide viewing angle of the entire situation behind the car, completely eliminating the occurrence of a “blind” zone;
- a clear image in the dark (modern cameras have high light sensitivity and allow you to get a picture that is much more informative than the usual reflection in the rear-view mirror at night);
- the ability to get a complete picture of everything that is happening behind on pickups, vans and other cars where it is impossible to use the interior rear view mirror (this situation is also relevant when the rear of the car is fully loaded, when the cargo obscures the view through the rear window).
The rear view mirror with monitor does not work
It can be assumed that when laying the cable from the mirror to the camera, the cable was broken, and secondly, the wires were hooked to the reverse light? If you mix up the polarity (+ and -) this is what you get. It is better not to touch the firmware, as a result you can just get a MIRROR.
Post edited by Viktor Korneev
— 21.05.17, 21:36
Boris-29, the question is certainly interesting. I strongly recommend that you contact the seller for advice, cameras can have a resolution from 420 (typical) to 580 (almost high definition) TVL, the question is whether the recorder can process the increased video stream. Only the manufacturer will give the answer here. The second option is to continue experiments, without guaranteeing results.
Post edited by Viktor Korneev
— 03.06.17, 16:01
I also encountered a problem. The mirror paired with the camera worked for 6 months, and then it began to fall off. To make it work you need to plug the sealed connector. I took it off/on and it worked, but after 20 minutes it fell off again. And I also noticed that the screen on the mirror began to light up gray at the end of the video recording cycle. I'm wrong, maybe not the camera, but still the firmware. (( First, I’ll try the conductive paste in the connector, maybe it’s oxidized somewhere. And by the way, regarding the compatibility of the mirror/camera. The seller on the website says, “4.o One Camera Lens (Without Rear View Camera Lens) if you buy One Camera Lens ( Without a Rear View Camera Lens), it cannot support any Rear View Camera lens." This is what a third-party auto supply store responded. We do not sell such cameras individually. Only in a set with its recorder. Moreover, these cameras are NOT interchangeable. Even within the same model range of the same brand, two neighboring models may have cameras similar in appearance and connectors, but not compatible in any way. That is, you can even plug it into the connector, but at best it won’t work, and either the device or someone else’s may burn out camera.
I wrote to the seller in China and asked if it was possible to buy the camera separately. I'm waiting for an answer.
The seller replied, yes, you can buy a camera separately - $10
E-ACE CHINA: ok,friend It costs $10 You can buy from this link https://www.aliexpress...615.0.0.192662a8DcRqPr Please buy 10 pieces for $10
PS it looks like the problem was in the sealed pin connector, the contacts are loosening, I cheated with conductive paste, the second day it works.
Post edited by wind line
— 29.12.17, 12:01
Post edited by Shdup13
— 15.02.18, 14:12