Volkswagen Tiguan S&S 170 HP Full › Logbook › Cleaning the fuel pump screen or what we drive
It all started on a beautiful Friday evening in June. Having escaped from the Moscow traffic jams onto the highway, I pressed the gas as usual, the tachometer needle quickly reached 4000 rpm and... bounced back! At the same time, the car jerked, as if I had suddenly hit the brake and released it. After that the car drove off as if nothing had happened. This rather puzzled me. The next day I drove the car in acceleration mode to hundred in 8 seconds - everything was fine. The situation repeated itself on another Friday, again it was hot, again I had been driving for a couple of hours, again there was a sharp acceleration and jolt. It looks something like this. I always pressed on the gas, but you can see how the tachometer needle twitches around 4 thousand and the camera twitches after the car:
In general, this bothered me, but all hands did not reach, as usual. Until I happened to go from Dmitrovskoe Highway to the south of Moscow in September. There wasn't much traffic, but there were a couple of bottlenecks. The tremors began already at 3000 thousand, and after the next narrowing, the car simply stopped accelerating, I drove to the side, stopped and stalled. The car wouldn't start. While I was talking with the service about the tow truck, the car cooled down a little and started up, giving a Check Engine light. I started to drive towards the service, but decided to look at this error first, since the laptop and Vasya are always with me:
008851 - Fuel pressure regulator P2293 - 000 - mechanical fault - Intermittent Freeze frame: Fault status: 00100000 Fault priority: 0 Error frequency: 11 Forgetting index: 255 Mileage: 48319 km Timing: 0 Date: 2028.14.09 Time: 14:17 :04
By the way, does anyone know what date this is?
In the end, I decided that since the problem is not permanent and the car is moving, I will not go to the service center, but will go home. I drove home normally, without acceleration or jolts. Along the way, I took logs (red - fuel pressure requested; green - actual):
It is clearly seen that during acceleration the pressure increases and then drops to zero. It’s as if the fuel injection pump can’t cope. So, the fuel injection pump is fine, it just has nothing to produce, because... it does not receive fuel. Thanks to the forum, I found out that 90% of problems with fuel are caused by the fuel pump mesh.
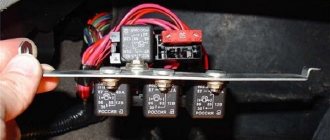
Remove the rear right seat. To do this, take a 17mm spanner and unscrew the two nuts in the front (under the plugs), move the seat forward and unscrew the bolts at the back:
Replacing and cleaning the fuel pump Lada Vesta
The fuel pump is one of the important components of a modern car, which must be periodically monitored and maintained. If you don’t do this, the consequences will not take long to arrive. On cars of the Lada Vesta family, an electric fuel pump is installed, which in turn means that you need to look for it directly in the fuel tank. In order to gain access to the fuel pump, you need to remove the rear row of seats; this is not difficult to do, as it might seem at first glance. The seat is secured with four latches, two of which are located in the front and two in the rear, the locations of the front latches are marked in the photo below:
Grasping the place of fixation, pull the seat up, but do it carefully, the lock is installed in plastic, so breaking it is not difficult. The remaining two latches are located on the other side of the seat - under the backrests. To remove them, you need to push the seat towards the backrest and pull it up with your other hand, as shown in the picture below:
The remaining two latches are located on the other side of the seat - under the backrests. To remove them, you need to push the seat towards the backrest and pull it up with your other hand, as shown in the picture below:
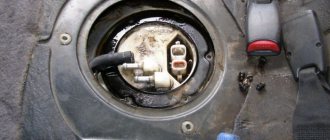
After removing the seat, you will have direct access to the fuel installation, which is located under sound insulation:
Before unscrewing it, disconnect the fuel pipe and power wires. By the way, for more convenient dismantling of the fuel installation, a special key is used, but if you don’t have one at hand, you can use improvised means.
Symptoms of a faulty fuel pump:
The car drives/accelerates poorly, when switching to second and higher gears there are strong shocks, the engine does not pick up speed above ~3000.
In fact, there are many more symptoms of a faulty fuel pump, and these are just the most common of them, however, in any case, problems caused by a faulty fuel pump will be associated with the dynamics and driving of the car.
Replacing a fuel pump can be different, sometimes it is necessary to replace the entire fuel system, and sometimes you can only change the pump itself. In the first case, we simply unscrew the installation and install a new one in its place, but in the second, we will have to disassemble it to get to the pump.
Replacing just the pump will cost several times less than buying a full-fledged installation. Before deciding to replace an expensive part, you should first make sure that this is the problem.
Perhaps your fuel pump will be helped by simply cleaning the protective mesh, which is installed at the bottom of the fuel installation and is located under its cover (see photo above). Unscrew the lid, pull out the mesh and rinse it well if there are traces of debris and dirt on it. Also in this case, you should think about changing the refueling location, since dirt can only get into the fuel system with low-quality gasoline, and if dirt is found during diagnostics at an authorized dealer, you will most likely be denied warranty repairs.
If there is no dirt, but you still think that the fuel pump is not working correctly, you should measure the pressure at the fuel pipe. Place the fuel unit in its normal place and connect the power wires, and install a pressure gauge in the place of the fuel pipe, then turn on the car ignition (do not start the engine). After turning on the fuel pump, the pressure on the pressure gauge should show 4 kg; after turning off the ignition, the approximate pressure should remain the same and only drop slightly.
When to change the fuel pump mesh Lanos, Sense and Chance
Any filter becomes dirty over time, and this also applies to the mesh installed at the inlet of the gas pump. When the element becomes clogged, there is a decrease in its throughput, resulting in a decrease in the amount of intake fuel. Reduced gasoline absorption has a negative effect not only on the fuel pump itself, but also on the functioning of the engine. A clogged mesh of the Lanos suction device leads to the following consequences:
- The load on the pump electric motor increases, causing it to heat up more. This reduces the service life of the device
- The absorption of the amount of fuel decreases, which ultimately leads to a decrease in the quality of cooling of the pump electric motor.
- The pressure in the fuel line decreases, which negatively affects the functioning of the internal combustion engine
The main signs of a clogged fuel pump filter on Lanos are:
- Problem starting the engine due to low pressure in the fuel line
- The engine does not start at all if the filter is heavily clogged
- When the car moves, jerking and jerking appears, indicating problems with the fuel supply
If the above symptoms occur on Lanos, it is necessary to resort to replacing the part. Every driver can cope with this, but the biggest drawback of the process of replacing the fuel pump grid on Lanos is that this will require dismantling the entire module.
This is interesting!
Some drivers prefer to clean it instead of replacing the mesh. This is not a rational approach to such an event, since it is impossible to clean the element to perfect condition. However, this method is suitable when the engine does not start due to a clogged filter mesh, but you still need to get home or to a car service center.
How to change the filter on a fuel pump
The mesh in the fuel pump design is a coarse filter for the fuel pump. The fuel pump mesh filter is necessary for pre-cleaning of gasoline, which is pumped from the gas tank into the fuel supply line of the fuel injection system. In other words, when fuel is pumped in, it first passes through the pump mesh, after which it is further cleaned in the fuel filter, and only then is supplied to the engine.
Like any other filter, this mesh becomes clogged over time with small particles, dirt and deposits that are in the fuel and gradually accumulate in the gas tank. A decrease in the capacity of the fuel pump grid leads to the fact that gasoline is poorly pumped, the engine starts with difficulty or does not start, the car jerks during acceleration and drives jerkily. The load on the fuel pump itself also increases, making it more difficult for it to create and maintain the required pressure in the system. When these symptoms appear, one of the available solutions is the ability to change the mesh in the fuel pump with your own hands.
Replacing the fuel pump mesh with your own hands
Let's start with the fact that in some cases, many car enthusiasts decide to clean the fuel pump mesh, especially when a new filter is difficult to find on the open market. Note that after cleaning the fuel pump screen, it is possible to remove a significant part of the contaminants, although the optimal way remains to replace the fuel pump screen with a new one. The fact is that it will not be possible to completely remove dirt. Also, cleaning is often impractical, since the cost of a new fuel pump mesh is usually quite affordable (about 2 USD for meshes for VAZ family cars);
Replacing the fuel pump filter is a procedure that should preferably be performed every 50-100 thousand km. mileage To replace the fuel pump filter you need a minimum set of tools:
- set of wrenches;
- screwdrivers;
- tubular keys;
Let us add that there is no need for an inspection hole or a lift, since access to the fuel pump is provided from inside the car. On most cars, the fuel pump is installed under the rear seat; the fuel pump screen is located in the pump housing itself, located in the lower part. It turns out that it is possible to remove the fuel pump filter only after removing the fuel pump from the gas tank and disassembling its housing (if necessary).
The entire process of replacing the fuel pump mesh in general terms is as follows:
- removing the rear seat to provide access to the pump;
- decrease in pressure in the fuel line;
- disconnecting the battery terminal and the power supply from the fuel pump;
- removing the fuel lines and removing the fuel pump;
- dismantling the pump mesh and replacing it with a new filter;
- assembly in reverse order;
How to properly remove the fuel pump yourself
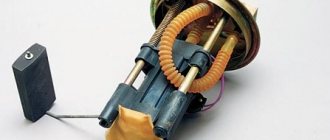
Now let's look at how to replace the fuel pump stack yourself using the example of a VAZ 2110 car. Let's add that these steps have to be performed if you need to change or repair the fuel pump. The difference is that when replacing, the float and fuel level sensor in the gas tank are removed from the old pump, after which these elements are moved to the new fuel pump.
- The gas tank of this car is located in the rear under the bottom. The fuel pump is installed in the upper part of the tank and can be reached from the passenger compartment. To gain access, it will be enough to remove the rear sofa and free up space.
- Then you need to prepare an open-end wrench (13 and 17), a Phillips screwdriver and a long tubular type socket wrench for 7. You can also use a short open-end wrench instead of a tubular one, but it is more difficult to work with such a tool.
- Before removing the fuel pump, be sure to remove the negative terminal from the battery, after which you need to reduce the pressure in the fuel line. To lower the fuel pressure, you need to contact the fuel rail (rail). In the area of the side injection nozzles there is a special valve closed with a rubber plug. The plug should be removed, then place a small container and press on the valve stem. After this, gasoline will begin to flow out, which will lead to the release of pressure in the system.
- Then we return to the salon. Under the chair you can see a square-shaped lid, which is screwed on with self-tapping screws. Under this hatch there is a fuel pump. Use a Phillips screwdriver to unscrew the screws, after which you should disconnect the electrical connector of the fuel pump. This connector can be moved to the side for convenience.
- Now you need to take an open-end wrench and loosen the nuts with which the fuel line tubes (“supply” and “return”) are attached to the fittings on the pump. Then you will need to pull the tubes out of their seats. Please note that there are O-rings at the ends. It is better to replace these rubber rings with new ones, since they are not originally designed for re-installation.
- After removing the pipes, you will need to unscrew the nuts necessary to secure the flat flange that presses the fuel pump to the body. A tubular wrench is suitable for unscrewing. After unscrewing the nuts, the flange should also be removed from the special mounting studs.
You should also pay attention to the rubber gasket ring, which is installed under the clamping part. The specified gasket is also removed from the studs. If you don’t remove it, then you simply won’t be able to remove the fuel pump. After this, the gasket should be inspected and its condition assessed. If defects are detected, this element must be replaced.
Replacing the fuel pump mesh for Skoda Octavia
I recommend that all Skoda Octavia owners select the mesh according to the fuel pump number, which is stamped on top of the fuel section. There are several options for collapsible and non-demountable structures. In my case, the filter in the form of a flask beats by number. The Skoda Octavia fuel pump is located in the tank; access to it appears after tilting the right side of the rear row of seats.
1. Replacing the Skoda Octavia A5 fuel pump begins with thoroughly cleaning the fuel section. Otherwise, some of this dust and dirt will end up in the tank. This can be done with a vacuum cleaner and a regular brush.
2. Using small blows into the grooves along the inner edge, unscrew the pressure plate counterclockwise. Place a mark on the fuel module body and tank to facilitate positioning of the section during installation.
3. Pull the section out of the tank so as not to bend the float rod of the fuel level meter. Before starting disassembly, pour all gasoline from the flask.
4. Unscrew the 4 screws securing the coarse mesh housing.
5. Disconnect the motor power terminals. Pull off the fuel pump fuel pipe clamp. In the original, a disposable clamp is installed on the car. In my case, I didn’t have one at hand, so I had to install a regular one during assembly. Before removing the handset, warm it up with a hairdryer.
6. Unclip the 3 plastic clips connecting the cover and the bottom of the fuel section.
Replacing the fuel pump motor
The reason for replacing the fuel pump module motor is low gasoline pressure or sudden changes in pressure, which is recorded by a pressure gauge during the diagnostic process. Also, the imminent failure of the motor is indicated by the fact that the fuel pump is humming or whistling.
In this case, it is often possible not to change the pump assembly, which will save money. The device must be removed (similar to the situation with cleaning or replacing the mesh filter), after which it is disassembled. The motor itself is replaced and can be purchased separately. The housing and fuel level sensor can be left from the old fuel pump. At the same time, it is recommended to replace the gas pump gasket and other rubber seals, which are not designed for re-installation after removal, that is, they are disposable.
Cleaning the fuel pump mesh
As you know, the engine is the most important component of a car. The main element of supplying the working mixture to the engine system is the fuel pump, which is responsible for supplying gasoline to the filter element and subsequently to the combustion site.
The period of operation of engine system elements and the fuel pump, among other things, is influenced to a large extent by the quality of the fuel mixture. In frequent cases, the use of insufficiently purified gasoline leads to dysfunction of the vehicle. If the fuel pump is clogged, the car begins to move jerkily or does not start at all.
The first step in restoring the function of the car, in this case, is replacing the fuel pump grid.
During the operation of the car, the fuel pump mesh becomes quite clogged and its condition can surprise even an experienced car enthusiast.
Tips and tricks
In the case when the gas tank is heavily contaminated, cleaning or replacing the fuel pump mesh will only be a temporary measure, and the rate of subsequent contamination of the mesh will not greatly depend on the quality of the fuel being filled. In such a situation, it is necessary to remove and wash not only the mesh, but also the gas tank.
To keep the fuel pump screen clean, try not to lower the fuel level in the gas tank below ½ unless necessary. Dirt and deposits that clog the mesh are usually located at the very bottom and are the last to be drawn in by the gas pump.
Selecting a fuel pump strainer for Lanos, Sens and Chance and its features
Before you start replacing the fuel pump strainer on Lanos, Sense and Chance, you must first purchase the part. Meshes for fuel pumps for Lanos are produced by different manufacturers. Before deciding on the manufacturer, you need to find out what diameter of the filter element you need to buy. Fuel pump screens for Lanos are available in different diameters: 11 mm and 22 mm. How they differ, and how to understand what diameter filter element to buy for a gas pump, we will find out further.
- New 11 mm mesh - designed for Lanos and Sens cars from 2003
- Old-style mesh 22 mm - for Sens and Lanos cars until 2002
These parameters need to be taken into account, since during the replacement process it may turn out that you bought the mesh of the wrong size, and it will need to be changed. Which manufacturer is the best product to buy? Today, the products in question are produced by the following companies:
- FSO is a Polish manufacturer characterized by the production of reliable and affordable spare parts. Part number for the fuel pump for Lanos is 96350589
- ICRBI is a Chinese manufacturer that produces spare parts of no worse quality than FSO. Part number 13042081
The price of the spare part in question is not so high as to save on it and sacrifice the quality of the engine. As a result, it should be noted that the procedure for replacing the mesh takes a little time, and most importantly, you can do it yourself.
Main causes of malfunction
If the fuel pump fails, the VAZ 2114 may stall after a short drive or may not start at all when the starter and battery are functioning normally.
The main signs of breakdowns are described below:
- Vehicle failure is one of the main signs, but it can be evidence of malfunctions of many devices, so you should first check the current condition of the spark plugs and make sure that they are not oily.
- You can also judge device malfunctions by pressure indicators: a normally functioning gas pump should provide a pressure of 3.2 bar. Normal values for a 1.5-liter fuel rail are in the range of 285-325 kPa, and for a 1.6-liter volume – 375-389 kPa.
- There is no characteristic vibration in the pump, which is usually felt after turning the key. This is usually the result of faulty wiring, which does not allow the ignition signal to reach the device. In this case, wiring diagnostics is required: they are disassembled and checked using special equipment.
- Lack of activation of one of the engine cylinders, which is accompanied by a significant decrease in power, the formation of vibrations at idle and the release of unburned gasoline into the catalyst. This is a fairly common problem that can occur with a variety of vehicle malfunctions, but in some cases it is a sign of a malfunction of the fuel pump, which leads to improper combustion of fuel inside the cylinders.
- Twitching of the engine at low speeds or before it starts in most cases indicates problems with the fuel pump: the device itself has failed or there are problems with the low-purity filter.
Many inexperienced car owners, after a pump failure, purchase a fuel module that includes this device. This is a common mistake, since it is enough to purchase a separate fuel pump, which costs 2-3 times less than a common module: it is not necessary to replace the remaining parts of the system.
The fuel pump is characterized by increased wear resistance, so it most often fails due to the fault of drivers; among the most common reasons are refueling with fuel of questionable quality or driving a car with a half-empty tank.
All such factors can lead to the following breakdowns:
If the pressure system fails, for diagnosis you will need to measure its indicators: at idle they should be 2.5; at the moment of ignition - 3.5; after removing the pressure regulator tube – 3.3; after squeezing the drain - 7; when you press the gas, vary from 3 to 2.5.
Malfunction of the wiring, consisting of a negative and positive wire, as well as a fuel level indicator. Power failure is one of the most common problems, so you should check the wiring immediately if it has been determined that the pressure readings are normal. For initial diagnostics, the negative and positive wires are connected to a 12V light bulb, after which the ignition is turned on: blinking of the light bulb will indicate the presence of contact. In this case, checking the internal contacts is required.
If there are no problems with pressure and wiring, the motor is checked - the main part of the pump responsible for distilling fuel
Diagnostics is carried out using an already used 12V light bulb.
Insufficient fastening of the fuel pump mass; the connection may be broken if the hand brake is used carelessly. Troubleshooting the problem is not difficult; it is much more difficult to get to it, since you will need to remove the grounding contact
It is located in the same place as the mass of the fuel pump; the presence of problems with it may be indicated by the absence of a characteristic click after turning the ignition key.
Fuse failure. You will need to inspect its contacts: if they are burned out, then this element must be replaced.
The cost of replacing a fuel pump in a car service center for a VAZ 2114 is about 500 rubles.
Source
Instructions for replacing the fuel pump mesh on Chevrolet, ZAZ and Daewoo Lanos, Sens and Chance
It should be noted right away that the resource of this filter element ranges from 50 to 100 thousand kilometers. It all depends on the quality of the gasoline being poured into the tank, but you can refuel once unsuccessfully and, at best, end up having to replace the filter, and in the worst case, you will have to change the fuel pump.
Next, we’ll look at how to replace the Lanos fuel pump mesh yourself, and what you’ll need for this. When carrying out the work, you will need a minimum set of tools, consisting of a flat or slotted screwdriver, steel wire and a hair dryer. To replace the mesh, you will need to remove the entire fuel pump module. How to do this yourself is described in detail in the material on removing the gas tank or instructions for replacing the Lanos fuel pump. The process of dismantling the fuel pump assembly with the mesh must begin by disconnecting the negative terminal of the battery.
https://youtube.com/watch?v=fXUnZuodjlU%3F
After the fuel pump module assembly is removed from the mounting hole of the tank, we proceed to further steps to replace the strainer:
After removing the pump, there will be some fuel left in it, which can be poured back into the tank or container by turning it down with its upper part. We place the entire mechanism assembly on a clean cloth or newspaper, and proceed to replacing the mesh. First of all, you need to dismantle the float, for which you remove the plastic C-shaped clip. To remove the clip, you need to compress it and remove it from its seat. To get to the fuel pump coarse filter, you need to remove the top cover of the plastic flask. It is attached using three protruding slots, which need to be pressed with a screwdriver. Before removing the top cover of the flask, you need to disconnect the power supply connector for the fuel level sensor. This sensor is attached to the outer flask (it is also called a glass). Next, we proceed to dismantling the inner flask with the fuel pump, since the mesh is attached specifically to it. You can dismantle the inner flask using strong steel wire, from which you need to make a hook. An example of such a hook is shown in the photo below. The hook is needed to dismantle the inner flask (with the fuel pump), to which the mesh is attached. This flask is fixed using an internal protrusion along the circumference on the outer flask. The photo below shows a protrusion in the inner part of the outer flask, through which the fuel pump bracket with filter is fixed. To simplify the process of dismantling the inner flask, you need to heat the walls of the outer bowl with a hair dryer
This will lead to its expansion, which will allow you to easily and quickly remove the flask (it is important not to overdo it with a hairdryer). Using a hook, you need to grab onto the plastic protrusion on the inner flask and pull towards you (moderately). To increase the effectiveness of actions, efforts should be made alternately at several points
As a result, the inner flask with the gas pump and the mesh located in the lower part is removed. It is this mesh that will have to be replaced, having previously assessed its condition. In 100% of cases, the inside of the outer flask will have contaminants that should be removed. We proceed to removing the mesh, for which the first step is to remove the retaining ring (washer) by prying it off with a screwdriver. Remove the old filter, replace it with a new one, and secure it with the retaining ring. It is recommended to purchase a new ring, since when it is removed, the quality of fixation has significantly decreased. If you install the old ring, then there is a high probability that the mesh may come loose during operation. We install the Lanos gas tank mesh in place and carry out the assembly in the reverse order.
The procedure for replacing the gas tank mesh is not difficult, but it is very responsible, since the work is carried out with parts that are coated with highly flammable substances.
After assembling and installing the fuel pump with the new element in place, you can put the negative terminal on the battery and turn on the ignition. When the pump pumps gasoline and turns off, you can start the engine. This completes the process of replacing the fuel pump mesh.
This is interesting! Two types of fuel pump modules TA and TG were installed on Lanos. The principle of replacing the mesh on TG type devices is discussed above. Blocks of the TA type differ in that the mesh on them is located on the outside. You can read more about the differences between the modules.
https://youtube.com/watch?v=KIs_mGTSxUA%3F
How to remove the fuel pump on a Ford Focus 2 with your own hands
This is how I drank it.
Before changing the fuel pump, let's decide on the methodology, since there are two ways to remove the module - officially, the fuel module can only be changed with the fuel tank removed. There is an alternative way: you can cut an inspection hatch in the bottom of the car under the rear seat cushion and thus get to the fuel module. This method is quite popular, but has some disadvantages:
- we violate the integrity of the bottom;
- Interior sound insulation suffers;
- additional pockets of corrosion may appear;
- There is direct contact between the fuel tank and the passenger compartment, and safety suffers, especially during work related to dismantling the fuel module.
Correct method (official)
Let's start with the official method of replacing the fuel pump by removing the fuel tank. In fact, there is not much work, the main thing is to have an inspection hole, a lift or an overpass.
Relieve pressure in the fuel system. To do this, with the ignition off, remove the fuel pump fuse F111, start the engine and, at idle speed, use up the fuel remaining in the pipes. Remove the terminal from the battery. Having placed the car on an overpass or lift, we go under the car. Remove the fuel filter.
Once the pressure has been released, you can remove the fuel filter.
Unscrew the 2 nuts securing the heat-protective casing of the tank with a 10mm head. Move the casing to the side. We remove the tubes from the adsorber, it is located behind the fuel tank. To do this, press the lock button with a screwdriver and simply pull off the hose. At the front of the tank, remove the fuel hose from the tube by prying the white plastic clamp with a flat screwdriver
The fuel is under pressure, so remove the tube carefully as it may spill or splash. Disconnect the filler neck hose. It is fixed to the tank with a clamp
Loosen the clamp by unscrewing the tightening screw and remove the hose. Attention! If the gasoline level is higher than the nozzle, it may overflow from the tank. We disconnect the air outlet thin tube near the filler pipe, freeing it from the clamp. Using a 13mm socket, unscrew the bolts securing the gas tank to the body, but not completely. We pass our hand between the bottom and the front of the tank, disconnect the contact connector on the hatch cover in the upper part. To do this, press the connector latch with a screwdriver and disconnect the contact blocks. We remove the tank by moving it forward and lowering it down.
Let's remove the tank Whoa, but without barbarity and sawing.
We thoroughly clean the surface of the tank from dust and dirt, especially in the area of the fuel module. Unscrew the plastic threaded washer. To do this, take a wooden spacer, rest it against the edge of the washer and, with light blows, unscrew the washer securing the module. Carefully remove the fuel module assembly, inspect the condition of the tank from the inside, look for the presence of suspended matter in the fuel, and, if necessary, rinse the tank.
New fuel pump installed.
We install the new fuel pump according to the marks, aligning the mark on the tank and the arrow on the pump.
Assembling the gas tank and installing it is carried out in the reverse order.
Replacing the fuel pump from the passenger compartment
Be prepared for the fact that when replacing the fuel pump on a Ford Focus, without removing the gas tank, you will have to cut metal.
This method involves replacing the pump without removing the tank from the car, but to do this it is necessary to cut a hatch in the bottom under the rear passenger seat using metal scissors. Work should be carried out either outdoors or in a well-ventilated area to avoid the accumulation of gasoline fumes. We cut out the hatch, focusing on the wiring harness passed into the bottom under the floor covering.
For aesthetics, you can also cut out a circle with a diameter of at least 250 mm.
Having cut out the hatch, we gain access to the fuel pump, but working with the pipes and the threaded locking washer will not be as convenient as with the tank removed. All operations for removing and installing the pump are carried out according to the same algorithm as described above, and the hatch can be closed with a new sheet plate with a diameter of about 300 mm, placing it on short self-tapping screws.
The length of the screws should be such as not to damage the plastic tank.
Assembly
The fuel pump must be installed so that its outlet fitting coincides with the recess in the top cover. Therefore, first, disconnect the insert with a coarse mesh from the flask (held on by several small latches).
Install the fuel pump into the flask, not forgetting about the sealing ring in the grooves of the lower and upper parts. A small ring is put on the body of the gas receiver. Snap the mesh onto the flask, aligning the fuel return drain fitting with the fitting on the mesh body.
Secure the plastic cover with 3 clips, put on the fuel pump hose, connect the power wires and screw on the part of the housing with the fuel level meter. The remaining components of the system are assembled in the reverse order of removal and do not cause any difficulties.
Replacing the mesh on a VAZ 2110-VAZ 2112
Removal:
1) We talked about cars with a 1.5 liter engine above.
2) Now let's talk about 16-valve cars. Remove the pump, take a screwdriver and remove the retaining ring from the guide (often called the pin). There is only one ring, although there are two guides. It is removed as follows: pry it with a screwdriver and move it to the end of the guide in the direction of the blue arrow in the photo until it is completely removed. Now the main thing is not to turn the fuel pump over, otherwise the housing will fly out spontaneously and the hoses may break.
3) The photo below shows two blocks with wires; they need to be disconnected. If you pull with force and they do not give in, then you are doing something wrong and there is a possibility of breaking the clamps. Press the retaining clips and carefully remove them.
4) Grab the top of the fuel pump with your hand and separate the two housings along the guides. Put one housing aside, continue to hold the gas pump in your hands and use a screwdriver to disconnect the mesh. Remove it and replace with a new one.
Installation:
Proceed in the reverse order of removal. Make sure that the part is securely fixed; it should not fall off. We recommend that you take your time and do not install the fuel pump flap with the rear seat cushion, but rather ask an assistant to turn the key in the ignition for about 5 seconds, and you watch to see if gasoline flows from under the fuel pipes. The tightness of the system is mandatory; in case of malfunctions and leaks, replace worn parts with new ones.
Additional video: Attached below is a video using the example of a VAZ 2114 on the topic of today’s article, we recommend you watch it.
Note!
The video below shows the procedure for disconnecting the wire block; if you have difficulties with this, it is useful to watch:
Do-it-yourself fuel pump screen cleaning.
To carry out the work, you need to stock up on the following materials:
- Compressor.
- Fuel pump gasket.
- Nozzle seal.
In order to clean the hard filter, it is necessary to dismantle the fuel pump.
- Turn off the car's power source.
- Unscrew the holders and remove the cover.
- We remove the electric drive.
- We disconnect the fitting and the conductor through which the fuel circulates.
- We also remove the fitting and remove the fuel outlet hose.
- Remove the seal.
- Raise the gasoline compressor and remove the float. Next, together with the mixture level analyzer, we dismantle the fuel pump.
- At the bottom of the pump there is a mesh (coarse filter).
It is quite difficult to determine the contamination of the mesh by visual inspection. Small particles can interfere with the proper functioning of the fuel, while remaining almost unnoticeable. To successfully wash the mesh, you need to let it soak in a special solution. To do this, you need to dilute the detergent one to ten with water. Next, you need to place the mesh in a tank with the prepared composition and leave it there for one hour.
After this, you can proceed to the main cleaning stage.
- To do this, uses the same composition and a brush with fine bristles. Using the specified materials, thoroughly rinse the mesh.
- After this, you need to clean the filter with a stream of air. To do this, we use a compressor.
- Next, you need to wait until the filter is completely dry. After which, you can assemble the fuel pump.
After washing the element, it is necessary to carry out repeated visual diagnostics. The network must not have mechanical damage. Otherwise, further use of the element is impossible and the filter must be replaced.
After completing all stages of work, we assemble the fuel pump in the opposite order. Next, you need to check the correct operation of the fuel system and the success of the operation.
https://youtube.com/watch?v=xnKwDtCtM_0%3F
During the operation of the car, it is necessary to promptly pay attention to malfunctions in the fuel system and regularly replace used filters. Happy renovation!
Happy renovation!
Fuel filter cleaning steps
If you decide to clean the fuel filter yourself and the dismountable filter, follow the following step-by-step instructions.
To find the fuel filter, you need to look at the fuel line from the carburetor or fuel injector. This is usually a small plastic or metal part.
Next you need to disconnect the hose clamps. When the clamps are loosened, you need to pull out the hose from the fuel filter and drain the excess fuel into a container. When the filter is empty, remove any remaining fuel using a dry, lint-free cloth.
- Wash the fuel filter on both sides with kerosene, solvent or acetone and knock off any remaining debris on any hard surface. It also doesn't hurt to blow out the fuel filter with a tire pump.
- Repeat the process until the fuel filter is in acceptable condition.
- Make sure the gaskets are in good condition. Replace them if necessary.
- After cleaning the fuel filter, let it dry and then reinstall it. If the filter is damaged, has perforations or cracks, you better replace it.
How to wash the fuel pump mesh
It so happened that when driving for a long time on the highway in pouring rain, the car stopped moving. The traction disappeared. I stopped for 10 minutes, started it and drove again for a while, then the same situation - the engine twitches and doesn’t want to go. I came home late at night, parked it until the morning, I thought that in the morning the car would be better (it was like that before a couple of times, but then it went away on its own), but in the morning the car barely started and did not want to drive normally. I had to gather a consultation of auto-minds and analyze the situation. VAG-COM did not clearly clarify the situation, there were no errors. We came to the conclusion that we need to climb into the tank and look at the fuel pump. The operation is not entirely simple! To get to the fuel pump in AVNT (and it is located in the trunk closer to the rear seat ) required:1. remove the rear seat2. remove the rear seat backrests3. remove the trunk floor lining at the 5th door (trunk)4. Remove the left and right trunk trims5. remove the plastic trunk trough (it forms, as it were, a double floor) and after that you have access to the hatch, which is screwed to the floor, under which there is a submersible fuel pump. I took all this apart and saw the body of the fuel pump, which is screwed to the tank with a huge plastic nut, to unscrew this nut, a special tool is usually used (there is such a puller), but we unscrewed it using a huge flat screwdriver and a hammer, gently tapping in the direction of unscrewing (counterclockwise) on the end ribs of the nut. Next, there is one point! You need to bleed pressure in the fuel supply system, otherwise if you remove the hose under pressure, everything will end up in gasoline! Tested by personal experience! )))) This is easy to do: remove the chip from the fuel pump, start the engine and wait until the car stalls (after that I recommend looking at and resetting engine errors).
Next, you need to use some skill to remove the fuel pump complete with housing from the hole, because The fuel level float sticks out from the body to the side, and the hole is round along the diameter of the pump.
After I removed the fuel pump from the depths of the gas tank, I immediately looked into the gas tank with a flashlight - the bottom was clean. This means we need to look at the fuel pump. There was a suspicion that the pump itself was dying. Disassembling the fuel pump housing was not very difficult, I unfastened several plastic hooks and the housing was disassembled into 2 parts (naturally, I first removed the float). I pulled the pump itself out of the housing and found that in the lower part of the housing (the housing is not dismountable) there is a mesh that filters the gasoline entering the pump from the tank, it is all black, as if in used oil. As they later explained to me, the black oily fraction is silt that forms in the upper part of the tanks when storing gasoline, because condensation + heat forms there — that’s where life comes from))). In the end, realizing that there was no way to remove the mesh in order to wash it, I resorted to military stratagem and asked my friends (after all, the car was standing on the street, all disassembled and with a hole in the gas tank approximately 100 mm in diameter, I didn’t decided to close it and leave it, but stood and ventilated it all this time) drive to the nearest car wash and ask the washers to wash the mesh with foam for washing the body and then rinse everything there with plenty of tap water. After 10-15 minutes they brought it clean, like a new pump housing and I started reassembling it. I assembled everything and the car drove after this operation as before.
To find out what condition the fuel system is in, you need to check its performance. To do this, you need to connect a measuring device to the gasoline supply system. In order to connect the pressure gauge to the fuel system, you must use a special device. Therefore, in this case you will have to contact a specialized workshop. For self-checking, you can use the following:
- Turn on the ignition. If the fuel pump does not work or makes abnormal noise, the gasoline supply unit may be overloaded.
- If engine performance decreases, the acceleration period increases, or the engine idles improperly, excessive clogging of the fuel lines may be the cause.
As a rule, a clogged fuel filter leads to such consequences.
In this case, the filter requires mandatory replacement, and the mesh can be cleaned with your own hands. In most cases, cleaning the mesh will give the desired result for a while. However, the price of the part is not that high, and it can be replaced without resorting to the help of workshops.
The replacement process will not take much money and time, but will nevertheless increase the service life of the fuel pump and other elements of the system.
How to clean the fuel pump yourself
Let's start with the fact that the mesh filter for the fuel pump is a coarse filter and is designed to capture large particles and deposits that are in the fuel and inevitably accumulate in the fuel tank. It turns out that the fuel pump has its own additional fuel filter mesh, which prevents debris from entering the fuel system from the tank parallel to the usual fuel filter. The process of cleaning or replacing the fuel pump mesh is almost similar to the general scheme for replacing the pump itself:
- The fuel pump is installed directly into the gas tank. You can get to the pump from the passenger compartment, as it is located under the rear seat. To gain access to the fuel pump, you need to remove the rear seat cushion or fold down half of the sofa (if possible).
- The fuel pump is usually located on the right and covered with a special plastic cover. The specified cover must be removed.
- Before removing the fuel pump itself, it is necessary to relieve the fuel pressure in the system. To do this, you will need to disconnect the power connector from the fuel pump, and then turn the engine with the starter.
- The next step is to remove the negative terminal from the battery, after which the tubes from the fuel pump are disconnected.
These tubes are “supply” and “return”, they are secured with clamps that need to be pressed out. You should be prepared for the fact that a certain amount of gasoline may spill after removal. For this reason, safety precautions must be observed! - Next, you need to unscrew the special pressure ring-cover of the fuel pump. It is very difficult to unscrew this cover manually. There is a special fuel pump cover puller for removal. If there is no such puller, then you can try to carefully unscrew the ring using improvised means. We strongly recommend that you first study on specialized auto forums how to remove the fuel pump cap on a specific car model.
- After unscrewing the cap, you can remove the fuel pump. Before complete removal, the remaining gasoline should be drained from its body, and the sealing ring should be removed.
- Now you can begin disassembling the fuel pump housing. To clean, you will need to remove the bottom part. There is often dirt in the indicated lower part of the housing.
- After this, remove the fuel pump screen. To remove the mesh, just pry out the filter at the place of attachment to the pump body using a regular screwdriver. The fuel pump strainer usually becomes completely clogged, especially on cars with high mileage.
- Then the fuel pump mesh can be replaced with a new one or cleaned. It is better to wash the fuel pump mesh first with carburetor cleaner. Mechanical cleaning is done with a soft brush. Then the mesh should be dried and blown. The bottom of the pump housing and the cleaned mesh are finally washed again with gasoline.
- The final step is to reassemble the fuel pump and install the device in the gas tank. To facilitate installation, it is better to invite an assistant, as it may be necessary to ensure high-quality pressure of the pump to the tank. The fact is that many gasoline pumps have a special spring, the force of which must be overcome. At the same time, you need to make sure that the rubber seal is in place and at the same time screw in the pressure ring-cover of the fuel pump. When tightening the clamping ring with a puller or improvised means, do not exceed the tightening torque. If you tighten it too tightly, the fuel pump cap may burst; if you tighten it too weakly, the fuel pump will wobble due to poor fixation.
Please note that when installing a fuel pump on many car models, you must be careful not to bend the fuel level sensor in the gas tank. It is also important to adhere to the position in which the pump was originally located.
In order to determine the correct position of the fuel pump, there are special indicators. Such indicators are made in the form of arrows and are located on the fuel pump, the gas tank body and the pressure ring. The correct installation of the fuel pump can be considered when all the arrows are in the same line. We would like to add that if the gasket is installed incorrectly, gasoline may leak out if you fill the tank full.
Now all that remains is to connect the fuel supply and return pipes to the fuel pump, while simultaneously checking that the clamps are securely fastened. The completion is to connect the electrical power connector to the fuel pump, after which you can start the car for testing.
Fault diagnosis
There are several signs that indicate that the fuel pump is clogged. Each of them individually may not indicate this one hundred percent, but taken together they are sufficient grounds to begin cleaning. These are the signs:
- the engine stalls when you press the accelerator;
- the acceleration dynamics of the car decreases;
- the engine responds poorly;
- starting with the starter is somewhat difficult;
- When the gas pedal is pressed sharply, jerking occurs.
Depending on how badly the fuel pump is clogged, these problems can vary greatly in scope. For example, if the pollution is very high, then when you press the gas pedal, the car may hardly accelerate.
Cleaning the fuel pump screen can solve these problems, but it is important to remember that there are other reasons that can cause them:
- The injector has failed.
- The fuel pump is not working correctly.
- The fuel filter is dirty.
If the filter and mesh are still easy to change on your own, then for the rest it would be better for a beginner to contact a car service center. This will allow you to avoid gross mistakes that an inexperienced car enthusiast may make during the repair process.
Reasons for replacement
Characteristic signs of a fuel pump malfunction:
- power drop;
- failures when sharply pressing the gas pedal;
- difficulty starting the engine;
- when you sharply press the gas pedal to the floor at low speeds, the engine begins to “choke”;
- increased noise level when the motor is turned on;
- “dips” are observed, a loss of power some time after the start of movement, and if the engine is allowed to cool, interruptions in operation disappear for a short period.
Before you begin replacing the fuel pump, it is important to make sure that engine interruptions are related to the fuel supply and not to the ignition system, ECU, or power supply to the pump motor. It is necessary to measure the pressure in the fuel rail
If the value obtained at the time of interruptions in engine operation differs from the standard values, you can begin diagnosing the power system. https://www.youtube.com/watch?v=JX5cP994JTU The symptoms described above can be caused not only by a faulty fuel pump, but also by a clogged mesh or fine fuel filter.
Also, do not forget that the cause of interruptions in the fuel supply may be poor contact in the motor power supply circuit (torn wires, oxidation, etc.)
For your own diagnostics, it is important to know the structure and operating principle of the fuel pump.
Where is TN
On the vast majority of passenger cars, the fuel pump is located inside the tank. A fuel pump with a coarse mesh, a fuel pressure regulator, a fuel level sensor and a critical fuel level sensor, and in some cars also a fine filter, are held inside the tank by the fuel section.
Design features of some cars
After reading the guide on how to replace the fuel pump yourself using the example of a specific car, you can easily replace it on any other car. But do not forget that in some cases the power system design will make adjustments to the replacement method.
For example, on the Ford Focus I and Chevrolet Cruze, there is no technological hole under the rear seat cushion for access to the fuel section cover, so to replace the mesh and the fuel pump itself, the tank will have to be removed. For ease of further maintenance, owners often cut holes above the fuel module themselves.
On the same Chevrolet Cruze, the manufacturer does not suggest a separate replacement of the motor and even the fuel filter (they are simply not in the catalog of original spare parts), so if the fuel pump fails, the fuel module will have to be replaced entirely. If you want to save money, you can pick up the engine, for example, from the related Opel Astra, but it will have to be adjusted a little. You can learn about this kind of design features from the repair and operation manual or from publications on specialized forums of the owners of your car model.
Tools
Replacement often requires only a socket with a wrench, Phillips and slotted screwdrivers, and pliers. In some cars, the cover of the service hole under the rear row of seats is mounted on a sealant, which will need to be cut off to access the fuel section (in most cases, the plug is screwed on with screws).
Important points
After stopping the engine, pressure remains in the fuel lines for a long time. Before you begin manual replacement, the system must be emptied. To do this, you can pull out the fuel pump fuse with the engine running. Stopping the fuel supply will stop the engine, after which replacement can begin. Modern fuel hoses are secured with self-clamping fittings
To remove them, you need to press the clamps on the sides of the latches, after which the hose should come out of the fitting relatively easily. If the fuel pump is replaced in cold weather, you should be extremely careful when unsnapping the plastic clips and removing electrical connectors. At subzero temperatures, the plastic becomes very fragile. The fuel section must be removed with care, since the free exit will be hampered by the FLS float. When disassembling the fuel module and removing the fuel pump, pay attention to the presence of sealing collars, which must be installed during assembly without distortions or deformations. After you have replaced the fuel pump and installed all the elements back, turn on the ignition a couple of times so that the fuel pump pumps gasoline into the line and ramp. At this time, you can check the tightness of the connected hoses.
When and why you need to change/clean the fuel pump screen
Let's start with the fact that general problems with the fuel system (fuel pump in particular) should be divided into the most common groups:
- the fuel pump mesh and fuel filter are clogged;
- the fuel pump itself has failed;
- injector problems;
Let us add that we should also not exclude the possibility of air leaks, that is, airing of the power system. Another culprit of problems may be the pressure regulator in the fuel rail. In this case, engine malfunctions may be partially similar to some of the symptoms mentioned above. For example, a slight ingress of air into the fuel system results in the engine not starting for a long time after parking.
Let's go back to the fuel pump. Its malfunction means that the performance of the fuel supply system is reduced. If the fuel pump breaks down, then the car becomes unsuitable for normal use. Signs of a fuel pump malfunction are as follows:
- It is impossible to start the engine, the fuel pump does not pump;
- the engine starts, but runs with serious interruptions;
In this case, the service often recommends diagnosing, repairing or replacing the fuel pump. It should also be taken into account that the fuel pump mesh filter may become clogged inside the device. Let us immediately note that it is impossible to accurately answer the question of when to clean the fuel pump stack. Some car enthusiasts clean/replace the fuel pump mesh as needed or as a preventative measure every 50-70 thousand km. mileage, while others are faced with the need to clean the fuel pump grid for the first time at mileages of 150 thousand km or more. and more. Let us add that the operating manual for some models specifically states that it is recommended to replace the fuel pump stack once every 120 thousand km.
It should be added that the loss of dynamics and the appearance of symptoms of a clogged mesh occurs gradually. For this reason, each driver decides to clean the fuel pump himself. On powerful naturally aspirated engines, the gradual deterioration in acceleration is not felt as strongly as compared to highly accelerated engines with a small displacement. For this reason, many owners of large-volume trucks begin to solve the problem after noticeable complications appear. Also, the condition of the pump grid is greatly influenced by the quality of the fuel being filled and a number of other factors and individual operating conditions, which we will talk about a little later.
Car won't start after replacing fuel pump
A common occurrence after replacing a fuel pump is that the car will not start. Let's start with the fact that the car should not start right away, since the pump must first pump up the pressure in the system, which was previously released.
To create pressure in the fuel system, turn on the ignition for a few seconds (the lights on the dashboard are on, but the key does not turn to the “start” position). After this, you can turn the engine with the starter for 5-10 seconds. If the attempt is unsuccessful, you should wait about 30 seconds. and then repeat the procedure.
If the engine cannot be started after repeated cranking with the starter, then this indicates that:
- errors were made when assembling and connecting the fuel pump;
- the new fuel pump is faulty;
- there was a planned blockage or failure in the car’s security system;
During installation and connection of a new fuel pump, various failures can occur, ranging from sticking valves on the pump itself to breakage of contacts, connectors and terminals.
In such situations, you need to determine the nature of the breakdown: mechanical or electrical. It’s easiest to figure out the power supply to the pump, since it’s either there or it’s not. As for a car alarm or immobilizer, the anti-theft system can block the car from starting by cutting off the power to the fuel pump. We should also not forget that the fuel filter may simply become clogged. When the valves on the pump stick, the device may hum and work, but idle.
If such problems occur, gasoline does not flow into the fuel rail and the engine does not start. To accurately determine the cause, you must first make sure that there really is no gasoline in the fuel rail. Then you will need to re-remove and connect the fuel pump directly from the battery or dimensions. This method of connecting the fuel pump directly is optimal for quickly checking the fuel pump yourself if the fuel pump does not pump.
- Replacing the fuel pump motor
The causes of whistling and increased noise during operation of the fuel pump are overheating of the pump. How to diagnose and fix the problem yourself. Tips and tricks. Read more
- Malfunction of the fuel pump relay: checking and replacement
What functions does the fuel pump relay perform, signs of breakdown. Where is the fuel pump relay installed, how to properly check the fuel pump relay. Read more
- How to clean the fuel pump mesh yourself
Why is it necessary to clean the fuel pump mesh? When is it better to change and how to clean the fuel pump mesh? How to properly remove the fuel pump, subtleties and nuances. Read more
- The fuel pump does not pump when the ignition is turned on
How to determine why the fuel pump does not pump or works poorly. Fuel rail pressure, pump diagnostics. Wiring, relays, fuel pump fuses. Read more
- Mechanical and electric fuel pump design
Mechanical and electric fuel pump, design and principle of operation of the device, types of pumps and main malfunctions, operating features Read more
- Replacing the fuel pump mesh with your own hands
Why does the fuel pump grid need to be changed? How to remove the fuel pump yourself to replace the filter. Features of reassembly after replacing the fuel pump mesh. Read more
User Experience
My engine rarely stalls. A couple of times there were simply problems with the fuel, but once there was a problem with the pump. I figured out how to take it apart myself. I realized that there was no damage, it was just pollution. I had to change the grille - before I had no idea that they could be cleaned. Since then I have driven a hundred thousand kilometers and so far everything is fine. When another 20-30 thousand are added, then I’ll look under the hood. This time only for preventive purposes.
I'm new to driving, but have already encountered this procedure. When the car didn't want to start the first time, I thought the problem was with the battery. But then the engine began to behave strangely - it either would not start or suddenly increased speed. Friends suggested that we need to disassemble and clean the pump. As it turns out, it's not difficult at all.
Grigory Vasiliev
I became a motorist five years ago. Since then, I have never needed to repair or change anything - my husband usually does this. He simply cleans the grille for himself, but always installs a new one for me. The answer to my questions is that it is safer.
Alexandra Safroshkina
I clean the grille every 150 thousand kilometers traveled. I have a sedan made by Nissan, and I almost never drive it outside the city. Although there are no particular problems, I should do this after about a hundred kilometers. Focus on the ignition - if everything is fine with the battery, then the pump is probably dirty.
Victor Kuznetsov
I never do this myself and I don’t recommend it. Any car service center will do this procedure almost free of charge. In addition, mechanics spend less than half an hour on it, and when you do it yourself, you don’t know exactly how much more digging you’ll have to do.
Aleksey Ivanov
How to determine if a fuel pump is faulty
Be that as it may, most of the signs indicating a fuel pump malfunction may indicate problems in other systems and components of the machine. The car is malfunctioning - maybe the spark plugs, maybe the ignition, maybe some sensor is acting up. Extraneous noise in the engine can generally be caused by various breakdowns. Even when the engine stalls immediately after starting, you cannot blame only the fuel pump. For example, without readings from the crankshaft position sensor, the ECU can stop the pump, which is quite a normal car reaction to such a problem. And even a decrease in pressure in the system can be caused by leaks in the fuel lines, breakdown of the bypass valve and other failures.
What can you do right away? First of all, you can check the operation of the fuel pump before starting the engine. To do this, open the fuel tank cap and have someone turn on the ignition without turning the starter. In the first seconds after turning on the ignition, you should hear a specific noise from the fuel pump. If it is missing, most likely the pump will have to be replaced, although it is possible that the reason for the failure is the power supply to the device.
Measuring the pressure in the fuel rail is another way to check the fuel pump. Normal pressure readings, as well as the correct procedure for installing a pressure gauge, should be found in the documentation for your car.
Most often, in modern cars, when the fuel pump fails, it is replaced. But there is no need to rush into this. Perhaps the cause of the failure is not the fuel pump itself, but, for example, a coarse filter that is simply clogged. In this case, simply cleaning this mesh will help and you won’t need to change anything. It is also worth checking the wiring, fuse, as well as the fuel pump relay; perhaps the reason for the failure of the device lies here. Again, checking the fuel lines, the bypass valve, and even the injectors themselves will also not be superfluous.
Fuel pump device
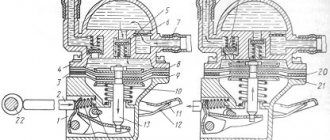
Modern cars use two types of fuel pumps - mechanical or electric. The former are used in carburetor engines, the latter in injection engines.
The mechanical pump is usually installed on the body of the gas tank, while the electric pump is installed inside the tank. Some automakers use both types of pumps at once.
Mechanical pump
The mechanical fuel pump is quite large. Its main elements are:
fuel chamber;
inlet valve;
release valve;
diaphragm return spring;
When power is applied to the fuel pump, the lever begins a repetitive up and down motion. Due to these movements, the diaphragm moves, and gasoline flows first into the pump and then into the engine.
This is how fuel is supplied in carburetor-type engines. Since the distance between the carburetor and the fuel pump is usually small, such devices can supply fuel even at minimal pressure.
A mechanical fuel pump is usually installed on the body of the gas tank
Electric pump
Electric fuel pumps are small in size and have a simple design. Inside the pump housing are:
chamber for gasoline;
inlet valve;
release valve;
diaphragm return spring;
The main element of an electric pump is the core. Due to the additional valve, it performs reciprocating movements and opens the valves for fuel inlet and outlet. Such a pump only works when the fuel pressure in the system is high and gets very hot while the car is moving. For more efficient cooling, it is usually mounted in the gas tank.
The electric fuel pump is small in size and simple in design.
How does a fuel pump work?
The fuel pump is powered by the power unit. When the engine starts, the on-board computer signals the fuel system about the need to supply fuel. Electricity is supplied from the engine to the fuel pump, and a small motor inside the pump creates the necessary pressure in the system. In the first few seconds after starting the car, you can hear the fuel pump humming as it pumps gasoline.
A certain amount of fuel enters through the inlet valve into the pump chamber, then through the outlet valve into the fuel filter. There, the fuel is cleaned of dirt and impurities and sent to the engine. The fuel pump turns off automatically, along with the engine.
We carry out the replacement ourselves
Deu Nexia cars, like any other cars, require refueling only with high-quality gasoline. Unfortunately, it is difficult to find one at domestic gas stations, as a result of which the car owner has to carry out technical work to replace certain parts more often. Here we are talking about the Nexia fuel pump filter. You can carry out such repair work yourself, and today you will learn how to do it.
Please note: the car's operating manual does not say anything about replacing the filter element. That is, the manufacturer installed the filter for the entire life of the car.
But given the low quality of Russian gasoline, experts recommend replacing the filter mesh or at least cleaning it at least every 20 thousand kilometers.
What to cook?
First of all, you should prepare thoroughly. Keep in mind that when you disassemble the fuel pump, going to the store to get something missing will be problematic, so it’s better to prepare everything in advance. So, you will need:
- wrench 8;
- Gasket for fuel pump;
- new mesh for the filter element.
Instructions
Before you begin to replace the fuel pump filter, you must relieve the pressure in the system. To do this, start the engine, and then find the relay on the fuse box that controls the fuel pump. Remove it from the socket: after some time the car should stall. When this happens, disconnect the negative terminal of the battery.
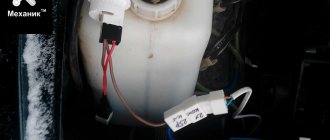
The fuel pump in the Daewoo Nexia is located in the rear of the body under the seats. To get to it, you need to remove the rear seat. To do this, you need to press the seat cushion towards the trunk and at the same time lift it slightly. After removing the seat, under the carpet we will see a hole for the fuel pump
By picking up the plastic plug with a screwdriver, this part can be removed. Then you should unscrew the clamp with which the pipe is attached to the fuel pump. Having done this, you can disconnect the power cords of the unit. Now carefully, without applying additional force, use pliers to disconnect the pipe from the fuel pump. At this moment, the device can be turned a little in different directions so that the hose suitable for it does not break.
The relatively small space will not allow you to conveniently dismantle your pump, so you will have to work hard here. After this, when the pipe and wires are disconnected, use an 8-mm wrench to unscrew the bolts securing the element to the car body. When the screws are unscrewed, begin to rotate the pump around its axis so that it does not cling to the car body with the mesh, that is, the filter itself. Now that your unit has been dismantled, it's time to start disassembling it. To do this, remove the clamps securing the pipe so that the hose is more elastic. Also be sure to disconnect the fuel system component's power plug. Then it will be necessary to remove the tube frame. We need to start at the base of the fuel cell. In order to pull the frame through the lower rubber clamp, you will need to make an effort. Please note that during this operation you must be careful not to tear the rubber retaining gasket. Having slightly bent the lower part of the frame, we remove it from the pump itself. Then, by removing the rubber retaining gasket, you get directly to the filter component. Remove it and replace it with a new one, reassembling all parts in the reverse order.
At this point, the replacement of the filter mesh can be considered complete. As you can see, there is nothing complicated about this - you just need to follow the steps indicated in the instructions.
Comments
The top picture is cool)))
The top picture is cool)))
- Login to leave comments
Gasoline level
It is necessary to ensure that the level of gasoline in the tank is below the level of the bottom of the glass.
Why? I can't understand.
- Login to leave comments
because everything is above the bottom
because everything above the bottom of the glass will be sucked out at once))) Physics, hell!
- Login to leave comments
The idea is certainly good, but
The idea is of course a good one, but it’s all a mess. And the gasoline level should be below the glass, because otherwise everything that is higher will be sucked right through the glass, as far as the hose goes into it. In general, draining gasoline from classics is a really big problem. I'll tell you how I tried to solve it. After I changed several covers with locks during the first few months and realized that this was a waste of money, I installed a limit switch in the hatch on the bracket where the rubber band (fungus) had previously been inserted, and connected the wires from the limit switch parallel to the trunk limit switch from the signaling. I have a signal with feedback. After this, the draining of gasoline stopped, but another problem arose - consistently once or twice a week I had to jump up in the middle of the night and go close the hatch. Of course, the thieves didn’t have time to drain the gasoline, but such night climbs really tired me. A couple of times I even had to jump up twice a night. In addition, recently advanced thieves have begun to come across - they not only stupidly opened the hatch and ran away from the alarm, but before that they still managed to tear off the wire from the limit switch. I got caught like this once - after the alarm went off, I went out and closed the hatch, I simply didn’t pay attention to the limit switch - it was dark and I wanted to sleep. In the morning, of course, I discovered a milked car and a broken wire at the end switch (the thieves returned after some time and calmly worked). After that, I realized that one signal was clearly not enough and some radical measures were needed. Then I drilled a hatch with a 5 mm drill and secured a small corner on the back side (you can use a bolt or rivet). In principle, if you don’t want to drill a hole, you can weld such a corner from the inside, since the hatch cover can be easily removed. I fastened one end of the cable (from the bicycle brake) to the corner, brought the other end into the trunk, made a loop at the end of the cable and hooked it to any convenient protrusion so that the cable was taut (I personally screwed a self-tapping screw into the trunk wall, but other options are also possible, and Instead of a cable, you can probably use a durable synthetic rope). Before refueling, you just need to open the trunk and remove the cable loop from the fastening to open the hatch. After that, over the last year I jumped up only once - apparently a very persistent thief was caught and tried with all his might to open the hatch, while the lid came off slightly and the limit switch went off, the alarm started screaming and the thief broke off. So the presence of a limit switch and a mechanical locking device made the seven really practically impossible to drain. There is only one fear left - if a particularly stubborn comrade comes along and tries to open the hatch with a crowbar or chisel. Of course, it won’t have time to drain the gasoline, but it can seriously spoil the appearance. However, this option is unlikely - why bother with one car when there are a dozen others nearby without any unnecessary problems.
- Login to leave comments
Interesting option, thanks
Interesting option, thanks for the description