In this article, today we will look at the process of troubleshooting a VAZ-2114. Initially, the car did not start.
Let's get started:
I couldn't hear the fuel pump running, so I decided to check the voltage on it.
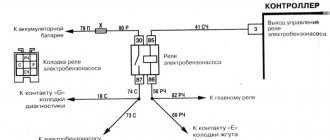
I found out that there is no voltage at the fuel pump. The next step I checked was the fuel pump relay. It turned out to be serviceable, but I heard some strange clicking sound from the upper relay. On a VAZ-2114, the top relay is the main relay, which switches not only the fuel pump, but also other systems, such as the fan relay, speed sensor, oxygen sensor and others.
Replaced the relay with a known good one. To check, I took the relay from the mounting block, in the engine compartment. After turning on the ignition, the click of the main relay turned on indicated that it was working properly and the car started up.
At this point, the inspection of the VAZ -2114 can be considered closed. Replaced the main relay and the car started.
When working with the car’s electrical wiring, do not forget to disconnect the negative terminal of the battery so as not to burn something working.
OPERATING PRINCIPLE AND DESIGN FEATURES
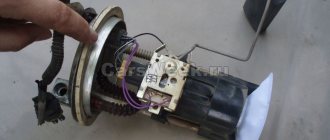
The VAZ 2114 fuel pump is located inside the car’s gas tank, which is why access to it can be problematic if you don’t know which side to approach. To free up access to the fuel pump, you need to remove the rear seat from the fourteenth, under which you will find a rectangular hatch hiding access to the fuel module.
Just recline the back seat and see for yourself
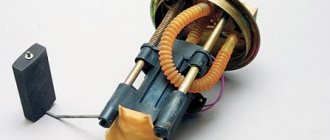
In addition to the pump itself, the VAZ 2114 fuel module includes:
- A float sensor that monitors the fuel level in the gas tank;
- Chamber for fuel intake;
- Mesh filter for coarse cleaning.
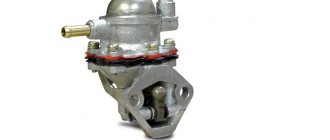
The gasoline pump has a built-in electric motor, which pumps up the pressure of the pumped fuel. The motor itself is powered from the vehicle's on-board network. The VAZ 2114 gasoline pump is located so that even with a minimum level of fuel in the tank, it is constantly washed with gasoline, as this is necessary for normal cooling of the unit, which gets very hot during operation.
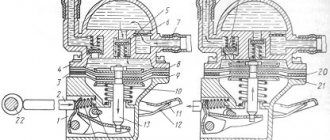
The main working element of a gasoline pump is a membrane, which during operation performs reciprocating movements. During normal operation, when the device is fully operational, the following pressure levels must be maintained in the fuel rail:
- For 1.5 l engine. – from 285 to 326 kPa;
- For 1.6 liter engine. – from 375 to 390 kPa.
As evidenced by reviews from owners of fourteenth VAZs, in practice BOSCH pumps have proven themselves to be the best.
Unlike domestically produced units, they cost almost 20-30% more, but at the same time they have an order of magnitude better build quality and reliability. The estimated cost of the fuel module for a 1.5 liter engine of the fourteenth is 2.5 thousand rubles, for 1.6 liters. – 2.6 thousand
However, rational savings are possible here - in most cases it makes sense to purchase a fuel pump separately, rather than the entire module, since, as a rule, the pump itself “dies”, and the remaining parts of the module remain in working order. Its cost, if taken separately, is 1-1.5 tr.
which power supply is responsible for the cigarette lighter, fuel pump and heater
The VAZ 2114 fuse box is a device within which all the safety components that provide protection for certain devices are concentrated. If problems occur in the operation of automotive equipment, the first thing to look for is a blown fuse. You can read more about the electrical circuit, as well as replacing the power supply, below.
Location and electrical diagram
What is the power supply circuit in the Chetyrka, the injector, where is the fuse (fuse) for the fuel pump and the cigarette lighter, which fuse is responsible for the instrument panel? All working parts are located in the power supply unit, which, in turn, is installed in the engine compartment, if you look at the car in front, then on the left, opposite the driver’s seat. If there is an overvoltage in the power grid, it is the PP that burns out first (the author of the video is the Ramanych channel).
The Fours, like all other domestically produced cars, use a single-wire on-board network system. All equipment that consumes energy is connected to the power supply and is equipped with its own switch, which opens the circuit in case of overvoltage. This occurs in order to prevent overheating of the wires and, accordingly, a possible fire. But you need to take into account that not all consumers are protected by safety devices in the unit. Some equipment draws more voltage, such as the coil circuit, battery circuit, or engine starting system.
If you open the lid of the box, you will be able to see the location and electrical circuit of the power supply - the device contains 9 relays and 20 PPs. On the back of the cover there is a diagram of the parts - with its help you can find out the purpose, that is, which fuses are responsible for the stove, dashboard lighting, central locking, etc. It’s worth mentioning separately about the control panel. Many car enthusiasts, faced with a problem when the backlight on the dashboard does not light up, begin to disassemble the panel and look for a problem in the power supply, but this is not entirely true. First of all, it is recommended to check the PP number f16 - it is responsible for the dashboard lighting.
Now let's take a closer look at the purpose of the elements in the block, starting with the relay:
- K1 - protects the front light brush circuit from overvoltage;
- K2 - protects the electrical circuit of the turn signals and alarms from overvoltage;
- K3 - detail for protecting the electrical circuit of the windshield cleaning system;
- K4 - allows the light source to operate in normal mode, ensuring the operation of other light bulbs;
- K5 - such relays are equipped with cars equipped with electric windows, it is responsible for their operation;
- K6 - this relay is used to protect the horn - steering wheel horn circuit;
- K7 - provides protection for the electrical circuit of the rear window heating system;
- relays K8 and K9 are used to ensure the operation of lighting sources in low and high beam lamps.
Instructions for removing and replacing the power supply with your own hands
Replacing a power supply unit is not a particularly complicated procedure, but if you have never encountered the need to perform this task before, then it makes sense to entrust the procedure to an electrician. However, there is nothing difficult about this, so if you strictly follow all the steps indicated in the instructions, you can perform this procedure yourself. To complete this task, you only need a new power supply and a 10mm wrench.
Stages
So, how to remove and replace the power supply with your own hands:
- First you need to turn off the ignition and open the hood. The power supply itself, as mentioned above, is located in the niche between the engine and the glass, opposite the driver’s seat. The device has a plastic cover, it is fixed on plastic fasteners. You need to press the lid with your finger and lift it, then remove it.
- Remove all parts from the installation locations. The PPs differ from each other in their nominal values; during further installation, it is important that they are installed correctly according to their nominal values.
- Then you will need to remove the plugs that are connected from the engine compartment directly under the power supply. To gain access to the connectors, it is necessary to dismantle the plastic protective casing, it is marked with the middle arrow in the figure below. The casing itself is fixed using plastic clips. The other two arrows in the photo mark the bosses on the bracket; these clips are inserted into them and need to be removed. Removal is carried out using a flat-tip screwdriver. Please note that the clips themselves will most likely break during dismantling, since they harden over time, so new ones will be required for further installation.
- After the connectors in the engine compartment are disconnected, you will need to disconnect all the plugs that are located in the cabin. They can be found behind the steering column; in some Fours they are closed using sound-proofing material. When disconnecting, we recommend marking the connectors so that there are no problems with future connections.
- When all the pads are disconnected, we proceed to dismantling the power supply itself. The device is fixed on two nuts, which you need to unscrew using a 10mm wrench.
- The power supply unit is removed, after which its seat must be thoroughly cleaned. After completing these steps, the device is replaced with a new one. The power supply must be securely fixed in the installation location; to do this, tighten the bolts that secure it as much as possible. Connect all connectors, install the PCB and relay in place, and then check the functionality of the installed device. If you did everything correctly, the new power supply will work.
SIGNS OF PETROL PUMP FAILURE
A faulty fuel pump is quite easy to identify, since it is characterized by characteristic signs of failure. For example: while driving, the car suddenly stalls - after turning it on again, the engine begins to make uncharacteristic sounds, while the starter does not stop turning. After the car starts up, the picture repeats itself - the fourteenth engine stalls again. It is also possible that the car starts every once in a while - problems usually arise after sitting at neutral speed.
Let's determine the most typical signs of a fuel pump malfunction:
- The engine refuses to start. Of course, there can be many reasons for this problem - the same spark plugs, or the ECU, but the possibility of a fuel pump malfunction is also worth taking into account;
- The pressure level in the fuel relay differs from normal values;
- The motor is tripping. As a rule, if the fuel pump does not pump as it should, the engine begins to twitch quite noticeably because gasoline is not burned properly in the working cylinders;
- The engine growls at low speeds. One of the most truthful signs, which indicates either an immediate breakdown of the pump, or that the low-purity filter is clogged and the mesh needs to be replaced.
There are quite a lot of possible breakdowns that could cause the fuel pump to fail. The following parts of the unit design can present an unexpected surprise: fuse, fuel pump relay, ground, electric motor, contact system. Let's look at each of them separately.
What to do if the VAZ-2114 fuel pump does not pump
Cars tend to break down periodically - for various reasons, one or another part may fail during operation. One of these types of situations that awaits a car enthusiast is a problem associated with the fact that the electric fuel pump on the VAZ-214 does not pump. It cannot be called too common, however, some drivers still have to deal with it. Then you basically have only 2 options for subsequent actions - either go to specialists and pay not only for spare parts or the unit itself, but also for the work, or fix the problem yourself. Financially, the second option is, of course, more profitable. At the same time, I would like to emphasize that there is nothing particularly complicated here. Therefore, you can completely spend a little time and try to solve the problem yourself.
PRESSURE LEVEL
In order to get most of the picture of what is happening, it is enough to measure the pressure in the fuel rail. For this, it is necessary to use a pressure gauge that has a small measurement range (preferably up to 7 atmospheres), since devices with a large range can produce significant inaccuracies.
Rail pressure measurement
Under the hood of the fourteenth there is a pressure fitting; unscrew its cap and connect the pressure gauge to it. Normal indicators should be as follows:
- When the engine is idling – 2.5 kPa;
- At the moment of ignition - 3 kPa;
- With a pinched drain hose – 7 kPa;
- When gaining speed - 2.5-3 kPa.
If the pressure gauge needle does not move when the ignition is turned on, then the gasoline pressure regulator is most likely broken. When there is no change as the speed increases, the fuel pump itself has failed, but if the needle moves very slowly, which indicates that the pump is pumping, but poorly, the fuel pump screen is clogged.
CHECKING WIRING CONTACTS
If the fuel pump does not work, do not rush to change it - perhaps the problem is in poor-quality wiring. There are 3 wires connected to the pump: to the gasoline level sensor, and positive and negative to power the motor.
No special tools are required to check the wiring - a regular 12-volt light bulb is enough. We connect the light bulb to the negative and positive wires of the pump, and turn on the car’s ignition - if the light blinks, then everything is fine with the wiring.
GROUND AND FUEL PUMP RELAY
In the fourteenth, the mass of the fuel pump is fixed under the dashboard, next to the handbrake lever, during use of which the mass can be touched and shifted from its normal position. To fix this, remove the plastic around the handbrake, clean the ground contacts and reattach it.
Next to the ground there is a VAZ 2114 fuel pump relay. The relay is necessary so that during ignition the required pressure level is immediately created in the system.
A few words about where the fuel pump relay is located: after removing the plastic around the handbrake, you will immediately find 3 different relays - one of them is from the fuel pump.
It is better to immediately replace a broken relay with a new one; it is not expensive.
Tips for motorists
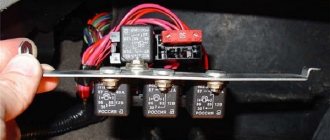
The electric fuel pump on a VAZ-2114 passenger car is located in the fuel tank, and after the ignition is turned on, voltage is supplied to its terminals through a 15 amp fuse F3 and relay R2, located under the panel on the passenger side in the car interior.
The first thing the driver of the “fourteenth” does after the fuel pump fails is to unscrew the two screws that secure the cover on the right side of the console under the panel, covering three relays and three fuses, and check the integrity of fuse F3, which is located next to two relays located one behind the other and the state of the contacts where the fuse is inserted. If it is intact, you need to check the fuel pump relay (you can replace it), which is located next to the fuse (it is the middle one among the relays available there).
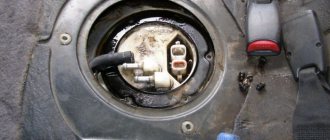
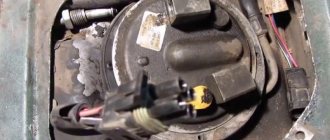
If everything is in order with the fuse and relay, then the driver’s next action will be to get to the fuel pump terminals. To do this, you will have to lift the rear seat cushion and remove the cover at the bottom of the car body by unscrewing the screws that secure it. In the opened hatch you will see three terminals, one of them is negative, and two are positive (gray and black wires), which supply voltage to the fuel pump and fuel level indicator. You have to check whether voltage is supplied to the positive terminal of the fuel pump motor. This can be done using a control lamp. When you turn on the ignition, it should light up for 3-5 seconds (this is the time it takes to pump gasoline from the tank into the fuel rail before turning on the starter).
If the light comes on and the fuel pump does not work, this means that voltage is supplied and you need to check its value using a tester, since if the voltage is below 10 volts, the electric motor of the fuel pump will not start. The voltage drop occurs due to oxidation of the contacts, so you will have to check the condition of the contacts of both the negative and positive wires. You can also check the serviceability of the fuel pump by applying voltage to its terminals directly from the battery using two long wires. If the above actions do not help, then the fuel pump will have to be removed from the fuel tank and either replaced with a new one, or disassembled and looked for a fault inside it (for example, the brushes are stuck or worn out).
In addition to the above reasons, a working fuel pump may stop working as a result of a malfunction associated with the installed security alarm, which blocks the operation of the fuel pump when the engine starts.
CHECKING THE FUSE
First, let's figure out where the VAZ 2114 fuel pump fuse is located: you can find it under the hood, on the windshield side. There is a drawer on the electronic control unit that needs to be opened. In the box we need a fuse that says Fuel Pump 15A above it. If the fuse for the VAZ 2114 fuel pump is blown, you need to install a new one.
The fuse blows due to incorrectly connected alarm contacts or the anti-theft system.
CHANGING THE PETROL PUMP WITH YOUR OWN HANDS
If the fuel pump in the VAZ does not pump, and all of the above system components are normal, it is necessary to clean the filters, and, if necessary, completely replace the unit.
Before starting work, you must completely drain the fuel from the gas tank. To do everything with our own hands, we need a screwdriver and a set of keys. Replacing the VAZ 2114 fuel pump is carried out according to the following algorithm:
- We de-energize the car by removing the “-” terminal from the battery;
- We take out the rear row of passenger seats;
- Unscrew the plastic cap that covers the pump;
- Remove the power wires from the device and disconnect the fuel supply hoses;
- We dismantle the main fastenings of the fuel pump; for this we need the 7th key;
- Now you can remove the fuel pump on the VAZ 2114 and remove the device.
It must be removed carefully, since the float sensor for determining the fuel level is a very delicate structure that is easy to damage . Inspect the fuel pump - if necessary, clean or replace the strainer, however, it may be necessary to completely replace the unit.
Diagnostics
A malfunction of the VAZ 2114/2115 fuel pump can be caused by:
- malfunctions in the device’s power supply circuit;
- failure of starting and protection elements (relay and fuse);
- wear of electric motor parts.
Checking the electrical circuit
At the beginning of the diagnosis, you should check the electrical circuit of the fuel pump. To do this you will need:
- car tester (multimeter);
- crosshead screwdriver;
- two pieces of wire about 2 m long.
Checking the electrical circuit is carried out in the following order:
- Turn on the ignition without starting the engine. When the key is in the first position, a click should be heard, characteristic of turning on the relay, followed by a slight whirring of the pump electric motor. If there is no click, the relay is faulty or is not receiving power. If there is a click, but no buzzing, the wiring coming from the relay or the pump motor itself is faulty.
- Under the glove compartment, find an additional mounting block consisting of three relays and three fuses. The pump relay is located in the middle, and the fuse is located to the left of it. Remove the fuse from its socket, test it with a multimeter, and if the result is negative, replace it. When replacing the fuse, please note that it is rated for a maximum of 15 A.
- Set your multimeter to voltmeter mode. Connect one probe of the device to the relay terminal to which the pink wire fits, and the second to the car body. Turn on the ignition. The device should show the on-board network voltage in the range of 11.7–12.4 V. If there is no voltage, the problem may be a broken wiring or a malfunction of the ignition contact group. In this case, it is better to contact an auto electrician. If power is supplied, check that the relay is working. With the ignition on, use a screwdriver or a piece of wire to close the contacts to which the pink and gray wires go. This closes the circuit bypassing the relay. If the fuel pump works, replace the relay.
- Be sure to check the connection of the pump's negative wire to ground. Often it is the lack of “ground” that causes interruptions in the operation of the fuel pump. Remove the plastic trim from the center console near the parking brake handle. Under it there is a “negative” wire of the pump, screwed to the body with a self-tapping screw. Unscrew it, clean the contacts, screw it back and repeat the test.
- Then check the fuel module. Remove the rear seat, peel back the carpet and sound insulation. Unscrew the two screws securing the gas tank flap and disconnect the electrical connector on the fuel module cover. Using two wires, supply power to the pump directly from the battery. If the pump works, the wiring is faulty; if it doesn’t work, the pump itself is faulty.
Pressure check
If the pump is working properly, but the engine begins to operate intermittently, you should check the fuel pressure in the system. For this you will need:
- pressure gauge (can be a tire gauge with a measurement limit of 5–7 kPa);
- petrol-resistant hose with a diameter of 10–12 mm and a length of 50–80 cm;
- two clamps for a hose of the appropriate diameter;
- Phillips screwdriver;
- nipple cap;
- dry rag.