The ignition system is largely responsible for the stable operation of the engine. An incorrectly set advance angle leads to interruptions in engine operation, difficulty starting it, loss of speed, popping noises and shots.
p, blockquote 1,0,0,0,0 —>
p, blockquote 2,0,0,0,0 —>
Another possible reason why you may need to adjust the operation of the system is dismantling the distributor.
p, blockquote 3,0,0,0,0 —>
p, blockquote 4,0,0,0,0 —>
Adjustment algorithm
A 12-volt light bulb, a set of probes and a special wrench for rotating the crank shaft are all that is needed to ensure ideal ignition of the fuel mixture using this method.
Which lights should light up when the ignition is turned on?
Here's how to proceed:
- Remove the upper cap of the ignition switch;
- Use a fine file to process the contacts, trying to remove all metal oxides and bulges formed on the surface;
- Bring the contacts as close as possible to each other (they need to fit tightly, with their entire plane).
Advice. If the contacts do not sit on each other with their entire plane, then it is recommended to slightly bend the fixed contact. This is done only when absolutely necessary, after thoroughly cleaning the contacts from oxides and tubercles.
- Turn the crank shaft to a position where the maximum possible distance is formed between the distributor contacts;
- Loosen the screw that holds the entire contact system;
- Insert a 0.4 mm measuring rod between the contacts and secure the holder as before.
Attention. It is necessary to provide such a gap between the contactors so that the 0.4 mm probe moves in this place with some force.
The same is done with probes of 0.35 and 0.45 mm. The crank shaft rotates using a key, and if it is missing, then in no case through the starter. You can ask an assistant to slowly push the car in 4th or 5th gear.
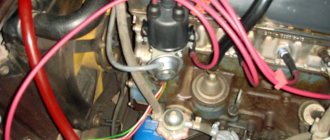
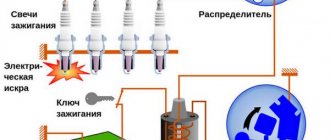
Distributor clearance using a light bulb
After setting the required gap, a specific UZSK value is set. However, you should know that this classic setting option is only suitable for new distributors assembled without any errors. Otherwise, additional adjustments have to be made.
The procedure for setting a light bulb to the ideal moment of ignition of a combustible mixture is carried out as follows:
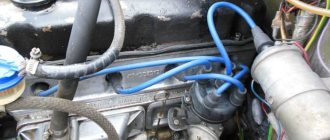
- The main armored wire is removed from the distributor cover;
- It leans against any part of the body;
- The light bulb is connected to the wiring going from the spool (coil) to the distributor.
Note. The light bulb (indicator) must be connected so that it lights up when the distributor contacts are disconnected and goes out when they are closed (naturally, after turning on the ignition with the key).
- You should slowly rotate the pitcher in accordance with the clockwise movement until the indicator goes out;
- Remember the position of the slider in the distributor;
- Continue rotating the crank shaft;
- Re-fix the position of the slider after turning on the indicator;
- Measure the distance between the marks made.
Attention. To provide an UZSK means multiplying the number π by 360 x the diameter of the distributor body, and then dividing the resulting amount by the distance between the marks. The final result will be the same angle, calculated in degrees and minutes. Of course, it is recommended to compare it with the values prescribed in the manual.
Ignition on an exposed distributor
To set the OZ:
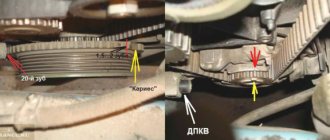
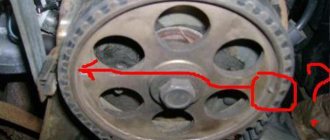
- Turn the CVshaft so that the mark on its pulley aligns with the notch on the timing cover (the distributor rotor should be positioned exactly opposite the armored line of the first cylinder of the power unit);
- Now you need to connect a 12 volt light bulb with one end to the wiring (distributor-woman), and the other to ground;
- Remove the main armored wire from the distributor cap and attach it to the body;
- Loosen the screw that holds the distributor body;
- Next, turn on the ignition;
- Rotate the crank shaft according to the movement of the clock until the indicator goes out;
- After this, slowly turn it back until the indicator lights up;
- Immediately after turning on the light, stop the rotation and secure the fastening screw of the distributor housing.
It is recommended to check all adjustments while driving. What does it mean? Here's what: immediately after making the appropriate settings, you should sit in the cabin and warm up the car engine, then accelerate to a speed of 40-50 km/h, always in 4th gear.
While driving, you need to check the following points:
- If you sharply press the accelerator pedal all the way at medium speed, detonation pops should be clearly audible, and the car should quickly increase its speed;
- If detonation knocks are not heard when you press the pedal, you need to stop, open the hood and turn the distributor against the movement of the clock by 1 line (look at the scale that is on the base of the distributor housing);
- If detonation continues for a long period of time (more than 2 seconds), and the car does not gain speed confidently, then the distributor should be turned clockwise, also one notch.
Lamp for checking the distributor
Ideal detonation should last exactly 1-2 seconds.
Installing the ignition with a UAZ light bulb
I found this method of adjusting the ignition on a 2106 on the Internet. It seemed simple to me to do in a garage, and I was wondering: is it possible to adjust the ignition on a UAZ in the same way?
This method can be called classic, since it is described in almost all automotive literature. You will need a 12 V light bulb with two wires connected to it (options are a voltmeter or the probe described below) and a special one. key for turning the crankshaft (preferred). Using a key, we turn the crankshaft so that the mark on the pulley is positioned in a given way relative to the marks on the cover of the gas distribution mechanism (see Fig. 1), and at the same time the distributor slider is opposite the high-voltage wire of the 1st cylinder (cylinder counting comes from the front of the engine). If there is no special key, you can engage 4th gear and push the car until the crankshaft reaches the desired position. We connect one of the wires of the light bulb to the wire going from the distributor to the ignition coil, and connect the second to the ground of the car. We remove the central wire from the distributor cover and lean it against ground. Loosen the bolt securing the distributor body. Turn on the ignition.
Turn the distributor body clockwise until the light goes out (the distributor contacts are closed). Then slowly rotate in the other direction until the lamp lights up (the contacts open). In this position, fix the distributor body with a bolt.
If a transistor or thyristor ignition system is used, it is possible that the voltage at the contacts of the distributor is not enough to light the light bulb. In this case, you need to use a voltmeter or diode probe. https://forum.uazbuka.ru/attachment.php?attachmentid=68528&stc=1&d=1295854653
I found this method of adjusting the ignition on a 2106 on the Internet. It seemed simple to me to do in a garage, and I was wondering: is it possible to adjust the ignition on a UAZ in the same way?
In a standard UAZ induction distributor there is an arrow on the stator and a mark on the rotor. You combine the marks on the HF pulley, and then the marks in the distributor and you don’t need any light bulbs (:
Well, yes.