The VAZ 2110 tunnel is a continuation of the dashboard. It contains many elements that help the driver control the vehicle. Sometimes a boring and dull dashboard is replaced with something more beautiful, sophisticated, unique. The same can happen with the tunnel.
Gender Variations
Some drivers decide not to bother and buy a ready-made tunnel from the store, which will ideally fit into the car. There are many ready-made variations of tunnels for the VAZ 2110, but if none of them interest you, then get ready, you will find yourself making a VAZ 2110 floor tunnel with your own hands.
Floor tunnel on VAZ 2110 - photo
1. We throw away the old floor, since the new tunnel will be higher than usual in order to create additional convenience. 2. To simplify gear shifting, we install a short-throw rocker. 3. Lengthen the gear shift knob. This can be done by welding a metal piece several centimeters long. 4. Install the limiter for the handbrake and loosen the cable. 5. Make a cardboard template for the new tunnel.
6. After the final adjustment, we transfer the model to a sheet of plywood 4 millimeters thick. 7. The tunnel is made of several parts. After the glue has dried, you need to cut holes for the devices. 8. Move the deflector to the desired direction. 9. Cover each part with car vinyl.
10. Screw the tunnel with decorative screws. 11. Place a chrome frame around the gearshift lever. 12. If desired, you can drag the substrates under additional devices.
That's all, the interior of your VAZ has acquired a completely different look. Let's remember that in the previous article we talked about
The rose-colored dream of any car enthusiast: I unscrewed a couple of screws, poked them with a screwdriver, screwed them on, and the car was in perfect order! But no... sometimes you have to disassemble several mechanical components, unscrew and tighten many screws and nuts in order to adjust, for example, the movement of the gearshift lever or the parking brake system.
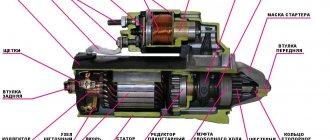
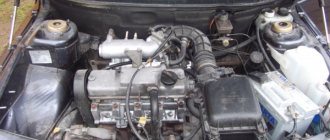
Repairing breakdowns in the gearbox is not so easy. This is an assembly that is securely fastened to the floor of the vehicle and covered by the floor tunnel lining. To disassemble and repair this mechanism, you will first need to dismantle the upper and lower cladding and then install it in place. We disassembled a VAZ 2110 car. The procedure is similar for other models.
Self-repair of the underbody of a VAZ 2110
The current condition of the car can largely be assessed by analyzing the body.
If all kinds of consumables need to be replaced, you can even rebuild the suspension yourself and even install a new engine, then restoring a completely rusted body is expensive and pointless. No one will tune, modify, or invest a lot of money in a car if its body is already in its last years. This significantly reduces the cost of the car, even if the engine is in perfect condition.
Therefore, if you want to maintain the attractive appearance of your VAZ 2110, extend its service life, and, if necessary, sell it for good money, keep an eye on the body and periodically carry out repair or preventative body work aimed at combating corrosion.
Problems of the “tenth family” on the used market
Before purchasing a VAZ-2110, check the history of the vehicle you like. A third of the “ten” are sold with registration restrictions, reduced mileage and after a taxi. Every fourth car is sold damaged or with unpaid fines.
Some owners put cars up for sale with several problems at once. We almost immediately found one.
"Ten" 2003 with a 1.5 73 liter engine. With. and a mileage of about 210 thousand km for 75 thousand rubles:
The owner indicated that restrictions were imposed on the car, and the check also found incorrect mileage, a small accident and a couple of unpaid fines for driving in a public transport lane:
Due to existing restrictions, the future owner will have problems with registration. The issue of fines and lifting of restrictions should be resolved during the inspection of the car.
Also read: Used LADA Granta: execution cannot be pardoned
Description of design
The bottom of the VAZ 2110 has the same design for all cars in the line and is made of rolled steel with additional stiffening ribs. The metal frame of the car is a type of frameless body; the entire load from the mounted units falls on the floor and side members, which act as a frame and ensure the massiveness of the entire structure.
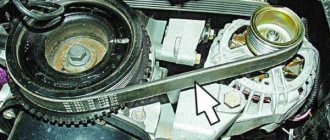
Repairing the underbody of a VAZ 2110 in 90% of cases begins with checking the side members and involves the use of welding. The welding points that hold the body structures together are torn apart by vibrations, bolted connections become loose, and the solidity of the structure weakens.
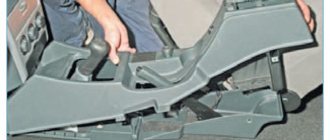
Dismantling the upper and lower lining of the floor tunnel
First of all, it should be noted that the lining should be removed after cleaning the floor in the cabin, after which disconnect the “?” terminal. from the battery and perform the following steps.
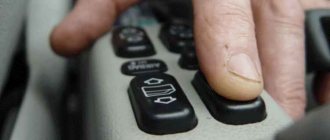
1. There are two mounting screws on the right and left sides of the floor tunnel lining. Unscrew them and remove both trims.
3. The lining, which is located on the facing, is removed by pressing its front part under the parking brake lever. Take it off too.
4. Remove the gear shift lever handle by pulling it up.
5. The car gearshift lever cover is attached to latches on each of the four sides. To remove it, press out each one with a screwdriver.
6. Now you can move on to the cladding itself. Unscrew the central fastening screw.
7. Fold the front seat back, which raises the front edge. This will open access to the middle fastening of the cladding. Remove the screws on both sides of the cladding.
8. Slide backwards and remove the top lining of the tunnel. It is installed in the reverse order of removal.
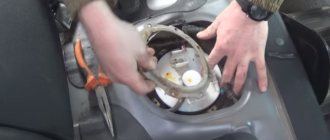
9. Move the seats forward. There are air vents underneath them. They can be removed by unscrewing the fastening nuts.
10. The lower tunnel lining is secured with six nuts. Unscrew each one and remove the lining itself.
11. When the manipulations to repair the required unit have been completed. All that remains is to install the lower lining of the car floor tunnel. This is done in the reverse order of dismantling. Pay attention to the sockets of the air vents: both should fit into the holes on the lower lining.
As you can see, there is nothing difficult in dismantling the floor tunnel lining. This event requires attention to detail and adherence to order.
Where to start changing the interior of Lada 2110
Disassembling the interior will not be difficult and will take no more than 3 hours, even for a person without experience. First, you need to remove the car seats so that they do not interfere with work, then gradually remove all the interior trim without damaging the panel wiring. There are quite a lot of wires here, so it is necessary to label each connector so as not to get confused during reinstallation.
The wiring also needs to be removed and inspected for cracks, signs of corrosion or burnout in the factory winding. In most cases, after a long period of use, the car's wiring needs to be replaced.
To do this, perform the following steps:
- Familiarize yourself with the electrical diagram of the car;
- Remove the front interior panel;
- Carefully inspect the wiring, especially those wires that are connected to the windshield wiper mechanism and headlights of the front group.
- Remove the damaged wiring and replace it with a new one.
Dismantling algorithm
- We remove and remove the front seats from the interior so that they do not interfere with the disassembly;
- Disconnect power from the battery;
- We lower the steering wheel of the VAZ 2110 to the lower position;
- Unscrew the screws that secure the panel covers. These are two screws on both sides of the tunnel. Now you can remove the shield;
- We remove the plug on the tunnel in the center by prying it off with a screwdriver;
- We unscrew the screws of the central tunnel to remove it. Before doing this, disconnect the wires from the cigarette lighter;
- We remove the air duct for heating the interior of the VAZ 2110. To do this, having disconnected the cover from the gearbox, you need to pry off the latches with a screwdriver, then remove the air duct;
- We remove the central panel by unscrewing it from the floor;
- Now it is possible to disassemble the torpedo. First, unscrew the mount that holds the glove compartment, disconnect it from the backlight, and take it out;
- In the hole where the glove compartment was located, we remove the screws on both sides, as well as directly behind the glove compartment;
- We unscrew the VAZ 2110 torpedo mount with a key and a screwdriver;
- Near the left pillar we pull out the air duct by prying it with a screwdriver;
- With special care you need to remove the torpedo, supporting it with your hands while unscrewing the nut with a spanner. Then, lifting it up, remove it from the pins;
- Now you need to remove all the wires, marking them with a marker as you go so that you don’t get confused when reinstalling them;
- It became possible to replace the lining and carry out noise insulation work.
You can make payment in one of the ways convenient for you:
- To a SberBank or Alfa-Bank card. The most profitable method for the buyer, as well as the most convenient one, is to use the Sberbank Online service, Alfa-Click, an ATM, or through an operator at the bank. After placing your order, the manager will send you the card details. If you do not have a SberBank or Alfa-Bank card, you can also top up your card using the details at any SberBank or Alfa-Bank branch. Payment is credited within an hour.
- Yandex money. Customers who have Yandex.Wallet can quickly and easily pay for an order in our online store, the commission will be 0%.
- Yandex.Checkout is an online payment acceptance service. A convenient option with a large selection of payment methods for your order: plastic cards of any banks, including credit cards, in cash through terminals, ATMs or phone shops, Qiwi Wallet, Yandex.Money, WebMoney, from your phone balance, purchase on credit (payment in installments) . Please carefully check which email address you provided during the ordering process, as you will receive a receipt for payment for your order. Yandex.Checkout commission for transfer will range from 3% to 6% .
- QIWI wallet. If it is more convenient for the client to use a QIWI wallet or, if it is not available, to pay through the nearest QIWI terminal, the manager will provide you with the wallet number. Commission 0%.
- Payment at any bank using an invoice or receipt (+3% to the cost). If you do not use electronic wallets and plastic cards, we provide the opportunity to make payments at any bank in Russia. The site manager will send you a pre-filled receipt “Form No. PD-4” by e-mail; please carefully check the e-mail address you provide. The bank commission will be approximately 3% and depends on the bank itself
- Cash on delivery upon delivery by the Transport Company (payment for purchase upon receipt of the order).
- Cash on delivery upon delivery by Russian Post (payment for purchase upon receipt of the order). The order arrives at the post office, after which you pay its cost and pick it up, in which case the Russian Post charges a commission.
Noise Removal
Basically, the panel rattles both due to improper installation and because the three parts that make it up touch each other, which causes creaks and rattles in the cabin.
That is why sound insulation is necessary, which the manufacturers did not take care of properly, and it is up to the owner to finalize it. Modelin can be used as sound insulation. They can paste over:
- All places where three parts of the panel touch;
- Those parts of the panel where it comes into contact with the radio, on-board computer, etc.;
- All bolt holes are also covered with modelling. It won’t hurt to screw them in, but there will be additional sound insulation, as well as protection against heat loss;
- Sides of the glove compartment;
- "Black box" in those places where it comes into contact with the panel.
It is better to cover the back of the panel with bitoplast. There is advice - also use vibration material, but this is not necessary.
The remainder of the bitoplast can be placed at the bottom of the glove compartment. Now, sound insulation done by yourself will eliminate squeaks, and replacing the lining will be pleasing to the eye.
Interior part 3 + tunnel tuning
In general, I continue with the interior of the cabin. This time the tunnel has undergone tuning.
Lower part in gloss black Upper part in chrome
+ I also made improvements to the heating system for the rear passengers (the idea was taken from the site - lada2111.rf/tuning-other/91-dorabotka-pechki.html)
Everything is there and described in detail, I did it my way. Maybe it’s a collective farm, but it’s blowing for the rear passengers. And the main thing is that it’s sealed, which is important. Well, and most importantly, in 2 colors for aesthetics) The cabin has become even more comfortable. All that’s left is to buy a new cover and gear knob
Well, chrome door pockets
I can say that this color (chrome) is not easily soiled like white. And it looks brighter. Again, who to carry and how to take care of the interior)
The next thing awaits me 1) Boring the bottom + secret details
Source
Product delivery options
Note! Below are the shipping methods available specifically for this product. Payment options may vary depending on the shipping method. Detailed information can be found on the “Delivery and Payment” page.
Parcel by Russian Post
Available payment methods:
- Cash on delivery (payment upon receipt)
- Using cards Sberbank, VTB, Post Bank, Tinkoff
- Yandex money
- QIWI
- ROBOKASSA
Shipping throughout Russia. Delivery time is from 5 to 12 days.
Parcel by Russian Post 1st class
Available payment methods:
- Cash on delivery (payment upon receipt)
- Using cards Sberbank, VTB, Post Bank, Tinkoff
- Yandex money
- QIWI
- ROBOKASSA
Shipping throughout Russia. Delivery time is from 2 to 5 days. More expensive than regular delivery by Russian Post, approximately 50%. Parcel weight up to 2.5 kg
Express Parcel EMS
Available payment methods:
- Cash on delivery (payment upon receipt)
- Using cards Sberbank, VTB, Post Bank, Tinkoff
- Yandex money
- QIWI
- ROBOKASSA
Installing the dashboard trim
The cover will be installed after complete disassembly - it’s easier and more convenient. The instructions say that the trim must be cut around the perimeter. Now you can assemble the case: we place in it the accessories and instrument connectors that came in the kit. Carefully lay out the wiring from the base of the cover. All joints of the new VAZ 2110 panel must be glued with anti-creak.
We attach additional harnesses to the standard wires and tighten them with zip ties. Please note that there are additional buttons on the cover - standard connectors must be connected to them. The cover is attached to the original panel using self-tapping screws. Now you can carry out the installation in reverse order.
We increase the height of the VAZ 2110 tunnel with our own hands
The interior design of our cars has never been particularly beautiful; for example, the old, low panel (torpedo) and the small tunnel between the seats did not provide any convenience. If we talk about the tenth generation VAZ, then you can improve the interior of the car by installing a Europanel and modifying the tunnel.
The tunnel between the seats is also called the beard. Even in over-upholstered interiors, the long VAZ poker (gearbox knob) catches the eye. Usually they shorten it a little, but it was decided to make the tunnel higher (raise it, like on foreign cars).
What will you need to tune a VAZ tunnel?
In the process of finalizing the tunnel, you will often have to remove/install it, so for convenience it is recommended to discard the right seat. At the beginning of the fitting, we figure out how the upper part will stand (the distance, the angle of inclination can be made at any angle, the main thing is that there are no difficulties with shifting gears), and we saw it off.
The upper part of the tunnel must be fixed; duralumin plates and screws are suitable for this. If nothing interferes, we remove the structure and make the back wall from fiberglass with epoxy. There will be no extra thickness, especially when smoothing, but it is not necessary to increase the thickness from the outside. After drying, it is better to try it on again in place, because the angle may change.
We remove the dried workpiece, remove the tape, increase the thickness as necessary, level it with fiberglass, and putty the tunnel. After drying, remove all bulges with sandpaper.
The high tunnel for the VAZ is now ready, all that remains is to properly decorate it. You can use: painting, film, or reupholstery. In our case, it was painted in a dark matte color (the picture shows a temporary option for now).
The second way to make the VAZ tunnel higher
The second option to raise the tunnel is not much different. In our case, we used 3 cans of glass putty and 3 bottles of epoxy resin. As a result, the tunnel became almost 3 times higher than the standard one.
Both options for tuning the tunnel look nicer than the standard low beard, and the gearshift knob no longer looks so long. An important point in this modification is the presence of a short-throw rocker, otherwise the gearshift lever will rest against the edges of the tunnel.
The process of noise reduction of the VAZ 2110 floor begins, of course, with disassembling the interior:
- To begin with, the seats are untwisted and removed.
- Then it’s the turn of the dashboard, since the front wall under it also needs to be made quiet. This kind of work is quite labor-intensive, but we will not describe it here; there is enough information on this topic on the Internet.
- We disassemble the central tunnel of the gearbox and take out the dashboard up and towards us.
THERE ARE TWO DIFFERENCES
To be a “ten” driver, and not to be left in the past. Today there are many so-called “time machines”, which take you back several decades.
In the late 80s, Audi, Citroen, and Rover cars with their dashboards with large keys along the edges were very popular. In terms of ergonomics, the VAZ-2110 is not designed very well - the steering wheel is covered by indicator lamps on the keys.
If the steering wheel were a little smaller, maybe it was planned to do this earlier, but they were late with the power steering, but the unified steering wheel arrived on time. As a result, we received fewer expenses, but no increase in convenience. In addition, most of the VAZ-2110, produced last year, were equipped with a similar arrangement of instruments, similar to the panel of the Priora, but of course with a different panel with no keys on the visor.
Car VAZ-21104. having undergone preparation before sale, we are visually distinguishable from the “ten” cars that we sometimes drove to the editorial office. We usually had to set the maximum recommended castor, install a brace, between the supports of the front struts. Thus, control was normalized and the steering was reactively strengthened. When testing a car, you may be surprised by such a slow reaction and large play in the steering wheel, because VAZ test drives are supposed to go like this.
The Priora car has a torsionally stiffer body by 40%, but behaves differently. Despite the fact that the electric amplifier is connected to the same “slow” rack, the car is not quite nimble in handling, but it still looks quite solid, given the assumptions of its behavior in turns. We can say that the amplifier behaves normally and provides confident response in the mid-speed ranges. However, I would like something more when in tight S-shaped turns you have to work the steering wheel a little more often. The predecessors of the Priora accepted driver's commands. Maybe with suitable tires everything will turn out to be much better, but the Priora is equipped with 175/65R14 tires instead of the promised 185s.
Compared to the “ten”, transmission noise has undoubtedly become much less audible, and other mechanical sounds have also become quieter. The good work on the sound insulation is clearly noticeable. There is also a difference in the engines. The VAZ-21124 unit was left without praise (see ZR, 2004, No. 12). The increase in volume required to fit into the strict environmental framework has not been carried out very well. The sixteen-valve engine is heavy at medium speeds and weak at high speeds. It turned out that there is not much difference between 8 and 16 valve engines.
The engine of the Priora VAZ-21126 operates much quieter, and also accelerates faster and is much faster at high speeds.
Interior measurements showed an unpredictable result. The body of the Priore has not changed, and the seats have become 30 mm higher, unlike the VAZ-2110. Tall drivers will find it a little tighter than drivers of average height. The hope is that the padding on the seat will sag quickly. We must express our gratitude to the authors of the ashtray, since the driver who gets behind the wheel of a Priora car will say goodbye to smoking. The ashtray is inconvenient to use; it opens with difficulty, but closes easier.
In general, the most important thing is the gaps. A constant problem with them on the “ten”, you can stick your fingers into the gap along the entire length between the hood and the body on almost every car. You may recall that when measuring the maximum speed (ZR, 2001, No. 7), the strongest cracks added a speed of 2.1 km/h. The Priora stamps are designed in a new way, since most of the shortcomings are a thing of the past. This is mainly noticeable in the absence of a joint between the rear fender and the pillar, which was permanently closed.
Steering wheel cover
Without braiding, the steering wheel on the VAZ 2110 seems thin and slippery, which does not have the best effect on driving safety. So after buying a car, car owners usually install a braid on the steering wheel. You should choose size “M”, intended for steering wheels with a diameter of up to 39 cm (this is the standard wheel for the VAZ 2110).
The purchased braid is put on the steering wheel, its edges are tightly sewn together using a clamp needle and strong nylon thread.
Alternative torpedo
The alternative dashboard is softer than the standard “tens” dashboard, but the main advantage is the absence of unpleasant grinding and squeaking. Motorists decide to get rid of the standard one precisely because of the squeaking. For the VAZ 2110 car there are several types of panels that differ in design.
The panel is sold as a set:
- The panel itself, which is an alternative to standard plastic.
- Buttons, brackets and inserts for blowers and instrument panels.
- A set of wires and a block for a double switch.
- Buttons for low beam, heating, dimensions and fog lights.
- Plugs for buttons are installed in places where keys are not needed.
The experience of the owners of the “Ten” shows that proper removal and installation of the Europanel improves sound insulation, increases airflow and changes the appearance of the VAZ 2110 interior for the better.
Preparatory work
Some are satisfied with dismantling without removing the remaining components of the interior, but this takes extra time and complicates the process as a whole. In order not to add more work to yourself, it is recommended to clear the interior for free movement. Strictly observing the sequence, you need to remove:
- armchairs;
- glove box;
- steering wheel;
- disassemble the floor tunnel. To do this, you need to unscrew the screws and move the part back a little.
We dismantle the lower part in the same way. The next step is to remove the glove compartment, after which you should remove the relay and mounting block. As you disassemble, you need to mark all the wires. Particular attention should be paid to the speedometer.