Comments: one Published: 02/01/2016
Rating:
Tags:Lada GrantaHeadlight range control
Hydrocorrectors first appeared on classic rear-wheel drive VAZs. More modern cars from the Volzhsky plant are also equipped with hydraulic regulators for the direction of the light beam. Although at one time they began to install more reliable electrical correctors. They perform the same functions, but operate thanks to electric motors powered from the on-board network. The Lada Granta is also equipped with a hydraulic headlight leveler from the factory. Let's figure out what can be done if the hydraulic device stops working. Is repair possible, and how to replace it, including an electrical analogue.
What does a hydraulic corrector consist of and how does it work?
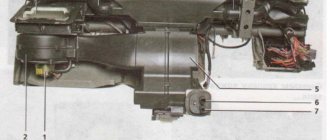
The hydraulic device, thanks to which you can adjust the angle of the light beam from the interior, consists of the following main parts:
- master cylinder located under the dashboard;
- working cylinders, one on each headlamp;
- tubes connecting the above devices.
Hydrocorrector for Lada Granta headlights
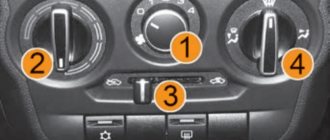
In addition, there is a mode switch knob on the instrument panel, with which the driver changes the pressure in the master cylinder.
The hydraulic corrector system is closed and at the same time sealed (normal). The changed pressure is transmitted through the tubes to the working cylinders. This leads to a change in the position of the pistons and the rods connected to them. They use a special lever mechanism to influence the angle of rotation of the reflector. This is the operating principle of the hydraulic headlight adjuster for the Lada Granta.
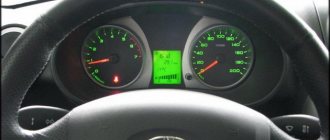
Switch for adjusting the headlight angle
The electric corrector is distinguished by the fact that the desired position of the lampshades is ensured by mechanisms powered by on-board electricity. Their operation is not affected by changes in ambient temperature, so they are much more reliable than hydraulic devices. Their only “minus” is the cost, which is several times higher.
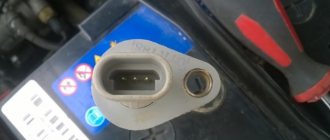
Electric headlight corrector for Lada Granta
Diagnostics and adjustment of optical elements on Grant
How to remove the headlights yourself, how to raise the optics, how to adjust the position of the low and high beam lamps? Let's start with the issue of diagnostics and settings; the methods described below are relevant for many car models. Fret Grants are equipped with lens optics and halogen bulbs. Using the hydraulic corrector, you can adjust the light of the left and right headlights yourself; if necessary, you can activate the delay function for turning off the lighting after activating the ignition after 45 seconds. As for the rear lights, of course, they do not need adjustment.
To adjust the light output, you will need a set of wrenches, as well as a Phillips-head screwdriver. To properly adjust the headlights, the spare wheel must be in place, in the niche under the luggage compartment, and it is also advisable to fill the fuel tank with a full tank. These nuances will ensure maximum load on the car; for more accurate diagnostics, the car should be placed on a horizontal surface.
How to adjust optics:
- First of all, you need to start the power unit of the car and wait a few minutes until it idles. The car itself should be set to the parking brake.
- Check the tire pressure level - if necessary, the tires should be inflated.
- It is advisable that there is a smooth and light wall in front of the car, but if this is not possible, then a sheet of plywood or drywall should be installed about three meters in front of the car. Its height should be about 2 meters. Markings should be applied to the wall itself.
- Next, a load weighing about 75 kg is placed on the driver's seat to simulate the driver being behind the wheel. This will align the low beam line from the light sources.
- To prevent possible vibrations from the car body and shock absorbers, the car needs to be rocked slightly from side to side.
- Next, the electric corrector must be installed in the position of one person in the car, corresponding to the load in the driver’s seat.
- After this, the low beam is activated and the lights are adjusted - separately left and right. A corrector is used for adjustment. In accordance with the above diagram, the lighting flux from the lamps should be similar to that shown in the figure.
Instructions for setting up the headlight
A special thumbwheel is used to adjust the lighting flux horizontally, and a hexagonal screw is used to adjust the lighting vertically. If necessary, you can raise or lower the lighting from the optics, for example, if there is a heavy load in the trunk and the front part is raised. When the low beam adjustment is completed, it is necessary to perform a test drive to check the quality and correctness of the procedure. You must not allow the light from your optics to blind oncoming drivers.
Tips for improving quality
In order for the light bulbs used in Grant to shine as efficiently as possible, it is advisable to diagnose the body itself before tuning. If there are traces of deformation on the body, for example, if the car is after an accident, then keep in mind that this may affect the quality of the lighting flux; the rays from the lighting sources in this case will shine scatteredly. Of course, if you want the light sources to shine as brightly as possible, then you should check the headlights themselves, in particular the glass, and their cleanliness. If there is a layer of dust on the surface of the headlight, of course, the headlight needs to be washed (the author of the video is the RomadriverTV channel).
As a result of prolonged use of the car, cracks and other damage may form on the surface of the headlight glasses. If scratches appear, you should at least polish the headlights; if this does not help, then replace the glass. The headlight itself must be replaced if there are problems with the reflector; this component cannot be repaired. It should also be noted that for proper settings, flashlights must use light sources of the same size and power.
Is it possible to repair the Lada Granta hydraulic corrector?
If one or both headlights stop responding to turns of the adjustment knob, you need to think that the hydraulic device has failed. There may be several reasons:
- jamming of the working cylinder (one lamp does not turn);
- depressurization of the system due to failure of sealing elements;
- depressurization due to damage to connecting pipes.
Recommended literature on repair and maintenance of Lada Granta:
LADA GRANTA / 2190 from 2011 onwards, / 2191 from 2014 onwards, petrol, repair manual
More details
LADA GRANTA/2190 sedanan/2191 liftback, petrol, from 2011 onwards, repair manual
More details
LADA GRANTA / 2190 petrol from 2011, maintenance manual
More details
LADA GRANTA / 2190 petrol from 2011, repair manual, operating instructions
More details
In the last two cases, both reflectors do not rotate. In most cases, they “fall”, that is, they occupy the lowest position.
Adjusting the hydraulic corrector rod
]headlight correctors for the VAZ 2114[/anchor] are very similar to the headlight correctors for the Lada Grant; they also did not provide for the possibility of repairing the closed hydraulic system itself, as well as its individual elements. In this case, you can only replace the device. Attempts to repair the hydraulic corrector still take place. However, these are rather temporary measures (screwing in self-tapping screws instead of a working rod, for example). They make it possible to install the lampshades in one working position. We are not talking about adjustments from the cabin here.
So, if the owner of a Lada Granta wants to have a working headlight adjustment system in his car, he will have to start replacing the hydraulic corrector. Whether to install a hydraulic device again or prefer an electric corrector is a matter for the owner. Both options are possible, so let's consider each.
Fog lights VAZ 2114 and VAZ 2115: what you need to know
So, in order to decide which PTF is better for the VAZ 2114 or 2115, it is worth noting that the choice must be approached responsibly. First of all, early versions of the VAZ 2114 were produced without fog lights, but subsequent “fourteenth” and similar “tags” may initially have standard PTFs.
If there are no fogs, in the second case there are still bumper plugs. This makes installation much easier. Let’s also add that many drivers of VAZ 2114 or 2115 are simply not satisfied with the standard VAZ fog lights. One way or another, owners are looking for the best option for both installation and replacement. Let's figure it out.
Replacing the hydraulic corrector with a similar device
In order to replace the hydraulic corrector for headlights on a VAZ 2110, you need to stock up on a wrench with a 21 and half hour head. The actions are performed in this order:
- The adjustment knob is removed (you need to pull it) on the dashboard. Under it there will be a nut 21, which should be unscrewed. This releases the master cylinder and can be removed.
- We open the hood and find headlights and working hydraulic mechanisms installed on top. On each one you need to release the latches, turn the cylinders counterclockwise and remove them.
- Disconnect the tubes (most often they are secured with clamps with a screw clamp). Now all the elements of the system located under the hood need to be brought into the cabin through an opening closed with a pliable seal.
- Install all elements of the new Lada Granta hydrocorrector. The sequence is reversed.
CIRCUIT DIAGRAM
Before starting diagnostics, you should study the electrical diagram for connecting the gearmotors on your car.
Most often, 2 typical connection schemes are used:
- with 5-wire gearmotor connector. This connection method can be found not only in standard systems, but also in kits for installing an electrical corrector with your own hands (for example, EMKF 11);
- with a 3-wire connector for gearmotors (most often found on modern cars). Accordingly, one of the contacts will be “ground”, the second will be a constant “+”, and the third will be a signal wire.
Despite the different pinouts, the electric headlight corrector works on most cars according to a similar principle. The operating principle is based on a constant comparison of the voltage across two variable resistors. One of the resistors is connected to the headlight range control switch on the dashboard, and the other to the actual position sensor of the electric corrector rod. Comparing voltages with a differential amplifier allows you to realize voltage equalization in the event of a mismatch error. Thus, turning the switch on the dashboard causes the headlight range control motor to extend by a fixed distance.
Replacing a hydraulic corrector with an electric one
If you still want to install a more reliable electrical device, there should be no difficulties with installation - everything will fit without problems. What should be done:
- Remove the used hydraulic device as described above.
- Disconnect the negative terminal from the battery.
- Electrical mechanisms are installed in the places where the working cylinders stood. It's a good idea to replace the O-rings.
- The positive wire is connected to terminal “20”, the negative wire is connected to ground.
- The wiring is attached where the connecting tubes were, or is wound to a common electrical wiring harness.
- All that remains is to put the negative terminal on the battery and check how the electric headlight range control works.
That's it, quick and easy. And your Lada Granta not only has a brand new headlight level control, but also works. So now you can load the trunk to capacity - there will be no problems adjusting the angle of rotation of the lampshade.
Author: Lagoda Vladislav Fedorovich
Higher education: secondary specialized. Specialty: Auto mechanic. Good knowledge of the design of foreign-made passenger cars. Work skills: replacing the timing belt of the cylinder head, chassis wheel alignment and maintenance. Repair…
1 comment
- Vitaly says:
Thanks to the author, it’s very interesting and informative, I’ll look at something with one headlight on Bedakuril in the near future.
Ideas for tuning headlights and their implementation
How can you tune the optics in the Lada Grant:
- Buy and install tuned optics. This option is one of the most expensive in terms of cost, however, it is considered the most effective. Tuned headlights will look really “cool”.
- Install eyelashes. This option is the cheapest in terms of implementation. You can purchase ready-made eyelashes in stores or online, which you just need to put on your car after first cleaning and degreasing the glass surface. If necessary, you can build eyelashes yourself; this will allow you to get a more original product, because you yourself can choose the appropriate shape. Eyelashes can be made from fiberglass, plastic or LEDs.
- Install new light bulbs - diodes or gas-discharge, that is, xenon. This option will not only improve the appearance of the car, but also provide better road lighting.
- Tint the headlights; for this purpose you can use a special film or tinting varnish. Please note that tinting may make the lighting worse, so you may need to install brighter lamps in addition.
Let's summarize
- Adjusting the headlights of a Lada Granta requires five meters of space, a machine, a Phillips screwdriver and a tape measure;
- to turn on the light in the trunk, turn on the low light and open the trunk;
- You can repair the hydraulic corrector yourself, or you can buy a new one for up to a thousand rubles.
Do-it-yourself adjustment of VAZ 2107 valves (video photo)
Even more articles about the repair and maintenance of Grants are here.
Good afternoon, colleagues!
There is such a nuisance as bad light, not in the sense that the headlights themselves shine poorly, but they shine in the wrong direction. I mean, on the road, but “under the nose.” The headlights began to “fall” in the spring, but somehow they lost a couple of meters in distance. But on vacation, the driver’s side suddenly sat down, literally in two days, bam and 5 meters, even if you turn it on far:
30-33mm, I hit 33 - it turned out to be too much)))) - clamp for the rod (made from a steel plate from something in a couple of minutes)
Off we go: 1 - snap off the hydraulic hydrant from the headlight 2 - bite the hydric off from the line, for the second don’t be afraid the contours are different (be careful with your eyes - it squeaks like hell and in all directions):
In general, after such an intrusion, adjusting the headlights is inevitable, but I no longer had time. And I missed the length of the pipe section by about 2 mm, the light was too high - I decided with the regulator and turned it all the way out:
Expenses - 95 rubles. Savings of almost 200 rubles, not counting replacement services (if done at a service center). A new kit costs from 275 rubles per Grant.
All work will be shown using the example of VAZ cars, in particular the Lada Granta, but the design will not be much different on other models.
Removing a faulty hydraulic regulator:
- remove the lower decorative panel to the left of the steering column (held on by clips);
- remove the hydraulic corrector switch handle. To dismantle, just pull the handle towards you;
- the main mechanism is secured with a 21 nut, which can only be unscrewed using a socket head. Since the clamping force of the nut is small, a 22 socket is also suitable for unscrewing;
- pull out the main mechanism from the inside;
- Each headlight housing has its own working cylinder. To pull it out, turn the actuator body counterclockwise until the latches are released and pull it towards you;
- it is necessary to release the tubes, which are attached to the body with special clips with clamps. If you are not going to repair the hydraulic corrector, then the tubes can be cut off, which will greatly simplify their dismantling (they can simply be pulled out by pulling the piece of tube near the left headlight). It happens that the hydraulic corrector does not work, but there is still quite a lot of liquid in the system, so prepare a container in advance to drain it;
- remove the negative terminal and dismantle the battery to gain access to the service hole in the engine shield (socket wrenches 10 and 13 are required);
- First press one of the edges of the rubber seal with a screwdriver, then gradually push it into the interior;
- pull out the tubes along with the seal by pulling the main mechanism in the passenger compartment. Most likely, you will have to disconnect the connectors at the pedal assembly, which will block the exit of the seal.
Installation of a new hydraulic corrector
To install from the interior, pull the actuators and tubes through the hole to the cuffs. Since the space at the pedal assembly is limited, it is advisable to ask someone in the engine compartment to pull the tubes you directed from the inside. The sealing rubber must be pulled out from the engine shield, and then installed in the groove from the outside. All you have to do is lay the tubes according to the factory contour. If necessary, clips with clamps can be purchased or replaced with regular clamps.
Expert answer
If you know how to remove correctors, then do it at your leisure. We will not repair them here, nor will we change them. Instead, we use one trick. Carefully study all the photos, and then get to work.
- Carefully remove, and if necessary, first bite off both hoses on each module. There will be liquid inside, it is poisonous;
Bite off hydraulic corrector hoses on the left headlight
Our self-tapping screw puts pressure on the piston, and it must be screwed in at an angle. This is the trick.
Height adjustment
If necessary, carry out additional adjustments. To do this you need a 6mm hex key. The adjusting screw in the Grant is fixed above the corrector module, which must be installed in place.
Vertical direction control
The setup itself is carried out according to standard methods. But we will assume that the “side regulators” are in the correct position. Then the procedure will be simplified:
- We move 5 meters away from the wall;
- We ensure that the upper horizontal border is at a distance of 52-53 cm from the ground. There is no need to go any higher - you will blind oncoming traffic.
Adjustment
There are 2 types of settings:
- Lamb - left, right.
- Plastic white nut - up, down.
You need to rotate it through the hole shown in the photo.
To do this, you will need a long hex wrench with a ball on the end, since the hole does not coincide slightly with the location of the nut. Therefore, the ball will help turn the key at a certain angle. You can use a hexagon with a small cardan, size H6.
We insert it into the indicated hole, get into the nut and rotate it. First, adjust the low beam of the left headlight. It is recommended to do this on the road with an oncoming car. The beam of light must be raised up so that it does not hit the windshield of an oncoming car. Otherwise, your headlights will blind the driver.
The light should fall approximately at the level of the bumper with a small margin in height. If there are passengers in the rear seats, the car will sit down and the beam of light will rise. For this you need a headroom.
After adjusting the left headlight of the Lada Granta, park the car near the wall. Then adjust the height of the right headlight beam to the level of the left one, focusing on the edge of the light. This completes the adjustment, good luck to everyone on the roads! We look forward to your comments and opinions on this issue!
Source: xn—-21-43dabppn4d4dn.xn--p1ai
How to turn on near or far
The light switch on the Grant is located below the left of the steering wheel - similar to the tenth family.
Switching the handle clockwise gives the headlight and low beam modes.
To turn on the high beam:
- turn the light knob to the extreme right clockwise - the low beam will turn on;
- push the left steering column switch forward (the one that controls the turn signals);
- your high beam will light up - and a blue headlight icon will appear on the panel - keep an eye on it so as not to leave the car with high beam when it is no longer needed.
Optics check
By installing a new electric corrector, the car owner also gets the opportunity to study the efficiency of the optics:
- condensation in the headlamp indicates an upcoming replacement - this condition leads to deterioration of illumination;
- a dark coating indicates that the lamp is failing;
- the reflective layer comes off when it’s time to allocate money for replacement, both blocks;
- Scratches, cracks and chips on the lens require the installation of new glass.
It will not be superfluous to clean the headlights from dust and dirt. It’s easy to cope with the replacement in your own garage, however, if you don’t want to change the electrical corrector on Grant yourself, this procedure will be performed at any service center.
Source: infokuzov.ru