We did it ourselves: AvtoVAZ drivers solved the problem of opening the trunk lid on a LADA Granta FL
VAZ informed dealers about a problem that Grant owners are already solving on their own.
"Grant" is locked in engineering "stupidity". Collage: Driver-News portal
Not a month goes by without discovering engineering flaws on LADA cars - Granta FL has become the new “patient”. The restyled Grants are equipped with a trunk opening button, which often does not work. The editors of the Driver-News portal talk about the “sad” recommendations of AvtoVAZ and the correct solution to the problem from motorists.
AvtoVAZ recommends that the problem of opening the trunk with the button be solved only by a dealer. There, with the help of diagnostic equipment, they will check the performance of the door spindle and perform a whole series of meaningless procedures designed to “fool” the driver’s head. Especially if the LADA Granta FL is no longer under warranty and you have to pay for the “repair” of the trunk lid. The trouble for AvtoVAZ is that the owners of Grant have already coped with the task themselves, and more successfully than the engineers.
It won't be possible to open the trunk. Photo: Drive2
The drivers decided not to go to dealers and not wait weeks for a response from Tolyatti. We found the problem ourselves, and it actually turned out to be in the button located on the arch of the driver's door. The cause of the breakdown is a sticky limit switch that does not release when you press the trunk button, leaving it blocked.
What will the new LADA Granta 2022 be like: Photos, changes, price forecast
The second generation Granta risks losing its identity due to the new platform from Renault and unification with Logan. And if the replacement of the old “trolley” is understandable, then the abandonment of the hatchback body is likely.
The cause of the problem is clear. Footage: YouTube
You can replace the button, which costs 200-300 rubles, yourself, in the garage. The old limit switch needs to be removed along with the wiring; the button is removed from the groove by twisting. After the car you need to turn off the power (for the safety of the “crooked”), remove the old button and connect a new one.
As a result, you can solve the trunk problem on the LADA Granta FL without a trip to the dealership. We previously wrote about the correct removal of the LADA Granta catalyst.
Source
Features of opening the trunk of the Lada Kalina
Owners of the LADA Kalina car are almost unanimously surprised: with all the bias towards Europe, the trunk lock of the Kalina hatchback in the basic configuration for some reason can only be opened with a key. For many, the situation immediately became quite common: the driver gets into the car, starts the engine and then remembers that he needs to put something from the passenger compartment into the trunk . Further actions are similar to a joke.
You need to turn off the engine, remove the key from the ignition, get out of the car, and so on. If you imagine all this in an environment of time shortage, one can only feel sorry for the owner. In addition, if someone happened to approach the trunk of a car with something heavy in their hands, the procedure for opening it with a key turned into something difficult. Another problem could have arisen: in regions where real frosts occur in winter, the lock cylinder would at times freeze tightly.
What’s interesting is that any car owner sees a separate button on the Kalina key, which for this brand of car replaces the standard key fob. She's supposed to open the trunk . If you press and hold such a button for a couple of seconds, you can hear a click - this is a signal that everything is in order with the electrical package control unit.
Then another interesting detail became clear: the craftsmen who climbed under the trunk trim to understand the internal structure realized that there was still a place for the lock activator and even a standard electrical connector for wires. And then the same craftsmen began to solve the problem of how to modify Kalina to increase the comfort of use. The complete trunk lock drive is not available for sale as a single set, so the parts will have to be obtained separately.
READ Replacing VAZ Granta rear pads
Installing a trunk opening button in the interior of a Lada Granta FL
The updated Granta received a number of improvements. For example, the trunk opening button was moved from the interior to the trunk lid. An excellent solution, but in some cases the button in the interior is now missing. For example, it will be useful in cases where there is no desire to get your hands dirty from an external button or when passengers do not know about the presence of this button, but do not want to leave the cabin.
Required
: trunk opening button (article 2822.3710-02).
- Remove the plug and install the button in its original place.
- Connect one wire of the button to ground (to the bolt next to it).
- We connect the second wire to the thin orange wire (do not confuse it with the thick orange one), which is located in the wiring harness at the left threshold.
Will you be installing an additional trunk opening button in the interior of the new Granta?
Key words: trunk of Lada Granta
Share on social networks:
Found an error? Select it and press Ctrl+Enter..
Source
Trunk lock opening switch Lada Vesta Cross / XRAY / Granta FL
- 690 rub.
- Description
- Characteristics
- Reviews (3)
- Question answer
Original standard switch (button) for opening the trunk lock for Lada Vesta Cross, XRAY, Granta FL cars.
Product characteristics
We recommend watching
Connector for the button (switch) for opening the trunk lock of the Lada Vesta Cross / XRAY / Granta FL. ..
Original tailgate trim for Lada Vesta SW and SW Cross for the trunk release button and standard...
Original tailgate trim for Lada Vesta SW and SW Cross for the trunk opening button without standard..
Original standard trunk lid trim for Lada Granta FL sedan with a hole for the button..
Original standard tailgate trim in Gloss Black color (factory painted, not painted..
Original standard tailgate trim in Gloss Black color (factory painted, not painted..
Chinese analogue of the standard switch (button) for opening the trunk lock for Lada Vesta cars..
New items
Radiator protection for Lada Niva Travel. The kit includes a top guard that fits over the license plate. Matte chrome color. ..
Radiator protection for Lada Niva Travel. The kit includes a bottom guard that fits under the license plate. Matte chrome color. ..
Radiator protection for Lada Niva Travel. The kit includes a bottom guard that fits under the license plate. Black color. Right..
Radiator protection for Lada Niva Travel. The kit includes a top guard that fits over the license plate. Black color. Pra..
The trunk release button does not work - what to do, how to repair it
The trunk lid of many modern cars (Volkswagen Passat, Chevrolet Cruze, etc.) is equipped with a special button, which can be pressed to open the trunk lid. During active use of the car and frequent transportation of things in the luggage compartment, this function turns out to be very useful, since there is no need to constantly stick the key into the lock or open the driver's door in order to reach a similar button in the cabin.
However, like any other electrical devices that operate in conditions of constant exposure to changes in temperature and humidity, the button may work intermittently or even break down.
As a rule, everything happens precisely because water gets inside the mechanism due to its insufficient tightness.
If your trunk release button is broken , do not rush to contact an auto electrician - this problem can be fixed with your own hands without difficulty and large financial costs.
First you need to understand how the button itself works and what the principle of its operation is. And here everything is extremely simple: when you press the button, the activator is activated, which removes the latch, opening the trunk. The button itself is a regular switch in a plastic-silicone housing.
Installation of a standard electric drive on a Lada
Frets of the “tenth” family of recent years of production are equipped with an electric drive for opening/closing the trunk directly at the factory. Earlier series of cars do not have such equipment, so owners will have to install the electric trunk drive themselves.
Our example involves the operation of the electric trunk drive through a separate button in the cabin. Some alarm systems have an additional ability - to open the luggage compartment, so it is to this system that we will connect the electric drive. For installation you will need the mechanism itself and a mounting plate.
In addition, you will need four meters of electrical wire and a switch button.
Before installing the electric drive, be sure to disconnect the negative terminal of the battery. Then we attach the lock drive and remove the protective casing, first removing the fastening clips. Using pliers, we straighten the rear end of the electric drive, unscrew the screw securing the rod, but not completely. The lock drive rod has been disassembled. Now the compartment cannot be opened from the outside, since the lock unlocking mechanism is disconnected from the lock cylinder.
5 door or 3 door cars
Car owners of vehicles such as hatchbacks, SUVs and crossovers with an odd number of doors should not have any problems during an emergency opening of the luggage compartment.
Here the main task is to get from inside the car to the cargo compartment. To do this, you must first fold down the rear seats. After this, on the inside of the odd car door, you can see a special handle. After pressing it, you can open the trunk door and repair the lock.
Methods for installing the trunk lock activator
The first option is to saw off one “tongue” from the Kalina lock. Particularly gifted craftsmen do this without any removal of the lock, right on the spot, using an angle grinder. You have to work very carefully. If you don’t have a grinder, the same steps can be done with a hacksaw. It just takes much longer, and one can only guess about the physical effort required for such a process. If you are not confident in the intricacies of your own work, it is better to remove the lock for modification. In this case, it will be easier to work with both a grinder and a hacksaw.
The second option is to replace the lock. LADA instead of the original one . This option is perfect for those Kalina owners who do not have the desire and/or ability to cut anything. All other steps for installing the Kalina station wagon trunk lock activator are extremely simple.
- A rotary washer is installed on the plastic activator pusher, then the entire system is secured with a locking ring.
- The complete activator is placed in a standard place.
- The activator wires are connected to the corresponding connectors. Naturally, all electrical work is carried out only with the battery disconnected. The point is not what can “knock” an electric current: 12 volts of direct current for a person is just nonsense. But capricious electronics, if something suddenly “shorts”, may suffer. In the best case, problems with functionality will begin, in the worst case, something will completely fail.
- The next stage is installing and adjusting the rods.
- A check is in progress. First, the lock itself, regardless of whether the original one was modified or another one was installed (from Priora). All detected problems are corrected. The activator is being tested.
If everything worked perfectly, then it is quite possible to install the trunk trim in place, if only there were “hedgehogs”. Car owners are advised, since they had to remove the trunk trim, to also check which parts are making noise, knocking or vibrating. If such small problems are discovered, they can be solved by installing plugs from pieces of foam rubber of the required size. This will not only solve the problem with the lock, but also increase comfort when driving the car.
Repairing the trunk release button - using the example of a Chevrolet Cruze
To determine the cause of the breakdown of the Chevrolet Cruze trunk release button, you need to remove it, inspect it and ring it.
- To remove the panel (saber) with the button and license plate lights, you will have to remove the trim on the inside of the trunk lid.
- Under it there will be 4 10mm nuts and 2 yellow plastic clips.
- The nuts are unscrewed, and the clips are carefully pressed inward and snapped off.
- After this, it is enough to disconnect the connector connecting the wires going to the button and the backlight to completely remove the saber.
When visually inspecting the button from the inside, traces of moisture will usually be visible under the transparent silicone sealant filler.
It gets there during rain through small gaps between the button key and the body, or at the place where the wires are connected (there is also a small gap there). Trying to dry the button with a hairdryer without disassembling it will lead to nothing.
Installing the trunk limit switch on the Lada Granta
Disconnecting the battery
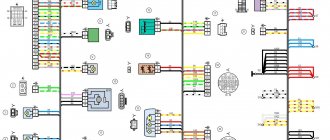
car and are looking for alarm connection points. The minimum connections that must be made for normal operation of the alarm are as follows: - trunk switch - hood switch - door switches - ignition - output to light signals - output to the driver's door lock actuator - minus power (housing) - plus power. I took the first Grant scheme I came across as a basis. It turned out to be a Granta diagram with an automatic transmission. It was sufficient for our purposes. My car has an 8-valve internal combustion engine and a manual transmission. Let's go in order. Trunk limit.
We are looking for the connection point to the trunk limit switch. We find the trunk limit switch. Let's go to the electrical connection diagram for the rear wiring harness. In element number 12 (“Trunk lock electric motor”) we find our limit switch (in the closed state of the trunk lock it is open).
Let's see where its wires go. The wire from the first contact (black and green) goes to point S11. We find this point on the diagram. We notice that it connects to point S6. We find this point too. We notice that it connects to point A3. We find this point - it is structurally connected to the car body. We get that one limit switch wire (black and green) is constantly on the body. When the trunk lock is opened, the limit switch is triggered and closes, i.e. its second wire is connected to the body. That's what we need. Let's look where it goes - this is the wire from the second contact of the limit switch (black and white). It goes to the first contact of the trunk light and nowhere else. This means that the wire to the trunk end switch will have to be pulled across the entire cabin. We disassemble the interior and get to this lamp, we find a black and white wire. We check it with the car battery disconnected. We turn on the tester in resistance measurement mode. One probe is on the car body (unpainted metal), the second is on our wire, the trunk lock is closed. The device should show infinitely high resistance. Next, open the trunk lock, the device should show a resistance of about zero ohms. If so, then everything is correct. From the diagram we see that this limit switch already controls the trunk lighting. This means that for correct operation as an alarm sensor, the connection must be decoupled using diodes. Usually, the decoupling diagram is in the alarm installation manual. We make a connection with decoupling (two diodes are required, you can replace the backlight lamp with an LED one, then - one diode). If you don’t want to make a decoupling, remove the backlight. We initially take a longer wire so that we don’t have to lengthen it later – we don’t need any extra connections. We isolate the connection and carefully pull the wire along the standard harness along the left threshold to the alarm unit. Hood end cap.
Electric trunk lock Granta liftback installation
For work we will need:
1. Liftback)) 2. Opening button with connector or 2 female wires. 3. Electric drive (installed StarLine SL-2). 4. Cable (approximately 30 cm) and 2 clamps. 5. Electrical tape, wire cutters, wires, flat and Phillips screwdrivers, 8 and 7 wrench.
To install the drive, you need to get rid of the lock rod, probably many people know, it is firmly in place and will not allow the drive to open the lock until you insert the key into the lock, so we install a cable instead, this way you can open the trunk from the outside.
Disassembling the trunk door
We pull off the central plastic (2 pistons and on the edges of the latch)
Unscrew the 2 opened screws and pull them off (on two pistons)
A pair of screws have opened again, unscrew them
We will pull off the main casing from these corners, and before that we unscrew the 2 bolts in the front handles
The trim comes off very easily and this is what's underneath
And here is the thrust of the lock (from the cylinder to the lock itself), we will get rid of it.
The drive we will implement
We select a place for it, I found it here, we make notches for the holes
Pulling off the traction from the larva
We drill holes for the self-tapping screws, put the drive together with our rod inward and just attach it to our place to determine the length of the rod. We hooked up the drive, pulled it out to its full length and the door lock should be open. On the top of the lock there is a ring that you need to pull to open it (it will be clear later in the photo), we bring the rod to the ring and make a notch with wire cutters.
Now we take everything out, the electric drive and the lock itself, by unscrewing 2 bolts with a 8 key. We pull out the right corner of the lock and unhook the second end of the rod, then completely pull out the lock and remove the connector.
Here is the drive rod with a notch, at a distance of 2 cm from the notch we chop off the excess tail with a chisel
Along the notch we bend the rod into the letter “G” and insert it into the lock
Control button combination
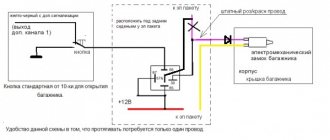
To connect, you will need a set of soldering tools (solder, blowtorch, electrical tape or heat shrink tubing), as well as additional parts. The circuit must include a power relay with a diode. It is this that gives a short-term electrical impulse that opens the trunk door.
The connection is made through a black and yellow wire from the 18-pin connector of the main unit. This is the fifteenth contact - the negative output of additional channel 1. It is responsible for programming and executing the command to open the trunk. The positive wire is a red cable from the 6-pin engine auto start connector.
If the power relay is not included in the kit, it can be purchased separately. It is important that the kit contains a special diode. The peculiarity of this part is that the diode passes a current of a certain charge in only one direction. Accordingly, its correct installation is required. The white strip on the part, indicating the positive side, should be turned towards the red wire, and the negative contact - towards the black and yellow negative cable. For correct connection, you must comply with the diagram below.
How to open the trunk using the StarLine A93 alarm key fob
After activating additional channel one, you can remotely open the luggage compartment. On the Starline A93 2Can 2Lin model and the Lada Granta car, this option is carried out as follows:
- on the key fob, press the second button for a long time until the corresponding melodic signal (at least 3 seconds);
- Then the first key is briefly clicked.
After this, the car blinks its dimensions three times and also gives an impulse to open the trunk. If the security mode is activated, all doors will remain locked, and only the shock sensor will be turned off (for closing the trunk). In this case, the open compartment door will be displayed on the key fob screen.
How to close the trunk using the Starline A93 remote control
The compartment is closed manually due to the fact that modern cars do not have closers. If the car is in security mode, then after five seconds the status will be updated and the compartment lock will be locked. In this case, the bullet will emit a sound signal, and the open door symbol will disappear from the key fob screen. You can open the trunk again either during this time, or after the next command (the second button is long, then the first is short).
Where to buy a power trunk lock
To protect yourself as much as possible from purchasing non-original spare parts, service center technicians recommend using the services of official representative offices, service stations, dealers, and specialized auto stores.
Do not purchase goods from third-party suppliers who sell spare parts at unusually low prices. Always ask the seller to provide documents identifying the manufacturer, and check that the package includes a warranty card.
Recently, it has been popular to order parts and then install them at a service center. There are many advantages of this method, for example:
- efficiency of delivery;
- professional installation;
- quality guarantee for work performed;
- Possibility of individual ordering for tuning and local upgrades.
The trunk of the Lada Grant does not close, what should I do?
Car : Lada Granta. Asks : Vasilissa the Beautiful. Question : The trunk on the Lada Granta does not close, what should I do?
Good afternoon everyone. I opened the trunk on my Grant, but couldn’t close it. I stopped near the house, took things out of the trunk, bang-bang, but the fifth door wouldn’t close. No matter how much I knocked with it, I tried with the key, nothing worked. Why might the trunk not close, is the lock broken?
Sequence of actions for self-installation of an electric lock
- We place the machine within the perimeter of the repair area; you can use a flat platform with unobstructed access around the perimeter. A road overpass or inspection channel in this case is not so effective, since the driver is limited in movement.
- Open the luggage compartment lid, unscrew the two mounting screws, and remove the inner part of the plastic trim.
- We connect the block with two wires (“plus” and “minus”). “Mass” is black. We pack the cables in a corrugated cable, lay it along the inner cavity of the trunk lid, and lead it out into the technical hole.
- We run the wiring in the corrugation under the side decorative inserts and lower it into the lower channel. First remove the plastic covers and sound insulation.
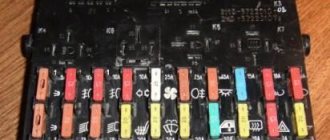
- We go to the fuse block, namely to fuse No. 10A.
- Next, we install a four-pin relay, connect the terminals of the wires from the trunk, fuse and mechanical button. We power the minus from the radio.
- We install a mechanical button instead of a plug under the optics regulator (hydraulic corrector).
- We assemble the casing and check that the system is working properly.
Self-installation
First of all, it is necessary to secure the electric drive to the trunk lid and provide it with a mechanical connection to the lock itself. To do this, you will have to make two cuts on the lock, and bend the resulting free “tongue”. Thus, we gained access directly to that part of the lock, by pulling which the trunk lid will open. Now we attach the long metal stick from the kit so that the lock can close when the system is operating. It is quite possible that you will have to cut off extra centimeters of this pin.
Now our device is installed properly and all that remains is to connect the electrics. To do this, we will use the diagram below.
Important! When working with electrical equipment, remove the battery!
In most cars, electrics operate on 12V positive voltage. However, if you doubt that everything is the same for you, it is better to check with the car dealer and not use this diagram for connecting
It is very important to make the correct connection of the wires, since the proper operation of your car as a whole depends on it. At best, some options will simply not work correctly; at worst, a short circuit will occur.
And it is not always possible to restore the electrics and electronics of the car after it. And this work will cost a lot of money. In addition to the above, lay wires where standard wiring is already laid. In difficult places, for example, when you have to pull the wire from the passenger compartment to the trunk, it is necessary to use protective corrugated tubes.
Electrical work
To begin with, according to the diagram, we connect all the elements located in the trunk. Now you need to tighten the wires to the driver's door. It all depends on the car model. For some it will be convenient to pull the electrics through the door sills from below, for others the option of protective strips from above is suitable. Immediately secure the wires with cable ties. If the length is not enough, take an additional wire, solder the joint with a soldering iron and rewind it with tape. Let's continue connecting. We connect the negative wire to the electric drive, and then connect the second negative wire to the main control relay. The third, also known as the last wire, needs to be connected to the alarm. To do this, you need to find the control unit; most likely, it is located under the dashboard. In it you will find free contacts for connection.
We check, find the negative one and connect. These are the last steps we need to complete. After this, we return the battery to its place and check the functionality of the system. There are cases when the lock does not have enough traction to close. In this option, it is enough to install an additional spring for the lock and the problem should be eliminated. There is one more point that we have not covered - the remote control button. Installation is very simple, and the connection method is described in the same diagram above. You can use absolutely any analogue for the button, even from power windows. And the location also depends solely on your preferences.
Reviews
Conclusion
In the Lada Granta “Norma” and “Standard” trim levels, a mechanical button for activating the trunk lid is missing. Provided you follow the installation algorithm and purchase original consumables and spare parts, the service life of the relay will exceed 5 years.
Cheap components for the lock, violation of installation technology, short circuit in the circuit contribute to rapid wear and damage to the mechanism. A number of negative reviews are unfounded; the damage was caused by the driver.
Is it necessary to install a negative cable into the interior of the car? Can I get power from the rear lights and side lights? This will save two meters of wire.
Konstantin, it is possible, even necessary. There is no fundamental difference where to connect the minus.
On the Lada Granta from 2022, the trunk opens from a button located on the trunk lid. To make opening the trunk easier, you can install an additional button in the Grant FL's interior.
Standard VAZ button worth 50-100 rubles
We connect the gray wire to Ground in its normal place
We connect the blue wire to the orange one in the Grant FL threshold
The trunk lid of many modern cars (Volkswagen Passat, Chevrolet Cruze, etc.) is equipped with a special button, which can be pressed to open the trunk lid.
During active use of the car and frequent transportation of things in the luggage compartment, this function turns out to be very useful, since there is no need to constantly stick the key into the lock or open the driver's door in order to reach a similar button in the cabin.
Installation and connection of an electric lock to the central locking
Car enthusiasts who have installed an electric lock on the trunk of their car with their own hands recommend using standard kits from retail chains. Installing high-quality components means ensuring the operational reliability of the electric lock. Chinese manufacturers offer good installation kits for trunk lid locks. Machine kits include: electric drives; buttons; rod sets; wires with fuses; relyushki; installation strips. It is impossible to install electric locks without the appropriate tools and auxiliary materials, such as insulating, corrugated tubes, and fasteners.
Having decided to install it yourself, you will have to perform a number of plumbing works on the machine. This includes marking for electric lock components, drilling holes for fasteners, installation, fastening. The sequence of work is similar to the previous ones:
- On the trunk of a particular car, locations for mounting an electric locking device are determined. After marking, installation holes are drilled, the drive and clamp are attached.
- If necessary, the electric lock components are modified. The lock drive rods are installed with preliminary markings.
- The battery terminals are disconnected; according to the electrical diagram, it is necessary to install and lay the wires and connect them to the appropriate contacts and connectors. Use a multimeter to check the correct connections of the electric lock on the trunk of the car. The terminals are connected to the battery.
- The lock is connected to the main central locking button, or to an individual one installed in a convenient place inside the car.
- The operation of the electric lock is checked. If necessary, adjustment and fitting work is carried out.
source
Electric trunk lid lock for VAZ Granta
Dear customers, in order to avoid mistakes when sending the trunk lid lock with electric drive of the VAZ 2190 Lada Granta, in the “Comment” line, indicate the model of your car, year of manufacture.
The trunk lock 2190-5606010-10 with an electric drive (activator) ensures automatic opening of the trunk lid of the Lada Granta, which significantly simplifies the life of the driver of this vehicle.
The automatic trunk opening function is a fairly new option, the existence of which most car owners of new car models are just beginning to get used to.
The essence of the operation of the activator (electric drive), which makes it possible to achieve such a result, is, in principle, not complicated: when someone presses the corresponding button in the car interior, the trunk lid lock is activated through this part, as a result of which it opens.
It’s a small thing, but it makes life so much easier for vehicle owners, especially during the cold season (the keyhole freezes). This device is compatible with a standard (mechanical) lock, which means that when opening the luggage compartment lid, you can use two methods simultaneously, which, by the way, increases resistance to burglary.
Today, there are two types of drives that, in order to open the trunk lid, bring the rod into working condition - this is a mechanism that has either an electric motor or magnetic plates.
The first is more common, as it is quite practical and durable, and the second, due to the complexity of the design and frequent problems with use, has not gained much popularity among car enthusiasts.
When using a VAZ 2190 Lada Granta trunk lid lock with an electric drive, the luggage compartment can be opened using the remote control key fob button, or using a button mounted in the luggage compartment lid.
The trunk lid lock 2190-5606010-10 with an electric drive for the Lada Granta is certainly a useful and necessary thing, but only if its installation is justified.
Other article numbers of the product and its analogues in catalogues: 21900560601010.
Any breakdown is not the end of the world, but a completely solvable problem!
How to install and replace the electric trunk lid lock on a Lada Granta car yourself.
AvtoAzbuka online store, repair costs will be minimal.
Just COMPARE and BE SURE.
Don't forget to share the information you find with your friends and acquaintances, because they may also need it - just click one of the social networking buttons located above.
Equipping the trunk with an electric lock
The electric trunk lock can be installed in another way. To do this, you will need a sheet of steel from which the mounting plate is made. The compartment lining must be carefully removed and the electric drive must be screwed to the steel plate using two metal screws. The plate itself is secured with two M5 screws. We insert the curved end of the rod into the corresponding socket of the electric drive, and clamp its second edge using pliers.
In the process of tightening the electric drive rod, it is necessary to achieve the opening of the lock, for which the length of the rod is adjusted, bending it in the middle. Then comes the process of connecting the electrical wires. The factory trunk wiring harness has a two-pole connector with white and black wires. The white wire must be connected to the blue terminal of the electric drive, and the black wire to the green terminal. This completes the installation of the mechanism.
Repairing the trunk release button - using the example of a Chevrolet Cruze
To determine the cause of the breakdown of the Chevrolet Cruze trunk release button, you need to remove it, inspect it and ring it.
- To remove the panel (saber) with the button and license plate lights, you will have to remove the trim on the inside of the trunk lid.
- Under it there will be 4 10mm nuts and 2 yellow plastic clips.
- The nuts are unscrewed, and the clips are carefully pressed inward and snapped off.
- After this, it is enough to disconnect the connector connecting the wires going to the button and the backlight to completely remove the saber.
When visually inspecting the button from the inside, traces of moisture will usually be visible under the transparent silicone sealant filler.
It gets there during rain through small gaps between the button key and the body, or at the place where the wires are connected (there is also a small gap there). Trying to dry the button with a hairdryer without disassembling it will lead to nothing.
In this case, there are only two possible solutions to the problem:
- Buying a new button and replacing it completely.
- Complete disassembly of the button body and cleaning/drying and sealing it.
The first option is the simplest, but there is one “but”: the trunk opening button is not sold separately, but only in a group with two license plate illumination lamps.
The original part costs about 2000 rubles. The Chinese analogue from Aliexpress will cost three times less, but there are doubts about the quality of production. Therefore, before going to the car market for a new button, you can try to repair the “native” one.
For repairs you will need a minimum of tools and materials:
- multimeter (tester);
- screwdriver;
- sharp knife;
- hair dryer;
- sealant or hot glue gun;
- sandpaper-zero.
An electric multimeter is needed to check (“ring”) the button. To do this, just join the contacts button and click on it.
Ways to open the trunk without a key
There are several similar methods. The choice in favor of a particular one depends on the vehicle configuration, the lock mechanism and the manufacturer. Let's take a closer look at them.
From the inside
We are used to hearing the phrases five-door hatchback, three-door sedan. But it doesn’t always occur to you that the outermost odd-numbered door is intended for the luggage compartment. In an emergency, you need to fold down the rear seats and get into the luggage compartment of the body. Use a flashlight or touch to explore the door. Stumbled upon a pen? Open it with confidence.
Car trunk lock mechanism
Tools to help
In most domestic cars, it is impossible to open the trunk from the passenger compartment. One thing is missing: either a handle or that same door. You will have to remove the rear sofa, and then return it to its place and re-weld the hinges to the body. Sometimes this is not an option, since access to the compartment is made difficult by the rigid frames. In this case, a screwdriver or other hand tool will come to the rescue. Insert and turn the trunk lid retaining loop.
If the trunk does not open even in this case, a wrench is needed to remove the lock. The size of the bolts for fastening the actuator is M10 - M15. The procedure is effective if you have the skills to restore the lock yourself.
Luxury or necessity?
Automatic opening of the car trunk is a function that most car enthusiasts who have switched to new cars are just starting to get used to. When you press a button inside the car, an electric drive is activated, which activates the lock, causing the trunk lid to open.
It would seem like a small thing, but in the cold season, the electric drive significantly simplifies the life of car owners. In models with a conventional mechanical lock, many often encountered a problem when, after washing the car, the lock freezes and cannot be opened. Someone pours boiling water over the lock, someone simply warms the key, in a word, everyone invents what they can. This will not happen with an electric drive.
The electric drive is compatible with a standard lock, and you can use two methods simultaneously when opening the trunk lid, increasing burglary resistance. The device is installed mainly on imported cars. In the assembly of domestic cars, an electric drive in the trunk appeared quite recently. Car owners who lack this convenience can easily install such a mechanism.
Features of choice - what does the driver need to know?
When purchasing a lock, you should consider how exactly it will be controlled. If it will only be used for opening using a button from the interior, then a standard one will do - its installation is quite easy to do yourself. In order for an electric lock to be activated from the alarm remote control, a more complex electrical mechanism is needed, the connection of which should only be entrusted to an experienced electrician.
Several models of electric locks are sold on the domestic market. By type, they are standard with side fastenings and reinforced (a little more expensive) - they are made of higher quality and are more reliable in use. When purchasing an electric lid drive, it is best to choose a kit with an inertia mechanism. This mechanism does not allow the engine to experience a constant load - if its rod rests against something, it turns off.
The principle of operation of the inertial mechanism is that when the button is pressed, such a mechanism first unwinds, increasing its traction force, and transmits it further to the pushing rod. At this time, a drive with a conventional motor type continues to operate while under load - it can quickly fail due to overheating.
How to open the trunk on a station wagon, sedan and convertible
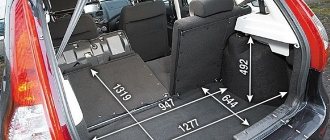
Let's start with the simplest thing - these are station wagons. A station wagon is a car body that has a closed design. The luggage compartment in such a car has a common roof with the car interior. This suggests that you can get into the trunk of a car through the interior of the car. To do this, you need to remove the top shelf and the trunk will be within a meter of the driver’s hands.
If dismantling the rear parcel shelf is not provided for by the design of the car, then there are probably locks that hold the back of the rear seat. For example, on a VAZ 2121 Niva, you can unfasten special latches and the back of the rear seat will move forward. This way you can take the keys from the trunk without opening it.
This method becomes relevant for the latest model Niva, since the first SUVs of this series had a special button on the trunk lid designed to open the trunk without the participation of special levers in the cabin or the car key.
Modern roof rack
Today, a roof rack for a car is not only a convenient and necessary thing, but also serves a decorative function.
Some car owners install it simply to improve the exterior of their car. We are not talking about the classic basket-shaped trunk made of welded steel rods, but about roof rails. These are two longitudinal rails installed on both sides of the car roof along the body.
There is another type of trunk - transverse arches, but it looks less attractive and, in addition, creates additional resistance to oncoming air flow while moving.
The same cannot be said about the roof rails. Without an attached load, they do not in any way violate the aerodynamic properties of the car.
Roof rails for Lada Grants are produced by two domestic enterprises: Petroil Tuning and APS. They are made from a durable aluminum profile (hollow inside), coated either with a protective and decorative polymer, or with an anodic oxide film and fade-resistant ABS plastic. For different modifications of Grants, roof rails of various sizes, configurations and costs are provided.
| Granta sedan | Granta sedan "E" | Granta Liftback | |
| Length, mm | 1350 | 1335 | 1420 |
| Width, mm | 760 (adjustable) | 700 (fixed) | 810 (adjustable) |
| Mounting type | Screw connection in the longitudinal groove of an aluminum profile | Screw connection using specially designed steel threaded bushings in an aluminum profile | Screw connection in the longitudinal groove of an aluminum profile |
| Approximate cost, rub. | 3350 | 3150 | 3600 |
The kit for installing roof rails on the Lada Granta includes:
- left railing;
- right railing;
- gaskets (6 pcs);
- M6x12 screws (6 pcs);
- hex key (4 mm);
- protectors;
- tread edging.
Protectors are designed to protect the car's paintwork from damage that can be caused by the brackets when transporting goods. In addition, they perform the function of sound insulation, eliminating any rattling or squeaking in the area where the roof rails are attached.