I made a powerful steamship whistle from plastic pipes with my own hands. Using various plumbing components you can assemble interesting crafts. For example, a steamship whistle (typhon in English). Moreover, to make a cool signal, I don’t need to weld, solder or glue anything. Read and see below about how to make a beep - a typhon with your own hands. The money spent will be repaid by the results obtained. It is impossible to buy such a beep anywhere - you can only make it yourself. I show you the diagram and secrets of assembling a steamship whistle with your own hands.
Making a 12 Volt air horn for a car with your own hands: from theory to practice
An air horn on a car serves to attract the attention of road users, especially pedestrians. If the standard signal is not satisfactory, you can replace it or install an additional one. The article discusses the device, the operating principle of the signaling device, and also gives instructions on how to make a 12 Volt air signal for a car with your own hands.
Installation of a pneumatic sound signal on a VAZ 2107
Some car owners install a powerful pneumatic sound signal on the VAZ 2107. Installation of such a device is quite simple. You will need a grinder, a drill and a standard set of plumbing tools.
First you need to determine where the horn and compressor will be located, and then make brackets to mount them. Typically, the pneumatic signal is installed behind a decorative grille in front of the radiator.
Installation is carried out in the following order:
- We make brackets from a suitable material (metal corner or strip).
- We install the brackets on the top panel in front of the cooling radiator in accordance with the dimensions of the pneumatic claxon and the design of its fastenings.
We install the pneumoklaxon on the brackets.
We mount the compressor on the standard signal brackets or on the panel near the radiator.
We connect the horn and the compressor with a hose from the pneumatic signal kit.
We connect power to the pneumoklaxon from the standard AP.
Design and principle of operation of an air signal
The first klaxons began to be produced in 1908. Translated from Greek, the word klaxon means “howl.” The first sound signals were a structure that consisted of a plate with a spring secured with a rivet in the middle.
When the gear wheel rotated, it came into contact with a spring plate, and a specific sound was produced. To amplify the sound and direct it in a certain direction, a speaker was installed. Later, a horn appeared in which the gear rotated thanks to electricity.
Thanks to technological progress, signaling devices have improved. A modern sound alarm system includes sound signals (one or more), a switch, a sound signal relay and wires for connection.
- by device: with and without a speaker;
- by sound: tonal and noise;
- according to the principle of operation: pneumonic, electronic and electromagnetic.
Signaling devices receive power from the vehicle's on-board electrical network.
Let's consider the design and principle of operation of signaling devices.
Pneumonic
The principle of operation is similar to the “horns” that were installed on the first cars and horse-drawn carriages. Air is supplied under pressure from the compressor, which moves through a special pipe, creating vibrations and causing it to make specific sounds. Such devices are quite expensive, regardless of the shape and design of the product.
Pneumatic devices differ in signal strength and pipe shape. Their frequency range is created by pipes of different tones. To ensure their sound, it is necessary to install a compressor that can provide a pressure of at least 6-10 atmospheres. The number of horns can be different; the melody of the signal depends on their number. When installing a pneumatic signal on a car, you additionally need to install a relay with a program that will control the opening and closing of the solenoid valves.
Electromagnetic
These devices are based on an electromagnet. It is attached to the main part of the signal - the membrane. The winding of the electromagnet core is connected to the battery through a breaker. The horn is connected to the vehicle ground using a button. When the driver presses the signal button, the core rod begins to move, causing the membrane to vibrate. As a result, a powerful sound is heard (the author of the video is tora 18).
Klaxons of the electromagnetic type differ in the sound emitter:
- Disc (“pancakes”). They can be collapsible or non-collapsible. The second type is more compact and therefore takes up less space in the car. In addition, disk signals can be closed or open. Disc horns are installed either under the hood or in plain sight. It is possible to install several beeps of different frequencies and tones.
- "Snails" These devices are difficult to install because the bell is curved and must be pointed with the open end facing forward. The signal power is very high. They make a sound so loud that it puts pressure on the eardrums. The beeps are produced in two-tone mode, but you can install a relay, thanks to which the voltage will be supplied to the windings alternately, as a result the specified melody will sound.
- "Horns". The bell of these horns resembles a “straightened snail” in shape and looks like a bugle or trumpet. They produce worse sound, but are more convenient to place under the hood.
Assembling the sound unit of the horn
I pulled the rubber onto the siphon, the degree of tension affects the volume and frequency of the sound, as well as the durability of the work. I did a little stretching.
Membrane
The membrane was secured with twine around the perimeter. There should be no folds.
The membrane is fixed
I inserted the cap tightly and secured it with electrical tape. With the installation of the cap, the membrane received protection from accidental damage and the sound became more directional.
Cap installed
I move on to the final assembly of the steamship whistle and the choice of sound tone.
Step-by-step manufacturing instructions
Many drivers are not satisfied with the standard signal, as it is sometimes hard to hear in heavy traffic. Therefore, car enthusiasts install additional horns on their cars. You can buy a ready-made device, but it will not be cheap. You can install a simple “quack” with your own hands.
Tools and materials
To make an air signal for a passenger car with your own hands, you need to prepare the following tools and materials:
- the housing in which the device will be placed;
- speaker for playing a signal;
- set of tools;
- transistors Kt 805 or Kt 819, the latter are preferable since they have more power;
- capacitors;
- switch;
- chip TDA 2005;
- resistors;
- LEDs to increase the load;
- electronic alarm system for a bicycle or an asymmetrical multivibrator.
A rechargeable battery is used as a power source, which provides a voltage of 12 V, sufficient to power the alarm device.
Stages
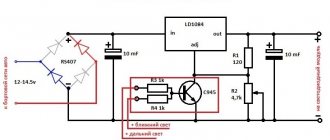
If you use an asymmetrical multivibrator to make a quack, it is assembled according to the following scheme:
Power is supplied to the multivibrator from the car battery. To increase the sound power, you need to make an amplifier. To do this, you need to assemble a bridge circuit, the basis of which is the TDA 2005 chip.
After the amplifier is assembled, it, together with the multivibrator, is placed in a metal case, which is placed on the radiator using fasteners. To reproduce sound, you can use a regular 25 Hz dynamic head or its equivalent. It is placed in the engine compartment and connected to the amplifier output. To turn on the horn, you need to place the switch button in a convenient place.
To generate a signal simulating quacking, you need to press a button. When you press a button, the multivibrator begins to produce alternating pulses, which generate sounds reminiscent of the quack of a duck. The amplifier makes the sound choppy and more powerful. To increase the volume, you can use a metal pipe about 20-30 cm long and place a speaker in it. An air horn, assembled with your own hands and placed under the hood, will produce quite powerful sounds that will attract the attention of road users.
How to make a pneumatic signal louder
The old signal was broken and worked sometimes after rain) It was decided to take a new one, the old ones were some kind of Russian, they were not very loud.
I’m also bullied by idiots who don’t use turn signals, and I was very nervous when my signal failed every other time! With such a signal, I can now take my breath away and not be so nervous on the road.
Since childhood I dreamed of a loud signal and today I took the plunge and bought a pneumatic signal! I walked around half the market, there was one crap, since there was no choice, I had to take crap, it feels like these signals are collected by narrow-eyed disabled abreks, everything is very clumsy, half is made of plastic, especially the fastenings to the body... But nothing, I took this signal for 200 UAH
I bought this crap:
The pneumatic signal kit included only iron bolts and nuts.
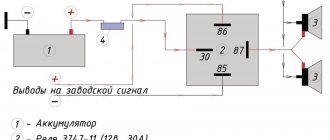
I read a lot about pneumatic signals and people wrote that it is advisable to put the plus signal directly from the battery through a relay. So the signal, in theory, will be louder and there will be no load on the standard wiring.
I used this scheme:
Therefore, heat shrink, terminals, wires and a 5-pin relay were found in the garage, but a 4-pin relay could also be used.
I did everything wisely so that it would last a long time:
I secured the hoses with plastic clamps, since due to weather conditions they will deteriorate and may become detached:
I put everything in place, thought for a long time about what and how to attach it, it was decided to do it like this: Be careful! The compressor must only be hung in a vertical position!
This way it will last longer and will not dull as much at sub-zero temperatures.
I hid all the wiring under the corrugation so that it would not dangle and would not be visible.
Earlier I wrote that I connected the signal to the standard wires. But this way the compressor did not develop full power, and this was not correct... And then the pipe began to wheeze when pressed, apparently it was clogged. I decided to clean it and redo it the other way, through a relay.
So, let's remove the bumper. And immediately there was a jamb: I broke the fog light bulb and the mounts for the light bulbs.
Okay, let's glue the pieces with two-component glue. Looking ahead, I will say that everything is holding up.
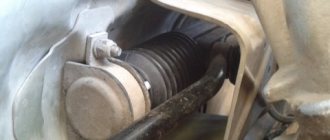
We remove the forge, disassemble it, clean it. We see a lot of oxides, and no appearance at all. Okay, the main thing is that it works.
As it turned out, a small hole (in the area of the red circle) was clogged:
Do-it-yourself powerful steamship whistle. You can assemble interesting crafts from various plumbing components. For example, a steamship whistle (typhon in English). Moreover, to make a cool signal you don’t need to weld, solder or glue anything. Read and see below about how to make a beep - a typhon with your own hands. The money spent will be repaid by the results obtained. It is impossible to buy such a beep anywhere - you can only make it yourself. A diagram of how to assemble a steamship whistle with your own hands is shown.
Accessories
The following parts were purchased from a plumbing store:
1. Bend 40 mm - 90° - 4 pieces;
2. Siphon for sink included - 1 piece;
3. Transition 50 mm - 40 mm - 1 piece;
4. Bend 110mm - 87° - 1 piece;
5. Transition 110 mm - 50 mm.
Refinement of the siphon
Before assembling the structure, it is necessary to modify the siphon; this modification must be taken seriously. Strictly adhere to the proposed revision scheme. You need to shorten the central pipe of the siphon with your own hands so that it protrudes above the plane of the outer pipe by 1.5-2 mm. Using a ruler, we mark the place of the cut and use a metal saw to cut off the excess part. We carefully sand the cut area with emery cloths to reduce the grain size. You should get a smooth, even surface - this is a must.
Siphon Inner pipe Pipe cut Edge smoothed
Difficulties in manufacturing were caused by the method of attaching the rubber sound membrane. There are two ways to implement this. The first way is simple, attach the membrane to the surface of the siphon without further modification of the latter. The second way is complicated, modify the siphon and install a protective cap over the membrane.
The first path was used when constructing the device. If you stretch the rubber and hold it tightly against the outer casing, you can blow into the side hole with your mouth and get a sound. So all available rubber materials were tested; the best effect was obtained from a piece of rubber from a torn swimming cap. There was no denser material at hand. When used permanently, the membrane can be secured with twine and electrical tape. The disadvantage of the first way is that part of the sound will be radiated outward bypassing the output pipe and the membrane may be damaged.
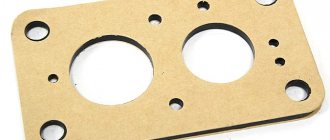
Second way . Various siphons and fastening methods were used, but it was not the original method that won. To avoid premature rupture of the membrane, the external thread on the siphon is completely cut off. The thread on the cap is covered with tape. There are holes cut in the cap itself; the size and number of holes affects the frequency and volume of the sound, and for denser rubber the number of holes may be small. The cap without a membrane should be freely removed from the siphon. See photo.
Thread cut Cap Holes in cap
Air signal 5.5 atmospheres
Good day, reader! I want to share my idea, which has been brought to life for a long time. And finally, I achieved the desired result... I hasten to share the results with you.
Without leaving aside the drivers of minibuses who like to leave a stop without a turn signal (traffic police officers are “fined” for not letting them pass), I created such a miracle that drives these minibuses back to the stop.
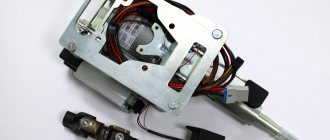
I had 2 original Chinese-made pipes in my garage, 2 compressors from which died safely over the winter. Well, there was a fire extinguisher of reasonable size lying around (not too big, but not small either). The handle from the fire extinguisher was removed, the hole was welded, and 2 tubes were welded for air inlet from the compressor and outlet to the pipes.
Oh, well, yes... The compressor was purchased in advance at the car market. Nothing special, just a compressor with “automatic stop” at the selected number of atmospheres. (I have five and a half, more than enough))
In the “first” version of the signal, I installed some kind of hydraulic valve (what a miracle), but it did not hold a pressure of more than 3 atmospheres... That is, if there was 4-5-6 atm in the cylinder, then the valve let air through until it dropped to 3 atm. It sucked) it seemed like I barely touched the signal, but it blew and blew)
I thought further and realized that it is possible to install an electric valve from an HBO) It holds air (not liquid), and can easily cope with a pressure of 8 atm.
Options for steamship horn resonators
In total, I considered three options for resonators. The longer the resonator, the lower the sound. See photo. The specific sound is shown in the video.
Low sound
Medium sound
Alt
The choice of air source is yours. Watch a video of the buzzer in action.