Typical dimensions of the VAZ-2107 windshield are: length 1440 (mm), width 536 (mm).
Standard dimensions of the windshield on the VAZ-2107:
Windshield dimensions in length/width format:
The car was produced at the Togliatti AvtoVAZ plant from 1982 to 2012. Many modifications of the model were released: 21072, 21073, 21074, 2107-20, 2107-71 and so on. Windshields of all modifications have similar dimensions.
Important: all modifications of the VAZ-2107 model by the Togliatti manufacturer were equipped with a windshield 5.6 (mm) thick.
| General measurements of automobile glass |
| General parameters of VAZ 2107 windshields | |||
| Drawing General view of windshields | Length min (mm) Minimum windshield length for different modifications of VAZ 2107. | ||
The measurement is taken along the widest bottom part of the glass, on the outside.
The measurement is taken along the widest bottom part of the glass, on the outside.
| Length max (mm) Maximum length of the windshield for different modifications of VAZ 2107. | Modifications Number of modifications of the model in our database |
| Parameters of windshields VAZ 2107 | |
| Parameter Windshield Parameter | |
Caution: in the data after which a letter designation is indicated in brackets (for example: 'Upper length (AB)') the dimensions of the glass opening are indicated, in all other cases the data refers to the dimensions of the glass.
The maximum length of the windshield for VAZ cars is 1520 (mm), the maximum width is 861 (mm).
The main dimensions of windshields on a VAZ:
The Russian PJSC AvtoVAZ has been producing VAZ passenger and commercial vehicles since 1970.
The parameters of windshields on VAZ vary depending on the body type and year of manufacture of the car.
The size range of windshields for some models is presented in the “length/width” format:
- VAZ 1111 Oka 1260×620 (mm);
- VAZ 2101 1440x536 (mm);
- VAZ 21099 1378x680 (mm);
- VAZ 2110 1427x861 (mm);
- VAZ 2121 4×4 1420x575 (mm);
- VAZ 2123 1520x770 (mm).
A tape measure is used to measure the windshield. The main measurements are taken horizontally from the bottom and vertically in the center.
Important: to avoid inaccuracies when measuring, you should take into account the bending of the glass, i.e. If the glass has a curve, it is measured as the curve goes along the glass.
| Value (mm) Parameter value in (mm). | ||
| Years of production 1970 - 2019 | ||
| Length | 1440 mm | |
| Width | 536 mm | |
| General measurements of automobile glass |
| General parameters of VAZ windshields | |||
| Drawing General view of windshields | Models Total number of models presented | ||
| Modifications The total number of all modifications of all VAZ models presented in our database | ||
| (drawing) | 21 units | 17 units |
| Total windshield length for main modifications | |
| Modification Modification, model or year of manufacture | |
Caution: in the data after which a letter designation is indicated in brackets (for example: 'Upper length (AB)') the dimensions of the glass opening are indicated, in all other cases the data refers to the dimensions of the glass.
Glass is an integral element in the design of any car and the VAZ 2107 is no exception. Without this part, safe and comfortable driving would be impossible. Therefore, this body element must always be not only clean, but also free from defects. If such occur, it is advisable to replace the damaged glass.
Content
2 3 Improvement of the VAZ 2107 stove. 4 Caring for the VAZ 2107 stove.
- 4.0.1 Operating procedure.
Despite a decent number of shortcomings, VAZs remain loved by our compatriots. Today, we will tell you how to improve the operation of the stove on the classic. The heater and ventilation provide a favorable atmosphere inside the car. In the VAZ 2107, air is supplied from the street. Air, through gaps in the hood of the car, enters the inside of the car. At the same time, depending on the setting, it heats up or cools down.
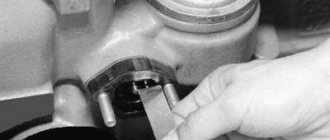
The air intake box is located in the rear part of the engine block; the air is purified from moisture. The box is protected from the engine by special (rubber) gaskets. Moisture comes out, and the air flow enters the heating system. The gaps in the box are closed with a special partition (lid). When driving, part of the air flow exits through devices located above the dashboard.
What has changed in the system of penalties for tinting?
- The best part is that the penalty in the form of license plate removal, which was imposed on July 1, 2012, has been abolished since November 2014. For this we can say thank you to Federal Law No. 307 (On Amendments to the Administrative Code) And now all that remains is a fine of 500 rubles, part 3(1) of Art. 12.5 of the Code of Administrative Offenses of the Russian Federation. The fine is imposed at a time, regardless of the number of glasses and light transmittance.
That is, no matter how tinted the windows are, you will not lose more than 500 rubles (in this place).
Source
Replacing windshield and rear windows
You will need: a screwdriver, a blanket (or something similar) to lay under the glass, a piece of cord (preferably nylon slippery) with a diameter of 3.5–4 mm and a length of about 5 m.
USEFUL TIPS Do the work with an assistant. Pay attention to the marking in the upper right corner of the windshield. Buy new glass with the same markings
Moreover, to avoid buying fake glass, check its strength by rubbing it with a cloth moistened with a solvent. The markings on branded glass cannot be removed, but on fake glass they are often easily washed off.
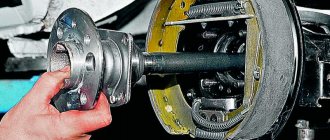
| 1. Move the windshield wiper arms and blades away from the glass. | 2. Unscrew the three screws securing the decorative trim of the front side pillar of the body and remove it (the right one is shown, the left one is located symmetrically). |
| 3. Remove the rear view mirror (see “Rear view mirrors”). |
| 4. Remove the sun visors and their holders (see “Interior fittings”). |
| 5. Disconnect the front fastening of the right handrail (see “Interior fittings”). | 6. Remove the decorative trim for the left ceiling lining mounting. |
| 7. Remove the screw and remove the cover holder. |
| NOTE The pad is held in place by its own elasticity, but it is better to have an assistant support it. |
| 8. Remove the trim. | 9. Pry up the seal in the upper corner of the glass and move it behind the body flange. |
| NOTE Operations on the right corner of the glass are shown. On the left, the work is performed in the same way. Work can be done on both sides simultaneously. |
| HELPFUL HINT If the seal has hardened, remove the trim. | To do this, slide the trim covering the joint of the edging in the middle of the lower part of the seal... |
| ...opening the joint. |
| Use a screwdriver to pry up the edging, remove it from the groove of the seal and remove. |
| 10. While squeezing out the seal with your fingers, simultaneously press on the glass and... | 11. ...move its upper corner out of the body opening. |
| 12. Press the corner of the glass from the body from the inside. | 13. Move the top and side parts of the glass away from the body and remove the glass. |
14
Place the glass on the hood, carefully moving it over the windshield wiper arms. 15. Starting from the middle of the bottom side of the glass...
| 16. ...remove the seal from it. |
| 17. Clean the glass opening from rust and dirt. |
| WARNING In the upper part of the opening, the headliner is secured to the body flange with seven spring holders... ...check their integrity, replace if necessary. |
| 18. Clean the grooves of the seal from dirt, mastic (if used), and glass residues (if it is broken). |
| HELPFUL ADVICE Replace the seal if there is mechanical damage or signs of aging. |
| 19. Clean the two drain holes (one each on the right and left) in the lower corners of the seal. |
| NOTE There is a drain hole in the seal. |
| 20. Place the seal on the new glass, starting from the bottom corners (if the trim was removed, install it). | 21. Place the cord into the groove of the seal, which is used to put it on the flange of the body opening, so... |
| 22. ...to ensure that the cord overlaps approximately 200 mm at the bottom of the glass... | 23. ...and the ends of the cord remained of sufficient length. |
| HELPFUL ADVICE If the cord is non-slip, lather it. To make work easier, additionally lubricate the edge of the seal with soapy water. |
| 24. Insert the glass into the opening so that the groove of the seal where the cord exits fits onto the flange of the opening, and the ends of the cord are inside the body. |
| NOTE Be guided by the marks of the sealant on the surface of the body. |
| 25. Install the glass by slowly and carefully pulling out one end of the cord so that the edge of the seal that it moves back passes through the flange of the opening, covering it from the inside of the body. |
| WARNING An assistant must press the glass against the opening. If necessary, use a screwdriver to adjust the edge of the seal. The operation is performed in two steps - pull each end of the cord to the middle of the upper side of the glass. |
| 26. Align the seal on the outside along the perimeter of the glass by tapping it with the edge of your palm. If the edging was removed, adjust its joint and cover it with an overlay. |
| 27. Install the removed parts in the reverse order of removal. |
The rear window is replaced in the same way as the windshield, with the exception of additional operations.
| 1. Use a screwdriver to pry up the trim trim in the lower corner of the glass and... | 2. ...remove it (the left one is shown, the right one is removed in the same way). |
| 3. Remove the glass starting from the bottom corners. |
Basic data for adjustments and control
| Gaps in the valve drive mechanism between the cams and levers on a cold engine, mm | 0,15 |
| Minimum crankshaft rotation speed at idle speed, min" 1 | 820-900 (750-800*) |
| Oil pressure in the engine lubrication system at oil temperature +85 °C, MPa (kgf/cm2) | 0,35-0,45 (3,5-4,5) |
| Fluid temperature in the cooling system of a warm engine, "C | 95 |
| Coolant level in the expansion tank on a cold engine | 3-4 cm higher risks "MIN" |
| Deflection of the fan belt at a force of 100 N (10 kgf), mm | 10—15 |
| Gap between spark plug electrodes, mm | 0,5-0,6 |
| Initial ignition timing to TDC, degrees | 5-7 |
| Gap between breaker contacts in the ignition distributor, mm | 0,4+0,05 |
| Brake fluid level in brake and clutch reservoirs | to the bottom edges of the filler necks |
| Clutch pedal free play, mm | 25—35 |
| Free travel of brake pedal, mm | 3-5 |
| Free play of the steering wheel, degrees (mm) | 5(18-20) |
| Toe-in of the front wheels of a run-in car under load when measured between the wheel rims, mm | 2—4 |
| Camber of the front wheels of a run-in car under load, degrees | 0°30’±20′ |
| Longitudinal angle of inclination of the steering axis of the front wheels of a run-in car, degrees | 4°+30′ |
| Axial clearance in front wheel hub bearings, mm | 0,02-0,08 |
| Tire pressure 175/70 R 13, MPa (kgf/cm2): | |
| 0,17 (1,7) | |
| 0,16 (1,6) | |
| 0,20-(2,0) | |
| 0,22 (2,2) | |
| 0,23 (2,3) | |
| Tire pressure 165/80 R 13 (165 SR 13), MPa (kgf/cm 2): | |
| 0,16 (1,6) | |
| 0,19(1,9) | |
| 0,21(2,1) | |
| 0,22 (2,2) | |
| Maximum slope on dry hard ground, on which a vehicle with full weight is held for an unlimited time by the parking brake when moving the lever by 4-5 teeth of the sector, % | 30 |
How to replace the windshield on a VAZ 2107
December 7th, 2015 Admin
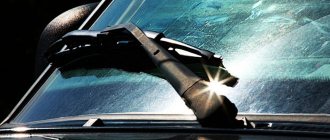
Every car enthusiast knows how dangerous pebbles on the roads are. Oncoming vehicles (especially trucks) lift them into the air, which often leads to them crashing into your car. Wherever the stone lands, it does not bode well. If it goes into the body, there will be a chip, and if it goes into the glass, it will crack. In the best case, the crack can be repaired, but in the worst case, it will grow to such an impressive size that the glass will have to be replaced. In most cases, this will require contacting a service center, but owners of some “classic” VAZs can save on replacement due to the fact that the glass in these cars is not glued in, but is installed using a rubber seal. In this article we will talk about how to replace a windshield using the example of a VAZ-2107 car. Tools and materials
- New windshield (item 21015206010);
- Crosshead screwdriver;
- 2 flat screwdrivers;
- A piece of soft fabric;
- A durable cord with a diameter of at least 4 mm and a length greater than the perimeter of the windshield.
Also, at a certain stage you will need an assistant, since some operations cannot be done alone.
Replacing the windshield on a VAZ 2107 with your own hands
First, carefully inspect the new glass for defects. If you notice anything, go to the store and change the product, otherwise you will have to change this glass soon.
Also remember whether moisture got into the interior from the street in rainy or snowy weather. If yes, the seal must be changed along with the glass.
As soon as you find a helper, you can start replacing:
1) Take a Phillips screwdriver and unscrew the 3 screws securing the side trim to the front pillar.
2) Remove the trim.
3) Repeat steps 1 and 2 for the other pad.
4) Next, remove the ceiling trim.
5) If everything is done correctly, you should see the seal. Now you can begin dismantling the glass.
6) Take 2 flathead screwdrivers. Place one of them against the edge of the seal and start squeezing it past the flange. Are you ready? Lock the screwdriver in the desired position, and then take another and insert it into the slot. There is no need to overdo it; if you insert it too deeply, you can damage the glass. Then start using the second screwdriver to work on the seal, squeezing it past the roof flange.
It makes more sense to start from the top, then move to the sides. There is no need to press out the seal any further.
You just need to carefully take the glass and press on it so that it comes out of the bottom of the opening, and then pull it out along with the seal.
If you do not plan to change the seal, remove the old one and the trim from the removed glass.
9) Now it is very important to thoroughly clean the place where the seal was adjacent to the body. If rust is found, sand, prime and paint the area while you can.
The old seal should also be thoroughly cleaned.
10) Take a piece of soft fabric and spread it on the hood. Carefully place the new glass on the fabric.
11) Place the old or new seal on the glass, straighten it carefully. It's better to start from the corners.
12) Take the edging and tuck it into the insulation, and then do not forget to lock the place where they meet with a lock.
13) Take the cord and insert it into the outer cut of the seal so that it overlaps exactly in the center of the underside of the glass.
14) Together with an assistant, place the glass against the opening and adjust its location.
15) Ask your assistant to sit inside the car while you lightly press on the bottom of the glass. Make sure it doesn't move! Next, the assistant should begin to carefully pull out the cord. This should be done slowly, maintaining symmetry, for which you will have to pull the ends of the cord one by one. At this time, you need to help the seal get into place by pressing on it as you pull out the cord. Install the glass from below in this way.
16) Now go upstairs and lightly tap the top of the glass until it sits in place.
17) Tell your assistant to start pulling the cord out on the sides of the glass as evenly as possible, while you yourself put the seal in place, as in step 15.
18) The seal in the upper part must be filled by pulling the cord from the sides to the center. At the same time, you need to press on the glass so that it sits as deeply as possible on the flange.
19) Finally, put back the trim on the ceiling and sides.
As you can see, dear readers, replacing the windshield on a “classic” is not so difficult. The most important thing in this matter is the coordinated actions of you and your assistant. That's all, good luck on your journey!
Dimming process
In order to tint the windows, you need to remove them, excluding the rear ones. The latter is fixed in the factory using special technology, so it will be quite easy to pull it out, and there is no need to do so. This glass is convex, which is why the film must be given a certain shape before gluing begins. The surface of the glass must be washed, that is, degreased by applying a soap solution to it. The film is applied to the glass from the outside, but the protective base should not be removed. The technician should intensively smooth the film by applying a construction or regular hairdryer to it. Your task is to completely displace all the air from under the film.
Add a comment Cancel reply
- Here you will find information on the repair, maintenance and operation of VAZ cars. Use the convenient search on the site!
- Categories Auto news
- Made by yourself
- Articles
- Specifications
- Tuning and improvements Appearance
- Striving for comfort
- Improved technical characteristics
| Height min (mm) Minimum rear window height: Minimum vertical height in the center for different modifications of the VAZ model. The measurement is carried out along the central part of the glass, along the outer side. Data is presented in millimeters (mm) | Height max (mm) Maximum rear window height: Maximum vertical height in the center for different modifications of the VAZ model. The measurement is carried out along the central part of the glass, along the outer side. Data is presented in millimeters (mm) | n Number of model modifications in our database | Value Glass parameter value in (mm): Data is presented in millimeters (mm). |
| Years of production 1982 - 2012 | |||
| Length | 1360 (mm) | ||
| Width | 512 (mm) | ||
| Years of production 1982 - 2012 | |||
| Vertical height at center (P) | 509 (mm) | ||
| Diagonal (R) | 1322 (mm) | ||
| Diagonal (R) | 1322 (mm) | ||
Wipers on the VAZ 2107: sizes and types
Wipers are irreplaceable parts of any car, the quality of which car owners remember only during rain or snow. Having visited any auto store, you can simply get confused by the abundance of types of wipers. Almost all cars are equipped with a pair of wipers that clear the windshield of rain, dirt, and snow. This is an almost irreplaceable part, without which it is impossible to drive a car in the rain. In the material we will consider which wipers are best installed on a VAZ 2107 car, as well as the main types of these devices.
Main types of wipers
If previously wipers or brushes for cleaning the windshield had only one type, today such products come in various shapes, types, and sizes. From the factory, the VAZ-2107 is equipped with standard windshield wipers, the shelf life of which is no more than 20 thousand km. Of course, it is wrong to tie brushes to the mileage of the car, so it is necessary to change products when they do not cope with their main task.
The wiper itself is a structure that is based on a body and a working element. The working element is the windshield wiper, and the housing is necessary to support this structure. Although today there are the following types of windshield wipers that can be installed on the VAZ-2107:
- frame;
- frameless;
- hybrid.
In fact, they are all universal, with the exception of modern foreign cars, where one element differs in size from the other. Let's look at how these types of brushes differ from each other.
Frame, frameless and hybrid for VAZ-2107
The frame type of wipers is a system based on rocker arms and levers. This system is called a frame, which has two purposes:
- Ensure that the product is pressed tightly against the windshield.
- Hold the wiper element.
The quality of glass cleaning depends on the degree of pressing of the edge to the glass, but the wear of the wipers also depends on this. When the graphite layer wears off, the structure will cause small scratches to the windshield. Although standard products are reliable, they have a short service life. The entire design of frame wipers is not reliable enough, since the hinges, levers and rocker arms wear out very quickly when exposed to moisture and the sun. In addition, frame wipers are negatively affected by cold and ice, as a result of which they simply become ineffective.
After their appearance, frameless materials simply amazed us with their extraordinary nature. They are materials with a working edge, but without a frame base. The role of the frame, or rather the clamping mechanism, is performed by a spring base. This option has the following disadvantages:
Although products have a longer service life than frame materials, this period does not exceed several seasons; high cost of products, 1.5 times higher than standard materials; lack of versatility, therefore, when purchasing frameless wipers, it is important to find products that were manufactured directly for the VAZ-2107.
The hybrid version of windshield wipers is the same frame wiper, only packaged in a special rubber body kit. Thanks to this body kit, the design of the product is protected from the penetration of snow, water and dirt. This has a positive effect not only on the quality of cleaning in winter weather, but also extends the service life of the products. The disadvantage of the product is that it is massive, so it is not very comfortable to ride with such brushes.
About light transmission standards for tinted glass
Nobody forbids tinting the windows of a VAZ 2107. However, if this is done without regard to the law, problems with traffic police officers are guaranteed for the car owner.
The higher the percentage of light transmission, the more transparent the tint film
From January 1 of this year, the Legislative Assembly intends to seriously increase fines for improper tinting of a car to 1,500 rubles. The requirements for glass for light transmission according to GOST 32565 2013 are as follows:
- there are no restrictions on light transmission for the rear and side windows of cars;
- the light transmission rate for the windshield is 70%;
- it is allowed to stick strips of colored film on the upper part of the windshield; their width can reach 14 cm;
- finally, the current GOST says nothing about so-called mirror tinting, and their use is not regulated in any way.
Windshield
The windshield of a car is a part of the body, without which it is impossible to feel comfortable inside the car while driving. The windshield plays the role of protecting the driver and passengers from air flow, road dust and other external influences.
Read more: Selecting and replacing bearings for a VAZ 2110 generator: what parts are by number, video, how to change
This body element needs replacement more often than any other external parts of the car, as it is constantly damaged.
To replace glass, you need to know its dimensions. The size of the windshield for the VAZ 2107 is 1440*536 mm. Its construction is three-layer - the so-called “triplex”.
To remove the windshield of the “seven”, you will need the following:
- a piece of fabric;
- cleaning agent with degreasing properties;
- two screwdrivers (phillips and flathead).
Make sure your new glass meets all requirements. After the inspection, you can begin to remove the old windshield. This procedure will require an assistant, as it will be difficult to do alone.
Set of tools
First of all, for tinting you will need:
The room in which work takes place must be clean and protected from precipitation. Having prepared everything you need, you can either dismantle the glass first or immediately begin gluing it. In any case, it must first be thoroughly washed and degreased.
Tuesday, February 19, 2022
How to remove and insert the windshield of a VAZ-2107
The windshield is removed when it is replaced, to clean or replace the seal, or to treat the body if corrosion occurs. We will need:
- Screwdriver flat and Phillips
- Blanket or similar
- Linen cord 5-6 m long, 3.5-4.0 mm in diameter
We move the windshield wiper arms with the brushes away from the glass. To facilitate dismantling, we remove the decorative edging and, if necessary, replace it with a new one after all the work.
We remove the decorative trims of the front pillars; it is not necessary to remove the remaining elements of the interior
Carefully use a screwdriver to pry up the seal in the upper corner of the glass from inside the passenger compartment and move it behind the body flange.
!If the glass has chips, cracks or other damage, you should work very carefully! By squeezing the seal with your fingers and simultaneously pressing on the glass, we remove its upper corner from the body opening, moving towards the opposite corner. We remove the top and side parts of the glass and remove it along with the seal, place it on a blanket
We remove the seal, clean all grooves from dirt and rust, and wash them in soapy water. We clean and wipe the edge of the glass.
We clean the two drainage holes in the lower corners of the seal.
If mechanical damage or loss of elasticity is detected, the seal must be replaced. We clean the body opening from dirt, and if there is corrosion, we carry out paint and varnish work.
We put the seal back on the glass.
We insert the edging into the seal (it can be installed after installing the glass).
We insert the cord into the groove of the seal, with which it fits onto the flange of the body opening so that in the lower part of the glass the cord overlaps by about 20 cm and there are still free ends of 30-50 cm.
We attach the ends of the cord with tape to the inside of the glass.
To make work easier, you can lubricate the edge of the seal and the cord with soapy water. We insert the glass into the opening so that the groove of the seal where the cord exits fits onto the lower flange of the opening, and the ends of the cord are inside the body.
Slowly and carefully pulling out one end of the cord, and pressing the glass against the opening on the other side, we move the edge of the seal through the flange of the opening. If necessary, adjust the seal with a screwdriver.
We perform a similar operation alternately with the other end of the cord until it completely comes out of the groove in the middle of the upper side of the glass. We make sure that the edge of the seal has completely passed the flange and has no curls.
Align the seal from the outside along the perimeter of the glass, lightly tapping it with the edge of your palm. We make sure that the drainage holes in the seal coincide with similar recesses on the body.
We install the edging lock-plate.
We put the removed trim parts back in place.
Article: 2101-5206010, additional articles: 6960286/4029084
Order code: 003187
- Buy with this product
- show more
- Buy analogues
- Passenger cars / VAZ / VAZ-21012 drawing
- » href=»/catalog/vaz-3/legkovye_avtomobili-30/vaz_2101-3/okna-20/#part411″>Wind glass Window and rear window / Windows
- » href=»/catalog/vaz-3/legkovye_avtomobili-30/vaz_2101-3/okna-31/#part732″>Wind glass Window and rear window / Windows
- Passenger cars / VAZ / VAZ-21031 drawing
- » href=»/catalog/vaz-3/legkovye_avtomobili-30/vaz_2103-106/okna-10/#part9097″>Wind glass Window and rear window / Windows
- Passenger cars / VAZ / VAZ-21051 drawing
- » href=»/catalog/vaz-3/legkovye_avtomobili-30/vaz_2105-6/stekla-18/#part15853″>Wind glassWind and rear window / Glass
- Passenger cars / VAZ / VAZ-21071 drawing
- » href=»/catalog/vaz-3/legkovye_avtomobili-30/vaz_2107-8/okna-12/#part22162″>Wind glassWind and rear window / Windows
- Passenger cars / VAZ / VAZ-21022 drawings
- » href=»/catalog/vaz-3/legkovye_avtomobili-30/vaz_2102-4/okna-20/#part4895″>Wind glass Window and rear window / Windows
- » href=»/catalog/vaz-3/legkovye_avtomobili-30/vaz_2102-4/okna-31/#part5216″>Wind glassWind and rear window / Windows
- Passenger cars / VAZ / VAZ-21041 drawing
- » href=»/catalog/vaz-3/legkovye_avtomobili-30/vaz_2104-5/stekla-18/#part12747″>Wind glassWind and rear window / Glass
- Passenger cars / VAZ / VAZ-21061 drawing
- » href=»/catalog/vaz-3/legkovye_avtomobili-30/vaz_2106-7/okna-15/#part18893″>Wind glassWind and rear window / Windows
There are no reviews for this product yet.
Today, the next article in the series “Crystal VAZs or typical breakdowns of domestic cars” is dedicated to the “classics”: VAZ-2101, 2103, 2104, 2104, 2105, 2106 and 2107. These cars have been driving along our roads for decades and, despite Despite all the shortcomings that we will talk about, their popularity is still high.
Glass is an integral element in the design of any car and the VAZ 2107 is no exception. Without this part, safe and comfortable driving would be impossible. Therefore, this body element must always be not only clean, but also free from defects. If such occur, it is advisable to replace the damaged glass.
Rear window
In Zhiguli cars, the rear glass also has a concave shape. It protects the interior from dirt and moisture. The tightness of the internal space is maintained until the seals deteriorate or the body element itself breaks.
Rear window dimensions
The rear window of the Zhiguli is also quite massive. Its dimensions are 136 cm in length and 51.2 cm in height. The dimensions indicate that dismantling and installation should also be performed with an assistant.
Replacing the rear window, algorithm of actions
In order to replace the rear auto glass of a VAZ 2107, you will have to repeat the steps that are required to replace the wind body element, with the exception of some nuances:
- Pry up the edging at the bottom using a flat-head screwdriver;
- Remove the metal corner element and take out the edging;
- Carefully pushing out the glass, we take it out. You should start from the bottom side. You can replace old auto glass with new one using the same instructions.
Heated rear window
The VAZ 2107 was equipped with heating from the factory - this option is very useful in cases where in winter everything can become foggy and the driver’s all-round visibility will be limited. When installing new glass, you need to make sure that the heating is connected and working properly.
Rear window grille
Often a grille is installed on the rear window as an addition. It beautifies the appearance of the car and helps darken the interior, protecting it from the penetration of sunlight. On hot days, it helps maintain a normal temperature in the cabin.
Frequent breakdowns
In winter, it may happen that the heating will work, but fogging will not go away. This phenomenon cannot be called a breakdown, because it occurs only with high humidity. If you notice a similar effect, there is no need to worry about repairs.
But if the humidity is moderate and the heating is not working, you will really have to start repairing. To do this, you will have to check the entire chain step by step:
- Fuse F5;
- Heater terminals and ground;
- Check the filament with a multimeter.
What to consider?
The film must be attached directly to the inside, because this way you can ensure its maximum protection from various damages.
If you need to tint the rear window of a car with your own hands, or you even want to tint all permissible windows, then you should first understand where this film can be installed and where it cannot. In Russia, in accordance with current legislation, tinting of front car windows can be carried out exclusively using a film in which the light transmittance is at least 75%.
Read more: What is the size of the alternator belt for the VAZ 2106