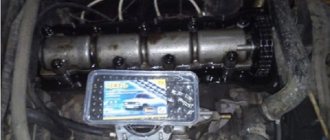
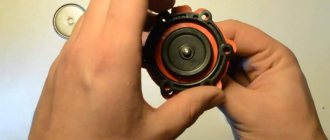
Removing and replacing the fuel pump VAZ 2107
If you have decided on the choice of fuel pump, then you can safely start replacing it, there is nothing complicated here, and any car owner can handle this job.
Open the hood and unscrew the two fuel hoses from the pump, which are connected to it using a screwdriver.
Attention! When unscrewing the hoses, be careful, as there is pressure in them and when removed, gasoline can get on your skin and eyes. Then we take the key for thirteen and unscrew the nuts on which it is screwed to the cylinder block
Then we take the key for thirteen and unscrew the nuts on which it is screwed to the cylinder block.
Now you can safely pull it out from the studs. Also remove the heat-insulating spacer, wash and clean it.
Before installing a new VAZ 2107 fuel pump, remove the old gaskets, one between the pump and the spacer, the other between the spacer and the block, and thoroughly clean and wipe everything there.
Important addition. Since most likely your car is no longer new, before installing the pump you need to check the minimum amount of protrusion of the pusher
It is advisable to do this, since the correct operation of the fuel pump will depend on it.
To do this, take and insert the heat-insulating spacer along with two gaskets and press tightly, after which, by turning the crankshaft, we find the minimum protrusion of the pusher.
Next, we measure with a barbell the protrusion of the pusher; it should be within 0.8-1.3 millimeters.
If the measurement is more or less than the permissible values, then this can be adjusted using a gasket, replacing it with a thinner or thicker one.
Then we install the pump and screw it into place, connect the fuel hoses, and the replacement of the fuel pump is complete. Have a good trip.
Instructions for replacing the fuel pump
To begin, move the rear seat to the side and fold back the piece of carpet that covers the fuel module hatch. Next, unscrew the two bolts securing the hatch and remove it.
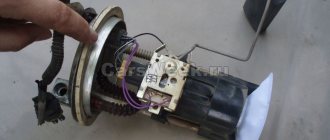
A fuel module with two tubes will be visible in front of us.
Before unscrewing the pipes, it is necessary to relieve the pressure in the fuel system. To do this, you will need to remove the fuel pump fuse, or turn off the power to the module and start the engine. After the remaining fuel in the system has been used up, the car will stall and you can begin replacing the fuel pump.
Our fuel module can be of different types - quick-release and screw-on, depending on the year of manufacture of the car. If the fuel pipes are on nuts, unscrew them with a 17mm wrench; if they are on quick releases, then simply tighten the clamps and remove them from the module.
Now, using a 7mm wrench or tube, unscrew the 8 bolts securing the fuel module clamp.
We move the fuel pipes to the sides, lift the clamp and carefully, so as not to spill gasoline, pull out the fuel module.
None To install a new fuel pump and perform assembly, you will need to put a new corrugated hose on the pump. To ensure that this hose does not allow air to pass through, it must be heated when it is put on the pump.
Then we reassemble in reverse order.
Fuel pump VAZ-2110: characteristics
The fuel pump (VAZ-2110) is the main structural element of the fuel system of a gasoline internal combustion engine, which functions to supply fuel to the injectors or carburetor under high pressure. Depending on the type of drive, there are electronic and mechanical units. And now we will look at the structure of this part using the example of an element installed on a VAZ 10-ku.
Mechanical fuel pump VAZ-2110 - properties and design
This type of mechanism is used only on cars with carburetor engines. This VAZ-2110 fuel pump has its own mechanical drive from the camshaft, and it is located on the internal combustion engine.
According to its design, this element is one of the types of piston and contains the following parts:
- 2-piece housing with a lid on top.
- Diaphragm. It is installed between the lower and upper parts of the body.
- Return spring.
- Stock. It connects aggressively to the diaphragm.
- Discharge and absorption valve. It is located in the upper part of the pump.
- Mechanical drive.
- Mesh filter.
The drive of this device, as we said earlier, is carried out from the camshaft eccentric. When this element rotates, the part moves the rod with the diaphragm down, and the spring force is overcome. The volume of space above it increases, and gasoline, due to the resulting vacuum, seeps into the pump through a separate valve from the gas tank. The discharge valve is still closed.
The main operating mechanism of the pump is the diaphragm. It consists of two membranes, between each of which there is its own gasket. The diaphragm is connected to the rod. The latter interacts with the mechanical drive parts. There are various pump drive schemes. For example, on Russian “10s” a design is used that consists of a pusher and a lever with a balancer. On imported cars, they use their own design with a two-arm “rocker arm”.
Fuel pump for VAZ-2110 - properties
The main properties of this device are the pressure level and housing dimensions. The most popular units today are German-made Bosch units. The pressure of the VAZ-2110 fuel pump is about 2.8-3.8 Bar. The very feature of the fuel pump is sometimes determined by the diameter of the body; in most cases, it is the length.
The dimensions of this part can be very different. Depending on the model and brand of the manufacturer, this parameter is 65, 90 or 105 mm. And these are not all the sizes of VAZ fuel pumps.
Apart from the length, these devices differ in the location of the terminal chips. The mesh itself, in terms of its seats, actually does not differ by brand. By the way, the quality of operation when the fuel level in the tank is low depends on the length of the gasoline pump itself.
In other words, when choosing, you need to pay attention to longer elements. By the way, the diameter of the body can be varied using a gasket made of gas-resistant rubber
Electronic analogues
What is special about the fuel pump? The VAZ-2110 (injector) is equipped with specifically such devices in the fuel system. The electronic pump is used on gasoline engines with distributed fuel injection. In turbodiesel and diesel engines, this element is used in the low-pressure circuit for the preparatory passage of fuel to the high-pressure pump. By the way, electronic pumps on gasoline engines with direct injection of Common Rail fuel operate on the same principle. The electronic mechanism makes the pressure about 0.3 MPa (in power plants with direct injection - about 0.7 MPa). The use of mechanical pumps in such systems is not recommended due to the low pressure when supplying gasoline.
Where is he located?
This device is located in the fuel line or in the fuel tank. Thanks to this placement, the risk of losses is significantly reduced due to the absence of absorbing mains.
The design of the electronic pump implies the presence of the following parts:
- Electric motor.
- Pump housed in an iron casing.
In other words, this device consists of an electric drive and a pump part. All its components are in direct contact with the fuel. In addition to the parts listed above, the module of this device also includes a fuel flow sensor, a fuel intake and a strainer.
And the part we are considering operates thanks to the presence of two valves - a reversible valve and a pressure reducing valve. The first one locks the system when the internal combustion engine stops. The second one performs the function of maintaining pressure in the system, while part of the fuel is bypassed to the rear inlet.
By design, there are a number of types of electric pumps:
Diagnostics
Pump failure can be caused by two reasons:
- Faulty fuel pump relay or blown fuse.
- There is a fault in the power circuit.
To check the electrical circuit and relay, do the following:
- Turn the key to the ignition position, but do not start the power unit. After turning the key to the ignition position, a click of the relay should be heard and then there should be a brief activation of the pump. If you do not hear a click from the relay, it means it is faulty or there is no power to it. If the relay clicks, but the pump does not work, then the problem is in the wiring that goes from the relay to the pump;
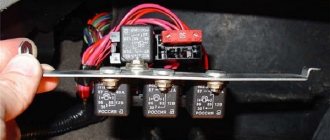
- Locate the relay box under the glove box. The block consists of three relays and three fuses for them. The fuel pump relay is located in the center. Remove the fuse, check its integrity and replace it if necessary;
Take a multimeter and set the measurement mode to 20V. Next, touch one of the probes to the contact on the relay where the pink wire is connected. Touch ground with the other probe and turn on the ignition. The screen should display the on-board voltage from 11.5 to 12.5 V. If there is no voltage, the problem will be in the ignition switch contact group or a broken wiring. To test the relay, use a jumper to connect the terminals to which the gray and pink wires go. If the fuel pump starts working, change the relay; Make sure that the negative wire on the body is not oxidized. Often, interruptions in the operation of the pump are associated with a lack of mass. The ground wire is located near the handbrake mounting bolts; To check the pump, remove the rear seat and the fuel module cover. Disconnect the power connector on the fuel module and supply 12 V there directly from the battery. If the fuel pump works, the problem is in broken wiring; if it doesn’t work, you need to change the pump; Also, the pump may not produce the required pressure for the injection system to operate. It is not difficult to measure the pressure yourself, but you need to have several special devices. We recommend stopping by a service station and asking them to measure the pressure of the fuel pump. It should produce 2.8–3.2 kPa for a 1.5 engine and 3.7–3.9 kPa for a 1.6.
Symptoms that clearly indicate a faulty pump and rod
Fuel pump and gasket set
The main sign of a faulty fuel pump is that the engine begins to stall at high temperatures, and after stopping it does not start. It sits for a while, cools down, and only then is it possible to start the engine. Of course, another breakdown has a similar symptom - a violation of valve adjustment. Only in this case does it feel as if the engine is trying with all its might to pull the car, but cannot, it is beyond its capabilities. And when the fuel pump starts to malfunction, the engine simply stalls.
The reason for this is excessive heating. As we said, the VAZ 2101 fuel pump consists of two valves. Well, one or both became warped due to heating and stopped opening. Cool them slightly and you can continue moving. Remember how often you saw a wet rag thrown over a gas pump? Now you know what purpose this is for.
But there is also a VAZ 2101 fuel pump rod, a truly wonderful contraption. It is made of steel. And if in the Soviet years it was hardened, now no one needs it. The price of the stock is at least 25 rubles. Well, who will spend kilowatts of energy on a part whose final cost is 25 rubles? Nobody! What happens then? But an unpleasant picture emerges - the fuel pump lever simply erases the rod, reducing its length.
And if you have gaskets under the fuel pump housing, then you are just lucky! When you pull one out, the rod will protrude from the insert more. And that’s it, the pump will continue to pump gasoline normally. But what if there are no gaskets? Who knows what could happen, for example, they forgot to put them on? And that’s why the rod was worn out. What to do then? Try taking it out and inserting it the other way. You know, this action helped several times.
A sign that the fuel pump rod has worn out is that the car accelerates to a certain speed. I had such a thing that I drove around the city normally, but as soon as I got on the highway, my maximum speed was 90 km/h, and that’s all. You step on the gas, but the engine stalls, it doesn’t have enough gasoline. I released the pedal a little - it drives calmly and shows no signs of breakdown. Moreover, a pump rod malfunction cannot always be detected when driving around the city or at idle speed. A short-term increase in engine speed will not give the same effect as long-term driving at high speed.
Imported fuel pump
If you have an imported device, then it is more difficult, or you will have to buy a new one or contact a specialized workshop.
But not even all workshops undertake to repair imported gasoline pumps, since components for them are very difficult to find. Some workshops got out of this situation thanks to the independent production of working parts of devices produced by various foreign manufacturers, the main of which in this market are BOSCH DENSO
,WALBRO
,
PIERBURG
,
AC
,
VDO
.
Having carried out a spectral analysis of the material from which the parts of gasoline pumps are made, they learned how to make similar units of no worse quality, which made it possible to repair them much cheaper.
Thanks to this, you can even completely restore a failed device that was previously planned to be replaced.
POPULAR WITH READERS: HONDA Service Manual - a complete repair guide
But there are only a few such workshops and you need to know where they are.
Removing and installing the fuel pump.
The fuel pump plays an important role in the car's power system and is an important link in the fuel supply chain from the tank to the carburetor. Removing and installing the fuel pump, as well as adjusting it, will require some plumbing tools. You will need a Phillips screwdriver, two centimeter rulers, an open-end wrench, or better yet, a 13mm spanner.
1. Loosen the clamp and remove the injection hose from the fuel pump nozzle.
2. Loosen the clamp and remove the suction hose from the fuel pump nozzle. 3. Using bolts whose outer diameter matches the inner diameter of the hoses, plug the hoses and tighten the clamps.
4.Unscrew the fastening nuts, and carefully trying not to damage the gasket, remove the fuel pump.
Pay special attention to the fact that each time after removing the fuel pump and replacing the adjusting shims, it is necessary to correctly adjust its position. Incorrect adjustment of the fuel pump can lead to a lack of fuel supply, or, conversely, to an increased supply and, as a consequence, to carburetor malfunction.
The numbers in the image show, under number one, a sealing gasket with a thickness of 0.27-0.33 mm. Under number two is a spacer designed for thermal insulation, that is, the simpleton does not allow the pump to heat up from the engine block. Under the number three an adjusting shim with a thickness of 1.10-1.30 mm or 0.70-0.80 mm is shown.
Install a new gasket before making adjustments.
Install the pusher into the heat-insulating spacer. As shown in the image, install the spacer assembly with the pusher on the studs. Place an adjusting shim 0.70-0.80 mm thick onto the pump mounting studs.
Press the gaskets installed on the studs and the heat-insulating spacer tightly to the cylinder block. Rotate the crankshaft and install the pusher so that it protrudes minimally.
The fuel pump is adjusted based on the diagram and indicators described below. As shown in the image, use rulers to set the protrusion length of the pusher. The length of the protrusion of the pusher is marked with the letter A. If dimension A is less than 0.8 mm, replace the adjusting shim with a thickness of 0.70-0.80 mm with another one with a thickness of 0.27-0.33 mm. If dimension A exceeds 1.3mm, replace the adjusting shim with a size of 0.70-0.80mm with another shim of increased thickness 1.10-1.30mm. Install the pump in the reverse order of removal.
Sources
- https://vaz-remzona.ru/shtok-benzonasosa-vaz-2101/
- https://avtovx.ru/toplivnaya-sistema-vaz/benzonasos-vaz-2106-159/
- https://doctorvaz.ru/sistema_pitaniy/snytie_ustanovka_benzonasosa.html
The process of installing a gasoline pump on a VAZ 2107
Now, after removing the gasoline pump before installing a new one, you must first check it. If the mileage of your VAZ 2107 car is more than 100,000 km. Then be sure to check the minimum ejector projection before installation. Since the location of the gasoline pump depends on its position, as well as on the correct stroke of the diaphragm of the gasoline pump. In case of disease, the diaphragm itself is damaged or its position is incorrect. In order to change the protrusion of the pusher on a VAZ 2107 it is very simple, to do this you need to select spacers of the required height, which are installed between the separator and the cylinders.
Disassembly and repair of the fuel pump
Before disassembling, it is necessary to thoroughly rinse the fuel pump, for which you can use the gasoline in its cavity. It is best to start disassembly with the top cover 4, screwed with a bolt 5 with an 8 mm socket head. Under the lid there is a nylon mesh filter.
Let us remind you that the deformed cover and the broken filter must be replaced with new ones. Under the strainer in the fuel pump housing you will see a pressed and rolled suction valve 6. There are cases when, due to valve failure, you have to replace the entire fuel pump housing since the valves are not supplied separately as spare parts, and replacing them at home is quite difficult .
To remove the fuel pump housing, you need to unscrew six screws 7 with a screwdriver. Before separating the housing from the bottom cover, try to replace their relative positions. This will come in handy during assembly.
The discharge valve is pressed and rolled on the inside of the removed housing. Wash the housing thoroughly in clean unleaded gasoline.
Remember that even the smallest grains of sand trapped between the valve and the seat disrupt the tightness of the valves, which leads to failure of the fuel pump.
Using a thin screwdriver or a match, you can check the mobility of the valves and the tightness of their fit to the seat under the action of the springs. If you can check the operation of the suction valve again on the assembled fuel pump, then the operation of the discharge valve can only be checked now, with the pump disassembled. When blowing air into the discharge pipe, monitor the behavior of the valve, which should sit in the seat and not allow air to pass through.
Determining the causes of fuel pump failure
Replacing the fuel pump for VAZ 2113, 2114, 2115
To determine the cause of a fuel pump failure, you can use several operations related to checking its functionality without removing it from the car.
The fuel pump does not supply fuel to the vehicle systems:
- We check the presence of fuel in the gas tank. It is recommended to operate the car with at least half a tank and with the obligatory use of the entire set of filters that reduce the impact of small particles on fuel pump parts.
- We check the performance of the fuel filters and, if necessary, replace them with new ones.
- We blow out and clean the pipeline system, removing deposits of small particles.
Check fuel filters
The main reasons for fuel pump failure may be:
- Damage to the diaphragm with leaks.
- Loss of spring stiffness and performance.
- Valves clogged due to dirt accumulation.
- Loss of filter capacity due to the accumulation of contaminants.
- Violation of the tightness of the pump circuit with leakage of gasoline and oil.
- Failure to operate due to exhaustion of the pump components.
You can see how the DAAZ fuel pump works in the following diagram:
Internal structure of the fuel pump
To determine the pump's performance, it is necessary to conduct an external inspection. The top cover must be installed without distortion and fit tightly to the body. The mesh filter must be installed evenly and ensure the tightness of the device, preventing leakage at the joints and fastenings with bolts.
DAAZ scheme
Next, you need to install the pusher in the working position; to do this, use the handle to turn the engine 1 revolution. The rod and eccentric will take a position that allows you to use manual fuel pumping.
When pumping, a working pump pumps gasoline without air. If a mixture of gasoline and air appears in the system, it is necessary to remove the pump and repair it to eliminate defects. To repair the pump, you must purchase a repair kit, which includes all the necessary spare parts.
If a fuel system malfunction occurs, the smell of gasoline appears in the car interior; the cause may be damage to the fuel pump diaphragm or broken threads of the fasteners. It is also possible that fuel may leak due to improper installation of the fitting.
The appearance of oily smudges on the lower part of the housing is usually caused by a failure of the lower diaphragm blade or leakage along the mounting rod in the pump drive.
The diaphragm design consists of a rod, a plastic spacer and three blades. The upper petals ensure the supply of fuel to the engine, and the lower petal cuts off oil from the cylinder block, as well as from gasoline in the event of a diaphragm failure. A return spring works together with the diaphragm, which also fails, which interrupts the fuel supply through the system (in automatic and manual mode). In some cases, the drive “foot” rod may malfunction (due to displacement to the side), which contributes to the failure of the fuel pump.
Fuel pump device
Sometimes situations arise when the pump operates intermittently, which is usually due to spring failure.
If it is difficult to start the engine, a possible cause may be wear on the fuel pump valves. When using a vehicle for a long time, the valves wear out, which leads to startup failures. After stopping the engine due to loss of tightness, the valves allow fuel to pass through, and it flows into the gas tank, and in order to start the engine again, it takes much more time for the fuel pump to supply fuel to the carburetor.
When the valve plate wears out, the plate changes its position, causing the pump to stop working. To eliminate such a defect, the plates began to be equipped with a rod, which prevents its displacement and rotation.
Situations also arise when the valve lining flies off and gets between the valve and the “seat,” which leads to a failure of the fuel pump.
It is also necessary to take into account that domestic gasoline pumps use three membranes: two for supplying fuel and one for sealing. Currently, there is no shortage of spare parts for any VAZ model. The distribution network presents all types of spare parts necessary to repair a car, regardless of modification and year of production.
Fuel pump drive
The VAZ 2107 fuel pump operates from a pusher (rod) and an eccentric located on the shaft of auxiliary devices (“piglet”, intermediate shaft), which is driven by the timing mechanism through a gear. Auxiliary devices include distributor, oil and fuel pumps.
Operating principle
The drive works as follows:
- the intermediate shaft rotates via a timing chain;
- the eccentric acts on the rod and pushes it;
- the rod presses the fuel pump lever, ensuring its operation.
Rod wear
The main sign of a worn-out rod is that the car does not reach the required speed. If the car accelerates, but, having gained speed to a certain value, does not develop it anymore, the reason is precisely the wear of the rod. Recently, the pusher has been made from such low-quality metal that it leads to wear out literally after 500–1000 km. The edge of the rod on the eccentric side is simply flattened, which indicates the need to replace the part.
A little about the design of the fuel pump
The inner world of a penny gas pump
The VAZ 2101 fuel pump housing consists of two halves. On the bottom there is a diaphragm drive lever. There are two small valves in the top cover - inlet and outlet. By the way, they are included in the repair kit. But it is better not to use it, since the effectiveness of replacing several components and gaskets is extremely low. As practice shows, even highly professional repairs will not give good results.
The fuel pump will still not work as it should. And if you think that the electric fuel pump on the VAZ 2101 can save the situation, then you are mistaken. These are unnecessary problems that you simply don't need. Such a fuel pump must be installed if an engine with a two- or seven-wheel drive (injection) is being installed. In all other cases, it is useless to do this - there are a lot of costs, there is no effect.
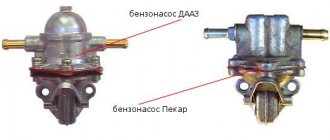
Therefore, the only correct solution is to completely replace the VAZ 2101 fuel pump. Its price in stores is 450-500 rubles, no more. The repair kit is cheaper, but the guarantee that it will pump the pump is small. But if you install a new one, the problem will disappear for several years. According to reviews from car owners, the most reliable fuel pumps for the VAZ 2101 are those produced by DAAZ. But it is worth noting that Pekar and Weber are also praised by drivers. True, it doesn’t happen every once in a while, sometimes a true G (marriage, in the sense) comes across. With repair kits the situation is even worse.
External view of the fuel pump of a VAZ 2101-2107 car
And if there is a chance to purchase a low-quality fuel pump, but it is small, then you can buy a repair kit of a very low grade. From my own experience, I will say that I personally purchased kits in which the valves either did not fit into their grooves at all, or fell into them like a spoon in a mug. I don’t know, it’s quite possible that fate doesn’t like me very much, but this happened not only to me. Therefore, I decided that the best way to fix the VAZ 2101 fuel pump is to purchase a new one. And install a new rod. And gaskets.
What fuel pumps were equipped with classic VAZ models?
Classic VAZs include all models of the Zhiguli family, produced from 1970 to 2012 and their modifications:
Depending on the year of manufacture, the engines of these vehicles were equipped with different fuel systems. In all the first Zhiguli models, the fuel mixture was injected into the cylinders using a carburetor, and the fuel was supplied by a mechanical fuel pump. The latest modifications of the VAZ 2104, 2105 and 2107 had an injection system and an electric fuel pump.
Carburetor cars of the Zhiguli family were equipped from the factory with mechanical fuel pumps of the diaphragm type DAAZ 2101 (catalog number 1106010) produced by the Dimitrovgrad Automotive Unit Plant. Thanks to their simple design, reliability and maintainability, they have proven themselves well not only on the “classics”, but also on cars of the Sputnik and Samara families, which were equipped with their modified versions.
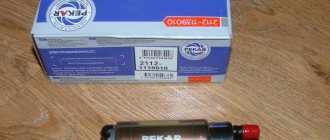
Injection Zhiguli models were equipped with domestically produced electric fuel pumps. They were produced by the Pekar and Utes enterprises under catalog number 21073–1139009. The latest modifications of the Zhiguli were equipped with products (catalog number 2112–1139009). The same devices were installed on all models of the Samara and Lada families.
Where is the fuel pump located on 2106, 2107 and other models
The location of the fuel pump on carburetor and injection classic VAZs is different. In the first, it is installed on the left (as viewed from the passenger compartment) on the engine cylinder block on a special boss, and is attached to it using studs through a heat-dissipating ebonite spacer. The mechanical fuel pump is driven from the engine intermediate shaft through an eccentric and a pusher (rod).
The mechanical fuel pump on the classic is mounted on a special boss on the engine cylinder block
In injection Zhiguli cars, the pump is included in the design of the fuel module. It is located inside the gas tank. The design of an electric pump consists of a DC electric motor and a specially shaped impeller mounted on its shaft. The electric motor is powered from the vehicle's on-board network. The electrical circuit of the device is protected by a separate fuse and relay.
The electric fuel pump on injection classic models is installed in the gas tank
Diagnostics and replacement of the electric fuel pump on cars of the Zhiguli family
In injection engines of classic VAZs, the fuel pump may lose its functionality both due to problems with the power supply to it and due to a malfunction of its electric motor. In the first case, the situation can be corrected by diagnosing and repairing the electrical circuit of the device. But if the electric motor of the pump fails, only replacing it will help.
Checking the protection devices for the electrical circuit of the fuel pump on injection VAZs of the Zhiguli family
If there is a problem with the electrical equipment of the fuel pump circuit, it usually does not turn on at all. Turn on the car's ignition without starting the engine and listen. First, you should hear a click from the relay, and then a characteristic “squeal” emitted by the pump’s electric motor. If you don’t hear anything like this, start diagnosing with the electrical circuit of the device.
The pump circuit is connected to the on-board network via a separate relay, and its protection is provided by a fuse. Both of these devices are located in the vehicle's optional mounting block. You will find it under the glove box. It contains 3 relays and 3 fuses. The fuel pump relay (indicated R2 in the diagram) is located in the middle, and the fuse (F3) is to the left of it. We pull the fuse out of its seat and check it by “ringing” it with a tester. If a malfunction is detected, we replace it, not forgetting to comply with the rating (15 A).
You can check the functionality of the relay by installing a known working device in its place. Instead, replace it with the relay located to the right of the one being diagnosed, which is responsible for the radiator fan circuit. If this option does not suit you, turn on the ignition and measure the voltage between the pink wire going to the relay and the vehicle ground. The device should show 12 V. This means that the device is powered. After this, you need to connect the pink wire with the gray one at the relay terminals. So we will connect the fuel pump directly to the battery. If it works (that same “squealing” sound will be heard), simply replace the relay.
The fuel pump relay is located in the middle (R2), and the fuse is located to the left of it (F3)
Checking the fuel pressure in the system
The main indicator of the operation of a fuel pump is the pressure it creates in the system. If the device turns on, pumps fuel, but the engine runs intermittently, take the time to check the pressure. To do this, you will need a pressure gauge with a measuring range of 5–7, equipped with a gas-resistant hose and a threaded fitting (if there is no special one, you can use a regular tire pressure gauge). The sequence of actions is as follows:
- On the fuel rail we find a fitting closed with a plastic cap. Unscrew the cap and connect the pressure gauge hose to the fitting. If your device is not equipped with a special threaded fitting, the hose can be secured to the “nipple” using a small clamp.
Pressure connection
The pressure in the ramp should be 2.8–3.2 atmospheres
When removing the vacuum hose from the regulator, the pressure should drop by 0.2–0.7 atmospheres
VAZ 2110 fuel pump, carburetor engine, VAZ 2110 fuel pump injector
A VAZ 2110 whose gas pump acts as a gasoline supercharger is unlikely to be able to move independently without this small but very important unit. Let’s say right away that the fuel pump of the carburetor “ten” is mechanical, and the VAZ 2110 injector has an electric fuel pump
Today we’ll talk about both in detail.
So, a mechanical fuel pump for a VAZ 2110 carburetor engine is installed between the valve cover and the ignition distributor, in the engine compartment. Actually, this arrangement allows you to receive reciprocating torque from the shaft, which goes from the camshaft to the ignition distributor. Thanks to the eccentric on this shaft, movements through the rod are transmitted to the fuel pumping lever. The lever itself, in a reciprocating motion, sucks in fuel through a membrane. By the way, this pump, like all pumps starting from the VAZ-2101 model, has a manual fuel pumping lever. This is quite convenient, as it allows you to quickly check the operation of the mechanism literally with your bare hands. Photo of the VAZ 2110 mechanical pump itself is below.
This is what a mechanical pump looks like in cross-section, look at the schematic drawing.
The VAZ-2110 mechanical fuel pump consists of the following elements -
- 1 – discharge pipe
- 2 – filter
- 3 – body
- 4 – suction pipe
- 5 – fuel pump cover
- 6 – suction valve
- 7 – rod
- 8 – manual fuel pumping lever
- 9 – spring
- 10 – cam
- 11 – balancer
- 12 – mechanical fuel pumping lever
- 13 – lower cover of the fuel pump
- 14 – internal spacer
- 15 – external spacer
- 16 – discharge valve
Removing and installing a VAZ 2110 mechanical pump does not cause much difficulty. It is enough to remove the air filter, loosen the clamps of the incoming and outgoing fuel line hoses, remove these hoses, then unscrew the two nuts securing the pump itself and you can remove the mechanism from the two studs on which the fuel pump hangs. During installation, it is advisable to replace the gaskets that are on the thermal insulation insert.
Gasoline pump VAZ 2110 injector
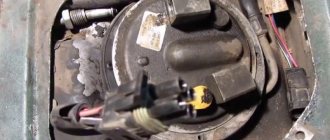
The electric fuel pump of the injection “ten” is installed directly in the gas tank. Removing and replacing this unit also does not cause problems for VAZ 2110 owners. It is enough to lift the rear seat sofa, unscrew the hatch and fuel supply lines... the main thing is not to forget to relieve the pressure in the system.
The fuel injection system itself differs from the carburetor version in the method of fuel supply. If a carburetor engine sucks in fuel independently from the carburetor, then in an injection engine fuel is injected under pressure through injectors. Therefore, the task of the electric pump in the tank is to constantly maintain high pressure throughout the entire system. The pump turns on and off automatically (using a relay), responding to commands from pressure sensors. Actually, the pump itself looks something like the photo below.
Determining whether the electric pump in your car is working is quite simple. Turn on the ignition (but do not start the engine), and you will hear the characteristic whirring of the electric pump in the tank as it builds up the necessary pressure. If there is no buzzing sound and the engine does not start, then the pump is most likely faulty. Or the pump activation relay, which is located in the cabin under the center console of the panel, usually near the passenger’s feet, is faulty.
It often happens that the pump is not able to create the necessary pressure, although it hums, then it also needs to be changed. The VAZ 2110 injector pump is very sensitive to various debris, so be sure to periodically change the fuel filter.
Replacing the fuel pump on a VAZ 2110 injector
A very useful video of removing the fuel pump on a “ten”.
To remove the electric fuel pump, do the following:
- 1 – reduce the pressure in the fuel system
- 2 – remove the hatch cover under the rear seat
- 3 – disconnect 2 fuel supply hoses in turn
- 4 – unscrew the 8 nuts around the circumference of the ring and remove it
- 5 – remove the pump block from the fuel tank without damaging the fuel level indicator sensor lever
- 6 – remove the rubber o-ring
Electric fuel pump for VAZ 2106
Due to the simplicity of the “six” design, a more productive electric gasoline pump can be installed on it. However, car enthusiasts themselves do not recommend installing a modern unit unless there is a good reason:
Mechanical fuel pumps are intended exclusively for carburetor car models, while electric ones are designed to serve injection cars. In this case, the installation method will differ:
- the mechanical pump is fixed on the surface of the cylinder block;
- The electric pump is mounted inside the cavity of the fuel tank.
The electric fuel pump is smaller in size compared to the mechanical one
On the VAZ 2106 carburetor engine, you can install an electric fuel pump of both domestic and imported origin. Thus, the new generation Pekar electric pump, as well as the German Bosch device, have gained wide popularity among car enthusiasts. The only difference is the price: if Pekar costs from 2 thousand rubles, then Bosch is cheaper than 3 thousand rubles; you won’t find it in a car store.
Installation of an electric fuel pump
Installing an electric fuel pump on a carburetor engine will require additional equipment. In addition to the pump itself, the following elements will be needed:
- five-meter hose with a hole diameter of 9 mm;
- fuel pump relay (in addition to the existing one);
- 7 mm drill (+ drill);
- filter element for injection engine;
- fuel filter for carburetor;
- steel pipe 250 mm with metal thickness 0.8 mm;
- a hose with a hole diameter of 12 mm for supplying fuel;
- adapter device from 8 mm to 12 mm.
Only after preparing the necessary mechanisms and components can you begin installing the electric fuel pump on the VAZ 2106. To make work easier, it is possible to install the device in the engine compartment:
- Remove the fuel level sensor in the tank.
- Drill a hole in the sensor cover with a 7 mm drill.
- Solder a steel tube into the hole with a soldering iron. In this case, bend one end in such a way as to form a return drain as far as possible from the fuel intake. Bend the upper end of the tube parallel to the lower one.
- Install a modified fuel level sensor into the cavity of the gas tank.
- Connect the rubber tube to the return adapter from the main fuel hose.
- Place one end of a five-meter hose onto the fuel intake fitting, and the other onto the steel tube on the sensor cover.
- Install the fuel pump on the engine shield, positioning it horizontally. Fix the pump housing on a bracket using rubber gaskets to ensure a reliable connection.
- Install the fuel filter for the injector onto the rubber hose.
- Place a five-meter hose onto the second fuel supply fitting. Secure it under the hood.
- Connect the electric fuel pump to the gas tank using a 12 mm hose. Use an adapter to connect.
- Connect the power supply to the new pump through the force field to the 12 V contact.
Video: electric pump for the “classic”
2106 car owners themselves recommend installing an electric pump at the outlet of the fuel tank:
Troubles with the gasoline pump can occur to any driver, both domestic and imported cars. The best option for solving all problems is, of course, contacting a car service. But if the driver is used to servicing and repairing his “swallow” himself, then do-it-yourself repairs are quite accessible. In addition, with this approach you can save a certain amount of money.
Fuel pump repair
To replace or repair the pump, it will need to be removed from the engine. Tools you will need:
- 13 mm wrench;
- crosshead screwdriver.
Removing the fuel pump
We dismantle the unit in the following order:
- Wipe the pump with a rag.
- Disconnect both hoses (inlet and outlet) by loosening the clamps with a screwdriver.
- We pull the hoses from the fittings.
Once a situation arose on my car when engine oil was leaking from the installation site of the fuel pump (in the area of the gaskets). It was not immediately possible to identify the cause. At first I made mistakes on the gaskets between the engine block and the spacer, as well as between it and the fuel pump. I replaced them, but did not achieve a positive result. After dismantling the mechanism again, I examined all the elements more carefully and discovered that the heat-insulating spacer had a crack through which oil was leaking. I had to replace it, after which the problem disappeared. In addition to the described case, there was a similar situation when oil was leaking at the location of the fuel pump. This time the pump itself turned out to be the culprit: oil was oozing from under the axis of the manual fuel pumping lever. There were two options to get out of the situation: accept it or buy a new product. I bought and installed a new pump (DAAZ), which to this day works properly and does not leak.
Checking, repairing and replacing a mechanical fuel pump
Methods for diagnosing fuel pumps for carburetor and injection engines of Zhiguli are also different. Checking a mechanical pump consists of determining its performance, as well as assessing the condition and performance of its component elements.
How to check the performance of a mechanical fuel pump
The productivity of the DAAZ mechanical pump is 1 liter per minute. To check the amount of pumped fuel you will need:
- a piece of gas-resistant hose (50–80 cm);
- 2 clean containers with a volume of at least 2 liters (plastic bottles are acceptable);
- 1.5 liters of gasoline;
- watch with stopwatch;
- crosshead screwdriver;
- assistant.
- Using a screwdriver, unscrew the screw on the clamp of the pump outlet fitting. We remove the hose from it.
Remove the fuel hose from the outlet fitting
We estimate the amount of fuel pumped by the pump per minute
If the amount of gasoline is less than 1 liter, the fuel pump is faulty.
Assessment of the condition and performance of component parts
The following pump elements must be checked:
- intake and exhaust valves;
- mesh filter;
- diaphragms;
- pusher (rod).
Design of the DAAZ fuel pump
- crosshead screwdriver;
- slotted screwdriver;
- key to 10;
- key to 13;
- caliper or ruler.
- Loosen the screws of the clamps of the inlet and outlet fittings of the pump, remove the hoses from them. We place a finger on the outlet fitting, and with the other hand we press the manual pumping lever several times. You should feel the air escaping under pressure with your finger. Next, plug the inlet fitting with your finger and pump it up manually again. A vacuum should be felt at the pump inlet, i.e. the finger should be sucked inside the fitting. If nothing like this happens, the valves of the device are faulty and must be replaced.
Checking the valves consists of determining the air pressure at the outlet fitting and the vacuum at the intake
The mesh filter should not show signs of damage or deformation
If the pump diaphragms are damaged or deformed, they must be replaced.
Removing the pump thermal spacer
The length of the pusher should be 82.5 mm
Do-it-yourself repair of a mechanical fuel pump
It is not advisable to purchase faulty fuel pump parts separately. It is much more profitable to purchase a repair kit, which includes elements that may fail, namely:
- valves;
- set of diaphragms;
- pusher;
- thermal spacer;
- gaskets and washers.
Thermostat on a VAZ - how it works, purpose and device
Good afternoon dear friends
An important part of a car's engine cooling system is the thermostat. It is responsible for regulating the temperature of the coolant, does not allow the engine to overheat and allows it to quickly heat up in the winter.
How does he do this? – Let’s look at it in today’s article. Let's figure out how the VAZ thermostat works, its design, and talk in detail about its purpose in the system.
We will discuss how to check the VAZ 2106 thermostat without removing it, how to understand that it has not opened, and what signs can be used to determine its malfunction. Let us announce the temperature of its opening on VAZ 2101-07 cars.
Pump Troubleshooting
So, the first and also the most common sign that the fuel pump is not working well and there is a malfunction in it is an engine that constantly stalls or does not start. That is, if you insert the ignition key, turn it, and your VAZ 2106 does not start or stalls immediately, most likely the pump is clogged.
You can confirm your guess in one sure way: remove the clogged part, make sure that it is clogged and clean it. This is done extremely simply, so you don’t even have to tow your “iron horse” to the service station.
Let us briefly analyze the disassembly and cleaning process point by point:
- We disconnect the fuel hose from the discharge tube, check with the mechanical injection lever whether gasoline is supplied;
- If fuel is not supplied, disconnect the hose from the nozzle and see if suction occurs at the inlet of the nozzle. If suction does not occur, then the pump needs to be disassembled and cleaned.
Replacing the fuel pump rod
Installation location of the gasoline pump on a VAZ 2101 car
So, you need two gaskets to replace - thin and thick. To be honest, I don’t remember the exact thickness, but if you say so in a store, the seller will understand you. The fact is that there are usually no other gaskets available J. The main thing is to ensure that the new rod protrudes beyond the spacer by no more than 1.3 mm. But it is unacceptable for the protrusion of the rod to be less than 0.8 mm. Take the average value - one millimeter. This will be quite enough for the normal operation of the fuel system.
The fact is that with a larger rod overhang, the likelihood that the diaphragm in the VAZ 2101 fuel pump will break increases. Well, if the protrusion is smaller than 0.8 millimeters, then all the symptoms described above will appear
Please note that the gaskets are placed between the spacer and the engine block. There is no need to install them under the fuel pump housing
You can easily confuse them; they will easily fit there too.
That’s probably all that can be said about the VAZ 2101 fuel pump rod. All that remains is to mention a few words about increasing reliability. Before installation, heat it red-hot over a fire, this will slightly increase the strength of the metal and make it not so sensitive to the influence of the diaphragm drive lever.
The VAZ 2106 automobile fuel pump is one of the main components of the fuel supply system, which pumps fuel from the tank to the carburetor. Directly in the carburetor unit, an aerosol mixture of fuel and air is formed, which enters the power plant.
What is a fuel pump and what is it for?
So, the first thing I want to talk about is what a fuel pump is and what it is intended for. As you can already understand from the name, the gas pump comes from two words: gasoline and pump, that is, it is a pump that pumps gasoline, everything seems to be clear here, and there is nothing complicated about it. In the fuel system, the fuel pump - if compared with the human body, can be called a heart, since our heart is also a kind of pump or pump that pumps blood, providing the body with everything vital. Life is impossible without a heart (fuel pump), and this also applies to a car with a non-working gas pump. The car turns into a static pile of metal that is incapable of anything.
Fuel pump drive
The VAZ 2107 fuel pump operates from a pusher (rod) and an eccentric located on the shaft of auxiliary devices (“piglet”, intermediate shaft), which is driven by the timing mechanism through a gear. Auxiliary devices include distributor, oil and fuel pumps.
Operating principle
The drive works as follows:
- the intermediate shaft rotates via a timing chain;
- the eccentric acts on the rod and pushes it;
- the rod presses the fuel pump lever, ensuring its operation.
Rod wear
The main sign of a worn-out rod is that the car does not reach the required speed. If the car accelerates, but, having gained speed to a certain value, does not develop it anymore, the reason is precisely the wear of the rod. Recently, the pusher has been made from such low-quality metal that it leads to wear out literally after 500–1000 km. The edge of the rod on the eccentric side is simply flattened, which indicates the need to replace the part.
Design and principle of operation of a fuel pump
The basic design of the VAZ 2106 fuel pump can be seen below.
According to its principle of operation, the “six” gasoline pump is focused on creating excess pressure, which, regardless of the stage of engine operation, must constantly maintain the required level of gasoline in the float-type fuel chamber. The diaphragm is designed and developed such that fuel flow is stopped or reduced when the fuel line reaches a pressure limit.
The standard fuel pump is located on the left on a special boss of the engine block and is secured with studs through a thermal spacer and an adjusting gasket. This spacer also serves as a guide element for the VAZ 2106 fuel pump pusher, driven by an eccentric through the fuel pump drive, powered by the gas distribution mechanism in use. The length of the new fuel pump rod is 82.5 mm, the permissible value for operation is 81.8 mm; if this parameter is reduced, the product must be adjusted by selecting installation spacers or replaced with a new spare part.
For manual supply of gasoline using the pumping method, the product has a special lever, which is recommended to be used after a long period of use of the vehicle to fill the fuel line with fuel. It is capable of creating a pressure of 20-30 kPa with an injection rate of at least 60 l/h at a frequency of 2000 frictions (pumping) per minute.
Our online resource describes the design of the VAZ 2106 fuel pump under the nomenclature number 2101-1106010, produced at DAAZ in Dimitrovgrad. As an alternative, you can use a Pekar gasoline pump manufactured at the Saratov Fuel Equipment Plant. The design and development of the product was carried out by Pekar JSC from St. Petersburg.
By the way, many car enthusiasts praise the so-called. “VAZ 2106 plunger fuel pump”, which improves vehicle starting and operates with a high degree of reliability. A product of this type is nothing more than a Pekar gasoline pump, the top cover of which is made in a high style and resembles 2 cylinders connected to each other, on the end parts of which arrows in the direction of gasoline flow are stamped. The valves inside the product are very similar to plunger pairs, and with the light hand of car enthusiasts they began to be called “six” plunger fuel pumps.
Fuel pump repair
To replace or repair the pump, it will need to be removed from the engine. Tools you will need:
- 13 mm wrench;
- crosshead screwdriver.
Removing the fuel pump
We dismantle the unit in the following order:
- Wipe the pump with a rag.
- Disconnect both hoses (inlet and outlet) by loosening the clamps with a screwdriver.
- We pull the hoses from the fittings.
Once a situation arose on my car when engine oil was leaking from the installation site of the fuel pump (in the area of the gaskets). It was not immediately possible to identify the cause. At first I made mistakes on the gaskets between the engine block and the spacer, as well as between it and the fuel pump. I replaced them, but did not achieve a positive result. After dismantling the mechanism again, I examined all the elements more carefully and discovered that the heat-insulating spacer had a crack through which oil was leaking. I had to replace it, after which the problem disappeared. In addition to the described case, there was a similar situation when oil was leaking at the location of the fuel pump. This time the pump itself turned out to be the culprit: oil was oozing from under the axis of the manual fuel pumping lever. There were two options to get out of the situation: accept it or buy a new product. I bought and installed a new pump (DAAZ), which to this day works properly and does not leak.
Tips for repairing the VAZ 2107 gas tank
Even after steaming, gasoline vapors may remain in the tank, which are very explosive. Therefore, holes in the walls formed as a result of corrosion or physical damage are best repaired by soldering rather than welding. Large diameter holes can be sealed by making patches of thick copper foil.
If a hole in the gas tank occurs on the road, it can be temporarily repaired using laundry soap. It needs to be pressed into the leak and the problem will be eliminated for a time sufficient to get to the garage, drain the fuel and remove the gas tank.
Replacing the fuel pump rod
Installation location of the gasoline pump on a VAZ 2101
So, you need two gaskets to replace - thin and thick. To be honest, I don’t remember the exact thickness, but if you say so in a store, the seller will understand you. The fact is that there are usually no other gaskets available J. The main thing is to ensure that the new rod protrudes beyond the spacer by no more than 1.3 mm. But it is unacceptable for the protrusion of the rod to be less than 0.8 mm. Take the average value - one millimeter. This will be quite enough for the normal operation of the fuel system.
The fact is that with a larger rod overhang, the likelihood that the diaphragm in the VAZ 2101 fuel pump will break increases. Well, if the protrusion is smaller than 0.8 millimeters, then all the symptoms described above will appear
Please note that the gaskets are placed between the spacer and the engine block. There is no need to install them under the fuel pump housing
You can easily confuse them; they will easily fit there too.
That’s probably all that can be said about the VAZ 2101 fuel pump rod. All that remains is to mention a few words about increasing reliability. Before installation, heat it red-hot over a fire, this will slightly increase the strength of the metal and make it not so sensitive to the influence of the diaphragm drive lever.
VAZ 2106 owners know firsthand how many problems this car can cause. At the same time, a particularly large number of troubles are associated with the fuel pump: it either pumps, or does not pump, or becomes clogged with debris, or refuses to work for unknown reasons. Therefore, it is necessary to learn in advance about all the intricacies of the operation of the gasoline pump and be able to eliminate any malfunctions that may arise.
Signs of a malfunctioning gasoline pump
Interruptions in the fuel supply to the engine or engine failure to start are not always associated with malfunctions of the fuel pump itself. Of course, these signs are a clear fact that there is a failure in the fuel system, but in order to find out their cause, it is necessary to carry out diagnostics. However, according to statistics, most often problems arise precisely because of the fuel pump.
The following signs can be identified that indicate a possible pump malfunction:
- the engine does not start or does not start the first time;
- the engine “troubles” at high speeds and runs jerkily;
- humming sound when driving;
- noticeable loss of vehicle dynamics.
About other causes of engine failure: https://bumper.guru/klassicheskie-modeli-vaz/poleznoe/ne-zavoditsya-vaz-2106.html
What to do if the fuel pump does not pump
The most common sign of a pump failure is a lack of pressure in the fuel system, that is, the fuel pump simply does not pump fuel. The cause of such a breakdown may be:
- natural wear and tear of pump elements;
- cracks and ruptures in diaphragms;
- diaphragm spring extension;
- clogged valves;
- severe contamination of filter elements;
- cracks in the pipes and hoses of the fuel system.
It is quite easy to see damage to hoses during a normal visual inspection. In all other cases, you will need to remove the pump from the machine and disassemble it in order to identify the faulty element and replace it.
In many cases, it is more advisable not to repair the old fuel pump, but to replace it
The pump does not pump when hot
In some cases, the pump on a VAZ 2106 may malfunction only in specific cases - for example, it works properly when starting the engine, but stops supplying fuel when it’s hot.
This is due to the fact that the gasoline in the tank and throughout the fuel system does not have time to cool. As a rule, the problem lies not in the pump itself, but in the drain pipe or fuel receiver. It will be necessary to check these elements so that the pump can operate smoothly.
remove the gas tank, check the blue drain tube for constriction, remove the fuel receiver, and also check if it is clogged
Artificial intelligence
https://otvet.mail.ru/question/60646959
Why does the pump hum but not pump?
VAZ 2106 owners may encounter a different kind of problem: the fuel pump turns on and hums, but does not supply fuel to the engine.
The pressure in the VAZ 2106 fuel system should be equal to 3 atmospheres. You will need a pressure gauge to check this indicator. If the pressure is significantly lower, the fuel pump requires replacement.
Gasoline may not flow into the engine even if the fuel pump is working. The reason in this case lies in the lack of tension. If you do not hear a characteristic buzzing sound when you turn the key in the ignition switch, then the problem lies in the relay, wires or connectors.
A working fuel pump should create a pressure of 3 atmospheres in the fuel line.
For what reasons can the fuel pump on the “six” fail?
As practice shows, the DAAZ fuel pump is more susceptible to wear and tear, and therefore fails much faster than the Pekar brand pump. However, for both models, the following reasons are equally sources of breakdowns:
- Gasoline pump rod. During vehicle operation, the pump rod inevitably shortens (natural wear). In this regard, the device stops supplying the required amount of gasoline to the engine. Only VAZ 2106 carburetor models are equipped with rod fuel pumps.
- Valve mechanisms. The valve is one of the fastest-wearing components in a pump. In this case, most often the sealing ring on the valve fails, which leads to incorrect operation of the opening mechanism.
- Low quality fuel. Gasoline used to power the engine of questionable quality can quickly damage the electric fuel pump. Electric pumps are installed only on injection models of the VAZ 2106.
To extend the life of the pump, you must:
- refuel only at proven gas stations;
- periodically clean the gas tank from dirt and impurities;
- monitor wear of pump parts;
- listen to the operation of the pump and carefully monitor the dynamic characteristics of the machine.
VAZ car repair
- Installation of LPG equipment on a car
- Possible ignition malfunctions of VAZ cars, their causes and methods of elimination
- Removing and disassembling VAZ rear brakes
- VAZ gearbox malfunctions and ways to eliminate them.
- Removal and installation of VAZ gearbox
- Removing and installing the clutch, slave and master cylinders of the VAZ clutch drive
- Adjusting the fuel level in the float chamber of the VAZ carburetor
- VAZ carburetor jets, dimensions, ratios and maintenance
- Idle speed adjustment VAZ
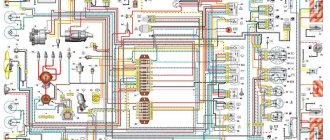
- Air and fuel supply diagram for VAZ 2101
- March 2015 (1)
- May 2014 (1)
- February 2014 (1)
- August 2013 (1)
- May 2013 (1)
- March 2013 (3)
- January 2013 (1)
- December 2012 (2)
- November 2012 (1)
- October 2012 (1)
- September 2012 (1)
- August 2012 (1)
- June 2012 (2)
- May 2012 (6)
- April 2012 (11)
- March 2012 (16)
- February 2012 (2)
Replacing the fuel pump in a VAZ 2106 car
We carry out preparatory work, concentrate in one place the necessary plumbing tools and the new product to be installed. The fuel pump is replaced in the following order:
- We loosen the fastening clamps with a figured screwdriver or wrench.
- We disconnect the ends of the fuel line from the fittings of the product and then plug them to prevent fuel leakage.
- We dismantle the fuel pump using a wrench.
- We dismantle the thermal insulation spacer and the installation gasket.
- The installation gasket should be changed, and the thermal spacer should be cleaned and placed in its original mounting location.
- If repair of the fuel pump is required, it must be disassembled and worn components replaced.
- If the product assembly needs to be replaced, then we place the gasket on the mounting studs, then install the “six” fuel pump.
The final installation of the fuel pump on the VAZ 2106 is carried out in the reverse order.
Replacing diaphragms and valves
To replace these elements, you need to perform a few simple manipulations:
- Hold the diaphragm rod by the shank.
- Unscrew the nut.
- Remove all components of the diaphragm assembly. Be sure to remember how they are located.
- Reassemble in reverse order. The holes for the bolts must match. The tongues should be directed in one direction.
- Next you will need to remove the valves from the seats. First you need to open them with a needle file.
- Be sure to cap it after installing a new valve.
If the valves are not secured, they may fall out during operation and, at best, cause a failure of the fuel supply system. During assembly, make sure that the hole in the spacer is opposite the pump lever. In this case, it will be possible to detect a leak much faster.