Many car owners, especially domestically produced vehicles and used foreign cars, try to carry out most of the repair work on their own. Very often, for one reason or another, it becomes necessary to remove the crankshaft pulley of a VAZ 2109 - an injector is installed or a carburetor is installed.
There are a lot of recommendations on the Internet, after reading which you might think that everything is very simple. But one problem arises, namely removing the bolt, which is not only difficult to get to, but sometimes simply impossible to move, let alone unscrew. It's also unclear how to secure the crankshaft to keep it in place. The crankshaft pulley on the VAZ 2109 is deliberately very tightly tightened and, unscrewing it, there is a possibility of damaging various components and systems in the power unit compartment or the paint.
The difficulty is that the bolt that secures the crankshaft pulley (or nut, depending on the modification) is tightened with decent force during assembly. This was done to prevent it from spinning up while moving, otherwise the consequences could be simply catastrophic.
Why do you need to twist the crankshaft pulley?
Removing the crankshaft pulley on a VAZ 2109 may be necessary in many cases. For example, you need to unscrew it to replace the crankshaft seals.
Gasket VAZ 2109
At a service station, a master will cope with this work within 10-15 minutes, but he will have to pay him a substantial amount. Therefore, there is a reason to learn how to do this work yourself.
Tools
To replace, we don’t need any special tools, just a standard set of wrenches and screwdrivers. You will also need a head with an extension. Liquid WD-40.
Stages of work
In order to cope with this work quickly and correctly, it is necessary to master and apply special techniques. In various engine models, a nut or bolt is used to secure the pulley.
In our case, the engine has an injector, therefore the removal procedure will differ from the removal process from a unit with a carburetor.
Since no one removes the crankshaft pulley on the VAZ 2109 injector unless necessary, we will consider this process when replacing the gasket. We will also tell you how to replace the part itself.
- Remove the timing belt.
- Using two screwdrivers we pry off the part we need.
We remove it with two screwdrivers. We remove it.
This is what the part we are removing looks like. Having pryed it up, we remove the crankshaft key. Be careful not to lose it.
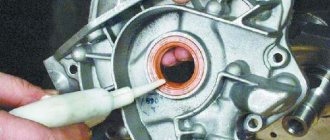
The key that is removed. Use the same screwdriver to pry up the oil seal.
Replacement process
- Let's take it out.
- Be sure to lubricate the new one with oil.
- Using the head, press the gasket into place.
- We put the key and the removed parts in their original place.
- Lastly, install the timing belt.
Press-fitting using a head
As you can see, there is nothing complicated. If you still have questions and have not yet understood how to unscrew the required part, watch the video. It describes in detail the process described in this article, and it will be useful not only for beginners, but also for experienced drivers.
Video “Replacing the oil seal”
This is a very useful video for owners of a VAZ 2109 with an engine equipped with an injector. It shows in detail how to remove the timing belt, as well as how to unscrew the crankshaft pulley to replace the gasket. Do everything as the car mechanic says, and you will be able to do everything yourself.
When carrying out repair work on the engine and engine-related parts, it is necessary to remove the pulley from the crankshaft, for example, to replace the pulley or to replace sealing seals in case of engine oil leakage. It would seem a simple task, but removing the pulley from the crankshaft poses difficulties and it is not so easy to remove it. Therefore, in this article we will look at how this can be done quickly.
Why is it difficult to remove the pulley?
No. 1. Depending on the engine design, make and model of the car, the difficulty of removing the pulley varies. Some machines have a lot of space to comfortably carry out repair work, while others have very little free space. The pulley design elements cover the pulley.
The structure of pulleys is also different, there are 2 types:
Damper pulleys have an additional outer ring with an elastic band in their design, which absorbs vibrations and micro-vibrations.
Before you start removing the pulley, you need to loosen the tension nuts and bolts, remove the generator and power steering belt.
No. 2. In the factory assembly, the pulley is seated on the engine crankshaft, pressed with a bolt or nut and tightened with high compression force. Thus, the factory assembly is very strong. Therefore, if you have never removed the pulley, it will be more difficult to dismantle it the first time.
In addition to tightening with the maximum permissible force with a special torque wrench, during operation, the engine becomes very hot, the threaded connection is tightened even more and sticks. And external factors influence the outside, due to which the threaded connection may be subject to corrosion.
Some engine models cannot be repaired; they are disposable. These are, for example: 1AZ-FSE, 3UZ-FSE. Each power unit was examined in detail.
No. 3. If you disengage the clutch, the engine crankshaft can be freely turned with a wrench. Therefore, in order to unscrew the crankshaft pulley nut, you need to stop the shaft from turning. If, when you press the clutch, the speeds do not change, then it is not working. Air may have entered the system. In this case, you need to bleed the clutch.
Why are special technological holes made in pulleys? In auto repair shops, there is a special device for fixing the shaft, which must be bolted to the pulley and the shaft locked.
If there is no special device for fixing the shaft, which is screwed to the pulley, then you need to install good anti-roll devices under the wheels of the car and put 4th gear on the gearbox.
Or, the third option is to rest a pry bar against the flywheel teeth and fix the crankshaft from turning while unscrewing the pulley nut.
Another option is to insert a pin into the pulley hole, and install a pry bar around the pin and the second stop, as in this figure.
Crankshaft gear: structure and functions
The crankshaft gear is the gear through which the engine equipment rotates. Depending on engineering solutions, it has the shape of a gear with teeth for a chain or belt.
Crankshaft gear for chainCrankshaft gear for beltTiming gear
As a rule, timing gears (lower) and oil pump drives are installed on the crankshaft. The gears are mounted with a tight fit, fixed on the keyway, and pressed with threaded fasteners.
Diagram of a crankshaft with gears
How to unscrew the crankshaft pulley
Depending on the design of the crankshaft, the pulley is attached to it either with a nut or a bolt. On rear-wheel drive vehicles, the pulley is usually secured with a nut. The engines of some rear-wheel drive cars can be started with a special crank, for which special protrusions are made for engaging the crank. This handle is also called a “crooked wrench,” and the engagement for this wrench is called a ratchet.
The pulley fastening nut is installed with a size of 36 or 38 mm on a wrench. Use a socket wrench. The key is strengthened by welding a long handle or putting on a tube to increase the “shoulder”.
How to unscrew the pulley nut:
- Place the car on a pit or overpass.
- Apply the hand parking brake.
- Turn on 4th gear at the gearbox, put chocks under the wheels.
- Do not tap too hard on the edges of the nut.
- Throw on a socket wrench, extend it with a pipe and remove the stuck nut.
Symptoms of a problem
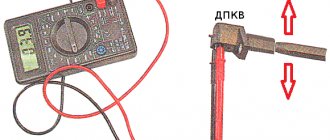
Signs of a malfunction of the DPKV can be different. Often, dirt adheres to the end of the sensor itself, which can interfere with reading. Also, symptoms of a faulty crankshaft sensor may be as follows:
In these cases, for the most part, the VAZ 2114 crankshaft position sensor is replaced.
In addition, crankshaft may well be in good working order. And on the “tidy” the DPKV error will appear (0335 or 0336). The reason for this may be a broken wire near the connector. This is easily determined visually; then it is enough to replace the connector without replacing the sensor itself.
If the owner notices signs of a malfunction of the crankshaft on his car, then this is a “signal” about the need for diagnostics.
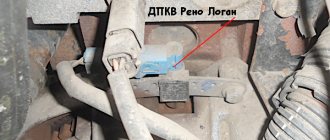
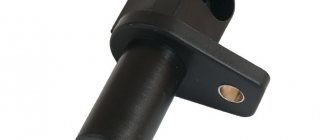
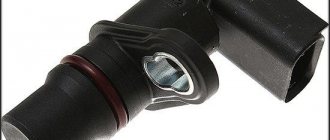
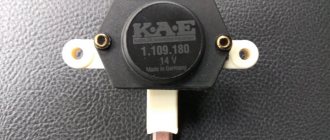
It is not difficult to guess where the crankshaft on a VAZ 2114. Like many other VAZ models, it is attached to the engine, and more specifically to the oil pump, near the generator drive pulley, on its cover. The sensor is attached with one bolt, which is typical for many models of this family.
Here is the crankshaft sensor on the VAZ 2114
How to remove the crankshaft pulley (using the example of a VAZ car)
- Physical damage to the case;
- The interturn closure of the winding turns entails a change in the generation frequency transmitted to the control unit (frequency type sensors);
- Emergency wear or loss of pulley teeth.
Tools
To replace, we don’t need any special tools, just a standard set of wrenches and screwdrivers. You will also need a head with an extension. Liquid WD-40.
How to unscrew the pulley nut:
- Place the car on a pit or overpass.
- Apply the hand parking brake.
- Turn on 4th gear at the gearbox, put chocks under the wheels.
- Do not tap too hard on the edges of the nut.
- Throw on a socket wrench, extend it with a pipe and remove the stuck nut.
Sources:
https://xn8sban6b6a.xnp1ai/rukovodstvo/ustanovka-kolenvala-vaz-2109.html
Pulley removal
Unscrewing a fastening bolt or nut is only half the battle. Next you need to pull the pulley out of the shaft. The pulley cannot be removed easily by hand unless its seat is broken. In addition, if the pulley fits tightly onto the shaft, it is also secured against turning by a key.
There are special pullers for removing the pulley from the shaft. There are mechanical and hydraulic pullers.
The design of a mechanical puller is simple. Usually it has three legs, with which you need to hook the pulley itself, and rest the central rod against the shaft. After which, you need to rotate the rod, the legs will straighten and pull the pulley towards you. There are even simpler pullers that you can make yourself. If there is no removable device for the pulley, then you can use pry bars. If one person is filming, then take turns, moving it a little on each side so that there is no distortion. If there are two, then at the same time, from different sides, the pulley is pressed out from the crankshaft with a sharp movement.
It also happens that when using a puller, the walls of the pulley grooves cannot withstand and break off. Therefore, when using pry bars, they must be engaged as close to the shaft as possible.
Replacing the timing belt VAZ 2109, 2108 with your own hands
To determine the accuracy of the belt replacement sequence, I found a pretty good description on the website https://www.vazmaster.ru/. Let's begin!
1. It is necessary to clean the engine of dust, oil, and contaminants (it is both beneficial for the engine and much more pleasant to work with).
2. Next, remove the protective cover that covers the timing belt.
Removing the timing belt protection cover
3. In any convenient way for you (by a hung wheel in 4th gear, by a camshaft gear bolt, or other methods), you need to align the marks on the camshaft gear and its housing, which will correspond to TDC in the 1st cylinder.
Combined marks on the RV pulley
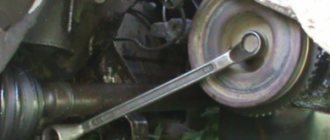
4.Next, you need to unscrew the bolt securing the crankshaft pulley; you can lock the shaft using a screwdriver. It is necessary to ensure that the shaft does not rotate and remains in the same position.
Unscrewing the crankshaft pulley
5. Remove the crankshaft pulley
Removing the crankshaft pulley VAZ 2108, 2109
6. We loosen the tension of the timing belt; this can be done by loosening the nut that secures the tension roller.
Loosening the tension roller VAZ 2108, 2109
7. Remove the belt
Removing the timing belt VAZ 2108, 2109
8. Then everything is in reverse order. It is necessary to control that the crankshaft does not move. We put the belt on the crankshaft pulley.
Replacing the timing belt VAZ 2109, 2108
9. The next step is to put it on the camshaft pulley, then on the tension roller.
We put the belt on the RV pulley
We put the belt on the tension roller
10. Don’t forget to reinstall the crankshaft pulley. The recommended tightening torque is 99-110 N*m (9.9-11.0 kgf*m).
Tighten the pulley on the crankshaft
11. All that remains is to tighten the belt, for which you need to push the roller and set the tension. It should be such that the belt rotates 90 degrees, as shown in the figure.
Tension the timing belt VAZ 2109, 2108
Checking the timing belt tension
Well, a short video:
Crankshaft gear: structure and functions
The crankshaft gear is the gear through which the engine equipment rotates. Depending on engineering solutions, it has the shape of a gear with teeth for a chain or belt.
Crankshaft gear for chainCrankshaft gear for beltTiming gear
As a rule, timing gears (lower) and oil pump drives are installed on the crankshaft. The gears are mounted with a tight fit, fixed on the keyway, and pressed with threaded fasteners.
Diagram of a crankshaft with gears