Connecting a mystery radio
Car radios of the Mystery family can be classified as fairly inexpensive musical equipment, designed for use in cars with an on-board voltage of up to 14.4V and, at the same time, having quite decent indicators for the quality of reproduced sound and reliability.
However, in order for such a multimedia system to show its best side, one should not forget that installing a mystery car radio with your own hands requires the obligatory fulfillment of certain rules. First of all, it is necessary to remember that before starting any work related to interfering with the electrical circuit of the car, you should disconnect the “negative” terminal of the battery and, thereby, eliminate as much as possible the creation of conditions for the occurrence of short circuits during the process of connecting the car radio. In addition, the connection diagram for the mystery radio presupposes the presence of a universal ISO connector on your car, and in its absence, you need to pay special attention to observing the color markings of the connecting wires (however, in order to avoid annoying surprises, it would be useful to perform at least a selective “diagnosis” of this connector). You should also ensure that the negative terminals of the sound speakers are connected correctly, avoiding connecting them directly to the car body.
It is also not recommended to power the Mystery car radio directly from the battery, that is, bypassing the ignition switch - such a “simplification” of installation will lead to accelerated battery discharge, especially during long periods of parking.
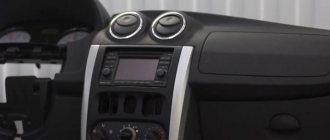
As for installing the receiver itself, as a rule, a compartment on the dashboard designed specifically for these purposes is perfect for it. However, in any case, this place must be protected from direct sunlight, vibration and excessive dust. The angle of inclination of the front panel of the receiver should not exceed 30°.
To securely secure the receiver in the installation compartment, use the special frame included with the system, which is fixed in the niche by bending special metal “tongues”. Secure the receiver unit in the frame using a metal bracket and a 5x25 mm mounting screw.
If it becomes necessary to dismantle the receiver, this procedure is performed in the reverse order by inserting special keys from the kit into the installation grooves on the side walls of the unit.
Before final fixing the receiver, including installing the external decorative panel, connect all electrical connections using the diagram below and check the multimedia system for functionality. In order to initialize the system before connecting for the first time, use a thin object (for example, the tip of a ballpoint pen) to press the RESET button located on the cassette player. A similar procedure should be carried out in other cases of complete blackout of the car, in particular when replacing the battery.
INTRODUCTIONCar security system MYSTERY MX.
INTRODUCTION
Car security system MYSTERY MX 203
developed
Tana in such a way as to reliably protect your car for many years. However, the reliability of the system largely depends on how correctly and efficiently the installation was carried out.
IMPORTANT NOTES
We strongly recommend that you always use a voltmeter
to check the electrical circuits of the car. Using the test light may damage the vehicle's on-board computer and/or cause the airbags to deploy.
Always disconnect the vehicle battery before
make electrical connections.
Before drilling holes in the instrument panel, check that
Are there any wiring harnesses or any other vehicle components in this area behind the panel that could be accidentally damaged? Use different types of wire connectors. Twisting the wires or using electrical tape to secure the connection may prevent the system from working properly.
We also recommend soldering the wire connections in the center.
pah, where the current exceeds 10A.
Please read these instructions carefully before
how to install the system. We recommend that the system be installed only by qualified specialists who have relevant experience in installing car security systems.
car security system installation guide
Peculiarities
The popularity of Mystery car radios among car enthusiasts is largely explained by the company's pricing policy. The manufacturer maintains prices at the same level regardless of exchange rates, so device prices are affordable to a wide range of buyers. The company always monitors the latest trends in the world of electronics, which is reflected in the release of new models.
Mistreri car radios are multifunctional. Despite the large number of models, the company produces high quality devices. The peculiarity of the devices is that they can be connected to standard connectors. Therefore, any car enthusiast can do the installation independently. Car radios are equipped with connectors for connecting various digital devices that can reproduce well-known formats.
The devices are equipped with built-in processors that are responsible for sound quality and frequency. With the help of equalizers, the user has the opportunity to adjust the sound according to his taste. Models are equipped with backlighting with a choice of colors. The built-in GPS navigator makes it possible to save on the purchase of navigation devices.
Review of 2 din car radios Mystery
Now let's look at the most popular models from this manufacturer with this standard size.
Mystery MDD-6280NV
Car radio 2 din mystery
Multimedia center with a standard size of 2 din. Features the following features:
- Built-in screen 6.2 inches;
- There is a USB port;
- There is a TV tuner;
- The car radio accepts SD memory cards;
- The model is equipped with multi-illumination;
- There is a CD/DVD drive that plays all modern formats and reads most media.
Other options
| Included | instructions/wires/remote control |
| Audio input | on the front panel |
| Display | touch/6.2 inches |
| GPS receiver | There is |
| TV tuner | There is |
| Radio | FM/AM |
| iPad support | There is |
Mystery MDD-6250BS
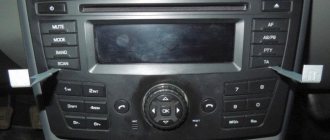
Mystery 2 din car radio and its connector
Car radio for 10 thousand rubles. Has the following capabilities:
- Built-in widescreen touchscreen monitor with a diagonal size of 6.2 inches;
- The typical size of the multimedia system is 2 din;
- There is a multi-color backlight with the ability to adjust and change;
- It is possible to combine controls with buttons on the steering wheel;
- Supports all modern formats and media;
- Built-in TV tuner that supports Pal, Secam and NTSC color standards;
- The radio tuner is capable of receiving three bands: FM/AM/VHF;
- There is Bluetooth support;
- The radio is equipped with a slot for micro SD memory cards;
- This car radio has 2 video outputs. There is a separate video input for connecting a rear view camera. In addition, there is a separate output for a subwoofer (see Installing an active subwoofer in a car on your own);
- The standard power of the car radio is 4x50 W.
MYSTERY MDD 6240S
Mystery MDD-4310S
2 din car radio
A car radio with a smaller screen. It has the following characteristics:
- The typical size of the car radio is 2 din;
- The screen diagonal size is 4.3 inches, but the song being played, folders with numbers and the current time are viewed no worse than on a larger monitor;
- There is a TV tuner. It is built-in and allows you to view video, as well as process medium and high quality signals;
- There is a radio tuner, although without RDS support;
- Separate subwoofer output and rear view camera input;
- Built-in memory. There is support for SD/MMC memory cards;
- There is USB;
- The kit includes a remote control that allows you to customize the radio to your liking, even from the back seat.
Mystery MAR-878UC
Non-standard 2 din car radio
Car radio without a built-in screen. Has the following characteristics:
- The car radio is equipped with a USB port;
- The radio tuner is very good with a memory for 30 stations in the FM/AM/VHF bands;
- There is a slot for SD/MMC memory cards;
- There is an audio input on the front panel;
- Excellent quality equalizer;
- Comes with a full-featured remote control;
- The backlight can be changed depending on your own preferences;
- There is an ISO connector.
Mystery MDD-7800BS
An entire multimedia system with a built-in screen. The following parameters and characteristics distinguish it from other models:
- Typical size 2 din;
- Electrically driven widescreen built-in monitor. 7-inch LCD display with active matrix and wide viewing angle;
- There is a USB input;
- The car radio control is completely touch-sensitive;
- There are many inputs and outputs: subwoofer/rear view camera/2 video outputs, etc.
Mystery MDD-7550BT
Car radio with a fully motorized screen position mechanism. Features the following features:
- Built-in widescreen LCD monitor 6.5 inches;
- Touch control with graphical interface;
- Supports all known formats and media;
- There is Bluetooth (see Bluetooth for car radio: do it yourself);
- Menu in Russian;
- The kit includes a fully functional remote control;
- Audio output linear 5.1;
- It is possible to move the controls to the steering wheel (to standard buttons);
- The output power of the device is high - 4x55 W.
The Mystery car radio models described above with a standard size of 2 din are quite easy to install in modern cars with your own hands. It is enough to have instructions in Russian, a detailed video overview of the process, and photo materials. The prices for the models vary and you will have to choose depending on your own budget.
Types and models
Mystery car radios are in demand in the automotive market. Some models will be discussed below.
MDD 6270NV
This model is a radio in a stylish case with a touch screen. One of the advantages is simplicity and ease of use. The kit includes a head unit, a powerful antenna, a GPS navigator, and a TV tuner. To make it more convenient for the driver to control the device, control buttons can be installed on the steering wheel.
- support for various devices, which allows you to listen to music from memory cards, play videos from CDs, etc.;
- for connecting devices, the radio is equipped with a USB port;
- An additional video input is provided, which makes it possible to connect a rearview camera;
- affordable price.
MMD 6220S
Externally, the receiver looks attractive, the size is 2 din. The screen is 6.2 inches, with switch buttons on the sides. The volume is changed using a knob, a similar switch for searching by radio frequency. There is a color backlight that can be changed. The choice of colors is quite wide. The appearance can be changed by selecting a picture of the car brand as the screen saver.
The radio is equipped with connectors for a rear view camera, a sambufer, a TV antenna, for reading SD memory cards, as well as a USB port and connector. The controls are simple. The time and date are displayed on the screen. At the bottom there is a button to switch the device to night mode. The device is equipped with an equalizer and a good radio receiver. It is possible to play CDs and DVDs.
MDD 7120S
The Mystery MDD 7120S car radio has a 7-inch diagonal LCD touch screen with high image quality. This model is a universal device capable of reading information in different formats and media (CD/DVD/MP3/USB). On the front panel there is a port for USB and SD cards (video by Serega Soviet).
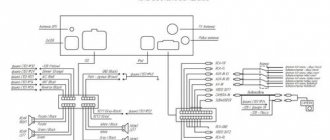
Connection diagram for car radio Mystery MMTD-9122S
- Specifications
- Functions
- Advantages and disadvantages
- Connection diagram
Mystery MMTD-9122S radio tape recorder is a modern device that has many useful functions. It is easy to use and can work efficiently for a long period.
Specifications
Mystery is a compact autoplayer that is easy to install and configure. It fits most car models.
- standard size - 1 DIN;
- supply voltage - 12 V;
- input power - 4×50 W;
- load resistance - 75 Ohm;
- screen format - 4:3, 16:9;
- display size - 7 inches;
- operating frequency - from 20 to 20000 Hz;
- dimensions (height, width, depth) - 178, 175, 50 mm.
Functions
The main feature of the player is its versatility, thanks to which the car owner has the opportunity not only to listen to music, but also to watch videos or photos. You can control the device using the included infrared remote control.
- FM/AM/VHF radio receiver with the ability to save selected frequencies;
- built-in TV tuner for viewing received TV programs;
- displaying information on an LCD or touch screen;
- compatible with control buttons located on the steering wheel;
- reading MP3, MPEG4, JPEG formats;
- ability to play CD and DVD discs;
- the ability to connect additional equipment (for example, a subwoofer) via a USB connector;
- Rear view camera support.
Advantages and disadvantages
Before purchasing, you need to study the positive and negative aspects of the Mystery MMTD-9122S, reviews from device owners, as well as the opinions of sellers of such equipment. Thanks to this, you can obtain information that is not in the operating instructions.
Among the advantages of the device are the following:
- stylish design;
- multifunctionality;
- good build quality;
- low cost;
- presence of a TV tuner;
- ability to customize the backlight of the screen and buttons.
The Mystery radio has a minimal number of shortcomings. However, they should be taken into account to avoid unwanted situations.
The disadvantages include:
- problems with finding a radio signal in places remote from the city;
- a rather complex sound tuning system;
- delays when playing music from a flash drive;
- no GPS.
Connection diagram
In order for the radio to work well and rarely break down, it must be connected correctly. To perform this work, you need to carefully study the installation diagram and take into account all the features.
Correct sequence of actions:
- Carefully remove the decorative panel. The easiest way to perform this operation is with a screwdriver.
- The plugs are removed from all cables.
- The wires are connected according to the attached diagram.
- Make connections to the positive and negative terminals on the battery. The wiring to the battery must be secured through a fuse.
- Insert the wires coming from the antenna into the corresponding connector.
- Connect front and rear speakers.
- Lay the wiring to the subwoofer (if it is installed in the cabin).
- The fastening points are carefully isolated to prevent their contact.
- To reduce the likelihood of a short circuit, the wires are connected with clamps.
- Insert the device into the mounting socket on the instrument panel.
- Return the decorative panel to its place.
After this, the correct installation is checked and the equipment is tested. If everything works, then proceed to setting up the device.
The Mystery car radio combines several useful devices. Due to its versatility and relatively low price, it is popular among vehicle owners.
Manual
Before installing the radio in the car, you should carefully study the proposed operating manual and adhere to the recommendations specified in it. Connect according to the diagram.
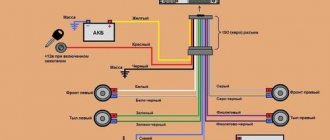
Mystery radio connection diagram
Basic Connection Considerations
Before connecting, you need to disconnect the negative terminal of the battery.
The receiver should be installed away from heat sources, in a place where there is no direct sunlight, dust, dirt and large vibrations.
For connection, you should use special automotive cables and wires with the appropriate cross-section to avoid voltage drop.
The installation process involves the following steps:
- Using special keys, you need to remove the radio from the installation frame.
- Then the frame in which the device will be installed must be inserted into its regular place on the dashboard. The frame should be installed without any force to avoid damaging it. After installation, the frame must be secured.
- At the next stage, you need to connect the antenna and connect all the wires and cables to the connectors according to the connection diagram, which is in the instructions for the Mystery radio.
- Next, the device is inserted into the frame until it stops until the springs fit into the corresponding grooves.
To increase noise immunity, the car radio housing must be connected to a metal part of the body.
After installing the radio, the battery is connected. For some models, power from the cigarette lighter is sufficient, so they can be connected to it.
Setup Basics
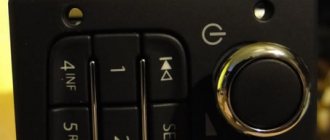
The device is controlled and configured using buttons located on the front panel.
They have the following purpose:
- button for removing the muzzle (front panel);
- on/off;
- volume control;
- selection of operating mode;
- move to next track;
- removing the disc;
- selecting a radio station;
- buttons for turning on various playback modes;
- go to the previous track;
- selection of frequency range;
- instant sound on/off;
- system initialization (data reset).
The front panel has connectors for connecting external devices, SD memory cards, and USB.
Similar control buttons are located on the remote control that comes with the device. The purpose of the control buttons is described in detail in the car radio manual. It also describes how to correctly perform general settings, as well as set up the radio, sound, time and date, image, steering, etc.
Post navigation
Connecting speakers This procedure is carried out carefully and carefully, since not only the purity of the sound depends on this, but also the operation and durability of the radio and speakers. MUTE Responsible for muting the sound when the button is pressed.
Sometimes there are two of them, and they control the operation of devices that operate only when the system is turned on. To ensure safety, disconnect the battery.
If the connector in the purchased radio does not match the car connector, then that’s okay too.
It will be better to use shrink sleeves and other precautions. Double-din radios are twice as large as single-din radios, which allows manufacturers to make models with a larger touch screen, as well as introduce more multimedia functions
Of course, the downside in this case is that the radio is in standby mode all the time. If the car does not have standard wiring from the battery, you will need a copper stranded wire with a cross-section of approximately 4.2 mm2.
Connections and installation of car radio
It is not recommended to connect the device to the cigarette lighter or ignition switch. Look in stores for an adapter for a multifunction steering wheel.
White ANT wire The wire with this marking is responsible for controlling the car radio's antenna. How to connect a car radio without getting tangled in the wires? Japanese, Korean and American usually work with 2 din - such models have 2 times the height, so the car must have a niche of the appropriate size. Connection method using an alarm Often the driver thinks whether I turned off the music in the car or not while parked. Thus, there are three main options for the procedure for connecting the radio yourself.
Connections and installation of car radio
Minimum wire length reduces resistance that distorts sound. Sometimes, if the phasing is not observed, some problems arise, namely, distorted transmission of low frequencies and bass. If your speakers are equipped with these types of connectors, you can use them to connect
It will be better to use shrink sleeves and other precautions. That's it
Working with 2 din car radios The process is similar, but there are several nuances. It is best when they are as short as possible and do not have additional twists. ISO connector pinout for connecting a radio
https://youtube.com/watch?v=KlTDn13M-Jc
Mystery MCD
For the best performance of the multimedia system, you need to follow some rules. Most Mystery radios have almost the same connection principle. However, in some situations they may differ between different models.
When purchasing from a dealer, you need to purchase a special adapter. It will simplify the installation of the car radio. You can cope with the task without an adapter. Additionally, you should take a multimeter or voltmeter. They will help determine the functions of the wires. You can connect the cable to the connectors based on the colors. The latter may sometimes not coincide.
- Before starting installation, you must disconnect the negative terminal of the battery. This precaution is necessary to prevent short circuits during connection.
- After reading the manual, you can proceed directly to installation. You must strictly adhere to the proposed scheme. If the wire is incorrectly connected, the device will work poorly or not function at all.
- Connect the yellow or green wire to the positive terminal of the battery. The black wire is used for grounding. Bring it to mass. To power the red wire, it must be connected to the ignition switch.
- Pinouts should be carried out taking into account the information provided. Similar shades of veins are often used.
- Connect the blue wire to automatically activate the audio amplifier of the radio and antenna. The vein may have a white stripe.
- The orange connector is used to connect to the terminal that controls lighting switching. Black and yellow is for remote volume control.
After aligning the inputs, connect the outputs. Connect such conductors to the speakers. Attach wires of identical colors to one column. Finally, check that the device is working properly.
Mystery TV remote control
The Mystery TV remote control contains the following infrared remote control buttons:
On our website you can download the TV remote control, location and designation of remote control buttons, as well as instructions and User Guide
Setting up Mystery TV
TV menus
Initial setup of Mystery TV
Initially, you need to select the menu language and country of residence using the remote control for the Mystery TV. Next, you will be asked to automatically search for channels. To start it, you need to press OK on the remote control. In the on-screen menu that appears, the search and recording of television programs will begin in the modes of analogue broadcasting ATV, digital broadcasting DTV, searching for RADIO radio channels, or recording data if they are transmitted in the received signal. The table indicates the number of programs found. The Mystery TV stores 100 television programs in analogue mode and 400 programs in digital television mode.
Setting up the Mystery TV HD media player
Mystery MMD
Some MMD versions may not have the black/yellow wire. There is simply no similar connector. The remote volume control function is not available in all cars. Its absence does not affect the quality of the device.
The conductors connected to the speakers deserve special attention. There is a thin black line in any pair of wires. It is used to designate the negative conductor. If you make a mistake and confuse it with a plus, low frequencies will not be heard. When playing back recordings, the bass will simply disappear. The speakers will start working out of phase. An error in the colors will cause an error in the balance adjustment.
The left front is connected with white wires. Gray ones are connected to the right front. The back left one is activated by green veins. Lilac is for the right.
Useful tips
It is highly advisable to buy a licensed device. Then the kit will contain the necessary connectors with a cable to activate various options. These include power supply, acoustics, etc. When purchasing, you will need to take additional metal skids. They are necessary to connect the radio to the car panel.
Before installing the Mystery radio, it is recommended that you carefully read the attached manual and connection diagram. If you have doubts about your own abilities, it is better to seek help from a specialist. As an alternative, you can search the Internet and watch a video called “Connecting the Mystery Stereo System.”
How to connect a Mystery active subwoofer on your own
Active subwoofer Mystery
This article can tell you how to connect a Mystery active subwoofer. The main advantage of this technology is its price. In addition, this sub can be easily connected to the radio, after which it can be placed in the car interior. By the way, such a speaker is usually placed directly under the car seat. The connection diagram for the Mystery active subwoofer implies reproduction of frequencies in the range of 30-200 Hz.
What you will need
When purchasing licensed equipment, the kit comes with special connectors with wires designed to connect various functions: acoustics, power, and others. In addition, when purchasing along with the device, a person purchases metal slides, which are necessary for the car radio to be connected to the vehicle panel.
When purchasing from an authorized dealer, it is recommended to purchase a special adapter. It will make installation of the device easier.
However, it is possible to cope without having this device, although the work will become more complicated.
A voltmeter or multimeter may be required. Such devices will help determine the purpose of the wires. You can connect the wires to the connectors intended for them in the car by color, if they differ.
Pros and cons of devices
The main advantages of Mystery car radios:
- convenience and ease of connection;
- connector for connecting a rear view camera;
- GPS navigator;
- powerful antenna;
- wide frequency range;
- presence of an equalizer;
- high-quality sound;
- backlight
Disadvantages apply to specific models.
You can name some of them:
- not all buttons are activated;
- limited equalizer capabilities;
- inconvenient player interface;
- poor sound quality;
- few settings.
Each model has its own advantages and disadvantages.
Connection instructions
To connect the Mystery radio, you should first read the instructions. This will help avoid mistakes. It is important to adhere to the connection diagram; If this is not done, the device may function worse or not work at all.
Green (yellow) connects to the “+” sign of the battery. Black is intended for grounding; it should be brought to mass. To power the red one, it is important to connect it to the ignition switch.
The manual should provide a pinout. You need to connect the radio, taking into account the information provided. Differences in colors are possible for different models and brands. Most often, however, similar colors are used. You should not decide where to connect the cords yourself, as this may spoil the good sound quality.
Blue (possibly with a white stripe) is intended for automatic connection of a sound amplifying device and antenna.
The orange connector is required to connect to the lighting switch terminal.
Another connector of the Mystery radio is black and yellow: it is needed to remotely lower or turn off the volume.
This option is not available on all machines; sometimes there is nowhere to connect it.
In such a situation, the connector remains unclaimed; There is no need to connect it anywhere other than a special wire. This function does not affect the quality of the car radio.
When the inputs are combined, you need to connect the outputs. These are the wires that connect to the speakers. Cords of the same color should be attached to the same column.
In each pair, on one of the wires there is a thin black line, which indicates the negative cord.
If you confuse the plus and minus, or connect them incorrectly, the bass will not be heard when playing recordings, since the speakers will begin to play in antiphase. An error in color will lead to errors in balance adjustment.
White ones are intended for the left front. Those with a gray tint are connected to the right one located in front. For the rear left, green ones are used; for the right - lilac.
Instructions and setup
Overview of basic operations when using the audio headunit:
Features of working with the radio station receiving unit:
When you turn on your MP3 player, you have the following options:
Under the control panel there is a hidden reset button that allows you to return the settings to factory settings. It is recommended to use a ballpoint pen or toothpick to press the button. Metal objects, according to user reviews, destroy the rubber surface of the key. When the text message Error appears on the segment display, you must force a reboot of the device. A similar operation is performed if the control buttons on the front panel partially fail.
When looking for a budget player for your car, you should pay attention to the convenient model Mystery MAR-828U?. The new device is not only equipped with several connectors for connection, but is also equipped with a sound amplifier to increase the volume. This car radio features simple settings and practical functions that any driver will appreciate.
The easiest way to connect
Subwoofer in the car
In this case, we mean the use of an active subwoofer, which does not require an additional amplifier. Started:
- We select a position for the subwoofer and supply power to this location. It is best done directly from the battery. If this is not possible, then as a last resort you can connect it through the cigarette lighter.
Note. It is very important to check everything correctly and maintain polarity. It is also important to additionally install a capacitor to power the subwoofer, so that when peak loads arise when playing low frequencies, problems do not arise.
- The subwoofer is connected to the car radio using a “tulip” wire or screw power contacts;
- After the connection is made, the setup will be reduced to limiting the upper limit of the speaker's low frequencies and selecting the speaker's oscillation phase.
How to connect a subwoofer
Note. Typically, many subwoofers have this feature.
A problem when connecting a subwoofer can be poor matching of amplitude-frequency characteristics. If you choose a subwoofer that has a special function that makes it possible to adjust the upper limit frequency using adjustment, then this would be considered as an advantage.
Advantages and disadvantages
How to connect an active Mystery subwoofer
The most important advantages of this active subwoofer are the following functions:
- It is equipped with a built-in amplifier, due to which an even higher sound level is achieved.
- This device is very compact in size.
Note. Due to this, it can be easily placed, as mentioned above, directly under the car seat.
- Thanks to the quality characteristics of this speaker, it is possible to reproduce sound with clear low frequencies. At the same time, due to this, the frequency of the sound will be slightly increased, which is why it will be clearer.
- The speaker costs very little - only 2500 rubles. But despite the price, it is very reliable.
- Its sale began in the Russian Federation in 2012. That is why purchasing such a device will not be difficult, since it is now quite common.
- And although the device has a very compact size, the sound quality can be called very good. That is, the subwoofer (see How to make a subwoofer: practical tips) has excellent sound output.
How to connect an active subwoofer Mystery
It has a stylish design (although this is not so important, because it will still have to be “hidden” under the seat). However, due to this, it can be placed near the rear window without any problems
But in no case will it affect the overall style of the car. The body is aluminum and very durable. As a matter of fact, you can be convinced of this only once you see this speaker.
Note. The speaker can easily withstand even the strongest mechanical shocks. And this is a fairly common occurrence, since the device is located directly under the car seat.
The remote control of any system perfectly controls the volume of the subwoofer. Also on its body there are several additional adjustments that facilitate the operation of the subwoofer itself.
Remote control that fits directly on the steering wheel
- The sub has an overload and power-on indicator, thanks to which the user can always understand whether the device has already booted up or whether it needs to wait a little longer.
- Suitable for any car as the speaker is universal.
- It is easy to connect, but this requires special knowledge.
Note. You can get them after reading our instructions.
This device has few disadvantages. But still they exist:
Connecting a subwoofer is specific, so you will have to tinker with it a lot.
Note. You should not purchase this subwoofer based solely on its price. This technique is perfect for those who are installing a subwoofer themselves for the first time. It will fit into a car that requires not too high acoustic parameters.
Connection via amplifier
This assumes connecting a passive subwoofer. So, let's begin:
- The first thing you need to do is connect the power. First, we connect the negative wire to the amplifier to the GND terminal. Don't forget to connect the other end of the wire to the car body.
Note. If you do not use a set of wires, but only pieces, then remember the following rule: the negative wire should always be thicker than the positive one!
- It is recommended to pay special attention to the cable cross-section. There is no need to skimp on good nutrition;
- We further connect the positive wire to the amplifier at terminal +12. Be sure to install a fuse, preferably as close to the battery as possible. It will protect against short circuit or sudden fire;
- In those places where the wire comes into direct contact with the metal of the body, it must be protected without fail. So, corrugations and bushings, as well as electrical tape, will cope with this task perfectly.
Note. We remember that connecting to the battery occurs at the very last moment.
- We connect with the REMOTE terminal. On all modern cars, or rather, in its head unit system, there is a blue wire with a white stripe applied to it. When the head unit is turned on, 12 volts are supplied to the wire and the amplifier turns on. Accordingly, if you turn off the car radio, the amplifier will also turn off. Convenient and safe.
Note. If for some reason there is no such wire, then the REM terminal is already connected to the ACC circuit. This goal implies such a position of the key in the ignition switch when only the radio works (typical for foreign cars).
- We carry out RCA cables. They connect the sound of the car radio with the amplifier (see How to connect an amplifier and subwoofer to a car radio: you are your own master). We try to lay these wires as far as possible from other cables and other sources of interference.
Note. If there is excess cable left, then it does not need to be twisted into a ring, but it is recommended to lay it in a snake.
If the Mystery car radio has one pair of line outputs, and the connection is to a 4-channel amplifier, it is recommended to use the Y-connector. Although with this connection the fader is lost. If the amplifier has an INPUT-SELECTOR, then this is the same Y-connector. We connect the subwoofer and this operation can be considered complete.
Installation
In order for the Mystery 2 din car radio to show all its advantages and show its best side, you should not forget that it must be installed correctly. If the installation is carried out with your own hands, then even more so, the operation will require the mandatory implementation of certain rules.
Mystery car radio connection diagram
Important points
Here's what to remember:
- Before starting any work that involves interfering with the electrical circuit of the car, the minus battery must be removed, completely eliminating the chance of a short circuit;
- When carrying out installation, you need to make sure that you have a universal ISO connector, which will allow you to connect easily and simply;
- If there is no ISO connector, then special attention must be paid to observing the color markings of the connecting cables.
Note. To avoid problems, it would be a good idea to carry out a selective “diagnosis” of a specific connector.
- Particular attention should be paid to the correct connection of the negative terminals of the speakers to prevent them from contacting the car body;
- You must be very careful during the installation process and act strictly according to the instructions. Thus, feeding the Mystery car radio directly from the battery is highly not recommended. This will lead to accelerated battery discharge, especially in cases where the car has been standing for a long time. It would be more correct to make the connection through the ignition switch;
- It is best to install the radio itself on the front panel compartment (see Homemade panel for a car radio on your own), which is intended specifically for these purposes. However, you need to ensure that the car radio is protected from direct sunlight, excessive dust, vibrations, and so on.
Note. It is recommended to leave the angle of the front panel of the receiver within 30 degrees.
- To securely fix the car radio in the compartment, you must use a special mounting frame that comes with the device. Fastening is carried out by bending special metal “tongues”;
- The car radio unit is fixed in a frame using a metal bracket and a special 5x25 mm mounting screw;
- If it becomes necessary to dismantle the receiver, then the procedure is carried out strictly in the reverse order. Special pins are inserted into the installation grooves, which are located on the side walls of the block. They also come complete with GU;
- Before finally fixing the receiver, it is recommended to check how everything works. It is necessary to connect all electrical connections according to the diagram, checking the system for operability;
- Before connecting the Mystery car radio for the first time, you need to initialize the system. To do this, press the Reset button located on the receiver body using a thin object, for example, the tip of a ballpoint pen.
Advice. This procedure is also recommended to be carried out in cases where the battery is replaced and the car is de-energized.
Mystery car radio connector pinout
With your own hands
Now let's find out how to install it directly with your own hands, without the help of specialists:
- Having certain skills and basic knowledge in the field of electrical engineering is a prerequisite. Otherwise, you won’t be able to do anything on your own and this can lead to significant problems. For this reason, it is advisable not to touch anything if in doubt;
- In our case, the installation of the radio will be carried out using a non-standard 2 din connector. This size is becoming more and more popular and most new products are released with it.
- You should also pay attention to the way the car radio is installed. As you know, there is the possibility of front mounting using a frame and a method of side mounting. Any set of 2 din Mystery car radio models comes with instructions, which can be used to determine the appropriate method.
- There is no particular difference between connecting a 2-din car radio and receivers with 1-din sizes. As a rule, a permanent connection is made using various speaker wires. Connection using a universal connector is no less popular
Note. The latter method is most suitable for self-installation, because the connection process will only take a few minutes.
- Equally important is the presence of special adapters, which are purchased separately in the store (they are often supplied in the kit).
Connecting the Mystery subwoofer
Connect the mystery subwoofer to the radio
If you have a Mystery radio in your car, then there is a reason to connect a Mystery MBV-251A subwoofer to it. It is active and everything necessary for connection is included in its kit. Started:
- To begin with, it is better to check its operation at home. If the sound power is satisfactory, then everything is fine.
Note. It will also be useful to measure with a tester how much electricity this subwoofer consumes. As it turns out, when completely turned off, this subwoofer does not consume anything. When enabled, even if you turn off the bass, the speaker will consume power. Thus, it would be more appropriate to place the button on the control wire rather than on the thick positive wire.
- It's time to lay the wires. It is advisable to take the minus from the bolt securing the rear seat of the car and tighten it with a nut to ensure good contact.
Note. Laying a thick positive cable into the interior can be difficult. If you don’t want to drill the body, you can push it into the wiring harness going into the interior. In a word, decide for yourself - the easiest way is to make a hole with a drill and insert the wire.
- After the positive wire is inserted, you will need to connect it to the battery terminal (you can use a 10mm bolt);
- The remote bass control can be mounted directly above the fuse box. Here the regulator will not be conspicuous and the place is convenient, always at hand.
The installation should be carried out so that after turning on the head unit, use the button to turn on or off the subwoofer if it is not needed. Very comfortably.
Possible malfunctions and ways to eliminate them
Like any device, the radio may have malfunctions.
| Malfunction | Cause | Remedy |
| The device does not turn on | Incorrect connection, fuse has blown. | Check that the connection is correct and replace the fuse. |
| No sound even though the device is turned on | The speakers are not connected correctly, the connecting wires are damaged, or exposed wires are touching the chassis or other wires. | Check whether the speakers are connected correctly, check the integrity of the wiring, replace damaged areas. |
| There is sound, but no picture | The parking brake wire is not connected or the parking brake is not activated. | Apply the parking brake. |
| The fuse blows | The wires are touching the frame and the fuse is installed with the wrong rating. | Check the wires, install a fuse with the required rating. |