HPF / LPF (HPF / LPF)
Hight pass filter (HPF), also known as a high-pass filter (HPF), filters out (cuts off) low frequencies, leaving high ones.
When setting up a subwoofer amplifier, set the control to about 20 Hz to cut out infrasound and not waste energy, since you won't hear it anyway. For mid-range speakers, the HPF is set around 80 Hz to remove the low frequency range for which the speaker is not designed and will not be able to play it. If you have separate channels or even a separate amplifier for tweeters (tweeters), the HPF is set in the region of 3000 - 5000 Hz, depending on the model, so as not to burn them.
All figures given are approximate, to obtain more accurate and safe values, study the characteristics of your speakers!
Low pass filter (LPF), also known as a low pass filter (LPF), is the opposite of HPF and cuts off the upper frequencies, leaving the lower ones.
For subwoofers, it is set in the region of 50-80 Hz, depending on the type of design (ZYA, FI, etc.) in order to cut off frequencies for which the subwoofer is not intended. The same goes for midrange drivers, cut them around 1400-1600 Hz.
If possible, you can limit tweeters to 20,000 Hz, but this is not necessary.
Setting up an amplifier for a subwoofer
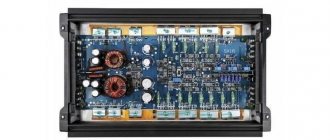
In order to get good and powerful bass sound, owners of passive subwoofers purchase a separate low-frequency amplifier. Some models are designed only to work with the low-frequency path, but many install a multi-channel unit that allows you to change for the better the sound of all speaker systems in the car.
ULFs designed to work with subwoofers have a number of adjustments that can be changed, adjusting the amplifier to a specific type of speaker and the configuration of the car interior. Factory settings are usually in the middle position, which is not always correct for reproducing low frequencies with a specific loudspeaker.
Gain\Level
Gain (sensitivity) is often confused with volume, but this is not entirely correct.
Gain is an adjustment of the amplifier's input sensitivity to match the radio. But let’s not get into the weeds and consider this setting from the point of view of what is useful for the user.
Sometimes the Volts (V) value indicated on the regulator can be misleading. The fact is that sensitivity is measured in Volts. The smaller V, the higher the sensitivity, the louder the speaker will play and vice versa.
To begin with, it will be useful to watch a clear video about how gain works on an amplifier:
Adjusting gain by ear (method 1)
Having a good sub link, do not use an equalizer and various bass enhancers, forget about bassboost on the amplifier - so before adjusting the gain, make sure that all this is turned off!
Set the control to minimum and play music that you usually listen to. Turn up the volume of the radio by 3/4 of the maximum; if you hear distortions in the sound of the subwoofer earlier, stop and turn down the volume a couple of notches. Go to the amplifier. Have an assistant slowly turn up the gain control until new distortion appears, and when you hear it, stop the rotation and turn it down by 10%.
Adjusting gain by ear (method 2)
If you don’t trust your hearing and are afraid not to hear changes during time, then use a more accurate method - using sinuses.
If you are tuning a subwoofer, then use 40 Hz, if your case is tuned above 40 Hz or you have a closed box, then take 50 Hz (download sines in the Downloads section). To set the gain for the midbass amp, use 315 Hz.
Sine or tone (in our case) is a tone signal of a certain frequency, changes in the sound of which you can easily hear
Set the gain to minimum, turn on your sine and turn up the volume of the radio. When changing the sound of the tone signal, stop and turn it down a couple of notches (set the maximum volume limit to this value if your radio has such a function). Go to the amplifier. Similarly to the first method, add gain. When the sound changes, stop and turn it down 10%.
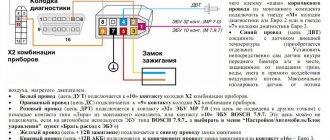
Connecting interconnect wires and control (REM)
To lay the cable, you need to find the linear output on the radio. The linear output can be recognized by the characteristic “bells” that are located on the rear panel of the radio. The number of linear outputs differs in different radio models. Usually there are from one to three pairs. Basically they are distributed as follows: 1 pair - you can connect a subwoofer or 2 speakers (labeled as SWF) If there are 2 pairs of them, you can connect 4 speakers or a subwoofer and 2 speakers (outputs are labeled F and SW), and when there are 3 pairs of linear wires on the radio, you can connect 4 speakers and a subwoofer (F, R, SW) F This is Front i.e. front speakers, R Read rear speakers, and SW Sabwoorer I think it’s clear to everyone what that is.
The connection will require an interconnect wire, which should never be skimped on. It is prohibited to lay the interconnect cable near the power wires, as various types of noise will be heard when the engine is running. You can run the wires both under the floor mats and under the ceiling. The latter option is especially relevant for modern cars, in the interior of which there are electronic accessories that create interference.
You also need to connect the control wire (REM). As a rule, it comes with interblock wires, but it happens that it is not there, purchase it separately; it does not need to be of a large cross-section - 1 mm2 is quite enough. This wire serves as a control for turning on the amplifier, i.e. when you turn off the radio, it automatically turns on your amplifier or subwoofer. As a rule, this wire on the radio is blue with a white stripe; if it is not there, use a blue wire. It is connected to the amplifier to a terminal called REM.
Bassboost
Bassboost - increases the volume at a certain frequency, usually 40-45 Hz. When using a bass boost, the chance of burning the subwoofer increases sharply, since clipping occurs much earlier. In most cases, bassboost is not needed and if you are a beginner, then just accept the rule “Don’t touch bassboost!”
Experienced people can use it to increase the frequency response shelf in order to draw out dips in certain frequencies, but these are already deep settings and the effect does not always justify the risk.
Lada Kalina hatchback 103 kW / MT › Logbook › Three-lane front, configuration.
Since installing the three-strip, I've been driving around for a certain amount of time and listening to what and how to set it up, and finally set it up.
Not without difficulties, of course, one of the first problems was the erroneous switching of the horn and midrange to one channel. The connection was parallel, that is, everything played at two ohms. With this decision, it was obvious that the horn was outplaying the midrange.
I tried to throw the horn from the standard head, but the horn was completely lost. I didn’t see any point in buying an additional amplifier for the tweeter, but there was a way out.
The thing is that when I soldered the MMC, I did not change the factory amplifier, but only did everything necessary for the linear outputs. By replacing the factory 4*40 amplifier with a TDA7560 (4*50) and generously coating it with thermal paste, I got the desired effect.
The horns began to play an order of magnitude louder and cleaner or something.
In total, the horns are connected from the head, 2 RCA pairs go to the focal amplifier, and the focal amplifier has its own RCA outputs for an additional amplifier, and the sub is powered from this output. (This saved me from having to buy a Y cable.)
Now for the basic rough tuning of the amplifier.
Firstly: the maximum volume of my radio is 100 units, but experimentally it was discovered that it begins to distort the signal at 70, so in fact 70 out of 100 is the maximum.
We match the midrange with the horn and make a cut on the amplifier.
The matching process is simple
, we turn up the
GAIN
until the midrange volume matches the tweeter volume, at volume 69.
Next, we make a cut, the cut was made using Bluetooth and cut using the generating frequency program. And I turn the HPF
until 300 Hz becomes quieter, then I slightly turn the
HPF
(this is necessary in order to level out the frequency cut because the amplifier cuts 12 dB per octave.)
Now I’m doing the coordination process with MIDBAS.
HPF
filter from 60Hz, but matching the midbass was not easy, the sensitivity of the speaker is lower than that of mm60, so I had to
the GAIN
almost to the maximum, but I would like to note that for this speaker my amplifier was in the butt, I threw in another amplifier from 100 watts on the channel, panchali dynamics are normal, right now a little bit worse than 4*100.
Then we coordinate the subwoofer.
GAIN
volume to the agreed front,
LPF
from 70 and below,
SUBSONIC
is the same
HPF
only for the sub, I cut the subsonic from 18 Hz, so the sub plays from 19 to 70 Hz.
BASS BOOST
a little .
Next came the adjustment on the head itself, initially the equalizer in the player was completely turned off, turned on several melodic songs and began to play sound presets in the head.
I set it to my ears, to my liking and turned on LOUD
(amplification of frequencies at low volume), until I was satisfied with everything.
Then I go into the equalizer of the mms itself.
I do the preset BASS because when I remove the terminal or something else, for some reason this preset is turned on in the player by default.
Then I tuned it by ear, it turned out like this:
By the way, as for pickup, here is my test, the squeak is heard more from the fuel pump itself and the throttle, well, actually, we can say there is no pickup.
He plays like this, at first he used fashionable compositions and walked as far from the car as possible, but YouTube blocked the songs, here is the third attempt to record a demonstration (I took an old song from the 90s, quite melodic), I think it was successful, although I didn’t go far, not from the phone if You can listen to it and give quality to the sound.
Just listen to the end.
Special thanks to Denis Koklyaev from check sound (for help in setting up and advice, and to the check sound store itself)
Best Specifications and Features
Output power per channel (4 ohms)
- PRIDE Quattro plus: 100 W
- Best value: 3470 W
Signal to noise ratio
- PRIDE Quattro plus: 100 dB
- Best value: 120 dB
Output power per channel (2 ohms)
- PRIDE Quattro plus: 140 W
- Best value: 7600 W
Damping coefficient
- PRIDE Quattro plus: 200
- Best score: 950
Number of channels
- PRIDE Quattro plus: 4
- Best score: 8
Grounding
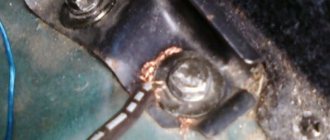
This point is of great importance for the reliable operation of an amplifier connected in bridge mode. The ground connection can be made directly at the installation site of the device. To do this, take a short piece of thick insulated wire. A common bare braided cable will do.
One end of the wire is connected to the negative terminal of the car amplifier, and the other is inserted between the bracket or bar securing the device and the floor of the body.
To avoid interference in the speakers, the body of the device should not be allowed to come into contact with the body of the car. Otherwise, ground loops will form, which will lead to unpleasant interference. To isolate the housing from the car body, you can place a strip of rubber under the mounting bracket.
Briefly about the product
- Output power per channel (4 ohms): 100 W
- Signal-to-noise ratio: 100 dB
- Output power per channel (2 ohms): 140 W
- Damping factor: 200
- Number of channels: 4
- Bridge mode: Yes
- Overload protection: Yes
- Bass Boost Mode: No
- Short circuit protection: Yes
- Low pass filter: No
Comparative table of PRIDE Quattro plus characteristics among the entire selection of products
| Characteristic | Product value | Average | The best | Worse | Points |
| Output power per channel (4 ohms) | 100 W | 253.6 W | 3470 W | 25 W | 0.4 |
| Signal to noise ratio | 100 dB | 92.6 dB | 120 dB | 57 dB | 11.7 |
| Output power per channel (2 ohms) | 140 W | 461.8 W | 7600 W | 45 W | 0.3 |
| Damping coefficient | 200 | 166.6 | 950 | 45 | 2.1 |
| Number of channels | 4 | 2.7 | 8 | 1 | 5 |
| Bridge mode | Eat | — | — | — | — |
| Overload protection | Eat | — | — | — | — |
| Bass Boost Mode | No | — | — | — | — |
| Short circuit protection | Eat | — | — | — | — |
| Low pass filter | No | — | — | — | — |
Connecting the front through an amplifier — Alfa Romeo 156, 2.5 l., 1997 on DRIVE2
Now it's time to put the finishing touches on the acoustics. It's already freezing outside, so we heat the potbelly stove and drive the Alpha into the garage.
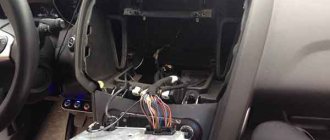
Let's start with an operation that I have already done more than once - withdrawing a card. There’s nothing complicated here, first let’s unscrew the power window control unit with a hexagon.
Then, using a 10mm head, unscrew the trim itself from the door, take out the crossover and disconnect the wires.
Then, in order, the trim for the handle, the speakers, and finally, unscrew the two screws behind the speakers.
Now the card is held in place only by clips, so we snap it off and smoothly remove the casing. I’ll start with the most difficult thing, which is pulling the acoustic wires through the socket into the door. We disconnect the chips and pull off the corrugation. Now the fun begins, through the technological hole we pull the wire to the corrugation. Attempts to pull out the wires with tweezers ended in failure. We try it with our fingers and achieve the desired result; by the way, this turned out to be the fastest method.
But the difficulties do not end here; there are no free plugs on our outlet. Therefore, the decision was made to remove the factory wires to the speakers. We won’t play roulette here, especially since the wires are very close to each other, and you can’t easily determine the ones you need by color. So, we take a tester and ring the desired plug.
After we find them, we tear out the plugs with tweezers and drill a hole for the wires. From the other chip we rip out the plugs located opposite the drilled holes. Again, take the drill and drill a hole.
Then we pull the wire through the corrugation, which is also not the easiest task, but as always, tweezers and long fingers do their job.
All the hardest part is over, all that remains is to stretch the wires into the chips and connect them. Let's continue with the wiring. We prepare the acoustic wire from the crossover to the midbass. Everything is simple here, the main thing is to put on the heat shrink first.
It came to the tweeters as well. We will replace aluminum wires with acoustic copper ones. We can do without soldering here. I bought sleeves for the forks on the tweeter and prepared the wires. I glued the tweeters to their regular place. In general, the wires included in the Ural AS-1627K kit are terrible, not only are they very thin, and they’re made of copper-plated aluminum, which in principle is what they should be like for the money. The same cannot be said about crossovers, tweeters and midbass. Silk food, which has a very good effect on the sound.
The time has come for creative work. I bought six sheets of vibration insulation for the front doors, almost for nothing. Everything is very simple here, first we degrease the inner surface of the door and paste it over 70%. We pre-heat the vibration for more convenient operation. Instead of a roller, we use a block and smooth out the vibration insulation. After making sure that all the wires are out and in their places, we begin to seal the technological holes. We also need to glue the door with splen, but we will put it off until the spring, when I install the leather interior.
We begin to put cards on the door. We check all the clips and slowly install the trim. First, we call the positive wire to the mid and screw it to the crossover at +, respectively, the negative wire at -. We perform the same operation with midbass. Now, with peace of mind, we install the speaker. You can already search for + from the amplifier, again we take the tester in our hands and call the wire we need, the same with tweeters. Well, let’s connect all this and move on. On the amplifier we have already screwed the wires to the channel, naturally observing the polarity. We look at the linear wires, the plugs are marked in different colors, which makes it easier to work with the connection, so we’ll put the light green one on +, and on the other -. Next, we connect the linear ones to the radio, the same thing here, it couldn’t be simpler. Before turning on the radio, let's go back to the trunk again, here we switch from two to three, when the other door is ready we switch to four-channel operation of the amplifier. We set the frequencies to 50 Hz, set the volume to minimum. Having made sure that everything is connected, we can safely turn on the radio. First, we listen at low volume, then turn it up on the amplifier. We turn up the volume on the radio a little and immediately notice a big difference between the other side, in terms of volume. The tweeter started playing more clearly, but the mid was louder. This is all superficial for now, because we were just making sure it worked.
With the passenger door we do all the same work as the driver's door, from start to finish, but we didn't touch the door stops. Oh yes, I forgot to tell you about the famous Alpha limiters. I'm pretty tired of their clicking. I thought about buying a new one, but the price tag made my jaw hit the floor, and the used one was also all broken. Therefore, we unscrew the limiter and place the rivet on the corner. We begin to hit the rivet, turning it over from time to time, do not forget to drop some oil so that the eye can scroll better. We check that the ear no longer shakes or dangles. We put everything back, and of course we are happy about the quiet closing of the doors. Perhaps this won’t last long, but I did the same thing on the passenger door, and it’s been a normal flight for a year now.
But now you can experience all this in practice. On the amplifier we turn on 4-channel operation and set the volume to the middle.
We turn on the radio... Finally, I heard what I had been wanting to hear for years, without even tuning it in I already received a bunch of violent emotions. The high ones hurt the ear a little, I already cut them at the crossover, and also cut them with the head, now they play more pleasantly and clearly. The midbass was also cut a little, which gave deeper bass and filled the Alpha with an excellent music scene.
In general about impressions. About music, I’ll add once again that these are pure emotions of joy, now you can not only drive around and enjoy high-quality music, but also organize your own mini-disco on vacation. Vibration isolation also gave a good result; the doors began to close dully without creating resonating sounds. At speed, the music is no longer lost along with the bass. For complete happiness, I also want a red leather Momo interior, I think I’ll find it by spring, then Alpha will be a living example of my ideal. I wrote the article about a month ago, I didn’t have time to post it. During this time, he managed to ripen for a more powerful front, which he had already picked up at the post office.
To be continued...
Price: $10 Mileage: 261,000 km
Pros and cons of PRIDE Quattro plus
- Signal to noise ratio 100 dB. This parameter is higher than 71% of similar products;
- Damping factor 200. This parameter is higher than 58% of similar products;
- Number of channels 4. This parameter is higher than 56% of similar products;
- Bridge mode;
- Overload protection;
- Output power per channel (4 ohms) 100 W. This parameter is lower than 63% of similar products
- Output power per channel (2 Ohms) 140 W. This parameter is lower than 66% of similar products
- Bass Boost Mode
Starting point for acoustic tuning
At the entry level, anything beyond adjusting crossovers and gain levels doesn't matter. In addition, it does not matter how the amplification part is implemented. The basic principle is always the same.
Here's how to set up the amplifier:
- To begin with, turn off any sound adjustment circuits.
- If this is not possible, then the correction is set to zero. It is worth remembering that this is not the same thing - in the first option, the signal will not go through the correction circuits. This means that its path will be shorter and the level of distortion will be lower.
- In passive crossovers, the RF control is set to approximately the average level, even if it is different from zero. You should select a value of -3 dB.
- In the case of active crossovers, the crossover frequency of the low-pass and high-pass filters is initially made the same. The level should be around 75-80 Hertz.
The gain level on any channels is set to the very minimum position. If all these conditions are met, then optimal basic settings can be achieved.
PRIDE Quattro plus review: highlights
The speaker system and the amplifier itself can generate their own noise. This happens for various reasons (heating, external interference, mismatch between input and output, etc.), and it cannot be completely avoided, and is not required. For guidance, a typical signal-to-noise ratio parameter is adopted. The higher this parameter is, the better, since it means a significant predominance of the sound signal over the noise. The unit of calculation is decibels.
Damping is the compensation of parasitic vibrations in the dynamic speaker system. In car amplifiers, it is customary to take into account the value of Damping Factor, that is, the damping coefficient. This value is equal to dividing the acoustic impedance level by the output impedance of the amplifier. A higher coefficient indicates the possibility of higher quality sound. There are no universal standards here; the actual impact of this ratio depends on the model, composition and characteristics of the audio system.
A car amplifier with a single channel is also called a monoblock. They are usually high-power (at least 100 W) and are designed to serve a subwoofer. Two-channel amplifiers are most often used to create a conventional stereo system or, as an option, pair a conventional speaker with a subwoofer. Four-channel amplifiers are the most popular and widespread option. They go for servicing, respectively, of four-channel car acoustics. Five-channel amplifiers are designed for a four-channel audio system in a car plus an additional subwoofer.
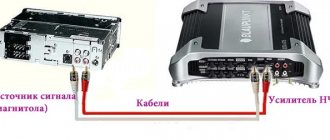
How to connect?
Let's see how to connect an amplifier in a car:
- First, the subwoofer and other speakers of the speaker system are connected to the corresponding connectors on the amplifier.
- Next, the device is connected to the radio.
- The amplifier will then automatically distribute the signal. Some will go to the subwoofer, and some to the high- and mid-range speakers.
Good nutrition is the key to success
The amplifier connection procedure begins with the power wires. Wiring is the most important element of a car audio system; the volume and sound quality depend on it. Amplifiers need a stable power supply, otherwise the power will not be enough and the sound will become distorted.
To understand why you need to pay attention to the quality of wiring and how it affects the sound reproduced by a loudspeaker, you need to know what a music signal is.
Some suggest that it represents a sine wave, however, the musical sinhala is characterized by a large difference between the normal and peak value. If sharp signal bursts are not important for car speakers, then in the case of an amplifier the situation is completely different. If the signal exceeds the permissible power for even a second (or even a millisecond), then these “anomalies” will be audible even to those who cannot boast of a good ear for music.
If the car amplifier is connected properly, the signal will flow through the wires undistorted. Carelessly done work or incorrectly selected wire cross-section will result in the sound being more compressed, rough and sluggish. In some cases, wheezing may also be clearly audible.
How to choose a wire cross-section?
Wire is the most common metal with a certain level of resistance. The thicker the wire, the lower the resistance of the wire. To avoid sound distortion during large voltage fluctuations (for example, when playing powerful bass), you must install the correct gauge wire.
An amplifier is considered to be a rather electrically intensive device. For its effective operation, high-quality grounding is necessary so that it is possible to receive the necessary energy from the battery. In order to choose the correct cross-section of wires, it is necessary to make some calculations. First, look at the instructions for the amplifier (or directly at the box from the manufacturer, if there is no documentation, use the Internet) and find the rated power value (RMS) there. Rated power is the signal power an amplifier can deliver over an extended period of time to one channel of 4 ohms.
If we consider four-channel amplifiers, they usually have a power of 40 to 150 watts per channel. Let's say that the amplifier you purchased produces 80 watts of power. As a result of simple mathematical operations, we find out that the total power of the amplifier is 320 W. Those. How did we calculate this? It’s very simple to multiply the rated power by the number of channels. If we have a two-channel amplifier with a rated power (RMS) of 60 W, then the total will be 120 W.
After you calculate the power, it is advisable to also determine the length of the wire from the battery to your amplifier and you can safely use the table to select the required wire cross-section. How to use the table? On the left side the power of your amplifier is indicated, on the right you select the length of the wire, go up and find out what cross-section you need.
The table shows the cross-sections of copper wires, remember that a large number of sold wires are made of aluminum coated with copper, these wires are not durable and have more resistance, we recommend using current copper wires.
Fuse selection
In order to secure the connection of the car amplifier, it is necessary to protect the power supply from the battery to the amplifier using a fuse. Fuses should be placed as close to the battery as possible
It is important to distinguish between a fuse that protects the device itself (whether it is an amplifier or a radio) and a fuse installed on the power wire
The latter is needed in order to protect the cable itself, since a considerable current flows through it. Make sure that the fuse ratings match, since if the rating of the wiring fuse is very large, the wire may burn out as a result of a short circuit. If the rating, on the contrary, is less, then the fuse can easily burn out at the time of peak loads and then there will be no other choice but to buy a new one. The table below shows the wire cross-section and the required fuse rating.
Tags: connection diagram
Comments 88
Maybe you can tell me, I have a pair of x6c 4 ohm midranges. And a pair of HF MT15 Neo 4 ohms. If I connect the midrange with the HF in parallel, will the impedance be 2 ohms or 4 ohms? The HF is connected via a condenser.
If MF 4 ohms and HF 4 ohms are parallel, then the axis will be 2 ohms. It’s better on 4x xnalnik everything is pokanaleo.
And if the HF is through the condenser, the load also drops?!
Well, it only passes high frequencies. Resistance doesn't seem to do
I see... thanks for the tip
Tell me, I don’t know what crosses to put on the mids of the Alphard LW650 A6, thanks in advance
yes any! In general, I don’t see any point in putting crossovers on mids
how to properly connect Pionner stages to the Auditor amplifier. Can you provide more details for a beginner?
thank you) it just so happens that there are 4 speakers, 2 mids and 2 tweeters, and the amplification is 2 channel :-) as I understand it, it’s all done by crossovers)
Yes ! There are 2 wires coming from the crossover; the amplifier has 4 connectors for connecting them. If I have 4 channels, I could still connect 2 dins!
please tell me) I want speakers to the front, can I connect this way? joxi.ru/47CwUxjKTJAmH78amgI
Well, this is a typical scheme! Of course you can! If tweeters and mids come complete with crosses and they are 4 Ohm, then everything is elementary.
and through the wires PVS. on acoustics!
Why doesn’t your head allow you to control the filters?!
This is what is approved! More preferable in my opinion!
Petya came and silenced everyone)))
food through 2 channels
The midrange and mids are bridged by the existing amplifier, but cut the midrange with a first-order filter and a 30uF capacitor.
a proven combination will be loud and detailed. Hannibal in ZYa 2.5-3l. The door will have to be specifically prepared for the PS8 to play as it should.
check out the latest pattern for today! they said it would be better
Petya came and silenced everyone)))
food through 2 channels
The midrange and mids are bridged by the existing amplifier, but cut the midrange with a first-order filter and a 30uF capacitor.