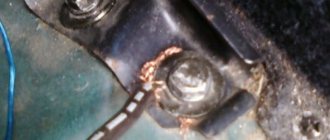
Grounding
This point is of great importance for the reliable operation of an amplifier connected in bridge mode. The ground connection can be made directly at the installation site of the device. To do this, take a short piece of thick insulated wire. A common bare braided cable will do.
One end of the wire is connected to the negative terminal of the car amplifier, and the other is inserted between the bracket or bar securing the device and the floor of the body.
To avoid interference in the speakers, the body of the device should not be allowed to come into contact with the body of the car. Otherwise, ground loops will form, which will lead to unpleasant interference. To isolate the housing from the car body, you can place a strip of rubber under the mounting bracket.
Instructions for setting up a 4-channel amplifier
Generally, there are three types of amplifier settings you need to know. All of them are given below.
Amplifier setup for four speakers but no subwoofer
- The amplifier's filter/crossover is turned off, and only the speakers reproduce the entire frequency range.
- We put the Crossover Selector switch in the Flat position.
- Level is set to position 8V.
- Bass Boost is set to 0dB.
- Now you will need to increase the volume on the car radio, but not more than 90%.
- The equalizer, if it is not configured, is set to position 0 according to music styles.
- Connect the amplifier and slowly turn the Level clockwise until the end.
Setting up an amplifier for a subwoofer and speakers
- Crossover Selector Front on the amplifier is set to the HP position.
- Phi Pass is set to 60Hz-80Hz.
- Crossover Selector Rear is installed on LP.
- Love Pass is adjustable in the frequency range 65Hz-85Hz.
- Level is set to 0.
- Bass Boost is also at 0dB.
- As with the above-described Level setting, rotate it all the way, but adjust the sensitivity.
Tuning for local gain
- Crossover The selector is set to Flat.
- Turn on HP for tweeters.
- Turn the Hi PASS control to the 250Hz position.
- We adjust the amplifier using the Level rotator.
Note. If the car radio in the car is a new version, adjusting the amplifier may not be necessary. These radios already have automatic Bass Boost settings. If this is the case, then you will just need to adjust the Level rotator.
Connection
After studying the types and types, we move on to the question of how to connect a subwoofer to a car radio without an amplifier:
To start connecting an active subwoofer, first we find two inputs on the back panel of the car radio, then using a linear wire we connect the input of the head unit to the subwoofer input. Then we connect the power - to do this we stretch the power wire from the “plus” terminal of the battery to the subwoofer A “negative” » we connect the subwoofer and the battery with a wire. When connecting an active subwoofer to a car radio, it is necessary to install an additional (very important) component - a fuse. It should be installed near the battery itself. The installation diagram of a subwoofer without an amplifier is shown in the first picture of the article. When low-frequency sounds are played, the subwoofer's electrical power consumption increases significantly , as a result of this, the load on the elements supplying the on-board network of the machine increases. Therefore, for the safety of the power circuit, an additional capacitor is installed in the subwoofer power circuit
- After connecting the subwoofer to the car radio, we proceed to setting up our speaker system
- As a rule, the whole setup comes down to creating a limit for the upper limit of operation for the woofer, then choosing the correct oscillation phase for the speaker
Now, how to connect a subwoofer in a car without an amplifier, you usually have to completely redo the audio power system, so here is an approximate list of necessary purchases:
- 5 meters 8AWG power cable(red)
- 1 meter of cable 8 AWG black
- 5 meters of control cable (thin) with a cross section of 0.75 mm
- Fuse holder FH58
- 40 Amp fuse
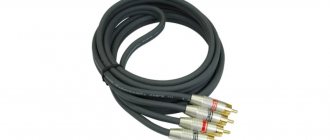
- Interconnect cables
- 2 meters of tubing
- Terminals and ties
The circuit of the sound system is simple, so there is no point in describing it in full, see the first photo of this article:
- The fuse is placed 10-15 centimeters from the battery, throw the power cable into the tube
- All cables inside the cabin are laid under the carpet
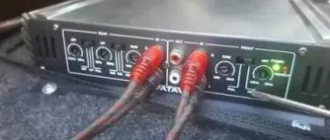
Subwoofer terminals
How to connect a subwoofer in a car without an amplifier - see the designation of the outputs on the subwoofer:
- +12V output is power (supplied only to the battery through a fuse)
- REM is the control wire, it comes from the radio, and connects to a blue/white wire (for Pioneer car radios, if you have a different one, then see the radio connection instructions), which usually sticks out of the bundle of wires coming from the radio
- The GND terminal is ground (negative wire)
- LOW INPUT contact (under tulips) - RCA wires are connected (to the subwoofer from the radio, if any)
- HI-INPUT contact - connect here if there are no RCA outputs on the radio
Now it’s clear how to connect a subwoofer to a car without an amplifier, all that remains is to wish you success in this matter; to better understand the topic, we recommend watching our training video.
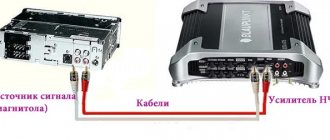
Connecting interconnect wires and control (REM)
To lay the cable, you need to find the linear output on the radio. The linear output can be recognized by the characteristic “bells” that are located on the rear panel of the radio. The number of linear outputs differs in different radio models. Usually there are from one to three pairs. Basically they are distributed as follows: 1 pair - you can connect a subwoofer or 2 speakers (labeled as SWF) If there are 2 pairs of them, you can connect 4 speakers or a subwoofer and 2 speakers (outputs are labeled F and SW), and when there are 3 pairs of linear wires on the radio, you can connect 4 speakers and a subwoofer (F, R, SW) F This is Front i.e. front speakers, R Read rear speakers, and SW Sabwoorer I think it’s clear to everyone what that is.
The connection will require an interconnect wire, which should never be skimped on. It is prohibited to lay the interconnect cable near the power wires, as various types of noise will be heard when the engine is running. You can run the wires both under the floor mats and under the ceiling. The latter option is especially relevant for modern cars, in the interior of which there are electronic accessories that create interference.
You also need to connect the control wire (REM). As a rule, it comes with interblock wires, but it happens that it is not there, purchase it separately; it does not need to be of a large cross-section - 1 mm2 is quite enough. This wire serves as a control for turning on the amplifier, i.e. when you turn off the radio, it automatically turns on your amplifier or subwoofer. As a rule, this wire on the radio is blue with a white stripe; if it is not there, use a blue wire. It is connected to the amplifier to a terminal called REM.
Good nutrition is the key to success
The amplifier connection procedure begins with the power wires. Wiring is the most important element of a car audio system; the volume and sound quality depend on it. Amplifiers need a stable power supply, otherwise the power will not be enough and the sound will become distorted.
To understand why you need to pay attention to the quality of wiring and how it affects the sound reproduced by a loudspeaker, you need to know what a music signal is.
Some suggest that it represents a sine wave, however, the musical sinhala is characterized by a large difference between the normal and peak value. If sharp signal bursts are not important for car speakers, then in the case of an amplifier the situation is completely different. If the signal exceeds the permissible power for even a second (or even a millisecond), then these “anomalies” will be audible even to those who cannot boast of a good ear for music.
If the car amplifier is connected properly, the signal will flow through the wires undistorted. Carelessly done work or incorrectly selected wire cross-section will result in the sound being more compressed, rough and sluggish. In some cases, wheezing may also be clearly audible.
How to choose a wire cross-section?
Wire is the most common metal with a certain level of resistance. The thicker the wire, the lower the resistance of the wire. To avoid sound distortion during large voltage fluctuations (for example, when playing powerful bass), you must install the correct gauge wire.
An amplifier is considered to be a rather electrically intensive device. For its effective operation, high-quality grounding is necessary so that it is possible to receive the necessary energy from the battery. In order to choose the correct cross-section of wires, it is necessary to make some calculations. First, look at the instructions for the amplifier (or directly at the box from the manufacturer, if there is no documentation, use the Internet) and find the rated power value (RMS) there. Rated power is the signal power an amplifier can deliver over an extended period of time to one channel of 4 ohms.
If we consider four-channel amplifiers, they usually have a power of 40 to 150 watts per channel. Let's say that the amplifier you purchased produces 80 watts of power. As a result of simple mathematical operations, we find out that the total power of the amplifier is 320 W. Those. How did we calculate this? It’s very simple to multiply the rated power by the number of channels. If we have a two-channel amplifier with a rated power (RMS) of 60 W, then the total will be 120 W.
After you calculate the power, it is advisable to also determine the length of the wire from the battery to your amplifier and you can safely use the table to select the required wire cross-section. How to use the table? On the left side the power of your amplifier is indicated, on the right you select the length of the wire, go up and find out what cross-section you need.
The table shows the cross-sections of copper wires, remember that a large number of sold wires are made of aluminum coated with copper, these wires are not durable and have more resistance, we recommend using current copper wires.
Fuse selection
In order to secure the connection of the car amplifier, it is necessary to protect the power supply from the battery to the amplifier using a fuse. Fuses should be placed as close to the battery as possible
It is important to distinguish between a fuse that protects the device itself (whether it is an amplifier or a radio) and a fuse installed on the power wire
The latter is needed in order to protect the cable itself, since a considerable current flows through it. Make sure that the fuse ratings match, since if the rating of the wiring fuse is very large, the wire may burn out as a result of a short circuit. If the rating, on the contrary, is less, then the fuse can easily burn out at the time of peak loads and then there will be no other choice but to buy a new one. The table below shows the wire cross-section and the required fuse rating.
Stylish design
The new Ground Zero Reference 4XS Class AB, high-performance, full-range amplifier is small, incredibly beautiful, and very powerful. These characteristics are achieved through the use of integrated Burr Brown circuitry, Elna and Mundorf MCap capacitors and new SMD technology.
This model was created for Sound Quality - car audio competitions.
- amplifier dimensions - 305 x 194 x 47 mm;
- power per load 4 ohms - 120 x 4 W;
- rated load power 2 Ohm - 220 x 4 W;
- new powerful built-in power supply;
- built-in new filters;
- updated ultra-efficient cooling system.
Connection diagrams
To properly connect the speakers, you need to develop a device layout and calculate the cable routes. To connect the amplifier to the speakers in a car, you need to use an acoustic cable with a metal screen that reduces the impact of electromagnetic waves (from radio transmitters, control units or the ignition system).
Switching circuits allow you to connect the front and rear speakers side by side into common circuits, freeing up the remaining rear channels of the amplifier unit for switching the subwoofer. The subwoofer is connected by a bridge, which increases the transmitted power while reducing the load on the electronics of the amplifier circuit.
Sequential
The circuit for connecting the amplifier to the car radio includes speaker connection circuits. When the loudspeaker windings are switched in series, the total resistance increases. A similar connection is used when connecting elements for additional sound located in the rear part of the cabin. The number of loudspeakers connected in a common circuit is unlimited. The permissible total resistance must correspond to the parameters of the amplifier unit.
To connect speakers to an amplifier in a car, you need to connect the positive terminal of one of the channels to the positive input of the speaker, the negative output from the same channel goes to the negative terminal of the additional speaker. The remaining speaker terminals are connected with an acoustic cord. By analogy, symmetrical channel loudspeakers are connected.
Parallel
Parallel connection of speakers through an amplifier allows you to reduce the load resistance, which drops in proportion to the number of elements installed in the circuit. In this case, an increase in power is observed; the number of connected speakers is limited only by the characteristics of the amplifier unit and the power of the speakers themselves. Car amplifier units allow you to connect circuits with a total resistance of 1-2 Ohms (there are modifications that can operate at 0.5 Ohms).
The positive cable from the first channel goes to the positive terminals of the loudspeakers, and the negative cable is similarly routed to the negative terminals. The speakers on the opposite side are connected in the same way; the second channel of the amplifier unit is used for switching.
Series-parallel
A combined technique is used when it is necessary to connect an amplifier to a radio to reproduce sound on an increased number of speakers. The circuit allows you to increase the output power of the speaker system while maintaining the standard level of impedance per channel. The car owner connects an unlimited number of speakers with a total resistance of 2-16 Ohms to each channel (depending on the characteristics of the amplifier circuit).
For example, in a channel circuit it is supposed to mount 4 speakers. A positive signal is supplied to the positive terminal of the first and third speakers. The negative outputs of these speakers are connected to the positive terminals of the second and fourth loudspeakers. The remaining free speaker outputs are connected to the negative terminal of the channel.
↑ About sound
How to connect an amplifier to speakers and a radio in a car (connection diagram)
Of course, they are inferior to audiophile amplifiers. But the sound is without obvious distortion and not annoying. All frequencies are reproduced, especially low ones. But the sound seems to be purified, simplified, smoothed out. There is no “air”, “liveness” and microdynamics.
But the disadvantages when listening to high-quality recordings turn into advantages when listening to MP3s and corresponding acoustics. The detail and transparency of higher-end amplifiers can only highlight the MP3's shortcomings.
I have my own “standards” for determining power (I was surprised to actually find confirmation on some datasheets), my own “musical” power, but it is fundamentally different from the bloated PMPO. For these amplifiers, my power rating is 1...2 W, and this is enough for home listening on acoustics with a sensitivity of about 90 dB.
How to connect to the standard radio
To connect the amplifier to the car radio, you need to remove the head unit, gaining access to the outputs on the rear of the case. Signal cables are laid along the shortest route; installation will require lifting the carpet and dismantling some of the plastic coverings. Interconnect cables are laid at a distance from the standard electrical wiring of the vehicle.
If the radio is equipped with a standard microphone or additional USB outputs with extension cables, you should check the tightness of the connectors and install the head unit in the standard socket. Then you need to install the removed plastic frames and air deflectors.
Connecting two-channel and four-channel
Connecting the amplifier to the standard radio depends little on the number of channels. The power cable is routed into the engine compartment through the holes in the engine panel. On some cars, the battery is located in a niche under the rear seat or in the luggage compartment. The cord is laid parallel to the standard wiring under the floor carpet; it is not recommended to bend the insulation over the sharp edges of the body panels. The negative cable is led out to the ground bolt or out to the car battery.
Then interconnect cables and a synchronous switching cord are connected to the amplifier; details of connecting the equipment are given in the factory operating instructions. The speakers are connected to the channel terminals; negative cords are prohibited from being combined into a common circuit or connected to the car body. When switching loudspeakers, you should take into account the location of the loudspeakers and the purpose of the channels. If the connection is incorrect, the sound picture is disrupted.
The subwoofer connection diagram includes the output of signal cables to the rear channels via a bridge circuit. The positive signal is taken from one rear output, and the negative signal from the opposite one. The remaining front outputs are used to power standard speakers connected side by side into common circuits. The type of connection depends on the resistance of the coils; the total value must correspond to the technical characteristics of the amplifier.
Connecting a single channel
1-channel type devices are used to power a passive car subwoofer. Due to the reduction in the number of channels, the power of the device increases, which allows it to operate with a load of up to 4 ohms. The design of the equipment uses a special electronic filter that limits the frequency of the audio range to be amplified. The bass amplifier for the subwoofer is a product type D.
The equipment is connected to the subwoofer using 2 cables connecting the positive and negative outputs to the speaker coil. Connecting the amplifier to the radio is carried out according to the method outlined above. It is allowed to use 2 identical subwoofers, which are connected into a single circuit using a parallel or series circuit. Negative outputs are switched to the amplifier block. Do not connect cables to vehicle body parts.
Connection without tulips
If there are no linear outputs on the head unit (typical of Chinese car radios), the cables from the speakers are connected to standard acoustic outputs through additional resistance. For switching, you will need to purchase 2 resistors with a nominal value of 0.1 and 1.0 kOhm. The elements are soldered into circuits, ensuring that the signal amplitude is reduced to an acceptable value.
It is possible to connect the amplifier through a ready-made adapter, which is connected by cables to the outputs on the head unit. On the other side of the block there are cords with tulip-type connectors, which are connected to an amplification device. It is recommended to check the operation of the paired devices in different sound modes, since the converter reduces the quality of the transmitted signal.
Setup Instructions
The amplifier is configured in accordance with the recommendations set out in the operating instructions. To adjust the parameters, buttons and rotary switches are used, covered with a protective panel. Rotating correctors are recessed into the body, which reduces the likelihood of accidental position changes. To rotate the element, it is recommended to use a flat blade screwdriver.
A control diode of the power supply is installed on the equipment case; further adjustment of the device is allowed only when the green lamp is turned on. When using standard factory settings of the equipment, the sound picture is blurry. Adjusting the parameters allows you to highlight low and high frequencies, as well as reduce sound distortion.
Amplifier setup for four speakers without subwoofer
After completing the connection of the four-channel amplifier and checking the operation of the electrical circuits, you need to configure the acoustics according to the following method:
- Turn the knob labeled Gain or Level to its minimum position.
- When using standard door speakers, you need to turn the HP filter control to the maximum position (indicated on the body as Full). If the car has small-sized acoustics with a diameter of up to 100 mm (in the instrument panel or front pillars), then it is necessary to set the corrector to the position corresponding to 120 Hz.
- Turn off the bass boost function and turn off the graphic equalizer.
- If you connected a 4-channel amplifier with channel separation, then you need to activate the HP and LP filters (for high-frequency speakers and mid-range speakers, respectively). The controls are set to the position corresponding to 4 kHz.
- The design of the amplifier unit has a HiLow Level switch, the position of which depends on the type of connection of the equipment to the head unit. When a signal is fed through speaker cords, the Hi position is set. If you connect the equipment to the linear outputs of the radio, the switch is moved to the Low position.
- Turn on the head unit, which contains a laser disc with musical compositions; you can install a removable drive with recordings in MP3 format (with a high bitrate). Check the position of the loudness selector (should be off), and then smoothly turn the volume control until wheezing appears in the sound picture. Carefully turn the corrector back, determining the boundary of the appearance of interference.
- Then the user adjusts the position of the Gain or Level control, the adjustment is made in the same way as adjusting the sound volume.
- Determine the broadcast volume for the rear channels, comparing the settings with the parameters of the front speakers. If the car owner has difficulty adjusting the acoustic equipment, it is recommended to contact a specialized service center.
Setting up an amplifier for a subwoofer and speakers
The adjustment is made by analogy with the adjustment of a system with standard acoustics. To ensure an improved sound picture, it is recommended to relieve the speakers from broadcasting low frequencies. This action allows the diffuser stroke to be reduced and improves the reproduction of mid frequencies. The HPF corrector is used for adjustment; the position of the potentiometer is determined by the user by ear. Some car owners do not turn on the HPF adjustment due to distortion of the sound picture.
The use of bass boost for a subwoofer is not recommended since it affects the band above 40 Hz. When using a subwoofer with a bass reflex, the subsonic filter is turned on, which is adjusted to a frequency 2-5 Hz below the bass reflex value (indicated on the equipment).
Many car owners without technical education do not know how to connect an amplifier to a car radio - for them it seems like too much of a time-consuming task. In fact, you shouldn’t rush to contact a car service center, since installing a car amplifier is not so difficult.
Maintenance by specialists will be expensive, so in order to save money, it is worth trying to understand the connection procedure, which this article will help with.
For high-quality operation of the amplifier you need:
- Give him good food;
- Give a signal from the radio. We looked at how to properly connect the radio here;
- Connect speakers or subwoofer.
More details on how to connect the amplifier can be found below.
Watch the video
When you decide to connect any electronics to your car, you should understand that this is a rather serious procedure that involves interfering with the car's wiring.
If you do not fully understand the car’s electronics, then it is better to seek help from specialists, since connecting an amplifier is not so much a complicated procedure as it requires specific knowledge. However, if you are determined, let's figure out how to connect a 4-channel amplifier to a 2-channel radio.
Settings for speakers on a 4-channel amplifier
When you first become the owner of a car amplifier, you may encounter misunderstandings in setting up, questions arise: how to set up an amplifier for an acoustic system or subwoofer, why do you need different switches, knobs, buttons and how to use them? There are two ways out: turn to professionals or figure it out yourself, which is not so difficult.
Let's consider several options for setting up the amplifier for different needs. Using the example of the 4-channel amplifier Blaupunkt GTA-475. The methods for adjusting amplifiers may differ, but they have the same meaning. For example, in place of smooth adjustment of the cut with a twist, there may be fixed ones, a switch, etc.
On the amplifier adjustment panel, a line piercing the upper adjustments with the inscription FRONT means that these adjustments adjust the front channels (front), REAR adjustments, adjust the channels to which the rear speakers (rear) or subwoofer are usually connected.
Setting up an amplifier in a four-speaker system, without a subwoofer. In this system, it is easiest to configure; the amplifier filter is disabled, since the speakers reproduce the entire frequency range.
— CROSSOVER SELEKTOR switch in the FLAT position (front, rear)
— LEVEL to position 8V (front, rear)
— BASS BOOST at 0dB (front, rear)
On the radio, we set the volume to 80-90% so that there is a power reserve, since some songs play loudly, while others are quiet. It’s good if the equalizer of the radio is already configured; if not, we set everything to zero or select from the list of preset settings (POP, ROCK, CLASSIC, etc.) based on interests. Turn on the music and slowly turn LEVEL clockwise to the maximum value, at which the sound is loudest and clearest. If necessary, you can add BASS BOOST.
Setting up an amplifier for a subwoofer and speakers. Let's assume there are speakers connected to the front channels, and a subwoofer to the rear.
— FRONT — CROSSOVER SELEKTOR to HP position, FI PASS control in the range from 60 to 80Hz
— REAR — CROSSOVER SELEKTOR to LP position, LOW PASS control in the range from 65 to 85Hz
— LEVEL to 0, that is 8V (Front, rear)
— BASS BOOST at 0dB (Front, Rear)
We adjust the sensitivity with the LEVEL control as in the first case of adjusting the amplifier, with one but, the system should sound harmonious, so we adjust the sensitivity (front, rear) to each other. BASS BOOST, if necessary and to taste.
Setting up the amplifier for channel amplification. Typically, channel-by-channel amplification is used for front speakers, where the speakers (midbass) and tweeters are amplified separately.
— Midbass reproduces the entire range, CROSSOVER SELEKTOR in the FLAT position
— For tweeters, HP is turned on, the HI PASS control is in the 250Hz position
When using advanced head units (radio tape recorders), the above methods for adjusting the amplifier may not be applicable, since the radio tape recorder itself is capable of filtering frequencies and adjusting BASS BOOST; all that remains is to adjust the LEVEL on the amplifier.
Source
How to connect two amplifiers with a bridge
Master/Slave
Amplifiers designed for this connection have MASTER/SLAVE switches. Therefore, with a bridge connection, one of the amplifiers will be the Master and the second will be the Slave, set the switches in this accordance. It is to the Master that the interconnect cables (tulips) from the radio are connected, and from it, through a mono connector, the signal is transmitted to the Slave (with a single interconnect). This is done so that all settings and control are carried out from one monoblock - from the Master, that is, gain, filters, subsonic, etc. will be exhibited only there. There is no need to take Y splitters to try to plug interconnects into the Slave as well.
If the manufacturer claims that the amplifier can operate as a bridge, but there are no Master/Slave switches, then it will have two sockets with similar names - Bridge Input and Bridge Output. In this case, use the Bridge Output jack on the master amplifier and connect it to the Bridge Input jack of the slave amplifier.
Connecting speaker wires
Here, be careful and do not confuse anything: we connect the negative connectors of the two amplifiers to each other; then we connect the plus (+) of the Master to the plus of the subwoofer, and the plus of the Slave to the minus of the subwoofer!
Why was there some kind of bitter experience? or just a warning.
The coils, as Yasen said, are 4 ohms each. So I'm wondering if it's worth it or not?
don't be afraid to cling.
what kind of info is there... judging by one 15A fuse for the subwoofer, it doesn’t work at all... but it’s better to connect it yourself and listen
It will work fine. Just figure out how to correctly set the filters and gains on the amplifier. Or contact someone who knows and can.
will you climb into the trunk to listen to it?
And the way Yasen drew it here is NOT correct. The diagram to the left of the block is drawn correctly, the inscription BRIDGED and a thick line indicate which terminals need to be connected to a bridge!
What information do you need? As far as you can see, the amplifier is weak, approximately 4x30-45 W. (15A fuse) I think you won’t even load half the speaker at its nominal value. Next, look from the reverse side, if there are high-pass cutoff filters, then more or less you can connect, and then only 2 channels with a bridge, or parallel the input so that everything comes from one channel. and it’s difficult (almost impossible) to achieve absolutely the same level when coming out from different channels. If there is no filter, then it should be on the radio, but not all of them have it. It's better to sell and buy what suits you, rather than try to make something you won't be happy with anyway.
I drew the ash tree correctly, since on the mustache in the same places (painted white in the photo) there is Bridged. But I’m interested in the different channels of the wuxia and one 2-winding speaker because I don’t have any experience in this area!
Newest technologies
The JBL Club-704 4-channel car amplifier can be installed in most modern car models. At the same time, it effectively enhances JBL's signature sound. For connection to standard head units, the model is equipped with a high-voltage input and customizable crossovers. The latest range of amplifiers are equipped with inputs for ADAS and HALOsonic systems.
- Maximum power - 1000 W.
- The signal to noise ratio is more than 85 dB.
- Compact design;
- Variable crossovers.
- Power 2 Ohm: 4 x 100 W.
- Power 4 Ohm: 4 x 70 W.
- Power through bridge (4 ohms): 2 x 200 W.
Source
Simple tips for connecting an amplifier to speakers
There seems to be nothing personal here, just suggestions: Keep calm and be a panda. Message from X-tream. Message from sab Message from SerYoGa. Message from Yuri Why does the teacher say: “Look, guys, this is Italy, it looks like a boot.”
What are you talking about anyway? Italy is like paradise. You look like a boot. And if you connect the front and rear via the cable, and install an active sub, what do you think? BMW Club Saratov. Guys, more ideas. Posted by Trahtebesdoh. Take the drive, run the front speakers and sub through the amplifier, and run the rear speakers straight from your head. Or look for a second amp. I won the main victory in my life 9 months before my birth. In general, the sound is not enough, and the rear passengers really want sound too.