Steering device
In terms of its design, the VAZ steering is a fairly simple, but technically sophisticated mechanism. Its most interesting part is the steering linkage, which consists of a very large number of levers and rods. In appearance, the steering mechanism of the VAZ 2105 is quite flimsy, but in fact it can withstand even very difficult road conditions. The design is not so archaic; the VAZ steering column has a special plate, thanks to which the shaft, consisting of several stages, folds in the event of an accident, and the steering wheel does not injure the driver. The worm gear of the VAZ gearbox and the lever system significantly reduce the effort that the driver spends on turning the wheel. Despite this, driving a “five”, or any other “classic”, requires considerable physical strength.
Inside the steering column of the “five” there is a cardan transmission that leads to the gearbox. The VAZ steering shaft crosspiece is used for connection. The entire mechanism is quite reliable and can withstand very long runs. All parts are made from high quality steel and are carefully inspected before assembly or sale. Thanks to this, there are very few accidents of Lada cars due to complete failure of the steering, and repair of load-bearing parts is required only in case of serious damage.
This is the unit
The most complex part of the mechanism is the steering gear, which is based on a worm gear. Since the worm gear is initially characterized by gaps and is subject to wear, a special adjusting bolt is built into the gearbox housing. It presses the bipod shaft, preventing gaps from causing the wheel to wobble.
The steering gear mechanism is in an oil bath, thereby reducing its wear. Regular transmission oil, an analogue of TAD-17, is poured into the gearbox. The steering rods of the “five” are mounted on hinges protected by rubber boots. The steering does not require constant injection and lubrication, but it is necessary to periodically inspect the boots for integrity. To assemble or disassemble the rods, you will need special pullers; you can make them yourself.
Thanks to its simple design, the VAZ 2105 steering control can be repaired with your own hands in a garage.
Replacing the steering column
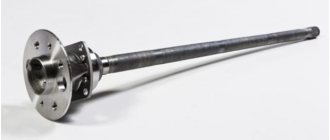
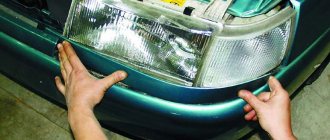
The need to replace the steering column arises if the splines in the connecting pair are worn out, and this connection cannot be restored. To do this, you need to dismantle this mechanism. For this purpose, it is necessary to disassemble the “Shohi” steering column, which even novice motorists can do. The procedure for removing the steering column is not particularly difficult technologically, but preventive measures take a lot of time.
Information for car enthusiasts: when replacing the steering column of the “six”, a slight modernization of this unit is allowed. It is possible to install a steering column from a VAZ 2107, the design of which is complicated by two small cardan shafts, increasing the degree of safety of the mechanism. In addition, additional equipment of the system with needle-type bearings will allow significantly less effort to be applied to the rotation of the steering wheel.
The required replacement of the steering column is carried out in the following sequence:
- We de-energize the battery and carefully remove it from the car and put it aside so that it does not interfere with work.
- We dismantle the steering wheel and the protective coating of the steering column shaft.
- We turn off the steering column control complex and the ignition switch.
- We dismantle the bracket fasteners, and it is possible that individual fastener components will have to be removed using a drill.
- Unscrew the tie bolt connecting the splines to the steering mechanism.
- We dismantle the sealing mount of the steering column shaft, and it is pulled out into the interior room.
Additional information: after completing the repair of the steering column, it is necessary to adjust the wheel alignment of the wheel pair to restore the required conditions of the chassis. It is almost impossible to install the wheelset at the optimal angle yourself without special adjustment equipment and stands.
Important: long-term operation of the “six” with splined joints, subject to increased wear, can ultimately create an emergency situation that is dangerous to the health and life of the driver and passengers. The steering wheel may turn completely uncontrollably, and this can happen at high speed. This is very life-threatening!
This is very life-threatening!
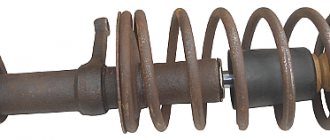
Operating a vehicle in extreme environments or on surfaces that do not meet acceptable standards can cause the steering rack to quickly become loose. This is especially true for VAZ models of the 2108-2109 series. Therefore, the part has to be periodically corrected - tightened. When this no longer helps, you need to carry out repairs or completely replace the rail. Next, we will tell you in detail how to replace the VAZ-2109 steering rack.
To carry out repair work you will need:
- hammer;
- mount;
- extension;
- socket heads for 10, 13, 22;
- ratchet handles;
- collars.
Having prepared everything you need, stock up on additional free time and the desire to do everything as needed, and not carelessly, so that later you have to redo it or send the car to a service station.
Typical breakdowns
The “Five” can notify its owner of problems with the steering not only by loss of controllability and the appearance of noticeable play, but also by knocking noises that appear when turning the steering wheel or crossing uneven surfaces. Most often, the steering column of the VAZ 2105 knocks, namely one of the worn-out crosspieces. Previously, there were smart people who pressed out the crosspiece and made repairs to it. Today the best solution is to completely replace the steering shaft, along with the cardan. It’s more reliable, faster and smarter. Replacement takes very little time, you literally need to unscrew two bolts. There is no need to worry when purchasing, because the shaft dimensions of the entire “classic” family are the same.
If knocking occurs in several places, then it is best to change the entire control, including the steering gear. Moreover, today they offer better quality spare parts than they cost initially. For example, the new VAZ gearbox has a more convenient system for changing the oil and disconnecting the bipod; there will be much fewer problems with it in the future than with the old one.
Adjusting the Steering Gear VAZ 2101 - VAZ 2107
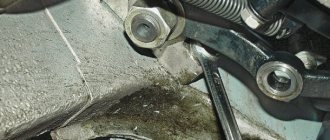
So, take a look at the photo of Rulevogo Reductor - a; - Do you see the nut (by the way, it is 19-size), and the pin with a slot - coming out through exactly that nut? The nut is a lock nut that locks the one we need and directly performs the adjustment - the stud.
Let's assume that the steering gearbox of your VAZ 2101-2107 is too tight. Then, you should take a wrench or a 19-point socket, loosen the nut (which we mentioned above), remove the locking gasket, and Unscrew the Pin with the Slot. This reduces the load on the steering mechanism of the column. Did you unscrew it? — try the steering wheel now.
Did you unscrew it too much and there was some play? Then you should screw the pin back in.
I think this is all clear. I would like to add that when adjusting the steering gear of a VAZ 2101 and other classics. The play, which did not seem to interfere with turning the wheels in place, and at low speeds, is actually felt at high speeds; - over 80 km per hour.
Therefore, you need to tighten the steering column just enough to just remove the play, or leave it minimal. This way, you won’t ruin your car’s steering mechanism, and you won’t fly off the road when turning.
What else can cause your steering wheel to not turn?
VAZ control tuning
Steering unit device
When thinking about modifying the steering, we must not forget that any interventions in this part of the machine are prohibited. Of course, replacing the steering gearbox with a newer modification may not cost anything. But with global changes, it will be impossible to pass a technical inspection. The design of the classics has been well studied; any expert knows it thoroughly. Therefore, it will be impossible to hide this without technical inspection. Nevertheless, for those who decide to do tuning at their own risk, we can advise several directions for creativity.
So, the most common thing is installing a steering column from a more modern VAZ model. The procedure is extremely labor-intensive, but as a result, the VAZ 2105 column gains the ability to adjust in height. For those who like to travel far and have a non-standard build, this is a very convenient option. The new VAZ 2105 column with height adjustment may only require an additional adapter. Such adapters are available in tuning stores.
The main drawback that the vast majority of owners of the “five” would like to eliminate is the heavy steering. It is very difficult and almost impossible to install power steering on a VAZ, but electric power steering is easy. Special kits are sold, even the VAZ 2105 column does not need modification. But electric amplifiers are not always reliable. There are known cases when, after their failure, the car began to be thrown into the oncoming lane, and even at full speed. Therefore, the installation is not very justified. And if you take the ESD from a foreign car, then you may have to install another steering gear and redo half of the car. You may also need to replace the VAZ 2105 steering shaft.
A well-lubricated, adjusted and serviceable steering mechanism of the “five” practically does not require additional strengthening or modifications. But if you want, you can modify it too. It is also possible to legitimize the alteration if you pass tests and receive a certificate from a research institute.
In the fall of 2012, the steering gearbox was pretty worn out; tightening the gearbox nut no longer brought any results. As a result, the question of replacing the steering gear was brewing. A friend with whom I was redoing the steering suggested redoing it through a cardan, the VAZ 2105 steering, reasoning that it would be easier to align everything and there would be no need to get more alignment. This is especially true if the spar has burst and a plate is welded there. You can also adjust the steering column in height and horizontally.
Step-by-step adjustment of the worm gear.
In order to independently adjust the steering gear of a VAZ 2107 car, you need a flat screwdriver, a 19mm wrench, the help of another person and follow the step-by-step work:
- In order for the steering mechanism to be adjusted efficiently, the car must be placed on a flat surface, and the wheels must be in a straight position.
- Next, open the hood and clean the gearbox from dirt. Then you need to find the adjusting screw located in the center of the crankcase cover. This screw is covered mostly by a plastic plug. Before removing it, the plug must be pryed off with a flat screwdriver.
- Then you need to use a 19mm wrench to loosen the nut located on the adjusting screw.
- After loosening the nut, the assistant intensively turns the steering wheel in both directions. At this moment, together with it, it is necessary to start rotating the adjusting screw so that the necessary clearance appears in the meshing of the gears. Free play should be minimized and steering wheel rotation should become much easier.
- After the gap is adjusted, it is necessary to tighten the lock nut tightly, while holding the screw with a screwdriver.
Fundamental differences between “left” and “right” drive
There is still controversy surrounding right-hand drive cars. Supporters argue that those cars that were made by Japanese or English engineers “as if for themselves” are higher in quality than similar models, but released for export. It is difficult to say whether this is really the case, but the fact remains: there is a separate category of car enthusiasts who prefer only right-hand drive cars.
The main difference between the steering of right-hand drive cars is the mirror arrangement of the elements. For example, placing the gearbox on the steering rack. And the gearbox itself is designed for the other side of the connection.
Is it possible to convert a right-hand drive car to a left-hand drive car? You can buy a right-hand drive car and then move the steering wheel to the left, and there are even service stations that specialize in such services. But the price of such tuning is quite high, since there will be a lot of “reshaping” to be done. It's not just a steering wheel on the other side; a lot of things are different, from the mirrors to the headlights.
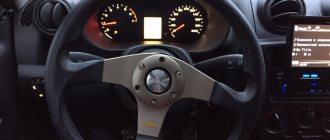
Installation of a sports steering wheel without an adapter on a VAZ 2104-07
If you are not too concerned about the steering column trim in the cabin, then a tuning product from the Sparco brand, equipped with a quick-release device, can be put in “four” without using an adapter. The essence of the method is to use as the last part the central part of the standard steering wheel with a wide platform and slots, and simply cut off the rest. To work you will need:
- electric drill with a 6.5 mm drill bit;
- long M6 bolts – 6 pcs.;
- hammer and core;
- grinder with a circle on iron;
- hex wrench to suit the size of the bolts;
- caliper, ruler.
The flange of the quick-release mechanism fits well on the central part of the standard steering wheel
The first step is to cut out the central part of the standard steering wheel with a grinder and carefully process the edges. Then the order is as follows:
- Having taken the dimensions from the quick-release mechanism, where there are 6 holes for fastening, mark the cut part for them. The central holes of both parts must match.
- Trim the ends of the cut element so that they do not interfere with the tight fit of the new steering wheel.
- Drill holes, having previously marked them with a core.
- Bolt the resulting part to the sports steering wheel mechanism.
Holes are drilled on the old steering wheel for a new flange
As a result, the splined part of the old steering wheel will serve as a mount for the new one. Then install and configure it as usual.
Sparco sports steering wheel with the core from the factory steering wheel
Instructions for removing the steering wheel
Removing the VAZ classic steering wheel is necessary in the following situations:
- to repair the horn button or steering mechanism;
- to align the transverse bar after the camber procedure - toe-in of the front wheels;
- in order to replace the standard steering wheel with another, more comfortable or sporty one.
Thin and uncomfortable steering wheel of the VAZ 2101-02
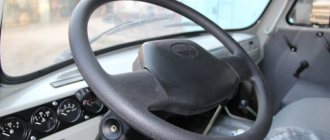
Reference. On classic models, the manufacturer installed 3 types of steering wheels - a “two-spoke” one with a thin bar (VAZ 2101-02), the same with a thickened cross member (VAZ 2103, 06) and a “four-spoke” one with a massive central part (VAZ 2104.05, 07).
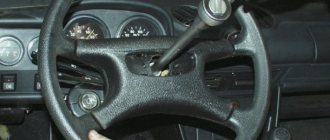
The steering wheel on the six is prettier, but just as uncomfortable
All of the listed elements can be removed equally easily, although there are minor differences in the disassembly technology, which is carried out using this set of tools:
- 2 types of screwdrivers - flat and Phillips;
- 24 mm nut head, extension spacer and knob;
- rags.
The most comfortable steering wheel was installed on the fourth, fifth and seventh VAZ models
Also, keep some thick grease of the “Solidol” type for applying to the splined part of the shaft.
Disassembly procedure
Removing the steering wheel on any classic VAZ model is performed in the following sequence:
- Place the car in a garage or on a level area so that the front wheels are as level as possible. Secure the car with the parking brake.
- Disconnect the battery from the on-board network by removing the negative terminal. During the disassembly process, you will probably touch the horn several times, which will buzz when there is tension.
- Sit in the driver's seat. In VAZ 2101-02 models, carefully remove the thin steering lining by prying it off with a flat screwdriver. The soft insert is pulled out from the VAZ 2104-07 steering wheel in the same way. Only on the “four”, “five” and “seven” this trim is located in the center (the AvtoVAZ logo is stamped on it). In the third and sixth models, the decorative trim is held in place by 2 screws, the heads of which are recessed into holes on the back side of the strip.
- Insert a 24 mm socket with a knob into the opened hole. While holding the steering wheel, loosen and unscrew the nut. Don't screw it all the way.
- Grab the steering wheel with both hands and pull it towards you with a sharp movement. If the part does not jump off the splines, tap it on the back side with your palms and in this way knock off the steering wheel.
- Unscrew the nut completely and remove the steering wheel.
Removing the decorative trim on the fourth model
Note. The nut holding the steering wheel must not be completely unscrewed for safety reasons. When you pull on a loose steering wheel, you can injure your head if it suddenly comes off. The nut will prevent the element from completely flying off the shaft.
If you unscrew the VAZ 2104 trim from the back, it will come off entirely
You can get to the nut of the “four-spoke” steering wheel of the VAZ 2107 in another way, by unscrewing 2 screws on the back of the wheel. Then the entire signal button made of plastic, equipped with springs, will be removed. After dismantling, take a rag and carefully wipe the shaft splines to remove old grease that has hardened in places. Now you can begin repairing or installing a new steering wheel.
On a penny, the signal key can be easily removed by hand
Advice. If you remove a part for repairs and plan to put it back, then before dismantling it is recommended to mark the end of the shaft and the steering wheel hub with a marker. This will help you immediately place the element in the correct position during assembly.
On the six, to remove the trim you need to unscrew 2 screws on the other side of the steering wheel
Photo of removing the steering wheel
Markers that will make it easier to install the steering wheel back
The steering wheel is pulled off the shaft in one sharp movement
Do not unscrew the fastening nut completely
Disassembly process on video
What steering wheel should I put on a VAZ classic?
It must be admitted that the steering wheels installed on the first modifications of Zhiguli leave much to be desired in terms of convenience and aesthetics. Of the entire line of classic models, only the “four”, “five” and “seven” had a nice steering wheel with a comfortable grip for the hands. Accordingly, the owners of “kopecks” and “sixes” sought to purchase and install the same one for themselves.
Nice factory steering wheel Lada Kalina
At the moment, there are other options for replacing the steering wheel on the “classic”:
- steering wheels from front-wheel drive VAZs of later years of production - VAZ 2115, Kalina, Priora.
- various steering wheels made in China;
- tuning sports steering wheels from famous brands - Sparco, Momo and so on.
This is what the sports steering wheel looks like on a VAZ 2106
Note. Tuning and sports steering wheels available for sale are universal. That is, they are installed on different cars using an adapter designed for a particular car model.
It is strictly not recommended to install cheap products from unknown Chinese brands on rear-wheel drive Zhigulis. The fact is that in the first VAZs the front wheels are turned by a worm mechanism, and not by a rack, as on new cars. Since there is no power steering there either, situations often occur that require the driver to put more pressure on the steering wheel. By installing a low-quality product, you run the risk of ending up with a steering wheel in your hands and a broken car - at best.
Adapter for mounting a sports steering wheel
Hence the conclusion: in addition to convenience and ergonomics, the steering wheel must meet safety requirements. These include factory parts from AvtoVAZ, properly tested, and steering wheels from well-known European brands.
Advice. Do not rush to buy products of a smaller diameter, in which the steering wheel itself is not moved forward relative to the central part. Firstly, such steering wheels are not comfortable for everyone, and secondly, out of habit, you will begin to touch the steering column switches with your hands when turning. If someone you know already has a small steering wheel on their car, test it and make sure that it will be convenient for you.
Sports steering wheel Sparco forward
Installation instructions
First of all, before assembly, lubricate the shaft splines with grease, then proceed in the reverse order:
- Place the steering wheel onto the splines, aligning the previously made marks. If the task is to level the position of the bar or install a new product, try to install it as evenly as possible.
- Place the nut inside the head, slide it onto the threads using the extension and tighten.
- Hold the steering wheel and tighten the nut with a wrench.
- Connect the battery and try driving the car 50-100 m on a road free of traffic. This way you will make sure that the steering wheel position is set correctly. Otherwise, unscrew the nut again and move the element 1 tooth to the right or left.
- Reinstall the top trim.
The position of the steering wheel can be fixed using a ruler
When installing a sports steering wheel, use an adapter for VAZ 2101-07 cars, which is a cylinder with holes for bolts (included in the kit) and a splined part in the center. It is installed simply: screw the steering wheel to the adapter, and then put it on the shaft, as described above.
Reassembly video
Comments
steering column
guys! That's the problem I have! I rebuilt the steering column myself and apparently I installed the shaft a little wrong. And that’s why my steering wheel turns to the right with a very small radius, and to the left with a large radius. Tell me how to install the shaft correctly, preferably in photographs.
Login to leave comments
And what’s important is mandatory
And what is important, be sure to lubricate the cardboard gasket, which is placed under the cover with the adjusting screw, with sealant.. You may also encounter the problem of worm play after tightening the side cover; the metal plates have different thicknesses
Login to leave comments
Gearbox
The bipod is stuck to the shaft like a dog, the puller flies off, that is, I sewed it with a hammer and a sledgehammer, the effect is 0, only the metal breaks. Do you think it’s possible to cut it down carefully?
Login to leave comments
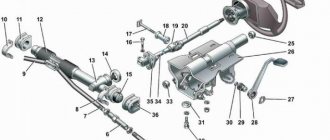
9.3. Steering gear
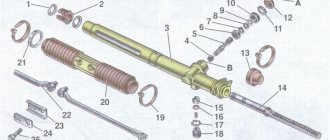
Steering parts
| 1 – steering gear housing; 2 – bolt securing the steering gear housing to the body; 3 – adjusting washer; 4 – flat washer; 5 – nut; 6 – spring washer; 7 – bolt securing the tip of the steering gear shaft to the worm shaft; | 8 – shaft seal; 9 – screw securing the rubber seal to the body; 10 – steering gear shaft; 11 – bolt securing the steering shaft bracket; 12 – steering shaft bracket; 13 – steering wheel; 14 – steering wheel fastening nut |
Installing a steering gear on a car
| 1 – bolts securing the steering gear housing to the body; 2 – bolt securing the steering shaft to the worm shaft; 3 – bolts securing the steering shaft bracket to the body; | 4 – plastic bushing; 5 – steering shaft mounting bracket; 6 – adjusting washers to ensure alignment of the worm shaft and the steering shaft |
EXECUTION ORDER
1
Disconnect the wires from the battery and remove the signal switch cover by carefully bending first one and then the other end from the bottom with your fingers. 2
Remove the steering wheel. 3. Remove both halves of the steering shaft casing.
Warning If it is necessary to remove only the steering gear housing, unscrew the bracket mounting bolts and the bolt securing the steering shaft to the worm shaft, and then slightly move the steering gear shaft with the bracket inside the passenger compartment and place a stand under the shaft so that it does not hang on the wires.
4. Remove the instrument panel and disconnect the turn signal switch and headlight switch plugs from the wiring harness plugs.
5. Loosen the clamp securing the pipe of the upper support of the steering gear shaft and remove it together with the turn signal and headlight switch, having previously unblocked the steering gear shaft from the anti-theft device.
6. Remove bracket 12 (see Fig.) securing the steering gear shaft, having first freed it from the ignition switch.
7. Remove the seal 8 of the steering mechanism.
8. Having unscrewed bolt 7 securing the steering gear shaft to the worm shaft, remove the shaft into the body interior.
9. Using puller A.47035, press the ball pins of the steering rods out of the hole in the bipod.
10. Remove the steering gear housing.
Warning When removing the steering gear housing, mark the number and placement of washers 3 between the side member and the crankcase in order to install them in their original place when installing the crankcase. This is necessary to maintain the alignment of the steering shaft and the worm shaft.
11. Install the steering mechanism in the reverse order of removal.
12. At the same time, before finally tightening the bolts securing the steering gear housing and the steering gear shaft bracket, temporarily put the steering wheel on the shaft and turn the shaft two or three times to the left and right. In this case, the shaft and other parts take the correct position (self-align) thanks to the oval holes on the crankcase and on the bracket.
Warning You can separately assemble the steering gear shaft with a seal, bracket, ignition switch, turn signal and headlight switch, steering wheel and install this unit on the car.
| previous page9.2.3. Checking and adjusting the clearance between the roller and the worm | next page 9.3.1. Removal and installation |
What is needed to carry out the replacement?
Before you think about replacing, see if it is possible to adjust the gearbox of the VAZ 2101. The price of this mechanism is quite high (about 2500 rubles in stores, at disassembly 500-1500 depending on the condition). Both adjustment and replacement require a small amount of tools:
- a set of keys;
- jack;
- wide flat screwdriver.
It will be useful to have a homemade key on hand, without which replacing the 2101 socket will be quite problematic. You can make such a key from a piece of reinforcement, which must be given the shape of the letter “L”. The upper horizontal part functions as a lever, and the lower part must be sharpened so that it fits firmly into the square hole of any head (you will need it for work on 19 and 22).