A modern car has a set of standard options that provide the driver and his passengers with comfort and safety while driving. However, the standard multimedia system (radio) installed on the car often does not satisfy car owners in terms of sound quality.
This problem is usually solved by installing a non-standard power amplifier, especially if the speakers themselves in the car are replaced with more powerful and high-quality ones. Also, another radio cassette can often be installed.
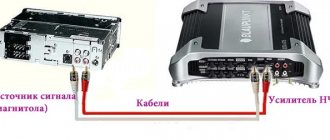
At the same time, it is important to know how to connect the amplifier in the car correctly in order to get full functionality and good results. Let's look at how to connect the amplifier to the radio yourself.
Why do you need an amplifier?
Multimedia head units have a built-in amplifier, which is not suitable for all car owners. Installing additional equipment allows you to clear the signal of interference and install additional speakers that improve the reproduction of low or high frequencies. When using an additional amplifier, the power of the generator and the capacity of the battery should be taken into account; to reduce the likelihood of voltage failure, electrolytic capacitors (storage) are used.
How to calculate power and choose
To select the equipment yourself, you need to calculate the power of the loudspeakers installed in the circuit of each channel. Based on the obtained values, an external signal amplification device is selected. It is recommended to purchase a more powerful device (10-15%) to reduce the load on the equipment and allow you to subsequently replace the acoustics. You should also take into account the resistance of the coils in the speakers and the frequency range for which the products are designed.
The choice of type of amplification machine installation depends on the configuration of the future speaker system. If you plan to connect a subwoofer to an amplifier, a device with 2 channels that are connected via a bridge circuit is sufficient. If the reason for the modification is the desire to get rid of noise in the speakers and increase the sound volume, you need to purchase a 4-channel unit. To use 4 speakers and a subwoofer at the same time, you will need to install a 5-channel amplifier or use 2 separate devices.
To connect the car amplifier to the radio, “tulip” or RCA connectors are used, located on the rear wall of the head unit housing. Before purchasing an external device, it is recommended to check the type of outputs used on the player. If there are no connectors, it is possible to switch the amplifier unit to standard acoustic outputs through a signal amplitude reduction module (attenuator).
Home amplifier from car
If not, there is a way out. Well, let's go: So, let's find out first of all what types of car subwoofers there are: 1 Active subwoofer. If you have a tester and you also know how to use it, then I think there is no need to say anything further, I’m sure you already know without me that you can measure the voltage at the output, and only then connect the sub - everything is really simple, but who doesn’t knows how to learn to work with devices in life it will be useful to measure the same battery, especially since a simple tester is not that expensive, literally a couple of thousand tenge Connecting a passive car subwoofer. In the absence of an amplifier, a passive subwoofer is connected to the front speakers.
Judging by the characteristics of the cheapest models that are now sold in stores, this is 12A. In this case, the amplifier is connected to the speakers, see
As you know, car radios have a special output, usually blue. Connect two pieces of cord to two terminals; 4. We also end the ring one on the car body, and the y-shaped one on the amplifier.
If you buy a good subwoofer but connect the subwoofer with thin wires, it will “fart”; it simply will not produce bass, this is explained by monstrous power drawdowns, the power supply on board the machine’s network drops from normal 14 Volts to Volts on the primary, on the secondary of the amplifier converter there are also drawdowns accordingly power and quality are lost. After completing the above procedures, all that remains is to connect the wires that transmit the sound signal from the amplifier to the subwoofer; the sound after amplification has greater power, so the cross-section of the wires must be appropriate. The passive one does not have a built-in amplifier - that’s why it’s called passive.
It has connectors for connecting a subwoofer. For them we set the mode to OFF. How to connect a car amplifier
Preparation
At the preliminary preparation stage, the car owner develops a connection diagram for the amplifier, taking into account the location of standard equipment. If additional loudspeakers (for example, a subwoofer or tweeters) are installed in the vehicle structure, it is necessary to consider the method of installing the devices. Based on the data obtained, the car owner purchases power cables, interconnect cords with tulips, additional decorative elements and other parts necessary when installing amplification equipment.
Wires
To connect the amplifier to the vehicle's on-board network, you need a special cable designed for the current consumed by the additional equipment. The cord is selected based on the power of the installed components, taking into account additional heat losses (up to 30%). For example, when switching a 2-channel amplifier with a nominal power of 200 W, the thermal load must be taken into account, which is approximately 60 W. The resulting power value requires the use of a cable rated at 21.6 A (it is recommended to make a safety margin of another 10-15%).
To calculate the wire cross-section, there are special tables that display the dependence of the cable diameter on the transmitted current. For installation, you should use a cord with a copper core that does not collapse under vibration loads. When purchasing a cable, you should pay attention to the thickness and characteristics of the insulation, since low-quality materials spontaneously crack when the temperature drops to -15°C.
Fuse
It is necessary to install a fuse in the power supply circuit of the amplifier in the car to prevent the product from igniting in the event of a short circuit (for example, due to destruction of the insulation of the power cables). The design of the equipment includes standard protection elements; an additional insert is located near the battery terminal. To properly connect a car amplifier, you must use fuses with a rating of no more than 50 A.
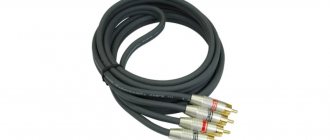
Interconnect cable
The mounted amplifier must be connected to the head unit using a special interconnect cable equipped with metal mesh protection. The screen reduces the likelihood of interference occurring during the operation of the ignition system and electronic components of the vehicle. It is not recommended to lay patch cords near standard control units and electric motors installed in the vehicle's air conditioning system.
HPF / LPF (HPF / LPF)
Hight pass filter (HPF), also known as a high-pass filter (HPF), filters out (cuts off) low frequencies, leaving high ones.
When setting up a subwoofer amplifier, set the control to about 20 Hz to cut out infrasound and not waste energy, since you won't hear it anyway. For mid-range speakers, the HPF is set around 80 Hz to remove the low frequency range for which the speaker is not designed and will not be able to play it. If you have separate channels or even a separate amplifier for tweeters (tweeters), the HPF is set in the region of 3000 - 5000 Hz, depending on the model, so as not to burn them.
All figures given are approximate; to obtain more accurate and safe values, study the characteristics of your speakers!
Low pass filter (LPF), also known as a low pass filter (LPF), is the opposite of HPF and cuts off the upper frequencies, leaving the lower ones.
For subwoofers, it is set in the region of 50-80 Hz, depending on the type of design (ZYA, FI, etc.) in order to cut off frequencies for which the subwoofer is not intended. The same goes for midrange drivers, cut them around 1400-1600 Hz.
If possible, you can limit tweeters to 20,000 Hz, but this is not necessary.
Where and how to install
Installing the amplifier in the car determines the length of the speaker cables required for connection and the length of the line to connect to the battery. For example, when placing the device in the luggage compartment, connecting each loudspeaker will require a cord 3-4 m long (taking into account bends and laying under the trim). The product is installed in a horizontal position on a special podium. On some cars, a second amplifier is used, intended for front acoustics, which is carried into the cabin.
It is allowed to place the equipment in a special niche under the rear parcel shelf (used on cars with sedan or coupe bodies). If you need to install a car amplifier under the passenger seat, you must take into account the placement of the air ducts of the air conditioning system and the presence of electrical wiring harnesses for heating the seats and controlling the side airbags. With such a scheme, the length of the cable running from the radio to the amplifier is shortened, which improves the quality of the transmitted signal.
Additional sound amplification devices installed in the car generate heat, which must be removed by ventilation. For normal ventilation, it is not recommended to install the case vertically, or cover it with plastic or fabric covers. To improve air circulation, additional fans are installed, which turn on together with the car's acoustic system.
Installation and connection steps
Most often, the amplifier is connected using wires directly to the battery. The external amplifier will be located in the trunk or interior of the car, and the wiring runs through the holes in the engine compartment. The wires must be well insulated with electrical tape.
The positive wire, almost always red, is connected to the positive terminal of the battery and plugged into the corresponding connector in the amplifier. And the negative wire, black, is connected to the body and inserted into the connector designated GND (GROUND). The remaining two sockets are used to connect the radio and signal cable. Almost all radios have outputs for connecting an amplifier and supplying sound to it.
For a four-channel amplifier, you need to use special adapters, and if the receiver does not have linear outputs, then the wire is laid directly to the speakers, where special inputs must be provided.
The wiring from the radio to the amplifier is laid inside the car, most often under the door trim. Under no circumstances should the signal cable be laid on the same side as the power cable. This will cause interference and loss of sound quality.
Another important factor when choosing the location of the amplifier is the distance from it to the acoustics. It is advisable to reduce it to a minimum so that the wires are as short as possible. In this case, the likelihood of interference during music playback will be minimal. https://www.youtube.com/watch?v=M42umT33V5o With the correct selection and installation of an external amplifier, you can significantly improve the quality of the sound reproduced by the radio, eliminate interference and increase the power of the radio.
Results
To install the amplifier, be sure to choose only high-quality wires; they should not have any damage. Be sure to follow safety precautions while working. Before installing the amplifier, you must read the operating manual and the instructions for the car radio.
A low-frequency power amplifier is the main component of a high-quality sound reproduction system. Everyone has an independent choice and the opportunity to connect it to the radio in the car. This is a difficult and troublesome task, but feasible for all car enthusiasts.
How to connect to the standard radio
To connect the amplifier to the car radio, you need to remove the head unit, gaining access to the outputs on the rear of the case. Signal cables are laid along the shortest route; installation will require lifting the carpet and dismantling some of the plastic coverings. Interconnect cables are laid at a distance from the standard electrical wiring of the vehicle.
The cords brought out into the instrument panel are connected to the connectors; an additional control signal cable is laid, which is switched to the Rem output (used for synchronous start-up and shutdown of the amplifier).
If the radio is equipped with a standard microphone or additional USB outputs with extension cables, you should check the tightness of the connectors and install the head unit in the standard socket. Then you need to install the removed plastic frames and air deflectors.
Connecting two-channel and four-channel
Connecting the amplifier to the standard radio depends little on the number of channels. The power cable is routed into the engine compartment through the holes in the engine panel. On some cars, the battery is located in a niche under the rear seat or in the luggage compartment. The cord is laid parallel to the standard wiring under the floor carpet; it is not recommended to bend the insulation over the sharp edges of the body panels. The negative cable is led out to the ground bolt or out to the car battery.
Then interconnect cables and a synchronous switching cord are connected to the amplifier; details of connecting the equipment are given in the factory operating instructions. The speakers are connected to the channel terminals; negative cords are prohibited from being combined into a common circuit or connected to the car body. When switching loudspeakers, you should take into account the location of the loudspeakers and the purpose of the channels. If the connection is incorrect, the sound picture is disrupted.
The subwoofer connection diagram includes the output of signal cables to the rear channels via a bridge circuit. The positive signal is taken from one rear output, and the negative signal from the opposite one. The remaining front outputs are used to power standard speakers connected side by side into common circuits. The type of connection depends on the resistance of the coils; the total value must correspond to the technical characteristics of the amplifier.
Connecting a single channel
1-channel type devices are used to power a passive car subwoofer. Due to the reduction in the number of channels, the power of the device increases, which allows it to operate with a load of up to 4 ohms. The design of the equipment uses a special electronic filter that limits the frequency of the audio range to be amplified. The bass amplifier for the subwoofer is a product type D.
The equipment is connected to the subwoofer using 2 cables connecting the positive and negative outputs to the speaker coil. Connecting the amplifier to the radio is carried out according to the method outlined above. It is allowed to use 2 identical subwoofers, which are connected into a single circuit using a parallel or series circuit. Negative outputs are switched to the amplifier block. Do not connect cables to vehicle body parts.
Connection without tulips
If there are no linear outputs on the head unit (typical of Chinese car radios), the cables from the speakers are connected to standard acoustic outputs through additional resistance. For switching, you will need to purchase 2 resistors with a nominal value of 0.1 and 1.0 kOhm. The elements are soldered into circuits, ensuring that the signal amplitude is reduced to an acceptable value.
It is possible to connect the amplifier through a ready-made adapter, which is connected by cables to the outputs on the head unit. On the other side of the block there are cords with tulip-type connectors, which are connected to an amplification device. It is recommended to check the operation of the paired devices in different sound modes, since the converter reduces the quality of the transmitted signal.
External amplifier in a car: what is it for, how it works and how it works
So, the main element influencing the sound is the device itself, and the amplifier built into the radio, which is usually weak, distorts the sound even at medium volume, is not able to “drive” more powerful acoustics, etc. By installing another amplifier (external), not only the sound quality increases, but also the power of the sound signal itself. The main purpose of the device is to amplify the signal received from the radio without distortion. The low-amplitude signal coming from the radio to the input of the amplifier is increased at the output to a certain value necessary for normal operation of the speakers.
You can also connect the amplifier to a subwoofer, this will allow you to optimally configure the car’s audio system, since the input and input signals differ only in power.
Also, connecting through a crossover allows you to perceive sound better in all frequency ranges. As practice shows, a voltage of 14.2 V, which provides the maximum power of the amplifier, does not always correspond to the voltage of the vehicle’s on-board network.
For this reason, there is a need to install high-capacity electrolytic capacitors, which, accumulating the necessary charge at peak load, do not allow “sagging”.
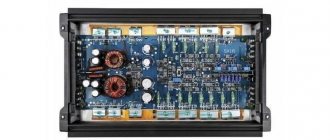
The design of any amplifier, regardless of the number of channels (1-6) and the method of amplification (analog and digital signals), consists of three main components:
- Input circuit - the “sensitivity” of the input node must correspond to the level of the signal supplied from the radio (any sound source has its own output voltage level). Inconsistency between levels can lead to distortion of the output signal;
- PSU (power supply unit) – converts (increases) the voltage supplied from the car battery. The use of a transformer in the power supply allows you to control and increase the supply voltage;
- Output stage (VC) – amplifies the signal supplied to the dynamic heads. One of the main elements of the VC is a high-power transistor, which, operating in switch mode, supplies high voltage from the power supply to the output of the amplifier by converting the voltage from the power supply.
Connecting an amplifier is not the simplest procedure, but not complicated either. First you need to decide on the choice of amplifier, then on its installation location, then connect it to the radio, subwoofer and speakers. In this case, you must strictly follow the instructions.
The number of amplifiers offered on the market today is quite large. All of them are classified according to the method of amplification, there are two of them: digital D and analog (AB), there are also differences in the number of channels.
Brief characteristics of devices of different classifications according to the number of channels:
- A 1-channel amplifier is mainly used for subwoofers. Type of amplification with a nominal load of 2 Ohms (a special volume control allows you to customize the audio system);
- A 2-channel amplifier allows you to connect two dynamic heads with high power;
- 3-channel (quite rare);
- 4-channel allows use in two-channel mode, connection to a subwoofer or connection of four speakers (possibility of connecting a subwoofer and two speakers);
- 5-channel PA – connection of four speakers and one subwoofer;
- A 6-channel PA is rarely used because it quickly drains the car battery (connecting four speakers and one subwoofer).
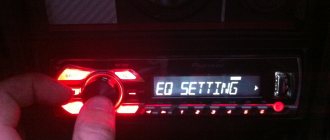
How to setup
Setting up the amplifier allows you to ensure uniform sound through all speakers of the speaker system. To adjust, you need to turn the Gain knob (indicated as Level on some devices) to the minimum level, and then set the HP filter corrector to maximum. If the amplifier unit is equipped with a built-in equalizer or bass booster, it is necessary to disable the functions (due to the effect on the sound picture). When using high-frequency speakers, the position of the LP corrector is additionally adjusted.
For further setup, you need to enable playback of music content on the head unit. After turning off the loudness compensation, the volume control is turned up to a position corresponding to the appearance of wheezing in the acoustics. Then the user lowers the volume and adjusts the position of the Gain corrector using a similar method. The operating mode is adjusted until a soft sound is obtained, uniform for all speakers. A correctly configured subwoofer does not stand out against the background of other frequencies, harmoniously complementing the sound picture.
Factors Affecting Amplifier Installation
– the device should not interfere with the driver and passengers, should not spoil the interior and should not take up much functional space;
– the amplifier must be screwed to the car body, and not to moving parts;
– the device must be well cooled, i.e. it should be located in a large space, not in a small box;
– wiring should be simple. The wiring of the speaker system must be in a separate harness from the main wires of the car.
Interesting! If you connect all the wires into one harness (main and music), then when the car is started, noise will be heard in the speakers.
Problems and their solutions
If the installed unit does not turn on, the cause of the defect is a violation of the integrity of the power supply circuit or the built-in adapter, which can be checked outside the car by connecting the product at home through a power supply that produces direct current, 12 V. If the equipment turns on correctly at home, you need to check the condition of the cables on the car using a test device. A coating of oxides and rust on the contacts impairs the transmission of electricity; as the current increases, circuit breaks occur.
From the radio there is a cable through which a signal is passed to activate the amplification circuit. Under normal conditions, the voltage in the cable is 5 V; when the parameter decreases, you need to check the reliability of the contact and make sure that there are no breaks in the cord. Additionally, the condition of the fuses and the reliability of grounding of the power circuit and interconnect cables are checked.
The amplifiers are designed with a protective unit that generates an error (blinking control indicator) when a faulty speaker is detected or when the audio cables are shorted. To restore functionality, turn off the speakers one by one to find the damaged circuit. To determine a grounding fault, an ohmmeter is used, which the user connects one by one to the loudspeaker circuits.
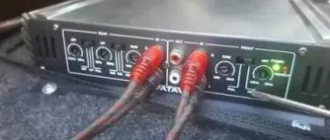
Connecting interconnect wires and control (REM)
To lay the cable, you need to find the linear output on the radio. The linear output can be recognized by the characteristic “bells” that are located on the rear panel of the radio. The number of linear outputs differs in different radio models. Usually there are from one to three pairs. Basically they are distributed as follows: 1 pair - you can connect a subwoofer or 2 speakers (labeled as SW\F) If there are 2 pairs of them, you can connect 4 speakers or a subwoofer and 2 speakers (outputs are labeled F and SW), and when there are 3 pairs of linear ones on the radio wires you can connect 4 speakers and a subwoofer (F, R, SW) F This is Front i.e. front speakers, R Read rear speakers, and SW Sabwoorer I think, and so everyone understands what.
The connection will require an interconnect wire, which should never be skimped on. It is prohibited to lay the interconnect cable near the power wires, as various types of noise will be heard when the engine is running. You can run the wires both under the floor mats and under the ceiling. The latter option is especially relevant for modern cars, in the interior of which there are electronic accessories that create interference.
You also need to connect the control wire (REM). As a rule, it comes with interblock wires, but it happens that it is not there, purchase it separately; it does not need to be of a large cross-section - 1 mm2 is quite enough. This wire serves as a control for turning on the amplifier, i.e. when you turn off the radio, it automatically turns on your amplifier or subwoofer. As a rule, this wire on the radio is blue with a white stripe; if it is not there, use a blue wire. It is connected to the amplifier to a terminal called REM.
Chinese players for passenger cars
It should be noted that the entire production cycle for the assembly of this type of equipment occurs in full compliance with the requirements of the companies that own the brands, which guarantees the high quality of the declared trademark.
There are a number of car radios that are positioned as native, Chinese products. But upon closer examination, these often turn out to be the same Kenwoods, Prologies, and so on, in a slightly modified form. By the way, very good quality. For the reason that Chinese developers do not bother themselves with technical changes to the devices, limiting themselves, as we have already said, to changing the design.
The third option for Chinese players can be called gadgets of unknown brand and manufacture. You should stay away from such radios, because apart from troubles and wasted money (despite the low price), they will not bring you anything.
To summarize our introduction, let's say. Most of the sound reproduction equipment present on the modern market is Chinese in nature, but developed and certified to global standards by well-known companies. Accordingly, the process of installing, connecting and operating these gadgets, as well as additionally connected equipment, is uniform (by model). And it is no different from the European (American, Japanese) assembly technology (does it exist at all?).
Settings
Before setting up the amplifier, you need to consider what devices will be used in the system.
If you do not use a subwoofer for acoustics (only 4 speakers), this scheme is considered the simplest. In this case, experts recommend setting the following parameters:
- Bass Boost (bass enhancement filter) - set to 0;
- Level (amplifier power indicator) - 0 (8V);
- Crossover Selector (responsible for switching the LP-AP-HP filter) - set its position to FLAT.
After such manipulations, you should adjust the radio. This can be done automatically by selecting the desired equalizer. It is possible to manually adjust the powerful and soft sound of the car radio. After turning on the song, the volume is set to 90%. At this time, the Level control on the amplifier is slowly scrolled and the position with the loudest and clearest sound is found. Bass Boost can be added.
If you have a subwoofer connected through an amplifier, a slightly different approach will be required. The sub is connected to Rear, and the speakers to Front. In this case, the indicators may be the following:
- Bass Boost - at level 0;
- Level - 0 (8V);
- Front - the Crossover Selector control should be in the HP position, while FI PASS can be left in the range of 50-80 Hz;
- Rear - the Crossover Selector indicator in this case is on LP, and LOW PASS is set to the level of 60-100 Hz.
Setting up the amplifier is done in the same way. It is important to adjust the sensitivity of the front and rear speakers.
Additional manipulations may be required if the car enthusiast decides to install a microphone for a Chinese radio or other equipment.
2 din connection via ISO connector
The connection diagram for a Chinese 2 din radio is described in detail in the operating instructions supplied with it from the manufacturer. To facilitate installation work, on the back panel of the player, as a rule, there is the necessary marking of all components and connections. Mostly, the difficulties for car enthusiasts who are faced with the installation of a standard or non-standard radio for the first time are caused by the correct connection of the car's electrical wiring to the receiver.
All work on connecting the car radio is carried out through the ISO connector, which consists of two plug boxes - A and B (each contains eight contact connections) or one combined box, where A is the plug for the power connections of the radio, B is responsible for the car acoustics.
The standard wire connection diagram (pinout) is as follows.
- Connector A. 1, 2 and 3 pins are not used.
- 4 - yellow power cable going to the car battery;
- 5 - blue wire, amplifiers and external antenna;
- 6 — orange cable, backlight;
- 7 - red - ignition;
- 6 - black. Weight.
- Block B. Everything here is also quite simple.
- Contacts 1 and 2 - purple, purple-black wire. Plus and minus of the right rear speaker (speakers);
- 3, 4. Gray. Gray-black. Plus or minus the front right column;
- 5, 6. White. White-black wire. Front left plus or minus;
- 7 and 8. Green and green-black wire. Rear left positive and negative contact.
When connecting a car radio, it is very important not to mix up the contact groups of wires. Since the sound quality of your equipment depends on them. And often the safety of the equipment itself.
Theory. Connection types
In electrical engineering there are two types of connections - series and parallel. With a series connection, the resistance is summed up; with a parallel connection, it becomes lower than the smallest of the connected ones. This is something worth remembering and will come in handy in order to connect your speakers correctly.
Basic formulas for parallel and serial connections
There is also a mixed connection. This is when serial chains and parallel connections are “mixed”. In this case, calculation formulas are used, gradually arriving at one of the “pure” circuits - parallel or sequential.
Mixed compound and its conversion to "simple"
The figure shows the sequential transformation of a complex mixed connection into a simple one.
Rear View Camera
There is no need to talk about the usefulness of this equipment. The rear view camera is an invaluable assistant for novice car enthusiasts who, as a rule, experience difficulties when performing parking actions.
Depending on the type (location and method) of installation, there are several types of rear view cameras:
- Standard installed cameras. In places strictly specified by the car manufacturer;
- Universal devices. The location is chosen by the driver himself;
- Wired;
- Wireless rear view cameras.
As an example, we use a universal wired camera and a Chinese 2 din radio.
Select the installation location. License plate frame, luggage compartment handle, etc. It is not recommended to place a camera inside the rear window.
We lay the cable connecting the camera and the GO. A five-meter long wire is included with the device.
Connect the camera to power. Any of the reversing lights acts as a source. Be sure to use a fuse in this circuit.
We connect the camera to the player via a tulip (connector). A separate exit is provided for this. If it is absent, the device is connected via the “video” input.
We adjust the picture and camera location.
Multifunctional steering wheel
This name means connecting a Chinese radio to the steering wheel of a car. That is, it is possible to control the standard player directly from the steering wheel.
To make this connection you will need:
- Steering wheel with built-in control buttons or a niche for their placement;
- Car radio;
- Two ISO adapters;
- Adapter devices for the antenna and combining the steering wheel buttons with the radio.
Let’s say right away that the process of connecting a multimedia system and adapting it with a multifunction steering wheel is not a complicated process, but it is painstaking and requires certain skills. This is explained by the fact that very often the pinouts of such connections between the car radio and the steering wheel do not match, although they are specified in the instructions. And therefore, we advise, if possible, to contact a specialized center that deals with this type of installation.
Tools and materials
When all the wires for installing the amplifier have been selected, prepare other materials and necessary tools so as not to look for them during the work.
In addition to the multi-core copper cables of the required cross-section and required length already listed above, pliers and other necessary devices, as well as insulating materials for the wires, are placed directly near the amplifier installation site. All this together will allow you to quickly and reliably connect the amplifier to the radio with wires, ensure their excellent contact and resistance to vibration, as well as carry out other planned operations.
Features of Chinese car radios
2 din radios differ significantly from smaller devices. These multifunctional modules with a 7-inch diagonal LCD screen allow you not only to listen to music, but also to watch videos. The size of the radio exceeds the dimensions of a 1din device, which immediately catches your eye. Users note their stable operation and high-quality sound.
Most often, Chinese 2 din format radios are equipped with a GPS module. With such a car player, there is no need to purchase a navigator. Additional gadgets can be connected to a Chinese head unit (GU) of this format: multifunction steering wheel, rear view camera, GPS antenna. This slightly modifies the connection diagram of the car radio, because new wires appear that were not on the standard chip.
In most cases, the audio device comes with ISO connectors and wires. Otherwise, you will have to buy an adapter to connect the purchased car player. Switching the device with a source of electricity will not be difficult, since the pinout of radio tape recorders of both formats is identical.
The yellow DC +12V wire is connected directly to the battery through a safety device.
The red control wire is connected to the ignition switch. It is desirable that when the key is turned to the ACC position, there are no other consumers besides the control unit. This will reduce the load on the battery. It is better to connect the black wire (“ground”) to the negative terminal of the battery, and not to the car body, since a 2 din radio is an energy-intensive device.
The GU has the ability to reduce the brightness of the backlight of the buttons and screen when the side lights are turned on. This makes it possible not to blind the driver at night. Power is provided by the wire marked ILL. Terminals KAY1 and KAY2 are responsible for connecting the remote control for the car radio (multi-steering wheel).
Find out in advance what you need
Before purchasing components, be sure to determine the wiring diagram. It determines exactly what you need, as well as a theoretical price range. The following are the most common and convenient schemes.
- Head unit - front subwoofer - 4-channel amplifier for front and subwoofer.
Classic. Budget-friendly, easy to install and configure. It is also good because it saves space in the car. The disadvantages include the low power of the system, but this does not significantly affect the sound quality. - Head unit - front - rear - subwoofer - 5-channel amplifier for front, rear and subwoofer.
It is based on the previous scheme. It differs only in that it provides sound in the rear part of the cabin. The setup is more difficult than the first scheme, and it is not always possible to achieve the desired result. - Head unit - front - subwoofer - 2-channel amplifier to the front - 2-channel amplifier to the subwoofer.
Do you like powerful bass? Then this diagram is for you. We get more power by connecting a two-channel amplifier to a subwoofer with a bridge. - Head unit - front - subwoofer - 4-channel amplifier for the front - 2-channel amplifier for the subwoofer.
The most expensive of the presented schemes. And the best. Sound quality and power are achieved through channel-by-channel amplification.
Connecting speakers
The following wires are responsible for connecting the speaker system of a Chinese 2 din radio:
The first 2 connect the front speakers, the rest - the rear ones. The speakers have 2 wires - positive and negative. A pure color is “+”, and a similar one with a black stripe is “-“.
It must be remembered that failure to observe polarity when connecting speakers will lead to sound distortion, since the devices will operate in antiphase.
If the standard control unit on a car is being replaced with a “Chinese” one, and the markings of the speaker wires do not correspond to the ISO connectors, then you must remember that a cable with a wide terminal is positive, and a cable with a narrow terminal is negative.
If the speaker outputs on the connected car player have additional “tulip” type connectors, then it is advisable to use them if the same connection is also available on the car speakers.
Conclusion
Now you have enough knowledge to go to a specialized store yourself and go through all the procedures: purchases, consultations, connections and settings - on your own. If you are not burdened with financial difficulties, it would be better to purchase an active type device, and then you will not have questions about how to connect a subwoofer to a computer. However, if you want to save money, or the hidden talents of radio electronics have awakened in you, you can safely purchase components at a reasonable price and create a full-fledged speaker system with your own hands. In any case, with a subwoofer you are guaranteed a life with rich bass, a lot of pleasure and the indignation of your neighbors.
Tags: battery, sconce, type, choice, generator, house, , capacity, sign, cable, like, computer, capacitor, , magnet, installation, power, load, voltage, setting, nominal, connection, polarity, potential, rule, wire, start, , work, size, regulator, relay, garden, network, system, connection, resistance, ten, type, current, installation, filter, photo, shield, effect
Connecting the audio system
It is not difficult for a person with minimal knowledge of electrical engineering to connect a Chinese 2 din radio. You just need to follow the included instructions exactly. In addition to connecting 4 speakers, it is possible to connect an amplifier or subwoofer. The wire marked AMP-CONT is responsible for this. The line has a built-in fuse, and power is supplied with a time delay of 8-10 seconds to reduce noise that occurs when the car player is turned on.
The acoustics are connected to the 2din radio with special multi-core acoustic wires. Their length should be minimal to reduce line resistance. It is not advisable to twist the wires, as this affects the sound quality. It is better to use special connectors.
Setting up or how to make a case
How to properly set up an active subwoofer in a car
In order for a subwoofer speaker to function normally, it is necessary to make a high-quality housing for it. Its further sound depends on the quality of the subwoofer box:
- If the displacement of the box is incorrect, the speaker will not play. It will make sounds similar to wheezing.
- With a flimsy subwoofer box, it will be impossible to achieve clear bass. On the contrary, it will always be difficult to hear.
- It is necessary that the housing has the correct shape, otherwise “standing waves” may form inside it, affecting the sound quality.
Some of the best cases are those that are made to order. The manufacturer needs to provide the dimensions of the speaker or itself. Due to this, all the subtleties and nuances of the device will be taken into account, so the sound will not be primitive.
How to set up a subwoofer yourself
Active subwoofer how to set up
acoustic system Therefore, now we will discuss how you can set up a subwoofer yourself:
You must purchase a special disk. It will allow you to identify shortcomings of the entire speaker system, including the subwoofer itself. A special melody is recorded on this disc, which allows you to hear even minimal defects.
Special disk for setup
- It is necessary to adjust the active subwoofer until the sound of this disc is ideal for the user.
- What exactly is a setting? This is a sequential switching of three buttons: Bass, Tribble, Sub.
As you can see, installing a subwoofer and setting it up in a car can be done easily with your own hands. It should be borne in mind that such a process is impossible without primary preparation. So, initially you should look at photos with a similar theme. Perhaps you will find some instructions on the Internet that will also not be superfluous. A video on this topic will also come in handy. The price of installation and configuration in a car service can vary: installation of an active subwoofer starts from 3,500 rubles.
Antenna connection
Having a radio in the car, some car enthusiasts prefer to listen to music or watch videos. But many drivers like to listen to their favorite radio stations while on the road, which is why every car audio system has an FM tuner. An external antenna is required for its normal operation. Experts recommend installing an active module that ensures stable reception of radio stations. The antenna is powered from the car network via the radio.
Chinese audio devices are equipped with a special output labeled ANT. Depending on the settings, power may be supplied to the antenna when the radio is turned on or only to the radio. The antenna cable is connected to a special socket located on the back wall of the device. The receiving part is located on the windshield. The active antenna is connected with 3 wires:
- Weight. It is connected to the car body or to the standard terminal on the GU body.
- Power wire. Connects to the red wire of the device control.
- Antenna wire. Connects to the corresponding socket on the radio.
In the case of installing a simple receiving device, an antenna adapter containing an amplifier is additionally used to improve the quality of the received signal. In radios with a GPS module, an active GPS receiver is used, which ensures stable operation of both the navigator and the radio. Connects similarly to an active antenna for a car radio.
Connecting speakers to an amplifier in a car
Connecting a car amplifier to speakers is not difficult if there are only two channels. On the back wall of the device there are screw terminals for connecting speakers. They indicate the polarity of the connection. Signs “+” and “–” are also available on speaker systems. It is enough to use the correct connecting cables and not make the wrong polarity when connecting. The REM (Remout Control) wire or remote control is designed to turn on the amplifier from the car radio. When it is turned on, a control voltage of +12 V is supplied to the wire and the device turns on. The connection diagram of a car amplifier to the radio implies automatic control of the power supply of the power unit, but some car enthusiasts install a toggle switch and supply the switching voltage through it.
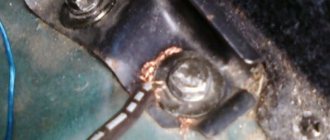
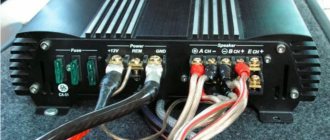
Power connectors (power supply).
Three contacts marked - +12V.
Power is supplied from the positive terminal of the battery. The supply wire should not be thin. It is advisable to install a fuse at a distance of 40 cm (or less) from the battery (pictured). It is designed to protect the vehicle's electrical wiring.
R.E.M.
The control wire from the head unit (radio tape recorder) is connected. The interconnect wire usually has a third thin wire, which is used as a control wire. It is needed so that the amplifier turns on and off together with the head unit.
GND (ground), connected to vehicle ground.
The wire must have a cross-section no smaller than the supply one and be as short as possible.