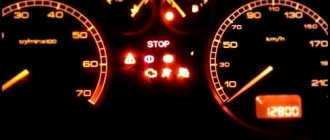
What does the exclamation mark mean?
The illumination of a red exclamation mark on the instrument panel informs the driver that the fluid level in the brake system is insufficient. When this sign lights up on the instrument panel, it is necessary to stop the car as quickly as possible, check the level of brake fluid in the reservoir, as well as the brake line for leaks.
The fluid level should be between the minimum and maximum marks; if there is not enough liquid in the tank, it must be added.
If, during inspection, leaks of brake fluid are found from the fittings of hoses and tubes or other connections, it is prohibited to continue driving.
When you can go and when you can’t
The appearance of the Check Engine indication can be accompanied by a number of symptoms, but there are situations when nothing fundamentally changes in the behavior of the car, or the reasons for concern are completely insignificant. Experts advise against traveling in the following cases. Firstly, if the car shows a decrease in power and limited speed (transition to emergency mode) with a constantly burning or blinking lamp. Secondly, it is extremely undesirable to continue driving if the engine is unstable, vibrates and other symptoms occur.
In this case, it does not matter whether the Check Engine is constantly on or blinking. And, of course, you should abandon the trip if the display with the oil can and catalyst icon turns on at the same time, as well as a notification about engine overheating.
Why may TJ levels decrease?
The reasons for the decrease in level may be the following factors:
Brake fluid leak
This problem can occur after driving on deep snow or gravel roads, where brake line tubes and hoses are at risk of damage. Leaks are also possible at the connections of the calipers and the main brake cylinder.
Pad wear
When the pads are worn out, the caliper piston comes out of the seat much more than with new pads, therefore, the volume of fluid required to fill the space increases, and the fluid level in the reservoir drops.
When replacing the pads with new ones, the level should be restored to normal.
Damage to the fuel level sensor
This reason occurs quite often. The cap of the brake fluid reservoir contains a sensor that measures the fluid level; when it drops, the contacts on the sensor close and the lamp on the instrument panel lights up in the form of a red exclamation mark, informing that the brake fluid level is low.
Quite often it happens that the fuel fluid level is within acceptable ranges, but the indicator still lights up, this indicates a malfunction of the level sensor or its power circuit.
Peculiarities
As a rule, stable activation of the check sensor occurs suddenly. During normal operation of all units controlled by this system, the indicator lights up briefly when the engine starts, and then goes out. Prolonged illumination indicates certain problems that are quite difficult to identify on your own. Why the check light is on on Kalina 8 and 16 valves is best to find out from specialists at a service station. This is especially true if the presented DIY troubleshooting methods did not produce results.
Checking the fuel oil level sensor
Checking it is quite simple; to do this, you need to unscrew the brake reservoir cap without disconnecting it from the connector. Then forcefully raise the “float”, then the lamp should go out; if this does not happen, then most likely the problem is in the sensor.
The next step is to check the control circuit. To do this, disconnect the sensor from the connector and insert a jumper into the plug, closing the two contacts together. When closed, the lamp should light up.
We hope our article was useful to you.
Battery does not have enough charge
Battery diagnostics
A common reason why the battery does not have time to charge is a large number of on-board equipment. The power supplied by the generator should slightly exceed the total consumption of the vehicle's electronics. The battery is charged due to this difference. If you installed new speakers, a navigator, a recorder, etc., and your battery immediately began to discharge, most likely the generator simply cannot cope.
After charging the battery, disconnect some of the consumers from the car's electrical network; if the light no longer lights up, the reason was an overload. The most reasonable thing would be to abandon some of the on-board electronics. If you cannot remove it completely, try disconnecting it from the network, connecting it only when necessary to use it.
Installing a more powerful generator is not advisable, but if absolutely necessary, this should be done by an electrician. Not all generators are interchangeable. When installing an incompatible one, the risk of serious damage to the car is high.
It is important to take into account the difference, for example, between the VAZ 2107 and 2114. The electronics of the VAZ 2114 places higher demands on the choice of generator
Exclamation mark blinking on viburnum
Why is there a red triangle with an exclamation mark and a sign next to the battery?
- Large current consumption in the parking lot in Kalina - 2 answers
- Kalina dashboard is glitchy - 2 answers
- Fuel indicator needle goes off scale in Kalina - 1 answer
- Why doesn’t the needle light up on Kalina’s tachometer or speedometer? – 1 answer
- What does the EBD indicator on the dashboard mean? – 1 answer
Specifically, the transcript is written like this.
Warning lamp for malfunction of the electronic brake force distributor (connected as an option). The lamp lights up red when the ignition is turned on and goes out after 2 seconds (self-test mode). Further, this is my explanation, and if it is on, it means a malfunction of this system, and this is 100 percent true. Mikhail S. Well, he was right, but he was wrong about the level of brake fluid. But that's not the point. So this lamp, well, it refers to the ABS, but specifically speaks about the EBD system, in short, exchange rate stability. Do you have a car with abs and speed control? It happens that a Lada without abs but this lamp is present. But in such cases, it only works when the ignition is turned on and goes out. Well, if there is no abs, it will never burn constantly.
The triangle seems to be on the right - an emergency signal. On the left, where the battery sign is, a circle with an exclamation mark indicates a brake failure.
This icon lights up when the brake system is in an emergency condition. Check the brake fluid level, then carry out diagnostics with a scanner and check for errors in the ECU memory.
This icon actually stands for this:
The icon lights up along with a warning message on the instrument panel.
Is this situation with the engine running? Is the battery light also on? Is the check indicator on or off? In general, are there any problems with the operation of the engine and the behavior of the car?
Subscribe
to our channel in
Index.Zen
Even more useful tips in a convenient format
1) Hello. On my viburnum, a red exclamation mark in a circle lights up and goes out, sometimes it blinks, what is the reason.
Similar articles
18 comments on “Exclamation mark on the instrument panel of the VAZ Kalina. On my viburnum, a red exclamation mark in a circle lights up and goes out”
1. Malfunction in the brake system.
1 check the brake fluid level. I had this when I was ten
Most likely there is not enough brake fluid due to worn pads or a leak.
2 any after 3000 km change Castrol 5-40
Diagnostic process
Instrument panel with which you can carry out diagnostics
So, diagnostic operations using the dashboard are not complicated and almost every Kalina car owner is able to cope with this on their own. Following the step-by-step instructions described below, you can carry out diagnostics on any generation of VAZ 1117-1119.
Now let's move directly to the process of performing diagnostic operations:
- We reset the daily mileage indicator. For this purpose, there is a special button on the instrument cluster. Using the daily mileage button we reset the indicator
- Do not release the button and turn to position I. Insert the key into the ignition and turn to position 1
- If everything is done correctly, then all the arrows on the instrument cluster will begin to move from the initial position (zero indicators) to the final ones. Instrument arrows move from the beginning to the final control point
- Using the button on the wiper switch handle, we switch the information screen.
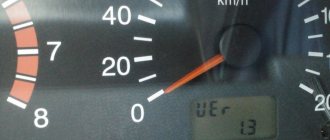
- First of all, the tachometer and sensors are checked for functionality.
- In the second case, the software version will be displayed on the screen. Often, as practice shows, this is version 3.0 or 3.2. The instrument panel screen shows the software version (in this case UEr 3.0)
- In the third case, error codes that are present in the ECU will appear. Errors received during the diagnostic process. There are 8 and 4 errors in photo 6.
- Now let's decipher the errors that can pop up on the dashboard screen:
Decoding instrument panel readings
2
— the on-board network voltage exceeds the norm;3
- An error has been detected in the fuel level sensor.
Occurs if there is an open circuit in the sensor within 20 seconds. 4
- an error has occurred in the coolant temperature sensor.
Appears if an open circuit is detected within 30 seconds. 5
- an error has been detected in the outside temperature sensor in the car.
If there are no sensor readings within 20 seconds, “-C” appears); 6
- detected;
7
— emergency oil pressure;
8
- error or malfunction of the brake system;
9
- low battery charge;
E
— determination of an error in a data packet stored in EEPROM.
Now all that remains is to compare all the errors that popped up on the screen with those listed above.
Why does the exclamation mark (!) light up on the instrument panel?
At the moment when the car brakes, the brake cylinders are pushed forward as much as possible, thereby acting on the pads. At this time, the cylinders are filled with the required amount of brake fluid in the system, and its level in the reservoir drops. It is for this reason that such an exclamation mark lights up
on the instrument panel, informing the driver about the minimum level of brake fluid in the reservoir, and accordingly in the system as a whole.
The following two tabs change content below.
All my life I have been surrounded by cars! First, in the village, already in the first grade, I was rushing around on a tractor through the fields, then there was JAVA, then a penny. Now I am a third-year student at the Polytechnic Faculty of Automotive Engineering. I work part-time as a car mechanic and help repair cars for all my friends.
Video with an overview of all warning lamps on the VAZ-2112
Reasons for appearance
If such an indication occurs, first of all we check the sensor itself
, which is located in the brake fluid reservoir. It is a float that actively interacts with the brake fluid.
When the float is dismantled, it must be put away on a rag.
In order to check its serviceability, it is necessary, with the engine running, remove it from the tank body and manually change the position of the float. If the indication on the instrument panel does not disappear and does not react in any way depending on the influence on it, then the sensor is faulty and needs to be replaced.
However, if the sensor is working properly, there may be a brake fluid leak.
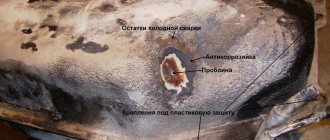
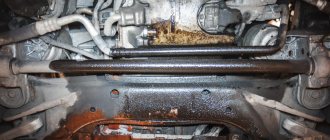
Where might brake fluid leak?
It is very easy to find out whether the required level of brake fluid is in the system, since it can be seen visually through the brake fluid reservoir. Its level should always be closer to o
, and if it is significantly less, or its level has dropped, then a leak is possible.
Brake cylinder
The front brake cylinder is leaking
First of all, inspect the brake cylinders on all wheels for leaks.
As a rule, leaks most often occur on the rear drums due to their excessive overheating. It is not difficult to notice a leak on the cylinders, since in the case of the front cylinder, the leaks will be noticeable on the caliper, and on the rear, it can drip directly from the drum. Problems with these elements usually arise during the cold season.
Brake hoses
The brake hose has cracks.
It is also very easy to determine the presence of ruptures or cracks in brake hoses, since this is all visible to the naked eye. Most often, they crack at bends or due to friction with adjacent elements of the car body.
Master brake cylinder
Traces of brake fluid are clearly visible on the body.
When inspecting the brake master cylinder, inspect its external condition for visible leaks.
The main place where a rupture can occur is the rubber seal located closest to the vacuum booster.
Location of the vacuum brake booster and master cylinder
If a leak occurs, it will drip onto the gearbox housing, and then onto the CV joint on the left side. This is easy to notice, and only then proceed to replace it.
- If you find any of the above elements to be faulty, it must be replaced immediately. Since the operation of the car with such malfunctions is impossible.
- After replacing an element of the brake system, be sure to do so, since air will accumulate in the system during work.
How to find out the reason for the lack of charge on the road
Naturally, such checks cannot be done on the road, so you should focus your attention not on the generator itself, but on its wiring. You need to check the contacts, perhaps they have oxidized or become loose
It is also worth checking the insulation of the wire going from the generator to the battery; perhaps it was damaged due to some repair work under the hood, and the copper wires inside were covered with salt, which is why they rotted or lost contact.
If you cannot find the cause of the malfunction on your own, and there is no visible reason why the battery light came on, then you should still go to the nearest auto electrician.
conclusions
Please note that replacing brake fluid is also necessary because, over time, it accumulates water particles from the air and becomes less effective.
With the development of the automotive industry, more modern instrument panels (DP) began to be used in vehicles. The software is used to inform the driver about the basic parameters of engine operation, as well as to warn about possible malfunctions in the operation of systems and components. What does the exclamation mark and other indicators mean? A description of the main icons is given below.
SOLVED. Trouble engine flashing CHECK VAZ 2110
Engine jammed
,
the check is flashing
, the engine does not pull, it jerks. I turn off the ignition. , I start it again and it's fine.
Similar news
Which Engine Should I Pour Oil Into Gasoline... In the economic motor oil market, there are many different brands that offer their fuels and lubricants. Which manufacturer has products that differ in additive package, base material (mineral, synthetic or semi-synthetic), viscosity and other parameters. Alas, at the moment we are interested in the scope of implementation: for gasoline...
After an Oil Change, the Engine Started to Run Louder... Why did the engine start to run louder after an Oil Change? List of probable circumstances When drivers wonder why after an oil change the engine began to run louder. Similar things happen sometimes, which often frightens car owners. After all, engine noise does not predict anything good. Often any sounds from the unit indicate that it is necessary to sternly...
Warning symbols on the visor
Now we suggest you familiarize yourself with the warning indicators on the tidy. Let's consider only the most common symbols (video published by Kirill Mukhin).
| A yellow steering wheel symbol indicates that the steering system needs to be adapted. If this indicator lights up red, then you should diagnose the performance of the amplifier, which can be electric or hydraulic. |
| The key sign in the background of the car usually flashes after the car has been armed. If the lamp is on without blinking, this indicates possible problems that have occurred in the operation of the system. Typically, the appearance of the symbol is due to the fact that the anti-theft system mechanism cannot read the tag from the key or that the installation has not turned on. |
| The handbrake icon is always on when the handbrake lever is raised, as well as when there is a malfunction, in particular, wear on the brake pads. Sometimes this symbol appears when it is necessary to add brake fluid to the expansion tank. If the pads are intact, the fluid level is normal, and the indicator lights up when the lever is released, then most likely you need to change the brake fluid level sensor; it is located in the fluid reservoir. |
| The yellow coolant symbol indicates the need to add consumables to the reservoir. The indicator may light up if the sensor or float in the expansion tank breaks down, and if it lights up red, then the power unit may have overheated. Before adding antifreeze, you need to eliminate the cause of its leak, and also make sure that the engine is not overheated. |
| The washer system symbol appears when there is insufficient washer fluid or water level in the tank; in some cases, the cause is a clogged level sensor. In more modern cars, the icon may appear if the fluid used does not match. |
| Traction control indicator. If the symbol lights up continuously after starting the engine, then there is apparently a problem with the system. The indicator itself may look different, it all depends on the car. |
| This is the catalyst icon; it usually lights up after the unit has been overheated. A related symptom is a lack of engine power. The cause of overheating may be poor throughput of the catalyst cells or problems with the ignition system. If the catalyst fails, the fuel consumption should also increase. |
| Such a lamp indicates that a problem has occurred in the exhaust gas purification system. In practice, this light most often appears after the car has been filled with low-quality fuel. The reason may also be due to the inoperability of the lambda probe. |
Photo gallery “Dashboards of different cars”
1. Tuned PP in VAZ 2109
Errors Lada Kalina 1st generation - decoding
Important! The list can also be used for the VAZ Priora model - the digital codes are similar for both cars.
- 30 – open circuit or failure of the air sensor to the catalyst;
- 31 – break in the wiring from the short circuit to the vehicle;
- 32 – a similar incident involving contact with other wires;
- 36 – open circuit of the line after the catalytic converter;
- 37 – damage to the cable winding with a short circuit to the machine body;
- 38 – wiring break with short circuit at BS.
- 102 – damage or malfunction of the mass air flow sensor;
- 103 – short circuit in the MAF wiring;
- 112/13 – failure or incorrect operation of the fuel mixture temperature sensors in the intake manifold;
- 115-116 – violation of antifreeze t° sensors – there is no cooling of the system or the main airflow is not working properly;
- 117-118 – open circuit of the coolant temperature sensor power supply/short circuit;
- 122/123 – defect in cable insulation at the TPS;
- 130/131 – error/break in DC circuit No. 1;
- 132 – short circuit of sensor No. 1 PCV;
- 133/134 – the air sensor connection is broken (sometimes it’s enough to clean the terminals and connector) or the wiring is damaged;
- 135 – malfunction of heater DK2;
- 136 – contact with the body of the DK2 highway;
- 137/138/140 – uncontrolled signal DK2 or break of the corresponding line;
- 141 – failure or interruption of heating of DC2;
- 171/172 - violation of mixture formation in the first case - depletion, for the second - excessive enrichment.
- 201-204 - a rupture in the control line for injectors 1-4, usually manifested by tripling or even doubling of the internal combustion engine, and the power plant may not start;
- 217 – critical temperature rise of the engine block;
- 230 - Lada Kalina error, accompanied by a drop in power or problems starting the power plant, is caused by a violation of the fuel filter relay circuit;
- 263/266/269/272 – the injector control driver has failed in sequence from No. 1 to No. 4;
- 261/267/270/264 – insulation violation of the injector control wire with a short circuit to vehicle ground for elements 1-4;
- 262/265/268/271 – similar to the previous point, only with a 12 volt touch.
- 300 – misfire or no spark for all pistons;
- 301/302/303/304 – similar to the previous number with clarification for each boiler sequentially;
- 325 – problems with the functioning of the DD;
- 327/328 – the mixture detonation sensor does not work correctly;
- 335/336 – failure or incorrect information is received from the DPKV unit;
- 337/338 – similarly with touching ground or other wires;
- 340 – wire break or DRF has failed;
- 342/343/346 – incorrect operation of the phase distribution indicator, possible short circuit;
- 351-354 – poor contact to the ignition coils, or damage to the wiring, for all boilers in series;
- 363 - dry pistons, no gasoline or oxygen, possible blockage or air bubble in the line.
- 422 - the catalyst is clogged, excess pressure forms in the pipe, usually a complete replacement of the unit is required;
- 441 – the adsorber purge valve is faulty; cleaning or repair may be required;
- 443-445 – rupture of the purge line with the formation of a short circuit (possibly to the body);
- 480/481 – the insulation of the power cables to the main radiator fan is damaged.
- 501/502 – electronic speed sensor readings are too low or high;
- 503 – contacts on the DC have oxidized, the block may be damaged;
- 505 – XO floats, you need to check the regulator;
- 506 – the engine does not hold idle speed, throttle adjustment is required;
- 507 – similar to the previous paragraph, speed float is added, TPS repair may be necessary;
- 511 – the XX regulator is faulty, perhaps it should be replaced with a new one;
- 560/562/563 – voltage surges in the vehicle network – we are looking for where the short circuit is.
- 601 – failure or unstable operation of the ROM;
- 603-604 – incorrect data from internal or external RAM circuits;
- 607 – possible disruption of the detonation line;
- 615-617 – damage to the power supply wire of the auxiliary PC with a permissible short to 12 volts or ground;
- 627-629 – breakdown of the fuel pump power supply with the possibility of a short circuit;
- 645-647 – the clutch of the air conditioner pump unit is de-energized with or without a short circuit in the wiring;
- 650 is a typical Lada Kalina check error, indicating that the corresponding lamp on the dashboard has burned out:
- 654 – the electrical line of the engine speed meter is faulty;
- 685-687 – breakdown of the insulation of the main relay power cables with a possible short circuit;
- 691-692 – rupture of the wires supplying voltage to the main fan with the possibility of a short circuit to the remaining parts of the wiring.
- 102/115 – disappearance of resistance or breakdown of the DC;
- 123-124 – incorrect formation of the XX mixture;
- 127-128 – similar to the previous paragraph, only at low load;
- 135 – damage to wiring DK1;
- 136-137 – incorrect mixing of air and gasoline components at low load on the internal combustion engine;
- 140 – the difference between the actual and calculated load is too large;
- 171 – potentiometer readings are underestimated;
- 172 – the opposite meaning of the above paragraph;
- 386 – incorrect data from the combustible mixture detonation channel sensor;
- 410 – break in the adsorber purge line;
- 425-426 – also with short circuit to ground or network;
- 500 – break in the fuel pump network;
- 501-502 – similar with a ground fault or 12 volts;
- 509 – critical overload of the idle speed controller;
- 513-514 – short circuit of the remote control sensor at idle speed of the internal combustion engine;
- 541 – the fuel pump has “died” or the voltage on the line has disappeared, it is also possible that a crack in the liner may form with fuel getting inside the structure;
- 570/600 – an erroneous impulse is received from the APS or there is none at all (sometimes cleaning the contact group helps);
- 602 – the ECU “shorts” at 12 volts;
- 603 – the firmware has crashed – a reboot is required;
- 606/616 – the rough road sensor indicates incorrect information (it begins to act up due to shaking on the “beautiful” asphalt);
- 612 – the ECU data was reset incorrectly, a forced reboot is required;
- 617 – the pothole indicator has died for a long time or the terminal has come loose;
- 620-622 – irreparable failure of the PROM, RAM or EEPROM blocks, respectively;
- 640 – software “glitch”;
- 689 – no problems were found during diagnostics – the encodings shown are false.
Error code: Diagnostics and errors of the Kia Rio ECU: description, characteristics
Most of the indices and encodings are similar to the first generation model, before restyling. Therefore, in 80% of cases, the above list will be relevant here too. However, the new generation has acquired a large number of on-board systems that were missing on the old car, which forced the manufacturer to adjust the standard table.
- 101 – the mass air flow sensor may be shorted, the permissible indication limits are exceeded;
- 106-108 – incorrect data from the intake manifold absolute pressure sensor;
- 130 – failure of the oxygen sensor before the catalytic converter is broken;
- 131-134 – power supply problems with the above sensor.
- 200 – malfunction of the fuel injector control network;
- 222-223 – incorrect indicators of the TPS network.
- 326 – critical fluctuations in the signal level from the fuel mixture detonation sensor;
- 363 – there are misfires of the mass to protect the catalyst.
- 458/459 – checking the short circuit of the KPA lines to ground and 12V, respectively;
- 485 – diagnostics of the main fan supply line is required.
- 500 – speedometer sensor network interruption;
- 501 – the above sensor is faulty;
- 503 – speed sensor indicators are floating;
- 504 – incorrect response of the brake sensor – ABS may not respond correctly;
- 505 – the XX adjustment indicator is broken or out of order;
- 506-507 – the XX regulator is jammed, accompanied by too low or high speeds;
- 522/523 – incorrect data from the oil pressure sensor inside the crankcase compartment of the internal combustion engine.
- 606 – ADC unit failed;
- 642/643 – incorrect signal from the sensor power bus;
- 660-662 – the channel length control valve is faulty or there is an open circuit with a short to 12V or ground;
- 691-692 – the power supply to the relay of the first radiator cooler is disrupted with a possible short circuit;
- 693-694 – similar, only for the second element.
- 830 – the switch sensor of the corresponding pedal does not respond to the ECU request; the sensor may fail or the wiring may be damaged.
- 141 – failure or damage to the DK2 heater circuit;
- 301-304 – misfires to protect the catalyst for all cylinders in series;
- 335 – incorrect position of the remote control;
- 336 – failure to synchronize the sensors and the actual throttle position;
- 384 – remote control drive control, internal combustion engine torque exceeds permissible limits;
- 385 – similar, only for the engine signal;
- 386 – the line indicating the presence of detonation of the mixture fails;
- 387 – violation of synchronization of the injection moment with the position of the remote control;
- 388 – TPS does not respond correctly to pressing the gas pedal;
- 389 – also only with exceeding the power plant speed thresholds;
- 390 – the throttle valve does not respond to the ECU request;
- 410/425/426 – malfunction of the canister purge valve circuit with a short circuit to ground or 12 volts;
- 513/514 – open circuit of the XX sensor network with a short circuit;
- 545 – synchronization failure or slow response of the remote control to the TPS pulse;
- 558 – wear or breakage of the throttle spring;
- 559 – remote control drive is faulty;
- 570 – immobilizer circuit open;
- 578 – malfunction or jamming of the remote control drive;
- 600 – no response from the immobilizer;
- 602 – power supply to the on-board network is lost, it may be necessary to tighten the battery terminals;
- 603 – EEPROM failure;
- 689 – error memory data is displayed incorrectly.
- 70-71 – the channel size diagnostic valve is faulty (jammed);
- 100 – break in the PDZ line;
- 101 – similar value to the previous paragraph;
- 102/103 – short circuit of the remote control control line;
- 105 – control unit failure;
- 122/123 – incorrect pedal position signal;
- 127/128 – similar to the above code;
- 187/188 – excessively rich or lean mixture at idle;
- 135 – sensors A and B, designed to control the position of the remote control, do not respond correctly;
- 138 – similar value for the corresponding accelerator lever position sensors;
- 176 – throttle drive position failure;
- 178 – complete failure of adaptation of the above block;
- 187/188 – incorrect mixture formation;
- 270/271 – lack of reaction of DK2 to enrichment or depletion of the mixture after the catalyst;
- 301/304/307/310 – short circuit of the ignition coil for all cylinders, respectively;
- 500/501 – incorrect generator power readings.
- 720 – failure of the output shaft rotation sensor;
- 717 – turbine rotation sensor;
- 705-706 – no selector signal or multiple values;
- 973/974 – solenoid on/off, open circuit or short circuit to ground;
- 962/963 - the same element responsible for pressure - there is a break or short circuit;
- 740/743 – LOCK UP SOL open or closed;
- 17AB/AA – L/C SOL;
- 17АЭ/AD – 2-4/B SOL;
- 17B1/B0 – H/C and L and R/B;
- 1735-1738 – the 1st-4th gear lock is closed, respectively;
- 744/1744 – LU CLUTCH;
- 731-734 – incorrect ratio for positions 1-4;
- 17A0-A4 – reverse and forward gears do not work alternately in accordance with the last digit of the code;
- 711-713 – network malfunction or DTM failure;
- 863 – connection failure with the diagnostic computer;
- 062F – memory error;
- 1701 – main controller power failure.
- 1 – test tire is broken;
- 9 – similar value with a short circuit in the line;
- 73 – connect the CAN connector;
- 0100 – connect the engine check connector;
- 305 – software incompatibility with EBKK.
Error code: How to check and correct VAZ 2114 errors on the on-board computer yourself: deciphering codes, diagnosing and resetting faults
Lights indicating a malfunction
Now let's look at the indicators that indicate problems.
| The red battery symbol lights up on the control panel if there is no battery charge from the generator unit. In the case of hybrid cars, the appearance of such a light will be accompanied by the inscription Main. |
| A lamp in the form of an oil can informs the driver that there is a lack of motor fluid in the power unit. The symbol always appears when the ignition is activated and disappears after the engine is started. If the indicator lights up after starting the internal combustion engine, then you need to check the oil level in the engine, all leaks must be eliminated. |
| Malfunction of the airbags. You need airbags; if an emergency or collision occurs, then most likely the airbags will not deploy. |
| This symbol can be made in different variations. If the color of its glow is red, then there are malfunctions in the functioning of the brake system, so the system must be checked before driving. The lamp may come on as a result of a lack of brake fluid in the reservoir or worn out pads. It is possible that the reason for the appearance of the lamp is due to a sensor failure. |
| The on-board computer detected malfunctions in the functioning of the ABS. If there is ice on the roads, then the problems must be corrected, since such driving can be very dangerous. The brake will function, but the ABS system will not work. |
| The Check Engine light comes on when the electronic control unit detects a malfunction in the operation of the power unit. There can be a huge number of reasons in this case, so you need to do computer diagnostics. |
| Faulty glow plugs - this symbol is only available in diesel vehicles. If the light is constantly on, you need to check the ignition system. |
"Check Engine" - the show of intuition begins
Many Kalinovites, when the check signal comes on, begin to panic and immediately go to a car service center. But not everything is as bad as it seems at first glance, and the reason may lie on the surface. So, let's look at why the check engine light is on on the Lada Kalina and the reasons for the mysterious effect:
- Failure of one of the power unit sensors.
- Throttle.
- Injectors.
- Fuel pump and filter.
- Air filter.
- Spark plugs and high-voltage wires.
- Petrol.
- ECU.
How to check the performance of the DTOZH?
Taras Kalenyuk
auto RU
In order to independently determine the serviceability of a thermistor-type measuring device, you need to acquire a multimeter and a thermometer that can withstand high temperatures.
You need to dismantle the device according to the instructions described above, and then connect it to a multimeter, previously set to ohmmeter mode.
Coolant is poured into a pre-prepared container, and the DTOZH and thermometer are placed there.
The antifreeze begins to heat up, and the owner looks at the resistance readings on the ohmmeter screen and at the thermometer, comparing the data with the plate to assess the accuracy of the device. Device data may vary from model to model, so it is best to use the instructions included with your existing device.
One thing remains unchanged - in devices with a negative coefficient, the resistance readings will fall with increasing temperature.
We recommend to buy
Comments and reviews
Ivan Ivanovich Baranov
Experience working at a service station:
View all answers
Avtozam.com - your assistant in car repair and maintenance
Your use of this website constitutes your agreement that your use is at your own risk.
I was driving calmly from Kamensk Uralsky home from my studies and suddenly the check engine light came on! The car drives as it did, there are no problems with the work at all... the question is what to do?! there is no on-board computer... should I go for diagnostics or contact the authorities? For now I'm leaning towards diagnostics at the service center. It really bothers me that this lamp is on! some travel with it for 2 years, but I can’t! and further! When testing the tidy (hold the odometer button for 3 seconds and without releasing it, turn on the ignition), the following error codes appear (as I think) or what can you tell me?
Mileage 23900 km