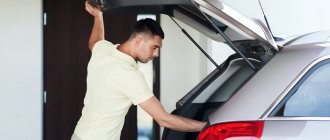
Replacing the rear window on a VAZ-2109
The rear window of a car is a real assistant for the person behind the wheel.
It is through it that you can see everything that is happening from behind and correctly assess the situation. But glass is a very fragile material and if a stone or other heavy object hits it, it can crack or crumble into many tiny pieces. As a temporary solution, you can seal the opening with thick film. But this, of course, is not a solution - in the future, the rear window still needs to be changed. Many car enthusiasts put off this work until later, fearing serious costs. In fact, all that is needed is to find money to buy new glass and glue. The rest of the work can be done with your own hands within 1-2 hours.
Replacing the rear window on a VAZ-2109
Before starting work, go to the store or market and get a new rear window for your car. It is important that it clearly fits your model (pay special attention to heating and its design features).
After this, prepare the necessary tools. To work, you will need new glass (this is logical), special glue (the best option is a 2-component composition), a new rubber seal (you will have to throw away the old one), a string for cutting glass, special suction cups (necessary for holding and lifting the glass). In addition, you will need tape, a knife, sandpaper and solvent.
It is advisable to work in a well-lit room with sufficient space for maneuver. If the weather is good outside, you can set up right next to the garage. The help of a partner when replacing the rear window is very desirable. It is extremely difficult to cope with such work on your own.
So, after carrying out the preparatory activities, you can proceed directly to the work. Here you need to go through three stages:
- Remove old glass. This work is done in the following sequence:
— take a flat-head screwdriver and press it into the rear window seal about 4-5 mm. Act without fanaticism - there is no need to insert the screwdriver deeper (this will only complicate the task);
- Gradually move the screwdriver around the perimeter. Walk a distance of about 4-5 centimeters and stop;
- tear out a piece of the seal;
— gradually, step by step, go through the entire area of the seal, pulling it out in small pieces;
- as soon as you have completely “exposed” the upper part of the side corner, you can actively sip the elastic band;
— after removing the seal, pierce the glue with a string and stretch it with an assistant along the entire perimeter;
- If the glass is damaged, be very careful when removing it. Please note that reuse of the product (for example, if you remove it due to cloudiness or a small crack) will not be possible.
When performing work, be very careful and try not to touch the car body (otherwise you will have to restore it as well).
- Prepare the opening for installing new glass
Once the old glass has been removed, do not rush to immediately “sculpt” a new one. It is advisable to perform several useful manipulations:
- Treat the edges with a degreaser. This will allow you to thoroughly clean the opening and prepare it for installing a new seal. Remember that the cleaner the installation site, the better;
- put on the seal. There is a nuance here. If you managed to carefully remove the “elastic band” (which happens extremely rarely), then you can leave it. But, as practice shows, it is better to install a new seal;
— lay the “elastic band” starting from the corners. After this, you can gradually press down the seal on four sides;
- after installation is complete, install a special lock (it looks like a small wedge). If you look at it from the outside, it looks like the letter “P”. Insert it so that it is located in the central part and runs along the entire length of the seal.
Before installing the lock, it is advisable to pull it a little. Otherwise, its length may not be enough. The wedge is installed as follows. Install the long section first, followed by the short section. If some part of the wedge remains unused, then it is better to cut it off. Otherwise, it will interfere with further work.
- Install the rear window.
When might it be necessary to install new glass? There are two options here - the old glass is damaged or you decide to apply tint. In the first case, everything is clear - you can’t do without a replacement. If we are talking about tinting, then it is better to do this work without dismantling. As practice shows, it is almost impossible to remove the rear window without damage.
Before installation, prepare a thick piece of rope. The length should be such that the rope completely encircles all sides of the rear window. Pay special attention to the quality of the rope - it should be tight. If it breaks during work, it will be extremely difficult to remove the torn piece from the seal.
So, the sequence of actions is as follows:
- find the middle of the rope and insert this part into the center of the upper part of the seal. Choose a groove that is closer to the top of the glass;
- Press the rope with a screwdriver into the groove as far as it will go. Deepen the rope to the middle of the glass surface. Ultimately, one edge should remain unused, and the other should be pressed into the “elastic”;
- press the rope on the other side until the ends of the ropes intersect. As soon as this happens, place their ends on top of each other;
— pull the free edges of the rope inside the cabin;
— install the glass in the seal. Make sure that it fits into the groove from below;
— lightly press on the glass and pull the rope simultaneously from both sides;
- Pull the rope to the lower corners and place the glass in its place. Teach that the rope will go very tightly - this is normal;
— as you pull out the ropes, place the glass in its place;
AVTOTRUE.RU
- Home
- Video
- How to Open a VAZ 2109 Without a Key Video
What is the best way to open a VAZ-2109 car using the means at hand, in other words, without a key? A similar question is asked comparatively infrequently. Under these circumstances, most car enthusiasts simply do not know what to do. The worst thing is if the problem occurs somewhere in the driveway, far from the garage and the tools available on the personal computer.
In most cases, the door does not open when:
- the driver absent-mindedly leaves the key in the car;
- the alarm system breaks down;
- battery discharged, etc.
Fortunately, in the model of the Volzhsky Automobile Plant in question, opening a locked door is quite simple, without damaging it at all or only slightly damaging it.
You should use a rope if your car has mushroom-shaped internal locking buttons. A slightly thick twine about a meter long will suit you. On the skinny end, take a shoelace. The main thing is that it reaches the bottom of the window with supplies.
At one end of the twine, make a loose loop. Its size should be approximately twice the diameter of the lever.
Next, the driver's door must be pressed away from the body in the upper right corner. We push the prepared noose into the resulting gap and throw it on the button. It is unlikely that you will succeed the first time, but at some point, with due diligence and patience, what remains to be done for our client will work out.
Then the rope, having pulled it a little, is pushed very carefully and even slowly downwards (towards the door handle) and only then is it tightened tighter on the “fungus”.
Opening VAZ 2109 without a key is a super method. 100%
After which the string is returned to the upper corner of the door again and the latch rises.
Also use a piece of fairly stiff wire or an old electrode. A hook is made at one end of it. Further:
- move the glass seal on the driver's door directly opposite the lock button to the side;
- a hook is inserted inside;
- they put him under traction;
- they grab her and pull her up.
It's easy to open a closed car with a student's ruler. Than just a very narrow iron one will do. The plastic one will most likely break, and part of it will remain inside the door. It is inserted in the center of the glass - this is where the lock rod is located, which should be pressed. Before this, the door is pressed more firmly against the body of the car by leaning with the whole body - this way the bolt will move easier.
The method described below is suitable if you need to get into the trunk; there is a cylinder on its door. You can open the lock here with a strong flat-head screwdriver. Namely, it is inserted into the well as deeply as possible and turned with a sharp, strong movement towards the opening. Usually the mechanism works the first time. In fact, it is guaranteed that it will have to be replaced later.
They also open the trunk with a standard lock in a more barbaric way. It will only work in such a situation if the metal is still quite strong. A rotten one will most likely simply break. For this purpose, you need to grab the edge of the door with both hands on both sides of the locking device and radically and sharply pull it towards yourself
The problem is that with this method of opening the trunk is often deformed, so it should be used with the greatest caution
Rear window replacement
Replacing the rear window of a VAZ 2109
You can replace the rear window of a VAZ 2109, as mentioned above, yourself. Before installing new glass, you must remove the old one.
Removal
To do this, you should:
- Take a screwdriver and insert it into the seal that holds the glass. It should be inserted approximately 5 mm.
Note: it will be possible to insert the screwdriver deeper, but you should not do this, as you may make a hole that is too deep.
- Push the seal out. First you need to pull out a small piece. The downside is that you cannot pull out the entire seal by pulling it. It's just quite fragile, so it breaks quickly.
- Carefully move the screwdriver a few cm. Tear off another piece of the seal.
- Step by step you can get rid of everything.
Note: since the glass is secured with a seal, as soon as it is gone, it will begin to wobble. Therefore, you need to get rid of the seal slowly and carefully so that the glass does not fall out before it is needed.
- After the seal has been removed to the upper side corner, you can begin to remove the glass itself.
Replacing glass on a VAZ 2109
Don't try too hard when removing the glass. Usually it cannot be kept completely intact.
It certainly cannot be reused. The main thing is not to damage the body of the vases, otherwise additional repairs will be required.
Preparing for installation
Before you begin installing new glass, you must do the following:
- Wipe the edges with degreaser to make it easier to install the seal. That is, the cleaner the glass, the better the seal will fit.
Note: If the old seal was removed carefully, it can be reused. However, in order to remove it carefully you will have to suffer. Therefore, it is advisable to use a new seal.
- Put on the seal. First, it is distributed in the corners, and then pressed against the sides of the glass.
- After this, you should install a lock, which is a small wedge that looks like the letter P. It needs to be inserted so that it is in the center of the seal, but runs along the entire perimeter.
Note: The wedge should be stretched slightly before installation. If you don't do this, then there simply won't be enough. Usually you can stretch it up to 20 cm!
- The wedge is installed as follows: first you need to insert the long part, then the short one. This needs to be done around the entire perimeter of the glass. If a small part of the lock remains intact (that is, it is redundant), then it must be cut off, otherwise it will interfere with subsequent actions.
Installation
Replacing glass on a VAZ 2109
Installing the rear window may be necessary when replacing it, or when tinting it. Although usually, tinted glass is new, since, as stated earlier, it is almost impossible to remove the rear window without damaging it. In order for the installation to be completed successfully, you should find a rope that is long enough to completely surround the sides of the rear window. It should be quite tight, since it cannot be allowed to tear. If part of the rope remains in the seal, it will be very difficult to pull it out. The installation of a new rear window should be done as follows:
- Determine where approximately the middle of the rope is. Insert this part into the upper side of the seal.
- The seal has two grooves. You need to find the one that is closer to the top of the glass.
- Use a screwdriver to insert the rope into the groove until it stops. You need to insert the rope to the middle of the glass area. We need to stop there. One end of the rope should hang freely on one side. In this case, the second one must be stuck into the seal.
- On the opposite side, you should also insert the rope until it intersects with the end of the previous rope.
- When they intersect, the end of one must be placed on the end of the other.
Note: the ropes must overlap each other. The overlap should vary between 5-10 cm.
- The free ends of the rope should be pulled into the cabin.
- Only after this can glass be placed in the opening. It is advisable to have someone help, as it is quite heavy and can be accidentally dropped. The bottom of the opening should fit into the outer groove.
Replacing glass on a VAZ 2109
- You need to press lightly on the glass. At the same time, it should press even better into the seal. In addition, this way it will sit in its place much better.
- The rope should be pulled towards you from both sides (as if you need to tie a knot).
- Stretch half the rope to the bottom corners of the glass.
- After this, smoothly seat the glass.
- To make it easier to pass the left corners, you need to “twist” the rope clockwise, and the right corners – vice versa.
Note: Since the rope is quite tight, this process will happen very slowly. However, the end result will please you. After all, in this way the insulation will fit well on the opening and will hold up well afterwards.
- While pulling the rope, you need to carefully seat the glass in the opening. There is no need to hit the glass, as it is still sitting very precariously, so it may fall out.
- When the rope has completely come out, you should carefully check the interior. After all, the seal could come out slightly. To fix this, you should drive it into the opening using a flathead screwdriver.
- At the end, you should shrink the glass all the way. To do this easily, you need to place your hand on the top edge, lightly hitting it with your second hand. The same should be done with the rest of the glass area.
Usually the glass shrinks to its maximum after 3-4 days of driving. This is facilitated by the constant vibrations that the car undergoes while driving. If you want to save time, you can take the car to a car dealership, where the price for this work will be rather high. However, you can carry out repair work yourself and at home. Of course, before this you should review various photos and videos on this topic. And if you come across instructions somewhere on the Internet, you should not neglect them.
Door opening method
If the VAZ-2109 door does not open from any side, then the cause of the breakdown is difficult to determine, since there is absolutely no access to the lock mechanism.
A somewhat simplified version of the breakdown occurs when the door does not slam shut completely and gets stuck in that position. Then it is possible to reach the latch from the outside with a sharp object.
To open a jammed door, you must first perform the following steps:
- When the sash is not completely slammed, try to get to the locking device using a steel flat ruler. It may be possible to open it in a similar way to conventional door locks with a latch.
- If the door is completely closed, try to move it to the slightly open position to gain access to the lock. To do this, try pressing the inside and outside handles together or alternately, while simultaneously pushing the door from the inside.
- Try opening the back door with a helper, who will press and release it to get it into position while you try to open the lock.
When simple means do not produce results, the door will have to be opened from inside the cabin, which will require removing its trim.
In practice, this is not easy to do, because the casing is pressed by the sash and it is difficult to pull it out without damage. But there is still no other way out: it is better to damage the inner panel than to mutilate the door itself.
To dismantle the decorative panel, you need to unscrew the armrest handle with a screwdriver, and then the storage shelf located at the bottom of the door card. Then the button that secures the lock from above is unscrewed and removed. Lastly, the window lifter handle and the opening handle frame are removed. Now you need to carefully separate the lining from the body using a pair of flathead screwdrivers and another suitable tool. You may be able to remove the trim without visible damage.
When the decorative panel is removed, access to the lock mechanism from the inside opens, although getting to it is inconvenient. Immediately check whether the rod running from the handle to the lock has fallen off. This is a fairly common malfunction that can be fixed with little effort. Put the rod in place and open the door.
If there are no visible reasons for the breakdown, simply try to open the door from the inside by working on the mechanism with various tools. If necessary, enlist the services of an assistant who will press or pull the door from the outside. Experience shows that such procedures for opening jammed doors can take a lot of time, so you will have to be patient.
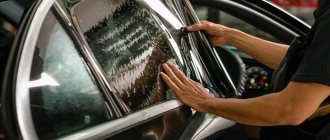
Replacing the rear side window on a VAZ 2109 on your own
Replacing a side window
Compared to the windshield of a car, replacing the rear side window on a VAZ 2109 is carried out less frequently. Side windows are located in both the front and rear doors of the car. These include fixed body products (luggage side windows), fixed body glasses in minibuses and commercial vehicles. Replacing the side glass on a VAZ 2109 can be done calmly and on your own. In some cases, side windows break due to mechanical force; these are situations when the keys remain inside the car. Also, don't forget about theft.
Note! The cost of the work directly depends on the method of assembling and disassembling the door in the car. It is not at all necessary to immediately contact a service station, since installation of the purchased glass does not take much time, 2-3 hours is quite enough.
Protection from dirt of the interior and body
Replacing the rear side glass in a VAZ 2109
Regardless of how the broken glass is replaced, we must not forget about thoroughly cleaning and removing small fragments from the interior. Otherwise, there will be a risk of injury to both the driver and passengers. As a rule, even a minor crack grows into a large web. This is due to the strong “tension” of the glass. To prevent the crack from expanding, the technician must remove it.
Replacing the rear side glass on a VAZ 2109
Today, many are interested in the process of changing side glass itself, namely detailed operations and step-by-step procedures for its installation. If you follow the instructions and recommendations, you can do the work yourself, but if for some reason this is not possible, it is better to contact an experienced auto mechanic who will carefully remove the damaged glass, preserving the molding.
Note! Installation of new glass is carried out only after removing the damaged product and cleaning the interior from fragments.
Replacing rear side windows in a VAZ 2109
Change the rear window on a VAZ-2109
Before you start, go to a store or market and get a new rear window for your car. It is important that it is clearly suitable for your model (particular attention should be paid to heating and its design features).
After this, prepare the necessary tools. You will need it for work. new glass (this is logical), special glue (the best option is a two-component composition), a new rubber band (the old one should be thrown away), a string for cutting glass, special suction cups (needed to hold and lift the glass). In addition, you will need duct tape, a knife, sandpaper and solvent.
It is advisable to work in a well-lit room with sufficient room to maneuver. If the weather is good outside, then you can live right next to the garage. A partner's assistant when replacing the rear window is highly desirable. Regardless, such work is extremely difficult to manage.
So, after carrying out the preparatory activities, you can go directly to work. Here you need to go through three stages:
Re-equipment of the "nine"
If you were driving a car that had electric windows installed, and even more so if you spent a long time behind the wheel, then in the future it will be difficult for you to do without electric windows. You get used to good things quickly, and to good and comfortable things even faster. But since the ninth model Lada car does not initially provide for the installation of electric windows, and every self-respecting owner of an always up-to-date “nine” wants to get such control, especially for this case it will be described here how you can independently equip your swallow with electric windows.
Glass replacement
It is better to buy glass and a glass holder as a set for replacement.
To replace, you need an extension, a wrench, an 8 and 10 mm socket and an assistant.
The side glass is blocked with a screwdriver to prevent it from falling out. The door trim is removed. A felt-tip pen marks the places where the glass frame is attached to the door on the frame and on the door. The bolts securing the glass frame to the window regulator are turned out.
The window regulator bar must be fully raised. The cable on the roller from the bottom of the glass is dismantled. Then the seals (velvet covers) are carefully removed.
Hold the glass during this time so that it does not fall out. After removing the seals, the glass is lowered down about 10 cm, tilted to the side and removed from the groove.
The new glass is installed in the reverse order. Apply WD-40 or a similar lubricant to the glass frame, insert the glass and leave to dry. After the grease has dried, the glass is installed in the door. New glass is installed in the seals.
If the seals have become unusable, new ones are cut out of rubber, while the old ones are used as patterns.
The glass with seals is inserted into the groove, aligned and lowered into the stopper. The window lifter handle is lowered to its lowest position. The glass is fixed with bolts and the cable is installed in its original place.
The operation of the window regulator is checked and, if necessary, the cable tension and the position of the seals are changed.
Removing the front door trim
Plastic spikes or “herringbones” for fastening may break during the process of removing the skin. We purchase in advance a quantity sufficient for the update. It is better to buy double white-orange or transparent clips.
- Open the door and remove the 3 screws securing the podium. The screws are unscrewed with a Phillips screwdriver. The podium carefully turns down and detaches from the body.
Do not remove the casing with jerks or sudden movements. The sockets that attach the trim to the door can be damaged.
- We remove the wires from the locking mechanism from under the top of the casing. We remove the door trim of the VAZ 2114, evenly moving it away from the door.
- After removing the trim, you can replace the glass, the trim itself, repair window regulators, install acoustics, etc.
If you are planning to replace the trim, before purchasing it, compare the dimensions of the trim installed in your car with the new one in the store. The location and diameter of the holes for the handle and for fastening may not be the same.
Installation of the casing occurs in the reverse order.
We install the rear window in a VAZ 21099 car
Rear window installation
in the vaz
21099 with your own hands)
- after removing the seal, pierce the thread with glue and pull it along the perimeter with an assistant;
— If the glass is damaged, be very careful when removing it. In this case, please note that it will not be possible to reuse the product (for example, if you remove it due to clouding or small cracks).
When doing the work, be very careful and try not to touch the body of the car (otherwise you will need to restore it).
- Prepare a hole for installing new glass
Once the old glass has been removed, do not rush to immediately “sculpt” a new one. It is advisable to perform several useful manipulations:
— Treat the edges with a degreaser. This will thoroughly clean the hole and prepare it for installing a new seal. Remember, the cleaner the installation site, the better;
- Put on the seal. There is a nuance here. If you were able to carefully remove the rubber band (which is very rare), you can leave it. But, as practice shows, it is best to apply new sealant;
— Laying the “elastic band” is done starting from the corners. After this, you can gradually press the seal on the four sides;
— After installation is complete, install a special lock (it looks like a small wedge). If you look at it from the outside, it looks like the letter "P". Insert it so that it is in the central part and runs along the entire length of the seal.
Protection from dirt of the interior and body
Replacing the rear side glass in a VAZ 2109
Replacing the rear side glass on a VAZ 2109
Today, many are interested in the process of changing side glass itself, namely detailed operations and step-by-step procedures for its installation. If you follow the instructions and recommendations, you can do the work yourself, but if for some reason this is not possible, it is better to contact an experienced auto mechanic who will carefully remove the damaged glass, preserving the molding.
Note! Installation of new glass is carried out only after removing the damaged product and cleaning the interior from fragments.
Replacing rear side windows in a VAZ 2109
With headlight removed
Replacement of headlight glass VAZ 2109
To improve operating efficiency, the headlights must be removed. Its installation is located in the engine compartment:
- Therefore, it is necessary to lift the hood and put on a gasket.
- The headlight is attached to four screws using nuts.
- Unscrew them with head number 10.
- The whole body moves towards itself; if necessary, apply a little pressure on the front bumper.
- Disable the two power timers.
- Remove the adjuster, turn your head to the left, remove the headlight.
It is advisable to carry out further work indoors at a temperature of 18 0 C. This is necessary:
- Place the spotlight on the table;
- Unscrew the turn signal housing;
- Remove the windshield wiper stops;
- Remove the remaining glass from the headlight housing, you can use a knife;
- Carefully clean the glass of any remaining glue;
- The solvent degreases the contact surfaces of the headlight and glass.
Note: Be careful not to get any solvent on the reflector; if necessary, wipe it with a dry cloth.
The sealant is applied in a thin layer to the body along the edge of the glass:
- After 3 minutes, all the parts that need to be glued together.
- Turn the headlight onto the glass, first place a piece of tarpaulin or any fabric on the table.
- Place a wooden rod under one edge of the glass to level the headlight housing support post.
Note. The work must be done carefully to prevent glue from getting into the housing.
- Leave the glued parts for one day.
- Faro stepped into place and connected all the parts.
After the work is completed, it is necessary to adjust the installed headlight. To do this, you need to contact a specialist car service. There, at a special stand, this procedure will be carried out professionally. The price of glass will largely depend on the manufacturer and quality. Since market prices have a wide range: from 100 rubles. up to 750 rubles. for one glass. Glasses are represented on the market by factories in Kirzhach, Avtopribor Plant LLC in Dimitrovgrad, BOSCH and others. Therefore, you need to weigh everything carefully, listen to the advice of sales consultants. After this, you can safely begin car self-service. When you do the work yourself to replace a headlight, you need to read the instructions, watch the video, study the photo carefully.
Search
rear window replacement
on VAZ-2109
Rear window The car is a real assistant for the driver. It is through him that we see what our client can do, what is happening behind us, and correctly assess the situation. However, glass is a very fragile material, and if a stone or other loose object gets caught in it, it can crack or shatter into a large number of small pieces. For a temporary solution, of course, cover the gap with a thick film. But this, of course, is not an option. In the future, the rear window will need to be replaced.
The car owner may have postponed this work until later, fearing serious expenses. In fact, our client is left to do everything possible to find the funds to purchase new glass and glue. The rest of the work is completed independently within 1-2 hours.
Replace the rear window on a VAZ-2109
Before you go to the store differently in the market and get a new rear window for your car. It is important that it fits your model correctly (pay special attention to heating and design features).
Then prepare the necessary tools. To do the job you need - new glass (this is reasonable), special glue (ideally a two-component composition), new sealing rubber (you will need to throw out the old one), a string for cutting glass, special suction cups (necessary for holding and lifting the glass). Additionally, tape, a knife, sandpaper and solvent are useful.
It is best to work in a well-lit area with sufficient maneuverability. If the weather outside is perfect, you can stay right next to the garage. Helping your partner replace the rear window is highly desirable. It is difficult to cope with such work without outside help.
What you need after the previous steps, start specifically. There are three steps here:
- Remove the old glass. This work is performed in the following order:
— Take a flathead screwdriver and press it against the rear window 4-5 mm in places. Proceed without fanaticism - you do not need to insert the screwdriver deeper (this will only complicate the task);
— Move the screwdriver evenly around the perimeter. Walk at a distance of 4-5 cm in some places and stop;
- tear off a piece of sealant;
You may also like
— Evenly, step by step, go over one hundred percent of the entire print area, pulling it out in small pieces;
- since you have completely “removed” the upper part of the side corner, you can pull the eraser intensively;
— After removing the seal, pierce the glue with a thread and pull it with an assistant around the perimeter;
Removing glass from the trunk lid 2109 2114
Conventional glass
even a schoolboy can control the trunk lid.
Removing the rear window on a VAZ 2109 from Seryoga)))
Is it correct to remove the rear window
with nine nine.
— If the glass is damaged, be very careful when removing it. With all this in mind, please be aware that reusing the product (for example if you remove it due to clouding or a small crack) will not be possible.
When doing the work, be very careful not to touch the surface. car body (otherwise you will have to restore it).
- Prepare a gap for installing new glass
When the old glass fails to take off , do not rush to “sculpt” a new one right away. It is better to perform some of the necessary manipulations:
- treat the edges with a degreaser. This will do a great job of cleaning the gap and preparing it for the new seal to be installed. Remember that the cleaner the installation site, the better;
- apply sealant. There is an aspect. If you managed to carefully remove the “elastic band” (which does not happen often), then you have the opportunity to quit. However, practice shows that it is better to apply a new sealant;
- laying the gums, starting with the development of the corners. Then, of course, press the seal evenly on all four sides;
- install a special lock (it looks like a small wedge) as a result of installation. If you look from the outside, it looks like the letter "P". Attach it so that it is centered and runs the entire length of the print.
Before installing the lock, it is better to pull it a little. Otherwise you won't like its length. The wedge installation is done like this. Install the long section first and the small section at the end. In this case, some part of the wedge remains unused; it is better to cut it. Otherwise it will interfere with future work.
When should new glass be installed? There are two options - the old glass is damaged or you decide to glue a shadow. At the beginning, our client remains clear - to do without a shift. In this case, we are talking about tinting; it is better to do this work without disassembling. Practice shows that it is almost impossible to remove the rear window without damage.
Conclusion
This is all. With such simple instructions, you can install a rear window on a VAZ-2109 and save a significant amount. Good luck.
Replacement of the rear window of a VAZ 21099 is done in the case when it is not possible to repair the rear window or the rear window was broken as a result of an accident. Also, the rear window is replaced if the rear window heating is damaged. In some cases, repair of the rear window heating on a VAZ 21099 can be done, but in most cases, the rear window will need to be replaced.
Replacing the rear window on a VAZ 21099 takes on average 2-3 hours. In warm weather, after replacing the rear window, you can immediately pick up the car. If the outside temperature is less than +10 degrees, then it is better to let the car sit for another 2-3 hours so that the glass can properly adhere to the glue.
GMC Rear Window Replacement Cost:
Types of damage
There are 2 main types of damage to car windshields: chips and cracks. Chips are small, most often located at the edges, areas of destruction of one of the triplex glasses (usually the outer one). You can operate a car even if there are a large number of chips without urgently replacing the glass.
In turn, cracks are through-cut damage that has a longitudinal or branched shape. They can appear even from a small pebble, but, regardless of their size, they pose a serious threat. Thus, over time, cracks in the glass can increase, gradually occupying an increasingly larger area, which can ultimately lead to a weakening of the glass surface and its complete loss.
Considering that this can happen even while driving, it is worth understanding that the only solution when cracks appear should be to replace the windshield (and, if necessary, replace the rear window of the VAZ 2114).
Replacing the windshield of a VAZ 2101-2107 (how to install glass on a VAZ classic)
It is worth noting that in some cases (for example, when the crack occupies a small area), temporary measures can be taken to prevent its increase, which will allow you to use the car for some time without replacing the glass.
- drawing 5 mm lines using a glass cutter in front of all ends of the crack;
- drilling small holes in front of each end of the crack using a pobedit or diamond drill;
- contacting a car service to seal (seal) the crack.
Required Tools
First you need to select a new canvas. Craftsmen recommend choosing double glass with a polymer layer or single-layer tempered stalinite. Required equipment and related materials:
- nylon cord - about 5 meters;
- rubber hammer;
- slotted screwdriver;
- sealant;
- anti-corrosion agent and primer.
Preparation involves choosing a comfortable room for work; you also need to select equipment, purchase new glass and dismantle the old fragment.
You can put the old seal on the glass or purchase a new element to make the job easier.
Replacement principle
When replacing the windshield on a VAZ 2109 car, it is necessary to take into account its dimensions. When purchasing, it is important to compare the auto glass article number with the data indicated on the factory element. The size of the frontal fragment is standard, as on all VAZ models. Rules and nuances of replacement:
- The rubber seal should fit tightly in all corners, and the structure itself should fit into the side, top and bottom sides of the frame.
- Installation of glass requires the installation of an internal lock. The locking mechanism is an important element during installation; it is shaped like a wedge. It needs to be installed in the center, but the wires should be routed around the entire perimeter.
- Careful removal of the structure is required first. It is important not to damage the frame.
- If the size is slightly off, it can be easily corrected with a rubber mallet.
- Anti-corrosion treatment of the element and frame is also necessary. It is recommended to use a rust modifier and primer. After drying, sealant is applied to the frame, then sealing material is installed. The external and internal grooves of the frame are lubricated.
The length of the nylon cord is equal to the size of the car glass. It is better to purchase this material with a diameter of at least 4 mm. The quality of the cord is checked by touch; it must have a slippery surface. The nylon fits into the grooves of the seal.
Removing the seal
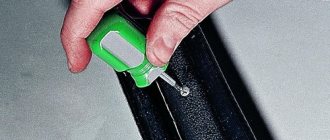
Removal of the sealing element will be required when replacing the windshield frame or the most transparent part. Removal is carried out from the passenger compartment, strictly according to the instructions:
- The windshield wipers are removed.
- Use a slotted screwdriver with a width of 10–12 mm to pry off the seal. The tool should be used carefully so as not to damage the rubberized material if you plan to use it in the future. You should start from the middle of the top edge. By pressing the top part with a screwdriver, the glass can be easily removed.
- When part of the sealing fragment is removed, the auto glass will already be movable. It is necessary to expand the area between the metal and the seal.
When you manage to remove most of the rubber, it will be possible to pull out the glass structure.
Removing old glass
To understand how to remove a VAZ windshield, you should refer to such a device as glass holders. A device with vacuum suction cups will allow you to carry out the process in an accelerated mode. This tool is installed on the sides of the glass. After fixation, a jerk is made upward. You can't do this without an assistant. If the glass holder is not found, a screwdriver will help.
Using a slotted screwdriver, the remaining sealant is pushed out. An assistant must hold the glass to prevent it from falling out of the frame. If the work is carried out alone, then you can play it safe by laying soft material on the hood of the car. Then the glass is pushed out of the cabin.
Windshield installation
Installation of a windshield is required if the product has been used for a long time and there are cracks. The impact of aggressive detergents, temperature changes, ultraviolet radiation, precipitation, and high humidity affects. To find out how to install VAZ auto glass, you should read the instructions, also prepare an installation kit and invite an assistant. Installation starts from the middle of the bottom contour of the frame:
- The seal is applied to the frame.
- The cord is laid. The loose ends are sent inside the cabin. The lock and wires are laid.
- After laying the sealing tape, the glass is inserted and the cord is pulled out.
To ensure that the glass element is firmly in place, it should be tapped slightly with your palms. It is important that the rest of the cord fits into the niche and that the seal does not stick out anywhere.
After the first trip on transport, final shrinkage will occur. The last step is to return the windshield wipers to their place.
Adjustment
The door of the VAZ 2109 is hanging loose. To adjust the doors on the “nine” you need to have only two tools with you:
- A good screwdriver;
- Hammer.
Front doors
On the “nine” the front doors are adjusted as follows:
- The position of the latch changes;
- Before carrying out this procedure, you need to carefully outline the contours of the latch on the stand;
- If the front door of the “nine” closes too tightly, then you need to loosen the bolts of the clamp, move it a little outward, and then tighten the screws thoroughly;
- If the front door closes poorly, then the latch must be pushed inward.
Note. During the operation, care must be taken to ensure that the door does not sink or protrude relative to the body.
- If the door drops below the level when closing, then the latch must be raised;
- If the door rises when closing, but sags in the open position, the latch must be lowered.
Note. To ensure that the adjustment of the latch is not disrupted in the future, it is reasonable to install a gasket under it. It is better that it is not rubber, but waterproof sandpaper. The gasket will help fix the distance of the latch from the post so that the pin of the mechanism does not touch the cover of the external lock.
- If you need to adjust the inner handle of the lock, you should move the bracket under the fastening screws. There are oval holes on the inner panel of the door that will help in this matter;
- If the internal handle does not cope with its duties and the door does not open well, then the bracket bolts are loosened, the handle is moved to the desired position, and the screws are tightened.
Rear doors
Adjusting the door on a VAZ 2109
The rear doors are adjusted as follows:
The bolts securing the hinges are loosened, the gaps between the body and the door (see Malfunctions of VAZ 2109 doors: how to fix them) are adjusted taking into account the draft and the screws are properly tightened.
Helpful advice. To determine the amount of displacement of the door hinges, it is necessary to outline the contours on the counter in advance. To check the draft, apply a load to the door, slightly open by 5 degrees, with a uniform increase to 100 kg and then decrease to zero.
Hood
Adjusting the door of a VAZ 2109
The procedure for adjusting the hood cover is as follows:
- The height of the pin changes in relation to the front surfaces of the front wings and radiator trim. A pin and springs secure the hood in the closed position. The pin itself is screwed into the hood and locked with a lock nut. There are cups installed on it with a spring between them;
- To adjust the hood cover, you need to loosen the hinge bolts, move the hood so that the gaps between it and the body are as they should be, and then tighten the screws thoroughly;
- If the hood lid does not close well, then you need to loosen the fastening of the pin, move it until it matches the lock socket, and then tighten the lock nut thoroughly;
- If the problem with closing the hood is in the lock, then with the hood open, you need to outline the contours of the lock body, and then move it to the desired position. After that, tighten the bolts and check how the lid closes.
The doors of the VAZ 2109 are hanging
Fifth door
To adjust the fifth door on a VAZ 2109, do the following:
- You should know in advance that the goal will be to achieve a gap size around the perimeter of 5/2 mm;
- It is necessary to outline the contours of the lock, loosen the hinges, and then move the latch to a new position. The bolts are tightened lightly, the work is checked, and then finally secured.
9's trunk door
Note. You should know that the luggage compartment lid hinges on the “nine” have a torsion mechanism that facilitates easy opening. If you move the ends of the torsion bars to one of the locking teeth, you can adjust the opening gain adjustment.
How to remove and install rear window
Removing the rear window is similar to the front fragment, only removing the rubber seal should begin not from the middle, but from the edges in the upper part. After the tape is pulled out along the top layer, the auto glass is removed in or out. The rear window is installed on a VAZ model 2109 using a rope or cord. Algorithm of actions:
- The rope is inserted into the frame to the middle, into the groove, which will be closer to the outer glass part.
- On the other side, a similar operation is carried out. The rope cords must cross. Drowning into the groove until it stops.
- The auto glass is placed in the opening. The structure is slightly pressed: not inward, but downward.
The finish is the removal of the rope. It should not be pulled vertically, but horizontally. The seal is being installed. It should first be wetted so that it becomes soft. After drying, the material will harden and fix the edges of the glass.