How does the starter of the VAZ “Ten” work?
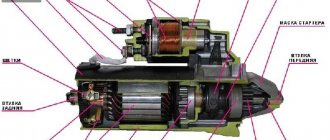
Domestic “tens” are equipped with a starter unit with number 5702.3708, which is essentially a DC electric motor. One of the main components of such a device is a traction relay, as well as a planetary gearbox. The motor is excited by the action of permanent magnets installed inside the unit structure. The body of the mechanism itself is made of steel; it is connected using two pins to the covers of the device.
Designation of the component elements of the device
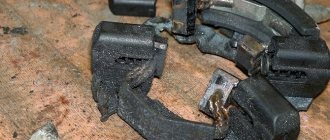
Also, the design of the starter unit implies the presence of an armature and a stator. The armature is designed to carry out rotation in metal-ceramic liners, as a result of which the rotation is transmitted through a gearbox to the device drive. When the driver turns the key in the ignition, voltage from the car's battery is transferred to the relay windings. As a result of the influence of the magnetic field, the armature is first retracted, causing the gearbox gear to mesh with the flywheel. Accordingly, this leads to the closure of the contact bolts inside the structure.
Then the armature itself remains in the same state, it is fixed in this way with the help of a holding winding. When you turn the key in the ignition switch, this winding is de-energized. Ultimately, this contributes to the fact that the armature returns to its original position (the author of the video is Avtoelectrica HF).
Tens starter device
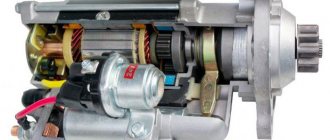
The VAZ 2110 is equipped with a mechanism model 5702.3708, which is a DC motor containing two main components: a traction two-winding relay; planetary reductor. This motor is excited by permanent magnets. They are attached from the inside of the starter housing, which is made of steel. The specified body is connected to the covers (fastening is done using two studs).
The starter design includes an armature and a stator. The armature shaft rotates in cermet liners, and from it the rotation goes through the planetary mechanism to the drive. When the starter starts, the car battery transmits voltage to the relay coils. The armature, experiencing the influence of a magnetic field, is retracted, after which the planetary gear gear engages with the flywheel, which causes the contact bolts in the device to close.
After this, the armature remains retracted, and its fastening is ensured solely by the holding winding. When the driver turns the key in the lock, de-energization of this winding is noted. This causes the anchor to take its initial position.
Characteristic malfunctions of the mechanism
If the device stops working, the reasons may be:
- Low battery. Before repairing the VAZ 2110 starter, you need to make sure that the battery is fully charged and operational.
- The appearance of oxidation on the wires, as well as the terminals of the mechanism. As a result, the contacts can no longer transmit current, and therefore the operation of the starter device will be impossible. This malfunction also includes poor fastening of the wiring, in particular the lugs. In this case, in order to get rid of the malfunction, you will need to clean each contact, as well as the terminals. If during the diagnostics you notice that there are loose elements or clamps on the mechanism, then they should be secured as much as possible. In addition, the connecting components will need to be treated with Vaseline or grease, this will further prevent oxidation of the contacts.
- Failure of the traction relay. Due to the inoperability of this device, short circuits may occur in the unit, which will lead to a complete stop of the mechanism. A failed element will need to be replaced. The reason may lie in a broken electrical circuit.
- Failure of the traction winding - such a malfunction can also cause short circuits in the system.
- Failure of the contact part of the ignition switch. Such a malfunction, as a rule, cannot be repaired, therefore, when it occurs, the contact group must be replaced.
- Anchor failure. Its malfunction may manifest itself in the fact that this element cannot scroll as a result of complications during rotation. For more accurate diagnostics, this component should be dismantled and the efficiency of its rotation should be diagnosed. If the diagnostics confirm a faulty armature, then the device must be replaced (the author of the video is the stas di channel).
Node malfunctions
The most common starter breakdowns are divided into several types. These include:
- Damage to the electrical circuit. A sign of such problems is slow rotation or complete absence of it at the crankshaft when starting the internal combustion engine. The reasons for this phenomenon may be a discharge of the battery, rupture of the contacts of the ignition device, unreliable fixation, wear of the wires, or violation of the integrity of the wiring suitable for the relay contact group. If, when starting the internal combustion engine, the armature does not respond and the relay does not operate, then the cause of the failure is most likely due to a break in the solenoid relay wire. In the absence of the described “symptoms”, it is necessary to dismantle, check the plates for short circuits, and the presence of traces of “burning” in the collector system.
- Worn starter brushes. The presence of such problems may be indicated by difficulty starting the car, but not always. The reason for this phenomenon may be “hidden” in a battery failure. Complete wear of the brushes leads to the spring “resting” against the brush holder (contact is ensured only due to its mass). This can be easily checked by changing the position of the starter. The reason for premature wear is the misalignment of the brushes during the operation of the starter.
- Broken traction relay. This is indicated by a failure of the internal combustion engine, since it will not be possible to start the engine without a working relay. The “symptoms” of a malfunction of this starter element include its rapid rotation, even after starting the internal combustion engine, idling movement (without contact with the flywheel of the engine, which does not start), and a click after turning the key in the ignition device. It may not exist if there is a break in the coil, the armature is jammed, or there is no power for some reason.
- Lack of starter rotation with a characteristic “buzzing” sound. This phenomenon indicates the occurrence of a short circuit in the electrical circuit, in which power is supplied to the brushes of the electric motor. However, it is in working condition. In such a situation, the holding coil often does not work and the bendix does not move. Its gear cannot engage the flywheel gear, and the electric motor runs in idle mode. The reason may be that the force of the retracting element “enters” the bendix through a lever made of plastic (has the shape of a grip). If the movement resistance of the bendix is high, then the plastic elements break down. As a result, it is not moved to the working position and the starter rotates, but does not transmit torque to the flywheel. Another reason for the failure of the rotor can be severe wear of the teeth, which are located on the rotor shaft of the electric motor. Do not forget that complete destruction of the mentioned teeth can also cause failure. This type of malfunction is related to the breakdown of the motor and is not related to the functioning of the drive. The presence of such a breakdown is indicated by the activation of all starter mechanisms, that is, the rotation of the electric motor and the transition of the bendix to the working position. It can be locked by turning the key in the ignition.
Many car enthusiasts complain that the battery discharges quickly and cannot activate the starter. You can read about the reasons for battery discharge here:
The main malfunctions of the unit include: the appearance of oxide on the wires and terminals, failure of the traction relay and traction winding, wear of the brushes, breakage of the armature
The listed faults can cause more serious problems if they are not corrected in time. Ignoring problems will most likely lead to vehicle failure at the most inopportune moment. The best solution is to contact a specialized service station when the first signs of the listed problems appear.
The following material will help you figure out why the starter does not turn in a VAZ 2110 car:
Instructions for repairing and replacing the device
Replacing a VAZ 2110 starter and repairing it looks like this:
- Disconnect the battery and disconnect the wire plug from the relay. Dismantle the wire itself, which o.
- The starter mechanism should be disconnected from the engine; to do this, unscrew the nuts that secure it.
- If you are making a replacement, then at this stage the device can be dismantled and replaced with a new one. If you decide to repair, then move on.
- On the relay itself, unscrew the nut, and then disconnect the traction element from the screw. The relay is removed; to do this, you also need to unscrew the two clamps.
- Then the anchor is dismantled from the seat; to do this, the element should be slightly lifted up.
- Remove the pins, and then remove the starter cover. The cover is dismantled first with the drive and gear element, and then with the brush assembly and their retainer, which is located next to the commutator.
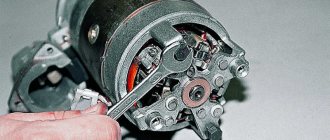
- Next, the gear is removed from the anchor shaft, and the anchor itself is then removed. Having done this, you can remove the gears from the gearbox. If they show signs of damage or defects, the gears should be replaced.
- The gear component is removed from the cover. Check the quality of the seal and replace it if necessary.
- Using a mandrel, it is necessary to dismantle the restrictive ring; it is located directly on the locking ring, after which the drive and other elements, including supports, levers and washers, are dismantled. Each of the elements, if necessary, must be replaced.
- After dismantling the brushes, you need to check them. If signs of wear are visible, the brushes are replaced. All failed components are replaced, and the starter is reassembled in the reverse order.
Replacing starter brushes
The engine on VAZ cars may not start well due to worn brushes. On the starter, the entire brush assembly is replaced at once; it is located under the rear cover. To change the brush assembly, the starter must be removed and disassembled:
- unscrew the fastenings of the back cover;
- here, on the cover, we tighten the two screws securing the brush assembly;
- remove the cover, prying up the rubber seal, take out the brush assembly, you can slightly pry it off with a screwdriver;
- install a new brush assembly, it is necessary to fill the brushes so that they can be installed on the rotor commutator;
- then the starter is reassembled in the reverse order and it is installed in place.
At this point, the replacement of the starter brushes can be considered complete.
Starter repair for VAZ 2110, VAZ 2111, VAZ 2112
Welcome! A starter is a very necessary thing in a car; thanks to it, the engine of the car turns on and starts, but recently starters have begun to be counterfeited and made of poor quality, and therefore many car owners, when installing a new starter, after a very short period of time go back to the service center and replace it with a new one , although you don’t have to change it at all, but simply repair it thoroughly yourself and at the same time put lubricant in the gears, which is so little put at the factory where new starters for cars are made.
Note! To repair the starter, you will need to take from the following tools: Keys, namely wrenches, sockets, sockets, in addition, expansion pliers will be required and a screwdriver (It all depends on what exactly you will change in the car, if there is only one solenoid relay, for example, then In this case, you won’t need anything else except wrenches)!
Summary:
When should the starter be repaired? If your car stops starting or starts poorly, then this indicates that the starter may have become unusable, but besides it, the ignition switch can also cause problems and the car will not start or even the same wires, so it’s clear to say that it’s the starter it didn’t break so easily, but still the most common reasons are when something clicks when you turn the key and the car doesn’t start, or when the starter spins but does it very weakly and the engine cannot start due to this (In this case, the battery is also may be discharged), and the last thing is when, when you turn the key, you hear extraneous sounds (grinding of metal and the like) if you hear such sounds, then we do not recommend using the car in the near future, otherwise in the future you will need to change the crown of the flywheel You will have to remove the flywheel itself from the car to do this.
Types of starters
There are 2 types of starters
, which are used on VAZ cars and differ in efficiency and internal structure:
The traditional type of starter has several negative aspects, which forced engineers to rework its circuit. The key disadvantage is the low permissible productivity. Due to the gradual increase in engine volume, automakers were forced to increase the power of starters - this affected their price and dimensions.
Units with a gear unit produce the maximum amount of power and at the same time are ergonomic and lightweight. For the system to work correctly, you do not need to spend a lot of energy. The uninterrupted functionality of the unit does not require a lot of voltage, so even a worn-out battery pack will not cause a failure of the gear unit.
How to repair the starter on a VAZ 2110-VAZ 2112?
Note! First, the starter is removed from the car and then checked for functionality. You can find all this information in the article entitled: “Replacing the starter on a VAZ”, but in addition, check out the video below, which talks in more detail about How can you check the removed starter for functionality?
Disassembly: 1) First, unscrew the nut indicated by the blue arrow and remove the wire behind it indicated by the green arrow, thus after this operation the solenoid relay can already be removed from the car and no wires will interfere with this (But regarding the removal of the relay, a little We’ll explain everything later, since there are still a couple of bolts to unscrew, but if you need to change it, then immediately skip all the points and read carefully point number 3 in which everything is described), now unscrew the two nuts (Indicated by red arrows ) tie rods that hold the stator and then disconnect it from the front cover.
Summary
It is worth noting that a starter without a gearbox has a larger gap between the armature and the stator than a geared counterpart. For this reason, its permissible shaft misalignment is also greater.
And one more piece of advice. If the starter is still disassembled, then it would be a good idea to replace the brushes. The parts are cheap, so waiting for them to fail and then dealing with them separately is not worth it. Of course, for all the operations described above, at least a little experience is required. And, as you know, he is a profitable business. In the end, to get it you have to try. Go for it!
The starter on a car is used to start the engine; if the starting device is faulty, starting the car will be problematic - you will have to use a tow or push it.
On VAZ cars, depending on the model, different types of starters are installed, but they are all designed almost identically, with only design differences.
Checking the functionality of the VAZ 2110 starter - why doesn’t it turn?
Before we begin disassembling the starting system mechanism of interest to us, we should make sure that it does not work precisely because of its malfunction. The check is performed as follows:
- We turn the gear in the direction of rotation of the armature. It should not turn in the opposite direction. If such reverse rotation is present, this indicates a faulty starter.
- We check the ease of movement of the device coupling along the shaft (use a screwdriver). With a normally functioning mechanism, the coupling moves without the slightest difficulty.
Using the “lighter” wires and the battery, we analyze the serviceability of the starter. To do this, we connect the negative terminal (black wire) to the starter housing, and connect the traction relay through its control cable to the positive terminal (red wire).
In cases where the relay operates normally, the drive clutch extends and a characteristic click is heard. If it does not turn on, you will have to disassemble the starter and replace the traction device.
Also, the starter of a VAZ 2110 car does not turn when its anchor does not work. Checking the armature is done as follows: remove the cable from the relay (from its output); connect the specified cable to the contact bolt. If the armature is in good working order, its rotation frequency should be at least five thousand revolutions per minute. If the frequency is lower, the starter does not operate.
Replacing starter bushings
If the bushings are worn out, the starter begins to turn slowly, and in some cases does not start at all. There are also differences between starters of the VAZ 2109 and VAZ 2110 types and in the location of the rotor bushings - the front bushing on the “nine” or “fourteenth” model is located in the front gearbox housing. To replace this bushing, you only need to remove the starter; disassembling the starting device itself is not required. The bushing in gearbox 2109 fits tightly, you can try to pull it out using a 14 mm tap.
The front starter bushing is pressed into place tightly, for this you should use a mandrel, and in order for the rotor shaft on the starter to fit into the bushing, before installation you should go along its inner diameter with a reamer of 12 mm. Replacing the starter bushing in the gearbox should be carried out carefully; chips and any parts should not get under the flywheel.
The rear bushing is located in the starter cover and to replace it the cover must be removed. In some cases, it is more convenient to replace the entire cover than to go through the hassle of re-pressing the bushing.
How to disassemble and repair the VAZ 2110 starter?
It is impossible to troubleshoot the starter without removing and disassembling it, so it has to be removed. The diagram of this procedure is given below: remove the battery terminals; We disconnect the cable connector from the relay; remove the wire marked “plus”; disconnect the starter from the engine by unscrewing the mounting nuts.
The mechanism has been dismantled, now you can begin disassembling it by performing the following steps:
- Unscrew the nut on the relay and disconnect the traction device from the contact bolt;
- remove the relay by unscrewing the two clamps;
- remove the relay armature from the lever (you need to slightly lift it up);
- remove the starter cover (it is necessary to remove the studs).
After all these operations, it becomes possible to remove the mechanism cover: first, it is removed as an assembly with the drive and gearbox on the drive side, and then with the brushes and their holder on the commutator side. Now you can remove the gear from the anchor shaft and take out the anchor, and then dismantle the gearbox gears. If they have defects, the gears need to be replaced (it is because of them that the starter often does not turn).
Next, with some force, we press on the drive gear and remove the gearbox from the cover. After this, remove the support from the lever (it is equipped with a sealing element) and check it for hardening and deformation. Very often the starter does not turn because of such little things. Just install another gasket, and you will forget about the inoperability of the starting system for a long time.
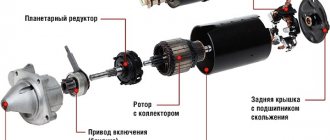
At the next stage of disassembly, using a mandrel, remove the restrictive ring from the retaining ring, then remove the drive, the lever ring and the lever itself with the washer and driver, as well as the lever spring. Now you can remove the drive shaft support, gear, and seal ring. Replacing the last of these parts is necessary in cases where it has lost its elastic characteristics (or has obvious signs of deformation).
Starter, bushing sizes and how to remove them.
| Outlander - Operation and repair, technical issues and exchange of experience |
Today I went over the starter, the repair budget is 70 rubles
price of two bushings. The dying starter turns very loudly and hard, at first I thought that my battery was discharged. So I took it off and, as it turned out, I barely had time; a little more and I would have had to look for a contract one. Below is information that will be useful for those who like to do it themselves, especially the sizes of the bushings. I’ll skip how to remove and disassemble the starter, there’s already information about removal. Outlander. Photo report. Removing and disassembling the starter
The main wear occurs on three bushings. This is the front one, which is in the area of the flywheel and bendix, it breaks into rubbish. The middle one, which is in the planetary gearbox and which is not sold separately. The back one, which is in the cover in the area of the brushes.
In general, there are three more bushings at the gearbox satellites and another one at the outer ring of the gearbox, but they hardly wear out, because constantly lubricated.
The dimensions of the bushings are in the picture below. You can buy the front and rear bushings, but suddenly someone has free access to machines, so the sizes will not be superfluous. And the middle one needs to be sharpened or selected according to size in spare parts stores. Bushing material is bronze.
Here is a photo of the worn bushings Front and rear, the wear is extreme. I couldn’t take a photo of the middle one, it has the same wear.
How to remove bushings You need taps for cutting threads A 10 or 12 tap for broken front and rear bushings An 8 tap for a broken middle bushing Screw the tap into the bushing and cut the thread inside. Then we screw in the bolt and pull it out along with the bushing. My front bushing almost fell off by itself, I just hooked it with a tap and pulled it by hand, the wear was severe. My rear one came out at the stage of screwing in the tap. And I pulled out the middle bushing with a bolt, you need a nut and a large washer, we twist the nut that rests on the washer and it pulls out the bolt. Here are the pictures
Pressing is the most pleasant part of the bulkhead. It is very easy to do with a bolt and a screwed nut. The bolt enters the bushing and the nut presses on the edges. With a hammer or a vice, everything goes in easily. Here is the result
About the middle bushing, it’s better to grind it out, or choose a suitable one if you have it somewhere. Because I was without a car, I had to make collective farms from scrap materials that I found at home. I found some kind of bushing with an inner diameter of 6mm and an outer diameter of 9mm. I took out the old one and drilled it to 9mm. Then I pressed it in, and then I pressed a new one into it, it turned out great.
Now a warning: If you buy a non-original bushing, check the dimensions before pressing. The front hub Ika 4.4464.0 which I bought as a replacement was 2mm higher. I had to grind it off, because the bushing must be flush with the body, and in no case should it protrude, otherwise the gearbox shaft will jam when you tighten the starter with bolts.
Source
Disassembly and repair of brushes, armatures, bushings and starter assembly dozens
The brush holder is removed from the commutator side by removing two screws. The pressure springs and the entire brush assembly should be inspected, paying special attention to its stoppers. All deformed elements are immediately replaced. Installing new brushes is a simple process, so there is no need to describe it in detail.
But you may have to “tinker” with the armature, since it is often the reason that the “ten” starter does not turn (and replacing the bushings can take a lot of time). It is advisable to lightly grind the armature commutator, and also turn it on a lathe if its roughness is high. The armature is replaced when the runout in relation to the axles of its core is more than 0.08 millimeters. It is also recommended to install a new anchor if there are large nicks and burrs on it.
It may be necessary to replace the bushings (the shafts rotate in them), which are located on the drive side in the cover of the trigger mechanism we are describing. Installation of new bushings is recommended if there are holes on them and if they are heavily worn. Reassembling the starter is done in reverse order.
Other faults
When the solenoid relay is activated, but the engine does not start
The following predisposing factors can be considered:
Even if only one brush is worn out, all four parts will have to be replaced. It is impossible to restore the retractor part on a VAZ unit in a garage using improvised means, which is why many car owners replace it. As an exception, cases are considered when any contact is oxidized - it can be cleaned and the unit reassembled. If the windings are damaged, replacement is carried out as follows:
If there are chips or damage on the housing with the starter relay, it will have to be replaced entirely.
Replacement and repair of VAZ 2110 starter
The VAZ 2110 starter is a powerful DC electric motor. If used incorrectly, the unit may be damaged or burn out. One example is holding the key in the “start” position for a long time.
It is quite easy to determine if the starter is faulty - it does not turn, it clicks when you try to start the engine, or it simply does not work. This article details the process of removing and installing a new component. In some cases, the starter can be repaired - a separate section is devoted to this process.
VAZ car starter - design and repair features
Features of the design and operation of a VAZ car starter: design, types, connection, dismantling and replacement, diagnostics and repair. Video about VAZ starter.
When the car engine is running, the movement of the car engine is supported by a flywheel, which provokes its rotation. The crankshaft has several counterweights. Both the flywheel and the components of this unit generate an inertial effect that prevents the motor from stopping at a “dead point”.
In terms of design and specifics of operation, starters for VAZ look almost the same as systems from other manufacturers. The only differences may be the power of the device. For example, a low-power starter is suitable for a gasoline engine, and a more powerful one for a diesel engine.
Purpose of the starter and its location
The “ten” has a small, but quite powerful 4-band electric motor, which is responsible for the primary rotation of the crankshaft. Without the participation of an electric motor, it is impossible to ensure the required crankshaft rotation speed. We replace this unit, since for a gasoline engine with an average cylinder capacity, 3 kW of energy is enough to start.
The starter supplies energy from the battery; it is a DC motor. Receiving voltage from the battery, the motor power is increased by four brushes. They are the main elements in any car starter. If necessary, the brushes can be replaced. If the starter meters are faulty, they can be purchased separately and replaced. But to do this, in any case, you will first need to remove the starter.
Starter replacement
You can remove the starter yourself, as the procedure is quite simple. You need to start by preparing the tools for work.
Required tools:
- Extension.
- Handle with ratchet.
- Socket head for 15 and 13 mm.
Attention! Removal can begin after disconnecting the negative terminal from the battery. This applies not only to dismantling the starter, but also to any other work related to electricity.
To make the process easier, you need to remove the air filter housing.
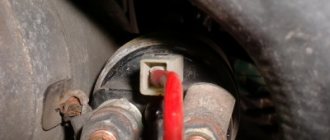
- The next step is to disconnect the wiring from the solenoid relay. It is important to ensure that the positive wire is also unscrewed from the terminal. The photo shows the elements that we need to dismantle.
If it is no longer possible to repair the VAZ 2110 starter yourself, then replace it with a new unit yourself in the reverse order.
Replacing the retractor starter
The main problem of the solenoid relay (SR) is burning of the contacts (nickels). The contacts burn out due to the high starting current when starting the internal combustion engine, and often the contacts oxidize under the influence of the environment. On many VAZ car models, the solenoid relay can be changed without removing the starter itself.
Let's look at replacing the starter retractor relay without removing the entire starting mechanism using the example of a VAZ 2112. It is more convenient to carry out repairs in a pit or a car lift, but you can do without them by placing the car on a flat, dry area.
We change the VR as follows:
- open the hood and disconnect the ground terminal;
- pull off the red wire with the chip that goes to the VR;
- Using a 13mm wrench, remove the nut securing the supply wire and move the wire to the side;
- unscrew the bottom nut on the BP by 13, remove the stator winding wire from the terminal;
- take a flat-head screwdriver (or a wrench if bolts are installed) and unscrew the two screws (bolts) securing it from behind the solenoid relay;
- We remove the old BP and install another one in its place, reassembling it in the reverse order.
Replacing the VAZ 2109 starter
On VAZ 2108-09-099 models, replacing the starter is not at all difficult; this does not even necessarily require a pit or a car lift. We make the replacement as follows:
- open the hood and first remove the battery terminal (ground);
- We disconnect the upper wire with the chip from the solenoid relay; it simply pulls off;
- unscrew the fastening of the positive terminal with BP (key 13), take the wire to the side;
- Using the same 13mm wrench, we unscrew the three nuts securing the starter itself, the most difficult thing is to get to the bottom nut, but if you try really hard, you can get to it;
- Having freed the unit from all fasteners, we dismantle it, and put a new starter in place, putting everything together in the reverse order.
That's it, replacing the VAZ 2109 starter is complete; with some skill, the work takes no more than two hours.
Repair
You should start with the pull-out relay. You should remove it carefully, as you can easily pull out the contacts. They need to be inspected for oxidation. If there is a lot of rust, then clean the copper contacts - this applies not only to the lever, but also to the bolts.
You can check the relay using a tester:
- “Minus” should be applied to the housing, and “plus” to the flat contact coming from the ignition switch.
- There is an alternative method, where the “plus” goes to the flat contact, and the “minus” to the brushes that are installed in the housing. When working properly, you can hear a clicking sound.
If the problem is in the contacts, then you can “throw” tin on the washer. If the condition of the relay is very bad, then it is easier to replace it. The asking price is about 500 rubles. If the starter burned out recently, you may smell a burning smell. By removing the retaining ring, you can verify this. In this case, the unit needs to be replaced. It can be purchased for about 1,500 rubles.
Starter malfunctions
Of course, the mechanism may stop working, and therefore experts identify several malfunctions here:
| The car battery is discharged. That is, before sinning on the starter, you should check the battery charge and that it is in good condition. |
| It is also worth checking the wires and its terminals for oxidation. If it is detected, then the current will not flow to other mechanisms. Of course, this can also include poor wiring. In order to fix all this, it is necessary to clean the contacts and terminals; during cleaning, you may find that the elements are loose and it is best to securely fasten them. |
| Do not forget that the traction relay may also fail, and the device will close; all these faults will lead to the device being inoperable. |
| If the starter winding is faulty, there will also be short circuits in the system. |
| The ignition contact part may also fail, but it cannot be fixed or repaired, so it will have to be replaced. |
| Also, the armature in the device may fail; this will become apparent if malfunctions occur during the operation of the device. To identify this malfunction, it is necessary to diagnose the starter. |
DIY starter repair on a VAZ car
The article describes in great detail with photo accompaniment the process of repairing a starter on a VAZ 2110 car.
In a new car, breakdowns and malfunctions in the starter rarely occur. But if the car has been in service for more than 5 years, then problems may arise. The car owner himself can determine if the starter is faulty - the car will not start, there are uncharacteristic sounds when starting the engine, the starter turns off spontaneously.
But many motorists do not pay attention to such car signals. And they bring the situation to the point where it is no longer possible to “save” the starter. But an experienced motorist who monitors his car will immediately determine the malfunction of this part by the sound of the car running. So how do you repair a starter? Its repair takes place in several dozen stages described below.
Lada 2109 PROCESSOR › Logbook › Replacing the starter support sleeve
In this article, we will talk about starters, specifically we will talk about such work as replacing VAZ 2107-2110 starter bushings. This problem (wear of starter bushings) is very common among cars that have been in use for a long time and require partial service due to the gradual wear of parts.
The starter armature rotates on special bushings made of bronze with graphite additives to reduce wear due to friction. The service life of bushings is usually long and their failure is possible only with long-term use.
On VAZ cars, several types of starters are installed, which differ significantly from each other, but the principle of replacing bushings is almost the same, so we will consider everything in order.
Let’s not get too excited, as they say, and let’s get straight to the point.
First we need to completely disassemble the starter. How to disassemble it correctly, I recommend reading the corresponding article “Disassembling the VAZ 2106-2114 starter”