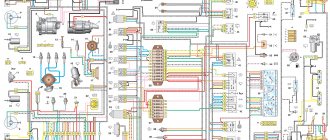
Replacing the Chain Guide VAZ 21213
Replacing a chain damper on a VAZ 2101-VAZ 2107
All parts that are in a car engine do not last forever, so they need to be replaced from time to time when they fail, and, by the way, such parts should also include a chain damper. After reading this article, you will learn how to properly replace the chain damper on “classic” machines of the family.
How much will it cost to replace the damper chain on a VAZ 2101-VAZ 2107?
1) Chain support will cost you approximately 100-400 rubles.
When do I need to change the schematic damper on a VAZ 2101-VAZ 2107?
The chain stabilizer must be replaced if:
1) Knock in the area where the chain is located.
2) And also when the chain oscillates and when the chain jumps on the sprocket tooth.
What is required to replace the damper on a VAZ 2101-VAZ 2107?
3) New chain valve.
4) Hook. (Or anything else that can connect the circuit stabilizer!)
How to replace a chain damper on a VAZ 2101-VAZ 2107?
1) The first thing you need to do is remove the air filter housing. (How to remove the air filter housing, read “ Replacing the air filter housing on a VAZ 2101-VAZ 2107”)
2) Then remove the device head cover. (For information on how to remove the block cover, see the section “Adjusting the valve timing using markers on the VAZ 2101-VAZ 2107”, in the dilution , from pt 1-10)
3) Now unscrew the chain tensioner nut cover.
Replacing the Niva damper is quite simple
Damper replacement
The fields are simple. Everything is in the creator's video IMHO! The creator is not responsible for your actions!
+ Change sedative circuits. Do it yourself!
Chain noise
in the
VAZ
due to the stone
there is a sedative
.
Show me how to install a new sedative
and raise
the chain
.
4) Then release the chain tension by pushing the chain tensioner onto the shoe with a screwdriver. (To see what chain tensioner pads look like, see the "Beginners!" section at the bottom of the article)
5) Hold the screwdriver and fully tighten the chain tensioner cover nut.
6) Then hook the chain stabilizer with any hook.
7) Holding the damper by the hook, unscrew both bolts securing it.
 After this, replace the damper with the screw that secures the camshaft sprocket.
Turn the bolt clockwise!
1) First install the new damper in place of the old one. (Installation is carried out in the reverse order of removal!)
2) After installation, you will need to adjust the timing chain tension. (For more information about setting the timing chain, see “Adjusting the chain on the VAZ 2101-2107”)
3) Next, install all other parts.
1) The bolts that secure the damper are of different lengths, so be sure to find them first!
2) Each valve is marked, so when purchasing a new damper, make sure the marking matches the old valve circuit!
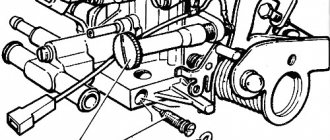
Question: Where is the switch located?
Question: what does the damper circuit ?
Answer: 1 bottom bolt to secure the chain valve.
2- Upper chain damper mounting bolt.
3- the switch itself.
Q: What does the chain tensioner block look like?
In the video you will learn how to replace the chain stabilizer , and what signs the engine will give when the damper is deformed.
Source
Replacing the hydraulic chain tensioner on Niva
The new model Nivki, which is better known to us as the Chevrolet Niva, cutting through domestic roads, inherited the above-mentioned disease from its older brother, the VAZ 21214, which, in turn, is now proudly called Lada 4x4.
But the problem is not as scary as its description. In order to keep the power unit in good condition, it is enough to always keep your finger on its pulse: listen to extraneous sounds, regularly carry out maintenance after 60-100 thousand kilometers and not let the problem take its course. Thanks for subscribing!
If it was not possible to solve the problem of extraneous noise by replacing one hydraulic tensioner with a new one, you can decide to install a mechanical device. Going to car forums for the VAZ 21214, you might be surprised how people almost unanimously give their preference to mechanics. The mechanical tensioner of the “Pilot” series is very popular among the masses. But this does not mean that you should definitely take it; among the mechanics there are a lot of worthy offers, and they are not that expensive. To lengthen the product for the Chevrolet Niva, you just need to weld an additional bushing onto the plunger.
Mechanical chain tensioner
Please note that simply replacing a used VAZ 21214 hydraulic tensioner with a new one is not the right way out of this situation. At a minimum, it is necessary to change the timing chain, which is clearly in critical condition, disposable rubber sealing gaskets in the form of rings and oil seals
And, if replacing such a simple device as a hydraulic tensioner does not present any particular problems on a VAZ 21214, then as for the timing chain, this is already a reason for a separate article.
Quality assurance
A client came to us from another service center with a complaint: After an accident and restoration of the car, something was knocking in the engine. Extraneous sounds were indeed heard from the VAZ 21214 engine. They resembled a malfunction in the timing drive, as if the chain was not tensioned. Since this engine has a hydraulic chain tensioner installed, there should not be such sounds, and if there is, then this indicates a faulty hydraulic tensioner. First of all, you need to check whether it works, whether oil is supplied to it. We take a “10” wrench to remove the tube and hydraulic tensioner. Where's the tube? Where is the hydraulic tensioner?
The tube was missing, and instead of the hydraulic tensioner, a regular chain tensioner from VAZ-2101 was installed. The “craftsmen” from service N did their best. They carried out their “dirty work” with pride and honor - they removed and threw away the hydraulic chain tensioner along with the oil supply pipe. They don’t even know that the injection Niva has a shoe of a different type, which in turn requires the installation of a hydraulic tensioner. Now everything has become clear! An ordinary, classic tensioner does not cope with its task, because... it is much shorter, so the chain dangles and makes unpleasant sounds. Remove the chain tensioner. Naturally, at its end we see an extension spacer in the form of a fitting from the brake pipe. But even that didn’t save me; this whole structure still turned out to be shorter.
We install the new hydraulic tensioner and tube in place. Let's start the engine. For the first 10-15 seconds it works with a roar - the tube and hydraulic tensioner are filled with oil. Then the engine runs quietly, without any extraneous noise.
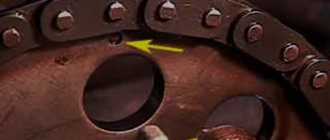
There is another reason for increased chain noise. For example, when the damper is broken, as in the photo below. In this case, the sound will resemble a chirping sound. It will appear when you change the throttle, after closing the throttle valve.
Chain damper.
Chain damper.
Post by _JJ » 19 Aug 2010, 09:49
Re: Chain damper.
Post by wwm » 24 Aug 2010, 09:18
Re: Chain damper.
Post by EVR » 25 Aug 2010, 03:35
Re: Chain damper.
Post by Captain » 25 Aug 2010, 03:53
Re: Chain damper.
Post by Miron_u » 01 Sep 2010, 23:14
Re: Chain damper.
Post by Captain » 02 Sep 2010, 03:53
Re: Chain damper.
Post by Miron_u » 02 Sep 2010, 09:39
Re: Chain damper.
Post by EVR » 02 Sep 2010, 09:50
Trouble with the head (the sedative came off)
Post by DRON_63 » June 30, 2011, 10:00
Re: Trouble with the head (the pacifier came off)
Post by GARIK » June 30, 2011, 10:04 am
Re: Trouble with the head (the pacifier came off)
Post by DRON_63 » June 30, 2011, 10:12 am
Re: Trouble with the head (the pacifier came off)
Post by Vigilant Falcon » June 30, 2011, 11:03
Re: Trouble with the head (the pacifier came off)
Post by DRON_63 » June 30, 2011, 11:15 am
Re: Chain damper.
Post by Wanderer » 07 Oct 2011, 09:06
Yesterday I changed the damper, installed a plastic one (the metal one broke into three parts =( ) Tell me which one is better? In Niva stores they sell a plastic damper, but they install a metal one from the factory.
[Posted from Niva-Club Mobile]
Replacing the timing chain on a Chevrolet Niva with your own hands: step-by-step instructions with photos
The topic of this section is Niva timing belt. This is exactly how people who want to repair this unit type in search engines. If we compare the engine with the human body, the gas distribution mechanism (hereinafter referred to as the timing mechanism) is muscle tissue, ligaments and tendons. That is, everything that conveys the basic elements of movement. The engine crankshaft sets the rhythm, and from it, through the chain and stars, the camshaft and oil pump are driven into rotation. In two separate articles I will talk in detail about the chain and sprockets. Here I want to write about the mechanism as a whole, and most importantly, why it causes so many troubles, although all over the world chain motors are considered relatively “problem-free long-livers.”
About replacing a single-row chain with a double-row one
In early VAZ 2107 models, predominantly double-row timing chains were installed. This technical solution had its advantages:
The main disadvantage of the double-row chain was its heavy weight. It is for this reason that in later VAZ 2107 models they decided to abandon it. However, drivers concerned about engine safety and reliability can always return the double-row chain back. To do this, you will need to replace not only the chain itself, but also the entire tensioning mechanism, from the sprockets to the damper and tension shoe. The shoe, as you might guess, should be wider, i.e., designed for two rows of links. The shaft sprockets must also be double-rowed.
To install a double-row chain on a “seven” you will have to install special double-row sprockets. Chains from are in great demand among owners of “sevens”
The sequence of installing a double-row chain on a VAZ 2107 is no different from the above. There is only one peculiarity: instead of single-row sprockets, double-row sprockets are installed. The same goes for the tension shoe. The procedure for installing a double-row chain using marks is no different from that described above.
So, the timing chain is the most important part of the engine. The consequences of failure of this part can be catastrophic. In especially severe cases, a seized engine cannot be restored at all. It is for this reason that the car owner must carefully monitor the condition of the circuit and change it at the slightest suspicion of a malfunction. Even a novice car owner can replace the chain. Despite the apparent complexity of this procedure, there is nothing terrible about it. The main thing is to correctly install the chain according to the marks, and no problems with its further operation will arise.
Replacing the chain tensioner on VAZ 21213, VAZ 21214, VAZ 2131
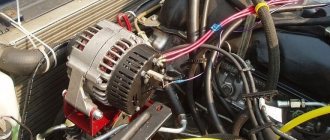
Welcome! Chain tensioner - as is already clear from its name, it is only needed to tension the chain so that it does not loosen while the engine is running, but over time this part breaks for various reasons, this happens, sometimes the tensioner simply cannot withstand very heavy loads breaks, for example, if you keep the engine speed in the red zone for a long time, the tensioner cannot withstand and breaks, but it can also break because it is not very durable, for example, there are a lot of very bad tensioners on the market at the moment qualities that really fail very quickly and after that they will need to be replaced with a new one, and you will learn how to do this from this article. Note! In order to replace the chain tensioner, you will need to stock up on: A basic set of wrenches, which will contain the most basic keys that you use almost everywhere in the car!
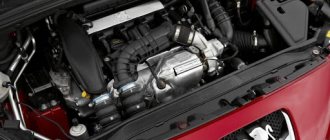
Where is the chain tensioner located? It is located on the side of the engine, it can be easily found by the way if you approach the car from the right side of the engine compartment (The countdown starts from the rear of the car to the front), there is also a battery installed nearby and there is a standard injection receiver in the form of curved pipes ( It is white), so when you stand on this very right side, look for the place indicated in the photo, this is the same tensioner.
Note! In the photo above there is one nuance, there is a completely different tensioner that was never installed on Niva cars, so don’t pay much attention to the shape of this tensioner, but just find out approximately where it is and that’s it! (There will still be a tube coming from the original tensioner, you will immediately understand, just take a closer look and it is all located almost in the middle part of the engine)
When should you change the chain tensioner? It changes only if it has become unusable, but how can you understand this, you ask? In general, when the tensioner becomes unusable, the car’s engine begins to run significantly louder, because the chain is weakened and thus there is such a roar as if you started the car with a diesel injection system, and not with a gasoline one, so if you hear something rattling in the engine, vibration may also appear, and by the way, this knocking should become less as the speed increases, that is, if the engine is noisy at idle and the chain rattles, then just give a little gas and if this knock goes away (the higher the speed, the weaker it should be knocking) then it is most likely really the tensioner, although many other parts could be to blame for this, but first you need to check it, since it is removed very quickly and is also checked accordingly.
How to replace a part
Prepare a new part and a set of tools (a long flat screwdriver, a 25 cm piece of wire, a set of open-end and socket wrenches). Place the car in a bright place and open the hood. Replacing the damper is carried out according to the instructions:
First you need to remove the screen from the engine and remove the cover from the cylinder block. In the process of this work, the gasket is almost always damaged, so it is best to buy a new one in advance. There is no point in trying to keep the old one, because it will not seal the block sufficiently. Then remove the tension roller. To do this you need to unscrew its mount. Make sure that the washer does not fall into the pan. Remove the camshaft gear without completely removing the chain. You have gained access to the damper, start unscrewing its fastenings from the bottom
Pay attention to the position of the bolts; they will need to be screwed back into the same places. To unscrew the top mount, connect the gear to the chain using a plastic tie. Unscrew the bolt and remove the damper. Hold the part firmly so you don't drop it into the oil pan, then inspect and set it aside
If you do not hold the component, you will have to disassemble the engine almost completely to get it out of the pan.
After you have removed the sedative, pay attention to its condition. If damage is visible, this unit must be replaced.
Don't wait until the part fails completely. Reassembling the engine after installing a new spare part is done in the reverse order. Treat the places for screwing in the damper bolts with sealant. Please note that during assembly, the levers (crankshaft and timing gear) must be aligned so that the marks on them coincide, and the chain must be tensioned evenly from one gear to another.
How to set engine marks on a VAZ 2121
Replacing a Niva Chevrolet chain guide
There is a standard 21213 NIVA, the engine of which has tractor traction at the bottom and lacks traction at speeds above 3000. Replacing the chain, all the sprockets, the camshaft with the bed did not solve the problem. Rearranging the chain on a tooth back and forth, too. It was noticed that the mark on the camshaft sprocket is not installed strictly opposite the protrusion; it can be placed half a tooth forward or backward. It was decided to check the valve timing. A device for adjusting valves with an indicator is welcome, but not at all required. However, I have it. The valve clearances must be properly adjusted!
When replacing the lower sprocket, check that the marks on the small sprocket and the pulley match. They correspond to TDC.
Having placed a mark on the pulley opposite the long mark 3 (TDC on the distributor drive cover), we mark marks 1 and 2 (5 and 10 degrees) on the pulley with a light marker (I used a white oil marker). We turn the crankshaft so that the standard mark on the pulley is opposite mark 1 (10 degrees) and mark 2 more marks - 5 and 10 degrees. on the other side of the zero mark. Also, by placing the extreme marks opposite the existing protrusions, we mark 15 and 20 degrees. We mark the zero mark on the second side of the pulley (now it is on both halves of the pulley). We have a scale marked on the crankshaft pulley - 20 - 15 -10 - 5 - 0 - 5 -10 - 15 -20 degrees. This is the easy way. You can make a scale out of paper, mark it more precisely, for example, with an accuracy of 1 degree, and stick it on the pulley. This method is a little more complicated, but also more accurate. I was quite happy with the 5 degree scale.
We install the crankshaft and camshaft according to the marks, as when adjusting the valves, the slider looks at the 4th cylinder. If there is an indicator, install it on the 2nd valve (intake of the 1st cylinder). We will use them to look for the moment of opening and closing of the valve. If there is no indicator, press the rocker up, using an open-end wrench 13-17. In this position, both valves of the 1st cylinder are clamped and slightly open (overlapping). Turn the crankshaft counterclockwise 10 -15 degrees. Using the applied marks, we find the moment when the intake valve begins to open by the appearance and disappearance of the gap between the rocker and the camshaft cam. We look at the pulley and the long mark on the cover, and count the degrees. For example, the mark is exactly between 10 and 15, we get 12.5 degrees. — the beginning of the opening of the intake valve. Let's remember. We move the indicator to the first valve (exhaust of the 1st cylinder) or control it by pulling the rocker up, turn the crankshaft clockwise, and find the moment when the exhaust valve closes.
For example, we got 15 degrees.
By simple calculations (in our head) we find the valve overlap point (15 + 12.5)/2 = 13.75 degrees. This point, located at TDC, is considered optimal. In our example, the overlap point moved 1.5 degrees after TDC. You can check the pie chart of the valve timing and compare the result:
On my car, the mark, with new sprockets and chain, turned out to be shifted forward by 5 (!) degrees. This is where the tractor came from. Perhaps VAZ specifically places this mark with an offset in order to increase the torque at the bottom, or maybe during assembly they use sprockets from Lada cars. In NIV, the block is slightly higher, which is why the mark shifts. Don't know. To correct the situation, a split (adjustable) sprocket was purchased and installed:
With its help, you can smoothly adjust the position of the camshaft relative to the crankshaft + - 1 tooth.
If we set it so that the overlap point does not reach TDC, we get earlier opening of the intake, an increase in power at high speeds and a drop in traction at low speeds, and vice versa, the overlap point after TDC - we have tractor traction at low speeds, and stupidity at high speeds. Exact recommendations like “how many degrees should I turn?” no one will give it to you. It all depends on the condition of the engine and personal feelings. However, you should not go more than half a tooth away from the point of zero overlap. It must be remembered that at large angles the pistons may collide with the valves. I made it so that the overlap point was shifted by 2.5 degrees before TDC, I got a good pick-up after 3000 rpm, and at low speeds the thrust remained almost unchanged. After all the manipulations, it is necessary to re-set the ignition timing, and it may be necessary to adjust the idle speed.
Source
Replacement cost
The cost of replacing the chain will be 2,600 rubles when purchasing a ready-made kit. When purchasing parts separately, the cost of the parts will be 800 rubles for a chain, 1500 rubles for a set of gears, 240 rubles for a damper and tensioner, and 550 rubles for a tensioner. When purchasing a set separately, the owner must have an amount of at least 3,100 rubles. To this you need to add about 300 rubles for a new oil seal, about 1 thousand rubles for cooling fluid and up to 3 thousand rubles for refilling the air conditioner (if it is present and there is a need).
Buying a belt for Opel engines will lighten the owner’s wallet in the amount of 3,300 to 4 thousand rubles. The price of the pump ranges from 2800 to 6300 rubles. To this it is necessary to add about 1 thousand rubles for replacing the coolant and about 2-3 thousand rubles for refilling the air conditioning system in the cabin. The final price will be at least 10 thousand rubles. Purchasing a set of clamps for camshafts will cost another 2,500 rubles.
The cost of performing work at a specialized service depends on the city. In Moscow and other large cities, the price tag for work reaches 7,000 rubles. At the same time, in small regional centers the cost of replacement is more humane and does not exceed 2500-3000 rubles.
Replacing the timing chain on a VAZ 2106 on your own
1. Remove the air filter housing from the carburetor.
2. Unscrew three nuts with a “10” wrench and four more with a “8” wrench.
3. Be careful not to drop anything above the carburetor, otherwise it will have to be removed, possibly even along with the intake manifold.
4. Next, remove the distributor cap and the fuel supply pipe.
5. Using a “10” wrench, unscrew the eight nuts securing the valve cover, then remove the washers with the plates.
6. Remove the choke cable and throttle valve drive.
7. Remove the valve cover with the gasket, which is also better to change.
8. Now you need to remove the protection from below and drain the antifreeze into the prepared container.
9. Loosen the generator mounting nut with a “19” key.
10. Loosen the clamps on the pipes and remove them.
11. Next, you need to loosen the clamp on the lower pipe of the water pump and remove it.
12. Turn off power to the fan and temperature sensor on the radiator.
13. The radiator, along with the pipes and thermostat, also needs to be removed.
14. Loosen the generator tensioner nut, then use a pry bar to slide it forward.
15. Remove the VAZ 2106 generator belt.
16. Using a key set to “36”, turn the crankshaft by the pulley to align the marks on the cover and pulley, as well as on the sprocket and camshaft bed casting.
17. Unscrew the “36” nut that secures the crankshaft pulley. Lock the pulley using a special key and unscrew it. If you do not have a special key, engage fifth gear, press the brake pedal, then use the key to unscrew it.
18. Remove the pulley. Using a “10” wrench, unscrew the six bolts and three nuts, as well as the three bolts from the bottom of the camshaft drive cover and remove the cover.
19. Unscrew the two nuts securing the chain tensioner, then remove it.
20. Unscrewed the bolt securing the camshaft sprocket and removed it. Mark or try to remember the alignment position. After that I saw the following picture.
21. Using a “10” key, unscrew the fuse, as well as the tensioner fastening and the bolt securing the auxiliary drive sprocket.
22. Remove the sprockets and old timing chain. Check if the marks match; the crankshaft key should match the casting on the cylinder block.
23. Install new sprockets on the drive, accessories and crankshaft. Lubricate the new chain thoroughly and put it in place.
24. Place some kind of tool to prevent it from falling down.
25. The camshaft sprocket is placed in the chain so that during installation on the camshaft the descending branch of the chain is in tension and all marks coincide. Rotate the camshaft counterclockwise and back behind the crankshaft. This way the chain is tensioned and it is possible to evaluate the correct installation of the marks. If the marks do not match, transfer the chain to the tooth and repeat the procedure again.
26. Place the chain tensioner in place, then activate it. Tighten all mounting bolts and “lock” them. After turning the crankshaft two turns, make sure that the marks match and the valves do not meet the pistons.
27. Lubricate the crankshaft cover gasket with sealant and put it in place.
28. Place the pulley, check again that the marks match and tighten it.
29. Unscrew the nut on “13” of the distributor, then take it out and turn the slider so that it faces the contact of the fourth cylinder.
30. Install the distributor in place, and do not forget to turn on the ignition after completing the procedure for replacing the VAZ 2106 timing chain.
Then everything is assembled in reverse order, antifreeze is added, etc.
Actually, that’s it, replacing the timing chain on a VAZ 2106 with your own hands is completed, I hope it’s successful!? Thank you for stopping by, all the best, see you again at VAZ DIY Repair!
Step-by-step self-replacement of a Chevrolet Niva timing chain
Recently, an old friend of mine came to see me in his old Chevrolet Niva with the characteristic sound of an extended chain.
In addition to the timing kit, I had the foresight to purchase even a front cover gasket, a crankshaft oil seal and a kilo of marinated meat. I could not refuse such an offer. So, Niva Chevrolet replaced the timing chain and front crankshaft oil seal.
First, let the engine cool to an acceptable temperature. Remove the pipe by unscrewing the bolt by 10 and loosening the clamps.
Air pipes
Next, we unscrew the eight nuts by 10 and move aside the throttle cable and all the pipes that will interfere with us, remove the valve cover.
Valve cover fastening.
Engine without valve cover.
Remove the air conditioner belt by unscrewing the bolt 13 of the tension roller.
Air conditioner tension roller.
Then loosen three 13mm nuts and one bolt of the generator belt tension roller and remove it.
Service belt tension roller
Now comes the fun part. To unscrew the pulley nut, we need a 38mm socket. Since the elongated head does not fit under a regular wrench (the radiator is in the way, but we don’t want to remove it), we use a pry bar, carefully sawed off from the hub key of some large car.
Homemade key.
Everything fits perfectly. Unscrew the nut and remove the crankshaft pulley.
Crankshaft pulley.
Unscrew the deflection roller.
Bypass roller.
We dismantle the reinforcing plate.
Plate.
Front timing chain cover.
Set the top dead center. The key on the crankshaft should align against the mark on the block.
Crankshaft mark.
The mark for the camshaft sprockets is against the ebb of the camshaft housing.
Camshaft mark.
Next, unscrew the oil supply pipe and two nuts 10 of the chain tensioner.
The tube is secured with a hollow bolt and copper washers on both sides. Don't lose them.
Tensioner fastening.
Next, unscrew the tensioner shoe, damper and remove the timing chain.
Tensioner shoe.
Compare the new and old timing chain. It could be worse.
Old timing chain.
New timing kit.
New timing kit.
Reinstall the chain, guide and tensioner shoe. We tighten the chain by hand and check that the marks match.
To make it convenient for us to check the marks after installing the front timing cover, we find the factory mark on the crankshaft pulley and mark it with a white marker. This mark at TDC should be opposite the center of the crankshaft sensor.
Mark on the pulley.
We install the front cover, crankshaft pulley and tensioner. Let's check the marks again. We install all the removed parts in the reverse order of removal. Fill with fluids, start the engine and enjoy.
Good luck on the roads. No nail, no rod.
There are no clear recommendations regarding at what mileage you should think about replacing the timing chain, however, if the mileage is more than 100 thousand kilometers, then most likely the chain is already worn out. To replace the timing chain of a Chevrolet Niva, it is necessary to disassemble the engine; only in this case it is possible to determine its condition and draw a conclusion about the need for such actions.
We recommend: How to properly change the oil in a manual transmission on a Lada Priora with your own hands?
However, there are also signs by which it can be determined that the timing chain has stretched. For example, this may be indicated by a sound reminiscent of a ringing rustle when a diesel engine is running, coming from under the hood. It is this characteristic noise that should alert the car owner and let him know that a replacement is coming.
Hydraulic chain tensioner for VAZ 21214 device and principle of operation
Content:
general information
It has long been known that the quality of car parts produced at the AvtoVAZ plant is not of a high level. And timing parts are no exception. The chain has to be constantly tightened, almost every thousand kilometers. A hydraulic chain tensioner will help get rid of this problem. It is this device that we will talk about in this article. Let's look in detail at the operation scheme and replacement of the device.
Scheme of work
Replacing the drive chain hydraulic tensioner
Detailed instructions with photos for replacing the hydraulic chain tensioner: The hydraulic tensioner is located under the cooling pipes in the front of the cylinder head.
Using a “10” wrench, which has five edges, we unscrew the tube fitting that supplies oil to the hydraulic tensioner. we take out the phone. Using a 10mm socket, unscrew the two nuts that press the tensioner to the cylinder block. Then remove the hydraulic tensioner. At the same time as replacing the tensioner, it is recommended to replace the sealing gasket.
Prices for hydraulic tensioner VAZ 21214 range from 400 rubles. up to 900 rub. Depending on the region. But there is no shortage of this device on store shelves.
Similar news
How to replace the chain tensioner on a VAZ 21213-VAZ 2131
Replacing the heater tap on a Niva 21214 injector
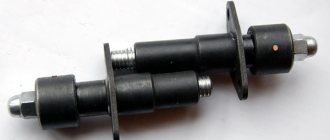
Cars of the Niva family are very old models, in my opinion the very first cars went back to 1977 if memory serves, but these are new times and the car is still being produced and refined, so here are the chain tensioners which AvtoVAZ installed on its cars, depending on the year of production, may differ from each other, for example, somewhere before 2000 or even higher, these cars of the Niva family came with the most common spring chain tensioners, these tensioners are very easy to remove, but they have one drawback (And maybe an advantage) is that they do not tension themselves, that is, from time to time you have to tighten them yourself, which is very inconvenient, but it’s for someone, because it only takes 1-2 minutes to tighten the chain tensioner!
Now let’s look at a new type of tensioner that came on cars that were produced much later, so to speak, during Russia and not during the USSR, and so in new times, the so-called hydraulic chain tensioner was installed on this family of cars, its whole advantage is that you won’t need to constantly tighten it, that is, it was installed at the factory, and you, as they say, forgot about it, but it’s not so simple, if this tensioner suddenly jams or something else happens to it, then you will have to change it to a new one , and today you will learn how to replace this type of chain tensioner in this article. (By the way, you can see what a hydraulic chain tensioner looks like in the photo below)
By the way, if you have a regular tensioner of an old model, but it looks like it is shown in the photo, then read more about how to replace this unit in the article entitled
Removing the chain tensioner
1) At the very beginning of the operation, use a wrench to unscrew the tube that is connected to the hydraulic chain tensioner itself, and after this tube is unscrewed, disconnect it and move it aside.
2) Then, using a wrench or a socket with a universal joint (If it is difficult to get to), unscrew the two nuts that secure the hydraulic tensioner to the car engine (One of the nuts is not visible in the photo, but when you look at this tensioner on the car, then you will immediately understand where the second nut is, since it is located nearby) and then carefully remove it from the hole in which it is located.
Installing a new
Installing a new tensioner occurs in the reverse order of removal, and by the way, after installation, close the hood and sit behind the wheel of your car, then try to start the car and if that chain rattle disappears, then you did everything correctly and that’s why the chain rattled the tensioner itself.
Checking the tensioner for wear
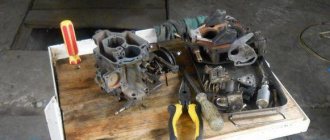
- If you have removed your old tensioner and think that it is in working order and there is no point in changing it, then first rinse this tensioner in a container filled with gasoline (Rinse the tensioner at your discretion, just if all the dirt comes away from it, then it may even improve its performance like this how small particles of dirt will not interfere with the movement of the plunger itself, but more on that a little later), and after washing, thoroughly dry this tensioner or simply blow it out with compressed air.
- After washing and drying it, let's look at what it consists of, namely the plunger itself, which is also indicated under the number 1, and the tensioner housing, which is indicated under the number 2.
- Now, after studying this material, let's move on to checking, firstly, inspect the tensioner plunger itself; in no case should there be any kind of defects on its surface, such as, for example, scuffs, deep scratches, etc.
- Then inspect the body itself; there should also be no nicks, dents, etc. on its surface.
- And finally, perform another fairly simple check, namely, grab the tensioner plunger itself with your hand and then try to move it; if the plunger sticks in any place, then replace the tensioner with a new one.
Mechanical chain tensioner. Main manufacturers.
Pilot. The operating principle is a toothed rack. Good quality tensioner. The big brother of "autopilot". Stable quality. It is also possible to work without removing it from the cylinder head. The main disadvantage is the huge percentage of fakes on the market. This tensioner was the first successful design, and the Chinese grabbed it. If Autopilot is completely impossible to find, then Pilot is very difficult to find “original”. Based on the St. Petersburg market, I estimate the prevalence of counterfeits for this tensioner at 70%. I work with Rusmash directly, so this as a “minus” is insignificant.
How does the installation proceed?
At the next stage, you should check the degree of chain tension, as well as the coincidence of the marks. You need to pull the pin out of the tensioner. The shaft is rotated several turns to ensure that the marks match. The bolts securing the pump gears and camshaft are tightened, then the stoppers are bent. The front cover is installed. At the same time, the mating surfaces and gasket are lubricated with sealant. The mounting nuts are tightened and the generator bracket is installed. The pulley is installed in place, the cover mounting bolts are tightened, and the valve cover is on top.
How is the timing chain replaced on a Chevrolet Niva? At the next stage, experts recommend checking the condition of the tension rollers and the auxiliary drive belt. If there are defects (noise during rotation in the first case and breaks in the second), the elements are changed.
Next, the pump is mounted with a new gasket. The pulley nut is tightened with a special wrench to 38 millimeters. The belt is put on and all the connectors that were removed earlier are connected. How is the timing chain replaced on a Chevrolet Niva? The radiator is put in place and antifreeze is added. All remaining parts are installed.
After these measures, the engine is started. If the engine starts normally, it needs to be warmed up to operating temperature. Next, you should turn it off and check for coolant leaks. If you have replaced the timing chain tensioner on a Chevrolet Niva with air conditioning, you will additionally need to charge the refrigerant.
How to tension a chain on a Niva 21213 carburetor
20 Niva VAZ 21213 chain tension adjustment Chain
tension adjustment GENERAL INFORMATION
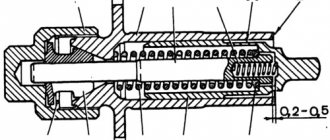
Chain tensioner section
1 – cap nut; 2 – tensioner body; 3 – rod; 4 – plunger spring; 5 – washer; 6 – plunger; 7 – spring; 8 – cracker; 9 – spring ring; A – plunger surface; B – places of punching at the end of the body
Procedure 1. Loosen nut 1 of the tensioner. In this case, shaft 3 is released and the chain is tensioned by shoe 7 (see figure. Plan of the drive of the camshaft and auxiliary units), which is acted upon by spring 7. 2. Turn the crankshaft 1–1.5 turns in the direction of rotation. In this case, the tensioner spring acting on the shoe will automatically adjust the chain tension. 3. Tighten the tensioner nut 1, due to which the shaft 3 is clamped by the collets of the block 8, and when the engine is running, only the spring 4 acts on the plunger 6. This spring presses the plunger away from the head of the rod 3, and oil flows into the space between them when the engine is running, which plays a role shock absorber during chain impacts. Replacing the chain Procedure 1. To remove the chain, brake the vehicle with the parking brake, open the hood, remove the spare tire with its support pipe and remove the battery. 2. Remove the air filter and close the carburetor inlet neck with a technological plug. 3. Separate the air and throttle valve drive cables from the carburetor. 4. Drain the coolant from the radiator and cylinder block, remove the radiator with hoses and thermostat. 5. Remove the fan by unscrewing the fastening nuts. 6. Remove the cylinder head cover and turn the crankshaft until the mark on the camshaft sprocket aligns with the mark on the bearing housing (see figure. Checking the alignment of the installation mark on the camshaft sprocket with the mark on the bearing housing), and the marks on the generator drive pulley – with a long mark on the camshaft drive cover (see figure. Marks for setting ignition timing). 7. Unscrew the camshaft sprocket bolt. 8. Loosen the cap nut of the chain tensioner, press out the tensioner rod with a mounting blade and secure it with the cap nut. 9. Remove the camshaft sprocket. 10. Loosen the generator and remove its drive belt. 11. Engage 4th gear in the gearbox, unscrew the nut and remove the generator drive pulley from the crankshaft. 12. Remove the camshaft drive cover with the gasket by unscrewing the nuts securing the cover to the cylinder block and the bolts securing the oil sump to the cover. 13. Unscrew the limiting pin 6 (see figure. Layout of the camshaft drive and auxiliary units) and remove the camshaft drive chain. 14. Install the chain in the reverse order of removal, following the recommendations set out in subparagraph 2.4. 15. Lubricate the chain with engine oil before installation. 16. Install new gaskets under the camshaft drive cover and cylinder head cover. 17. After installing the chain, adjust the tension of the chain and generator drive belt, adjust the carburetor drive and ignition timing. Niva VAZ 21213 chain tension adjustment Next page»»»»»»
1.2.3.4.5.6.7.8.9.10.11.12.13.14.15.16.17.18.19.20.21.22.23.24.25.26.27.28.29.30.31.32.33.34.35.36.37.38.39.40.41.42.43.44.45.46.47.48.49.50.51.52.53.54.55.56.57.58.59.60.61.62.63.64.65.66.67.68.69.70.71.72.73.74.75.76.77.78.79.80.81.82.83.84.85.86.87.88.89.90.91.92.93.
The purpose of the timing chain and its length
To understand the purpose of the timing chain, it is necessary to outline what the engines of classic VAZ models are. All these engines are overhead engines. That is, the timing shaft (aka timing) is located in the upper part of the engine, above the crankshaft and above the oil pump shaft.
The timing chain is the main connecting link in the VAZ 2107 engine
All these shafts are equipped with sprockets, onto which the timing chain is placed. The chain's job is simple: it must transmit torque from the timing shaft to the crankshaft and to the oil pump shaft. From the crankshaft, torque is transmitted to the chassis, and from there to the drive wheels. They begin to rotate and the car moves forward. Thus, the timing chain is the most important connecting link between the three engine shafts, and any breakdown of this link will inevitably lead to either serious problems in the operation of the motor or to its complete jamming if the chain breaks.
Timing chain length for VAZ engines
If the driver decides to replace the timing chain on his “seven”, he will go to the spare parts store, where he will inevitably be faced with the question: which chain to choose?
You should know a simple rule: all engines on the VAZ “classic” are equipped only with chains. The only difference is in the length of the chains, or more precisely, in the number of links:
Based on all of the above, the driver in the store will have to determine what kind of chain he is buying - short or long. There are two ways to do this:
It should also be noted here that recently counterfeit timing chains have often been found on store shelves. Fortunately, the fakes are made rather carelessly, so an attentive car enthusiast can immediately suspect something is wrong.
Purpose of the chain tensioner shoe
Early models of VAZ engines (2101 and 2103, installed on all VAZ Classic models, as well as 21213 and 21214, installed on Niva cars) use a chain drive of the gas distribution mechanism, which has a number of undeniable advantages over a belt-based drive. In particular, the chain reduces the likelihood of slipping and incorrect engine phases, it is more reliable and durable, allowing for less frequent timing maintenance. However, such a drive works normally only if the chain has constant tension with a certain force. This problem is solved using a system of two main parts - a chain tensioner and a tensioner shoe.
The tensioner and tensioner shoe solve several problems:
— Provide optimal timing chain tension throughout the entire range of crankshaft rotation speeds; — Compensate for weakening of chain tension when it is stretched (in automatic mode or during manual adjustment); — Uniform distribution of the load from the pusher over the chain section, reducing the degree of wear.
The tensioner is installed on the ascending side of the chain between the crankshaft gear and the camshaft gear. Between the tensioner and the chain there is a movable shoe (it has one fulcrum and can swing), which receives the force from the tensioner and distributes it along the chain. The chain tensioner shoe plays an important role in the operation of the timing belt, so let’s look at this part in more detail.
Timing belt 21213, specifics
single-row timing belt 21213 The photo shows a single-row timing belt 21213, which has already been checked and run-in. Set contents:
I'll try to explain why the new kit is better. The difference in losses between the SAME single-row and double-row circuits in terms of efficiency (efficiency) is relatively small. According to theory, about 4-5%. But we have an “ace of trumps” in our pocket. The double-row chain in timing belt 21213 is bush-type, that is, the roller does not rotate, the so-called “heavy chains”. The single-row chain that goes to this timing belt is a bush-roller chain, the rollers rotate, these are “light chains”. But in this case, the difference in friction losses is no longer a few percent, but tens of percent. about this bushing-roller chain . And of course, friction losses on the rubber and plastic shoe of the tensioner are clearly not in favor of the old design. Now about the chain tensioner for this unit. I recommend installing “Rusmash”. The point is this: the tensioner shoe 21213 has an iron base, and the shoe 21214 is plastic, and the TZA tensioner, with its sharp nose, will slowly break it. Mechanical tensioners in more detail earlier.
Source