Detonation (detonation combustion)
– deviation from the norm in engine operation, expressed in the explosive nature of ignition of the fuel-air mixture in the cylinders.
Normally, the flame front propagates at a speed of 30 m/s, while during detonation the speed can reach 2000 m/s. This phenomenon is undesirable, since due to the impact on the cylinders, pistons, cylinder head and due to the very high speed of flame propagation, it can cause serious damage after 4-6 thousand kilometers, and sometimes much earlier. So, during detonation, the gas distribution mechanism and the cylinder-piston group are the first to be hit. To prevent this, a special sensor is used. Let's take a closer look at what causes detonation? What is a knock sensor? What are the signs of its malfunction and how to check?
Engine detonation: what is this process and features of its manifestation
The phenomenon of detonation is familiar to many who have driven Zhiguli and Moskvich cars and filled them with AI-76 gasoline instead of the prescribed A-80. As a result, the detonation process did not take long to occur and manifested itself mainly after the ignition was turned off. At the same time, the engine continued to function, and caused surprise and even laughter on the face of an inexperienced driver. However, there is little good in this phenomenon, because with this process the CPG wears out very quickly, which leads to a decrease in engine life, and as a result, engine malfunctions appear.
On modern fuel-injected cars, detonation also occurs, and not only due to poor quality or inappropriate fuel being poured into the tank. The reasons for the occurrence of such a process are various factors, and before we get acquainted with them, we will find out what the engine detonation effect is and why it is so dangerous.
Detonation is a phenomenon in which spontaneous ignition of the mixture in the combustion chamber occurs without the supply of a spark from the spark plugs. The result of this process is unstable operation of the engine, and the consequences are not long in coming, and if this effect occurs frequently, problems with the engine may soon begin. In this process, not only the CPG comes under attack, but also the gas distribution mechanism.
To prevent the prolonged occurrence of this process, a knock sensor is used in the design of modern injection cars. It is a kind of noise eliminator that transmits information about abnormal engine operation to the electronic control unit. Next, the ECU makes an appropriate decision on the possibility of promptly eliminating the problem.
Advertisements on NN.RU – Auto
A specialized company for converting trucks into tow trucks invites you to install a tow truck platform on.
Manufacturing of a broken-type platform with retractable ramps on the GAZ-33023 Gazelle-farmer chassis. Technical characteristics of the tow truck.
With us you can not only extend the frame to fit a body of 5.1 m, 6.2 m, 7.5 m, 9 m for Maz Zubrenok, Maz, Kamaz, Ural, Zil, Mitsubishi, Nissan.
The company offers you to upgrade the Fiat Ducato Fiat Ducato basic version for a solution.
If you heard Dmitry Bykov on the radio, read his columns, books, articles, came to lectures, you do not know him. He is a poet.
The danger of detonation effect on a car and the reasons for its occurrence
Detonation loads are dangerous for any internal combustion engine, and that is why all manufacturers of modern cars equip units with special sensors. Such devices do not exclude the possibility of a process occurring, but warn of its occurrence, which allows the controller to quickly resort to eliminating the problem.
To appreciate the danger of such a process, which is called internal combustion engine detonation, you should look at the photo below.
They depict engine parts that were removed during repair work. The piston and valve suffered such severe destruction precisely because of spontaneous ignition of the fuel in the combustion chambers. The piston and valve are not the only parts that experience accelerated wear during detonation. Because of this phenomenon, other parts, such as the crankshaft and crank mechanism, also experience strong loads.
The causes of engine detonation loads are the following factors:
- Fuel octane number mismatch. If the manufacturer recommends using A-95 gasoline, then using low-octane fuel is strictly contraindicated. Detonation, which occurs due to fuel mismatch, contributes to the formation of carbon deposits, which provokes the development of glow ignition. As a result, after turning off the ignition, the engine continues to function, which is manifested due to the ignition of the fuel assembly from the hot electrodes of the spark plug.
- Operating conditions and driving habits. Very often, engine detonation occurs among inexperienced drivers when upshifting occurs at too low a vehicle speed and with insufficient crankshaft revolutions. It is important to switch to the next gear when the engine speed on the tachometer is between 2.5-3 thousand rpm. If you switch to a higher gear without first accelerating the car, it is possible that a characteristic metallic knock will occur in the area of the engine compartment. This knock is engine detonation. Such detonation is called permissible, and when it occurs, it does not last long.
- Design features of the engine - cars that are equipped with turbocharging are especially susceptible to the development of a negative phenomenon. This effect often occurs if the car is fueled with low-octane fuel. This also includes factors such as the shape of the combustion chamber and tuning (boosting) the internal combustion engine.
- Incorrect setting of the ignition timing angle. However, this phenomenon is more common on carburetor engines, and on an injector it can occur, among other things, due to a malfunction of the knock sensor. If the ignition is too early, the fuel will ignite much earlier than the piston reaches top dead center.
- A high degree of compression in the cylinders often occurs when the engine cylinders are heavily coked. The more carbon deposits on the cylinder walls, the higher the likelihood of detonation loads developing.
- Lean fuel assembly. If a mixture with a low amount of fuel is supplied to the combustion chamber, the high temperature of the spark plug electrodes contributes to detonation. A small amount of gasoline and a large volume of air leads to the development of oxidative reactions that respond to increased temperature. This reason is typical for injection engines, and usually appears only on a warm engine (usually at crankshaft speeds of 2 to 3 thousand).
This is interesting! Very often, the cause of self-ignition of fuel assemblies in cylinders is associated with a change in the ECU firmware. This is usually done to reduce fuel consumption, but the engine suffers from such a whim of the car owner. After all, one of the reasons for the development of detonation load is a lean mixture.
If the knock sensor fails, this will not cause detonation processes. If the ECU does not receive the appropriate information from the DD, it will go into emergency mode when the ignition timing is adjusted with a deviation towards late ignition.
This, in turn, will entail many negative consequences: increased fuel consumption, decreased dynamics, power and instability of the internal combustion engine.
How to determine a malfunction of the knock sensor on a Priora
Returning to our Priora, it should be noted that quite often car owners are faced with a malfunction of the knock sensor. The reasons can be very different, and it is quite possible to determine them on your own.
On a Priora, a malfunction of the DD can be identified by the following signs:
- The Check Engine indicator lights up on the instrument panel.
- If the sensor malfunctions, the ECU will try to adjust the SOP, which will ultimately negatively affect engine operation. This will manifest itself in the form of reduced dynamics and power, as well as increased fuel consumption. Black smoke is detected from the exhaust pipe. When checking the spark plugs, the presence of black carbon deposits on the electrodes is revealed.
- The corresponding error codes are displayed on the BC on-board computer.
It is thanks to these codes that the car owner can not only identify a device malfunction. After all, unstable engine operation can occur for various reasons (not only due to a malfunction of the engine), and the corresponding codes indicate the specific place where interruptions in the engine occur.
If the knock sensor on a Priora malfunctions, the following error codes are displayed on the BC:
- P0325 - no signal from DD.
- P0326 - DD readings are higher than permissible parameters;
- P0327 - weak signal from the knock sensor;
- P0328 - strong DD signal.
Based on these errors, you should immediately resort to checking the sensor, finding the cause of its malfunction, and replacing it if necessary.
This is interesting! If the DD on a car malfunctions, the effect of detonation occurs extremely rarely, because if a problem with the sensor is detected, the controller goes into emergency operation mode, and the OZ is adjusted in the direction of setting a late ignition.
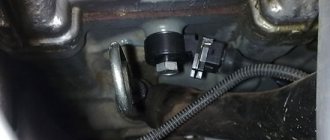
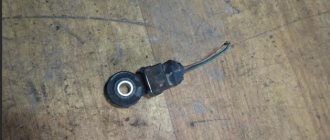
Where is the knock sensor installed on the Priora and how to get to it
On VAZ-2170 Priora cars with 8 and 16 valve engines, a knock sensor is installed. If it fails, the motor will function, but in emergency mode. Knowing where the knock sensor is located on the Priora is necessary in order to be able to assess its condition, as well as remove it, followed by inspection and replacement. On Priora it is installed in the front part of the cylinder block between the second and third cylinders next to the dipstick for checking the oil level in the engine. Access to the device is complicated by the crankcase ventilation pipe.
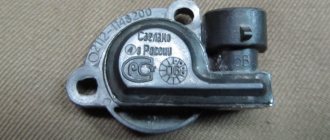
The photo above shows its location and the appearance of the device.
The part has a simple design, and before checking it, you should study the internal structure and principle of operation.
Some additions
Instead of the original ZMZ-406 knock sensor, you can use its version installed on other engine models. It is only necessary to bring the current flow resistance characteristic to the original parameters. To do this, solder a corresponding resistor between the signal line and ground to obtain an output of 560 kOhm.
It has been noticed that sometimes a completely working sensor gives incorrect readings. The cause is interference caused by current surges in the vehicle's on-board network. The problem can be solved by installing a simple filter. Why is a 2500–4700 pF, 16–24 V capacitor soldered between ground and the signal line?
Types of knock sensors: design features and operating principles
On fuel-injected cars, it is impossible to manually set the ignition timing, since electronics are responsible for this process. The appropriate amount of advance depends on various factors. The ECU collects information from all sensors, and based on their readings, as well as the operating mode of the internal combustion engine, it adjusts the SOP and the composition of the fuel assembly.
To prevent a prolonged detonation process, a sensor is used. It sends a corresponding signal to the computer, as a result of which the latter has the ability to adjust the ignition timing. We will find out further what signal the device sends to the ECU, and how it detects unstable operation of the internal combustion engine.
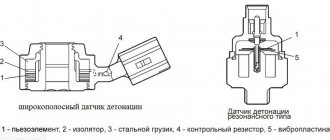
Before you understand the peculiarities of the operation of the DD, it is necessary to inform you that such devices come in two versions:
- resonant or frequency;
- broadband or piezoceramic.
Priora cars are equipped with broadband knock sensors.
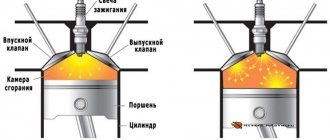
The principle of their operation is based on the piezoelectric effect. Its essence is that when the plates are compressed, an electrical impulse is formed. Below is a diagram of the operation of the broadband sensor.
The operating principle of such a device is as follows:
- When the engine is running, the sensor generates a signal with a certain frequency and amplitude, which is recorded by the ECU. Based on this signal, the controller understands that the sensor is functioning properly.
- When detonation occurs, the engine begins to vibrate and “clatter,” which leads to an increase in the amplitude and frequency of vibrations.
- Under the influence of vibrations and third-party sounds, a voltage is induced on the piezoelectric sensitive element, which is transmitted to the ECU block.
- Based on the received signal, the controller understands that the engine is operating abnormally, so a signal is sent to the ignition coil, as a result of which the ignition timing changes towards the advance (a later ignition is set) in order to prevent the development of a dangerous detonation process.
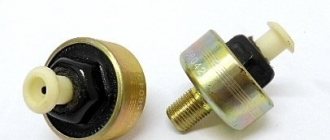
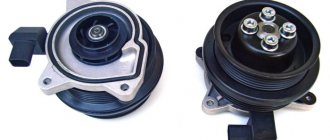
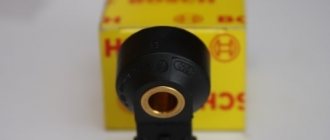
The photo below shows examples of broadband and resonant type sensors.
The broadband sensor has the shape of a washer with a central hole and output contacts through which the device is connected to the ECU. Inside the housing there is an inertial mass (weight), insulators in the form of contact washers, a piezoceramic element and a control resistor. The system works as follows:
- when the engine detonates, the inertial mass begins to affect the piezoceramic element;
- the voltage on the piezoelectric element increases (on Priora up to 0.6-1.2V), which is supplied to the connector through contact washers and transmitted via wire to the computer;
- Between the contacts in the connector there is a control resistor, the main purpose of which is to prevent the controller from detecting an open circuit after the ignition is turned on (this resistor is also called an open circuit recorder). If it fails, then error P0325 is displayed on the BC.
The photo below describes the operating principle of resonant type sensors. Such devices are used on cars, for example, Toyota.
Determining the type of knock sensor that is installed on a car is not difficult. To do this, you need to inspect the part, and by its appearance you can understand the type of device. If broadband elements have the shape of a tablet, then frequency-type products are characterized by the shape of a barrel. The photo below shows a frequency-type sensor and its device.
This is interesting! Prioras are equipped with broadband sensors that have code 18.3855. Products are produced by different manufacturers, for example, AvtoKom, Bosch, AvtoElektronika and AvtoTrade (Kaluga plant). The cost of a Bosch sensor differs from other analogues by approximately 2-3 times.
Diagnosis and problem solving
Begin your diagnosis by visually inspecting all system-related wiring harnesses and connectors. Inspect electrical circuits, sensors, and connectors that are contaminated with engine oil, coolant, or power steering fluid.
Petroleum-based liquids are known to corrode the protective insulation of wires and cause short circuits or open circuits. This may cause the P0327 code to appear.
Sensor test
To test an older style knock sensor, connect a multimeter set to AC voltage between the sensor output wire and ground. Tap the engine near the sensor. You should see the AC voltage reading on your DMM. Otherwise, the sensor is faulty and must be replaced.
To check the resonant type sensor, we connect a digital multimeter in the same way. But instead of knocking on the engine block. The fuel pump relay must be removed to prevent the engine from starting.
Crank the engine, shift into gear, and keep your foot on the brake. As soon as the car starts to run out of fuel, it will start knocking and stalling. You should then see the AC voltage output. Otherwise, the knock sensor is faulty and must be replaced.
Checking electrical circuits
If the knock sensor is working fine but the P0327 code is still on, you need to check the sensor circuit. Using a digital multimeter set to resistance, connect one side of the meter to the harness side of the sensor connector. And the other to the knock sensor input terminal on the PCM. This will check the continuity between the sensor and the PCM.
Now you need to check the grounding. Old style knock sensors are grounded through the sensor itself, while newer style knock sensors usually have a separate ground circuit. Connect the red lead of the multimeter to the positive terminal of the battery and the black lead to ground. You should see a reading of around 12 volts, indicating a good ground. Otherwise, you need to look for a circuit fault.
Causes of sensor malfunction and ways to check it
The knock sensor on cars rarely fails, including the Priora. However, VAZ-2170 owners can often detect a DD malfunction error. And the reasons for its occurrence may be the following factors:
- Damage to the wiring that connects the sensor to the ECU.
During operation of the car, damage to the insulation may occur, which will ultimately affect the signal level. A normally operating sensor produces a signal from 0.6 to 1.2V. - Oxidation of contacts.
The device is located on the cylinder block and is exposed not only to moisture, but also to aggressive substances in the form of engine oil. Although the sensor contact is sealed, a connection failure cannot be ruled out, which leads to oxidation of the contacts in the sensor or chip. If the wire on the DD is in good condition, then you need to make sure that the contacts in the chip and on the sensor connector are intact. - Violation of the integrity of the body. It should not have cracks or other defects.
- Damage to internal elements.
This happens extremely rarely, and you can verify the suitability of the device by testing. The piezoceramic element or resistor may fail. To do this, you will need to perform a sensor test. - The connection between the sensor and the cylinder head is not reliable enough.
It is recommended to pay attention to this point to all owners of Priora cars whose BC displays error P0326 . The device is fixed with a bolt that has a shortened thread. This thread does not rest against the block with its end part, therefore vibrations from the block with a normally operating motor are not enough to generate the minimum permissible signal of 0.6V. As a rule, a sensor fixed with such a bolt produces a low voltage of 0.3-0.5V, which is why error P0326 occurs. The problem can be corrected by replacing the bolt with a stud of the appropriate size.
Having considered the main symptoms of a malfunction of the knock sensor on a Priora, you should resort to checking its serviceability. To do this, you need to arm yourself with a multimeter. The method for checking the device is quite simple, and it is much more difficult to remove the sensor from the car than to check its suitability. The check is performed as follows:
- Vehicle-mounted sensor. You can check the device without removing it, which is especially important for Priora cars with 16-valve engines, where access to the device is limited. To check the sensor, you must perform the following steps: get close to the sensor in order to be able to strike on or near it. We ask the assistant to start the engine, after which we strike the sensor with a metal object. As a result, the sound of the engine should change, which indicates that the ECU has set the ignition later. If such changes can be traced, it means that the device is working properly and is suitable for use. This also indicates that the sensor circuit is working properly.
- Checking the voltage on the sensor removed from the car. Connect the multimeter probes to its terminals and switch the device to the 200 mV voltage measurement mode. This is necessary in order to fix the voltage on the device. Next, lightly hit the metal part of the sensor with a steel object (or press the metal part with your fingers), and observe the readings. Their changes indicate the suitability of the device.
- Checking resistance. A working DD on Priora and other VAZ models has a resistance that is equal to infinity, which is quite normal, since when not working the piezoelements are not connected to the contact washers. We connect the device to the DD terminals, setting the measurement mode to MOhm, and take measurements. In the non-working position, the value will tend to infinity (on device 1), and if you start to influence the sensor, squeezing it or hitting it with a metal key, the resistance will change and amount to 1-6 MOhm. It is important to understand that sensors for other cars have different resistance values.
- Check the condition of the wires and contacts of the chip. It is checked visually, and if damage to the insulation is detected, the chip must be replaced.
- Checking the integrity of the circuit. To do this, you need to arm yourself with a multimeter with a continuity mode, and test the wires from the chip to the terminals on the ECU. The pinout diagram for the knock sensor on the Priora will help with this.
Knock sensor pinout diagram
The above presented pinout diagram for the Priora knock sensor is appropriate for January and Bosch brand controllers. If the wires are not damaged, and error P0325 is displayed on the BC, then this indicates a failure of the resistor. Some craftsmen eliminate such a breakdown by soldering a resistor of the appropriate size between the wires in front of the chip. However, this is not recommended, and it is much easier and more reliable to buy a new sensor and replace it. Moreover, the cost of the product is 250-800 rubles (depending on the manufacturer).
This is interesting! If checking the sensor and wires shows that there are no defects, but the error message on the BC about a device malfunction continues to light up, then you should resort to replacing the fastening element, that is, replace the bolt with a stud with an extended thread. How to do this correctly, read in the next section.
How to eliminate a knock sensor error on a Priora or features of replacing a mounting bolt
If during the check no problems were identified with the knock sensor, but errors continue to be displayed, then the sensor mount must be replaced. Why is this being done?
The DD from the factory on most Priora car models (and other VAZ models) is attached using a short bolt element, which is screwed into a hole on the engine block. The disadvantage of using a bolt is that when screwed in, its end part does not rest against the hole in the block, and thus the level of vibration transmission from the engine to the sensor is reduced. Plus, it has a smaller contact patch.
The connecting element is an important part, which not only ensures reliable pressing of the sensor, but also transmits the vibrations of the running engine. To correct the situation, it is necessary to replace the connecting bolt with an extended pin.
Why is it necessary to fix the DD on a Priora with a pin? This is a valid question, since you can use a bolt with an extended threaded part to ensure the sensor is tightened. Using a bolt will not solve the problem, because it is quite difficult to select a product that could be screwed into the block and at the same time ensure that its end part rests against the wall inside the hole. That is why you need to use a pin, which will ensure more efficient operation of the sensor.
This is interesting! In simple terms, the fastening element transmits vibration directly from the cylinder walls, where the process of self-ignition occurs.
How to replace the DD mounting bolt on a Priora with a stud? To do this you need to do the following:
- Take a hairpin of suitable length and width. In order not to look for the part and, especially, not to order its recess, we use the exhaust manifold mounting pin from the VAZ-2101 or the fuel pump (00001-0035437-218). They have the following parameters M8×45 and M8×35 (thread pitch 1.25). A 35mm long hairpin will be sufficient.
- You will also need a washer, a groover and an M8 nut of the appropriate sizes. A washer and an engraver are required. The washer ensures high-quality pressing of the DD, and the engraver will eliminate the possibility of the nut being unscrewed due to constant vibrations.
- Screw the pin (with a pin driver or using two nuts) into the sensor mounting hole until it stops.
- After this, you need to install the sensor, the washer, and then the grower, and tighten it all with a nut with a force of 20-25 Nm.
- Finally, put the chip on the sensor and reset the accumulated errors. Drive it and make sure that the engine starts working better and no errors appear on the BC.
This is the way to fix the problem with the knock sensor on the Priora. However, it is important to understand that you should first make sure that the device is working properly.
Final result
Finally, a few words about installing the sensor after checking it. Remember that the metal surface of the sensor must be clean and free of debris and/or rust. Clean this surface before installation. Similarly with the surface on the sensor seat on the engine housing. You also need to perform preventative cleaning. The sensor contacts can also be lubricated with WD-40 or its equivalent for preventive purposes. And instead of the traditional bolt with which the sensor is attached to the engine block, it is better to use a more reliable pin. It secures the sensor more tightly, does not loosen the fastening and does not unwind over time under the influence of vibration.