Hi all! I think each of you knows how big a role the engine cooling system plays in any car with an internal combustion engine. In this case, one of the elements of the system is a water pump or simply a pump. The car owner is obliged to know the signs of a pump malfunction in order to diagnose them in time and prevent engine overheating with all the ensuing consequences.
If the pump fails for any reason, the consequences for the engine can be catastrophic. Moreover, capital, that is, major repairs, will not always allow you to get out of the most difficult situation.
The main problem is that the water pump does not immediately indicate the presence of a malfunction. Not in all situations a breakdown can be detected quickly enough. Basically, the driver learns about the problem when thick smoke comes out of the engine compartment. Although this can be avoided. I'll try to tell you exactly how.
Where to begin?
There are certain signs of a VAZ pump malfunction. In these models, the pump ensures the movement of antifreeze along the cooling jacket circuit, lines and pipes, as well as through the radiator. During the warm season, even a slight malfunction of the pump can lead to overheating.
It is worth noting that signs of a pump malfunction on the VAZ-2112, 2107, 2109, 2114 and some other models need to be able to be identified as soon as possible. The fact is that in these models the pump is driven by a timing belt. If the pump jams for some reason, it will break. This, in turn, leads to deformation of the valves on the engine. This situation is observed in most cases when such a breakdown occurs. Therefore, it is important to independently recognize the signs of a pump malfunction in the cooling system.
Knowing the signs of a malfunction in the VAZ-2114, 2112 or earlier models, you can avoid expensive engine repairs or constant overheating.
It is worth noting that the cooling system water pump has a certain service life. After its expiration, this element of the system must be replaced. In cars with a pump driven by a timing belt, this element of the system needs to be changed every 60 thousand kilometers. The car usually covers this distance (with regular driving) in approximately 48 months.
Conclusion
Based on everything written above, we can easily say that the life expectancy of the machine’s engine, as well as its service life, directly depends on the condition of the pump. After all, if this element of the engine cooling system is in a faulty condition and the driver decides to leave his garage, we can say with confidence that this will not lead to anything good. The motor will most likely overheat or boil, it’s good if it doesn’t have to be completely changed. So it won’t hurt to look under the hood a couple of times, listen to the sounds coming from there and be a little vigilant; this will save you from trouble more than once, and will also save a lot of money.
Why does the pump break down?
Before considering the signs of a malfunction of the pump 2110, 2107 or other models, you need to pay attention to the reasons for the rapid wear of this element of the system. A high-quality pump can last about 100-110 thousand kilometers. For this reason, not all drivers change it after the 60 km mileage established by the manufacturer's regulations.
Most often, replacing the pump coincides with the second replacement of the drive belt, which is installed in the gas distribution mechanism. In this case, they usually try to combine the replacement of the pump with a change of antifreeze.
High-quality pumps are durable. They can last as long as 2 timing belts. However, it is not always possible to purchase a high-quality pump. Such a device is not able to work for a long time without breakdowns. Therefore, problems that appear in the cooling system cannot be ruled out.
Low quality antifreeze or mixing different types of coolant can reduce the life of the pump. Because of this, the pump fails much earlier. For this reason, it is advisable that the driver regularly check the pump for malfunctions.
Pump malfunctions
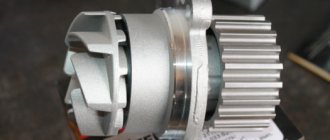
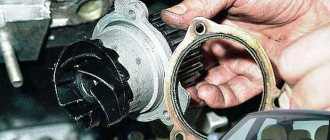
Misalignment. This is possible for two reasons - incorrect assembly and manufacturing defects. However, incorrect assembly is a fairly rare occurrence, because the case has ready-made mounting holes that are very difficult to miss. Another reason is uneven seating on the cylinder block (due to dirty, rusty or bent surfaces). And, unfortunately, manufacturing defects, especially in younger pumps, are not so rare. An alignment error causes the pulley to become misaligned, which in turn accelerates wear on the belt and bearings. In the most critical cases, the belt may break and the valves and pistons may collide. Sometimes misalignment is caused by the car being in an accident with a misalignment. Re-pump to a new one, especially if it has been used for a long time. When replacing the pump, the antifreeze is also replaced.
Source
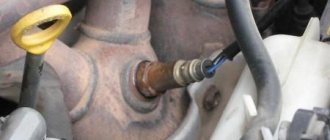
Fluid leaking from the drain hole or from under the seating surface
There are different signs of a malfunction of the VAZ-2109, 2107, 2114 and other car models. So, if the coolant was of poor quality, a leak may occur in the area of the drain hole. In this case, leakage occurs, the formation of drops after the vehicle is run in. This can be determined by examining the area of the drainage hole. It is worth noting that a small leak of liquid is normal for a new pump. This happens within the first 10 minutes. motor operation. This occurs due to the mechanical seal moving to the correct position.
If the new pump's break-in period is complete and fluid is still leaking from the drain hole, this is a sign that it is faulty. It is necessary to thoroughly flush the cooling system and install a new pump. Next you need to fill in the required amount of new antifreeze of acceptable quality.
If a leak is observed from under the seating surface, this also indicates a breakdown. In this case, a sign of a malfunction of the VAZ-2107, 2110, 2109 or other models is wetness, the appearance of drops, smudges on the body or around the specified area. The cause of such a breakdown is incorrect installation of the pump or incorrect use of sealant or seals.
If the pump is new, it needs to be removed and checked for correct installation. It is especially important to pay attention to the tightening torques. If the pump is already old, it must be replaced.
Replacing the pump on VAZ 2114 and 2115. Everyone can do everything
Replacing the timing belt Lada Granta 1.6 with 16 valves
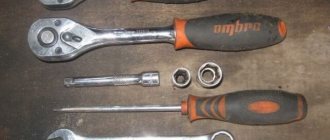
- Keyset(10,17,19);
- Head for 10;
- Slotted screwdriver.
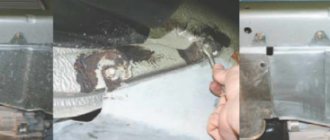
Remove the crankcase protection. Otherwise, it will interfere with our further actions; Drain the antifreeze. To do this, open the valve on the radiator. Find the drain bolt on the engine and unscrew it. Sometimes it's easier. Simply unscrew the pipe clamp and drain the liquid through it; When using the “10” key, unscrew 3 bolts securing the timing case; We set the tags; When using the “17” key, the camshaft pulley mounting screw breaks off. To do this, jam the pulley with a screwdriver. Be careful not to lose the key; Unscrew the belt tensioner and remove it; The belt is removed from the upper pulley and from the pump; Remove the camshaft pulley. Usually it can be removed without problems; in extreme cases, you can lightly tap it on the back side with a hammer; Unscrew the protective cover and then remove it; The rear casing nuts also secure the pump. Therefore, to remove it, it is now enough to simply pry off the edge with a slotted screwdriver. Next, the pump is carefully removed; We clean what is left of the gasket from the cylinder block. The better you clean the pump landing area, the better. The slightest piece of the old gasket will lead to uneven installation of the new unit and fluid leakage; The new gasket is lubricated with sealant; this must be done on both sides. Carefully install it in place; Reinstalling the pump
Pay attention to the inscription. It should be at the top; We install the removed parts.
AutoFlit.ru
Rust, deposits
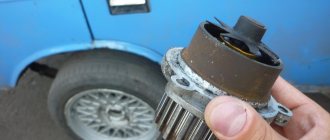
Signs of a malfunction of the VAZ-2110, 2114 or other car models may be different. When examining the pump externally, you can notice rust. Most often, corrosion affects the impeller blades. This leads to a decrease in the rate of pumping antifreeze in the system. The cause of rust may be dirty coolant or a composition that is incompatible with the pump. Mixing antifreeze with different chemical compositions can also lead to a similar malfunction.
Another reason for rust on the pump may be damage to its cover. In this case, it will not be able to close hermetically. Because of this, air bubbles appear in the composition, which causes oxidative processes.
In this case, the pump will need to be replaced. The cooling system will need to be thoroughly flushed and filled with new antifreeze. You need to check the lid for tightness. It may need to be replaced.
You also need to replace the pump if deposits appear on the internal surfaces. Such signs of malfunction of a pump 2114, 2110 or another model can only be assessed by visual inspection of the system. Resinous, mineral or other deposits appear on the internal surfaces of the pump. They clog the pump and prevent the system from working properly.
The reason for this malfunction lies in contamination of the antifreeze or the use of an inappropriate composition. The system must be thoroughly flushed using special compounds. The pump is replaced and new high quality antifreeze is added.
Symptoms of malfunction
- Pump noise when the engine is running. Extraneous noise is caused by bearing wear. It is recommended to replace the cooling system pump after one or every time replacement. If maintenance intervals are not observed, the rolling elements, inner and outer rings will wear, causing noise and whistling. Quite often, the cause of accelerated wear is antifreeze, which gets into friction pairs due to leakage of oil or rubber seals.
- Antifreeze leak. Like the pump bearing, the oil seal and rubber bushing have a limited service life. Play due to bearing wear will result in much less sealant leakage.
- Misalignment with respect to gears, shafts (pump is misaligned). Uneven stress distribution causes accelerated wear not only of the bearing, but also of the seal. Incorrect assembly or manufacturing defects, when the pulley rotates misaligned, leads to accelerated wear of the loaded part of the belt. Such a malfunction, even with low mileage, can break the timing belt and break valves with pistons.
- Engine overheating. When the impeller vanes break, the pump's performance drops, resulting in less coolant flow through the small circulation circuit.
A decrease in performance is often noticeable after applying sealant to repair a radiator leak. The mixture clogs the cooling system passages and sticks to the pump impeller.
Unless grease has clogged the body coolant drain, leaking sealant will not cause water pump failure. However, it is necessary to disassemble the pump and flush the system.
Cavitation, bearing damage
When considering the signs of a malfunctioning engine pump, one should note such a negative phenomenon as cavitation. This is the process by which bubbles form in antifreeze. They damage internal surfaces and individual parts of the pump. As a result, chipped areas remain on them. Subsequently they become covered with rust.
Air bubbles appear in the pump inlet area. When the pressure in the system increases, they collapse. This process causes significant harm to the entire system. The pump will need to be replaced and the system flushed.
When considering the signs of a malfunction of a VAZ-2114, 2112 or other model pump, it is worth paying attention to such a phenomenon as play on the bearing shaft. You need to check the system after turning off the engine. You need to press down on the bearing by hand. There are no signs of play in a working system. If the pump makes a grinding or squealing noise during operation, this also indicates a bearing failure.
The cause of this malfunction is excessive belt tension. Because of this, a large load is placed on the bearing. This leads to accelerated wear of this part. If the seal at the end of the mechanism is damaged, liquid will penetrate into the bearing. Its lubricant will be washed out.
You need to check the belt, pulleys, alignment and tensioner. If there is a malfunction in this system, it must be corrected. Then the pump is changed. A cheap pump of poor quality can also cause a similar malfunction.
Shaft defects
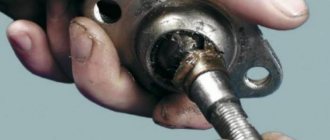
Among the signs of a malfunctioning water pump, one should note the presence of deformation on the shaft. Upon inspection, it may appear bent or completely destroyed. If it is broken, it means the overload was sudden. Also, imbalances lead to similar consequences.
If the material from which the shaft is made has changed color (most often it acquires a blue tint), this indicates the gradual destruction of the shaft. This occurs due to excessive heat. The reason for this failure is the misalignment of the drive belt. This leads to shaft deformation or even fracture. Due to insufficient quality maintenance, significant vibrations appear in the system.
In this case, the pump is changed, and the belt drive is also checked. All elements of its system need to be inspected. You also need to evaluate the condition of the fan that is located on the pump (if it is provided in the engine system). If it is bent, other deformations are visible on it, this can destroy the shaft. Wear of the fan coupling and spacer ring also lead to a similar outcome.
Other verification methods
There are other signs of a pump malfunction. You can check the system using a simple method. First, the engine of a VAZ or other car (the method is suitable for most car models) needs to be warmed up. The system should reach operating temperatures.
Then the engine must be turned off. Hand pinch the upper pipe that goes to the radiator. When the pump is working properly, the fluid pressure inside will be felt. It is pumped by a pump. With this method of checking, you don’t even need to remove the pump from the car.
Caution must be exercised when conducting such a test. The antifreeze in the system gets very hot. If there is no pulsation in the system or it is weak, you need to carefully inspect the pump.
To carry out the inspection, the protective casing must be removed from the gas distribution mechanism. This will allow you to visually inspect the pump. If there are defects that were discussed above, you need to take the appropriate actions.
Replacing the thermostat on Priora 2170. How to do it
- 1. Insert the key and start the engine;
- 2. Next, wait for the car engine to warm up to operating condition 80-90°C;
- 3. And lastly, we touch the lower radiator fitting, it is necessary that it remains completely cold. This can be explained by the fact that the thermostat damper is located in the shutter position, and therefore the antifreeze does not circulate through the pipe. Accordingly, this allows the engine to instantly warm up; the liquid circulates continuously and almost instantly increases the temperature of the engine. After the antifreeze heats up to 90-100°C, the damper slowly opens and liquid begins to circulate. After the damper is open and the antifreeze (antifreeze) has flowed in a large circle, the pipe located below gradually heats up, or rather becomes warm. If you find that your tube has heated up at a temperature of 75-85°C, the thermostat needs to be replaced. But there are exceptions - for example, a hot pipe may be due to a malfunction of the water pump, so you can check that too.
- 1. Initially, you need to pour out the antifreeze. This is possible by opening the cap on the radiator;
- 2. Use a pentagon to loosen the clamps; they are attached from the water pipes to the thermostat, then pull them out;
- 3. Using a Phillips screwdriver, unscrew the bolts that secure the thermostat and pull it out;
- 4. Unscrew the mounting bolts and remove the cap from the thermostat;
- 5. Next, pull out the rubber ring (gasket) and look for cracks (worn); if necessary, replace the ring;
- 6. Pull out the mod, using pliers, lightly squeeze and rotate the spring, pushing the plate out of the hook with the grooves.
- 7. Before installing a new mod, check its functionality. This is possible at home. To check, you need to pour water into a pan and dip the thermostat into it. When the water is heated to a temperature of 92°C, the thermostat rod will begin to move; if the water boils and the rod remains motionless, the sensitive element must be replaced immediately;
- 8. To assemble the thermostat, repeat all steps in order from seventh to first. Fill the engine expansion tank by pouring antifreeze into the cooling system until fluid begins to flow from the hose pulled out of the throttle body. After that, insert the hose into its place and put on the clamp;
- 9. Pour antifreeze until the liquid level reaches the “maximum” mark, which is marked on the wall of the expansion tank (after starting the engine, the antifreeze will squeeze out the remaining air and the level in the tank will decrease slightly). Screw on the tank cap. To avoid air accumulation in the system, when pouring liquid, squeeze the hose with your hand;
- 10. Start the engine and leave it to warm up, that is, until the fan turns on. As a result, turn off the engine and check the antifreeze level. The liquid should remain at the level between the “minimum” and “maximum” prints. While the engine is running, monitor the antifreeze temperature sensor. A week after the repair, look under the hood and check its level. As the liquid in the tank decreases, add antifreeze.
AutoFlit.ru
Replace or repair?
If signs of pump malfunction appear, it must be replaced. Many drivers do not do this after every 60 thousand km. If the time has come for replacement, but there are no external signs of pump malfunction, you need to perform a thorough check. Often the first signs of failure are observed within the system. So, if the pump blades are made of metal, corrosion appears on them. Traces of mechanical damage will be visible on the plastic elements of the system. Such a device cannot be used in a cooling system. Even if it works now, it will fail very soon.
Some drivers decide to repair the pump. Theoretically, this procedure can be performed, but practically it is impractical. The cost of the pump is quite reasonable. That's why it's easier to buy.
Experts do not recommend repairing the pump, which is driven by the timing belt. Otherwise the pump will not be reliable. The likelihood of its breakdown increases many times over. Due to its breakdown in such a system, the motor may fail. Therefore, it is better not to save money, but to buy a new pump. It will be much more reliable than a refurbished pump.
It is very important to install it correctly in its original place. Particular attention is paid to seals and proper tightening of fasteners. In some cases, a special sealant is used for joints. It eliminates the possibility of leaks. However, the use of the presented material is not always possible. It will not allow you to subsequently loosen the motor for attaching the timing belt on some car models.
Installation of the Grants thermostat on VAZ 2110, 2112
| It is no secret that the production of VAZ cars of the tenth family in Russia has already been completed. However, nothing prevents owners from improving their cars by replacing outdated parts with more modern ones, from foreign cars or VAZs of the latest years of production. An example of this would be replacing a VAZ 2110 thermostat with a Lada Granta thermostat. |
Will need to buy
- Thermostat Lada Granta (catalog number: 21900-1306010-00), price 640 rub.
- Gasket for the thermostat (same as standard), price 8 rubles.
- Lower radiator pipe for Lada Granta (1 self-tightening clamp included), price 440 rub.
- M8 studs, approximately 85mm long, price 20r.
- Washer for temperature sensor.
- ABRO sealant, clamps.
- Antifreeze.
Replacing the thermostat
- Remove the hoses by unscrewing the clamps (don’t forget about the throttle assembly).
- Unscrew the thermostat mounting bolts (see replacing the thermostat).
- Remove the studs and lower pipe.
- Install a new pipe and tighten the clamp.
- Plug the hose coming from the throttle valve using an M10 bolt and tighten it with a clamp.
- Screw in new thermostat studs.
- Secure the Granta thermostat.
- Connect the hoses. Cut the hose from the stove in place (by about 5 cm). Reinstall the temperature sensor.
Conclusion
- faster engine warm-up, especially while driving.
- the cabin became noticeably warmer
- more stable temperature conditions in different operating modes (during traffic jams, using the stove, in winter on the highway and in the city).
xn--2111-43da1a8c.xn--p1ai
Replacing a pump in an 8-valve system
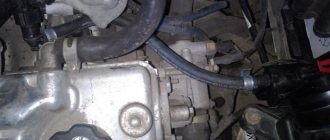
Knowing the signs of a pump malfunction, you can replace it in a timely manner. First you need to remove the timing case. If necessary, you will need to loosen and remove the tension roller. Then reduce the clamping force of the generator. Its belts and timing belt are removed. The hose from the pump can be disconnected. Next, the antifreeze is drained. After this, you can remove the protective cover and pump.
When the new pump is installed in the appropriate place, you need to set the timing marks. This is necessary because the crankshaft may move relative to the camshaft.
You need to pay attention to the correct tightening of the pump bolts. They must firmly fix this element of the system. But at the same time they cannot be overtightened. Otherwise, the threads may be damaged and the seal may be crushed.
When subsequently filling antifreeze from the system, it is necessary to remove plugs from the air. The liquid must be added according to the level. After replacing the pump, you need to turn on the engine and warm up the system. It is then inspected for leaks.
How to remove an air lock from an engine cooling system
So, let's start with simple cars (old foreign cars, domestic auto industry). On such cars, air is removed from the cooling system as follows:
- All you have to do is drive the car onto the overpass. This must be done in such a way that the front part is slightly raised.
- Next, you need to unscrew a special cap on the radiator, after which the engine can be started.
- After several minutes of operation at idle, the air is bled from the engine cooling system.
Replacing a pump in a 16-valve system
If your car has a 16-valve system, changing the pump will be a little more difficult. However, performing this procedure yourself is not difficult.
First you need to dismantle the plastic casing and timing belt casing. To remove the upper parts that separate the pulleys from the cylinder block, you need to perform the steps sequentially. This can only be done after dismantling the timing belt, camshaft pulleys and rollers (tensioner and support). Only then will it be possible to remove the pump.
To be able to get to the lower bolts securing the casing, you will need to remove the right wheel. After this, you can dismantle the pump. Then carry out the same actions as in the previous paragraph. If the pump is installed incorrectly, it will leak. Therefore, it is important to follow the instructions specified by the manufacturer.