The knock sensor (hereinafter referred to as DD) in the VAZ 2110 - 2115 model range is designed to measure the value of the knock coefficient during engine operation.
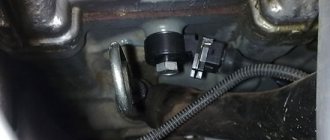
Where is the DD located: on the cylinder block stud, on the front side. To ensure access for the purpose of prevention (replacement), it is necessary to first dismantle the metal protection.
The dynamics of vehicle acceleration, fuel consumption, and stability of idle speed depend on the technical serviceability of the engine.
How does a knock sensor work?
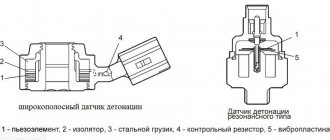
Car engines can use one of two types of knock sensors: resonant and broadband. But since the first type is already outdated and is rare, we will describe the operation of broadband sensors (WS).
The design of a broadband DD is based on a piezoelectric element, which, when subjected to mechanical action (that is, during an explosion, which, in essence, is detonation), supplies a current with a certain voltage to the electronic control unit. The sensor is configured to perceive sound waves in the range from 6 Hz to 15 kHz. The design of the sensor also includes a weighting agent, which enhances the mechanical effect on it by increasing the force, that is, it increases the sound amplitude.
The voltage supplied by the sensor to the ECU through the connector terminals is processed electronically and then a conclusion is made whether there is detonation in the engine, and accordingly, whether the ignition timing needs to be adjusted, which will help eliminate it. That is, the sensor in this case is only a “microphone”.
[custom_ads_shortcode1]
Kinds
Two types of knock sensors are used: resonant and broadband.
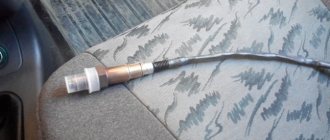
Design of broadband DD used in VAZ cars and other foreign-made cars:
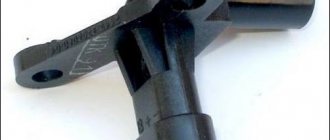
Broadband sensors are mounted on the cylinder block in close proximity to the combustion zone. The mount is rigid so as not to damp shock impulses in the event of internal combustion engine malfunctions.
The piezoceramic sensing element generates an electrical pulse with an amplitude sufficient for processing by the engine control unit in a wide frequency range.
Wideband sensors generate a signal both when the ignition is turned off when the engine is stopped at low speed, and at high speeds while driving.
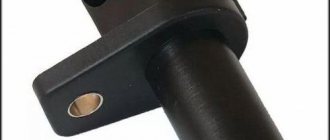
Some cars, for example Toyota, use resonant sensors:
Such DDs operate at low engine speeds, at which, due to the resonance phenomenon, the greatest mechanical effect on the piezoelectric plate is achieved, and accordingly, a large signal is formed. It is no coincidence that a protective shunt resistor is installed in these sensors.
The advantage of resonant sensors is the filtering of mechanical impacts when driving on uneven roads and extraneous mechanical knocks not associated with engine detonation.
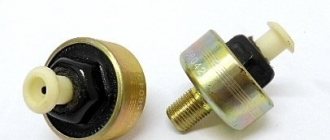
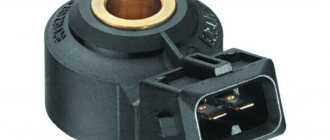
Resonant-type sensors are installed on their own threaded connection and resemble oil pressure sensors in shape.
Causes of knock sensor malfunction
As for the reasons why problems arise with the knock sensor, these include the following breakdowns:
- Loss of mechanical contact between the sensor housing and the engine block . As practice shows, this is the most common reason. Typically, the sensor itself has a round shape with a mounting hole in the middle, through which it is attached to its seat using a bolt or pin. Accordingly, if the tightening torque in a threaded connection decreases (the pressing of the motor to the engine is weakened), then subsequently the sensor does not receive sound mechanical vibrations from the cylinder block. In order to eliminate such a breakdown, it is enough to tighten the mentioned threaded connection, or replace the mounting bolt with a mounting pin, since it is more reliable and provides a tight mechanical connection.
- Sensor wiring problems . In this case, there may be various problems, for example, a short circuit of the supply or signal wire to ground, mechanical damage to the wire (especially in places where it is bent), damage to the internal or external insulation, breakage of the entire wire or its individual wires (supply, signal), violation of the shielding braid. In this case, the problem is solved by restoring or replacing its wiring.
- Poor contact at the connection point . This situation sometimes happens if, for example, the plastic latch at the point where the sensor contacts are connected is broken. Sometimes, as a result of shaking, the contact is simply broken, and accordingly, the signal from the sensor or the power to it simply does not reach the recipient. To repair, you can try replacing the chip, correcting the contact, or using another mechanical method to try connecting two pads to the contacts.
- Complete sensor failure . The knock sensor itself is a fairly simple device, so there is nothing special to break there, and accordingly, it rarely fails, but it does happen. The sensor cannot be repaired, so in case of complete breakdown it is necessary to replace it with a new one.
- Problems with the electronic control unit . In the ECU, like any other electronic device, software failures can occur, which leads to incorrect perception of information from the DD, and accordingly, the unit makes incorrect decisions.
It is interesting that when a car owner contacts a car service center with complaints about the operation of the knock sensor, some unscrupulous repairmen immediately offer to replace it with a new one. Accordingly, take more money from the client. Instead, you can try tightening the torque on the sensor threaded mount and/or replacing the bolt with a stud. In many cases this helps.
Is it possible to drive with a faulty knock sensor? This question interests motorists who are encountering this problem for the first time. In general terms, the answer to this question can be formulated as follows: in the short term, you can use the car, but at the earliest possible opportunity, it is necessary to carry out appropriate diagnostics and fix the problem. Indeed, according to the principle of operation of the ECU, when a malfunction of the fuel knock sensor occurs, a late ignition is automatically set to prevent damage to the piston group parts if real detonation occurs during combustion of the fuel mixture. As a result, fuel consumption rises and dynamics drop significantly, which will become especially noticeable as the speed increases.
[custom_ads_shortcode1]
Step-by-step diagnostics
- We install the machine on the inspection channel. As an alternative, we use a hydraulic lift;
- Open the hood to improve visibility;
- From under the bottom, unscrew the six screws that fasten the metal protection. We remove it from its seat;
- The DD is pre-installed under the exhaust manifold housing. Carefully pry up the block with the wires and disconnect the contact;
- We connect the multimeter terminals to the limit switches;
- We measure the actual resistance and compare the results obtained with the standards specified in the operating instructions;
- Based on the data obtained, we make a decision on the advisability of further use of the equipment.
Signs of a malfunctioning knock sensor
If the DD fails completely or partially, a malfunction of the knock sensor manifests itself according to one of the symptoms:
- Engine shaking . If the sensor and control system in the engine are working properly, this phenomenon should not occur. By ear, the appearance of detonation can be indirectly determined by the metallic sound emanating from a running engine (knock of fingers). And excessive shaking and jerking during engine operation is the first way to determine a malfunction of the knock sensor.
- Reduced power or “dullness” of the engine, which is manifested by deterioration of acceleration or excessive increase in speed at low speeds. This happens when, with an incorrect DD signal, the ignition angle is spontaneously adjusted.
- Difficulty starting the engine , especially “cold”, that is, at low temperatures after a long period of inactivity (for example, in the morning). Although it is quite possible for the car to behave this way even at warm ambient temperatures.
- Increased fuel consumption . Since the ignition angle is disturbed, the air-fuel mixture does not meet optimal parameters. Accordingly, a situation arises when the engine consumes more gasoline than it needs.
- Fixing knock sensor errors. Usually the reasons for their appearance are the signal from the sensor going beyond the permissible limits, a break in its wiring, or a complete failure of the sensor. The occurrence of errors will be indicated by the Check Engine light on the dashboard.
However, it is worth considering that such symptoms may indicate other engine failures, including other sensors. It is recommended to additionally read the ECU memory for errors that could arise due to incorrect operation of individual sensors.
[custom_ads_shortcode2]
Operating principle of DD
The functionality is based on the operation of a piezoelectric element. A piezoelectric plate is mounted inside the DD structure. When detonation occurs, tension is created on the plate. The voltage is not great, but quite enough to create oscillations.
The higher the frequency, the higher the voltage. When fluctuations exceed the maximum range, the electronic control unit automatically adjusts the angle of the ignition system towards a decrease. The ignition is advanced.
When the oscillatory movements disappear, the ignition angle is restored to its original position. Thus, maximum operating efficiency of the power unit is achieved under specific operating conditions.
If the engine fails, the “Check Engine” error appears on the dashboard.
What happens if you turn off the knock sensor completely?
Some car owners even try to disable the knock sensor because under normal operating conditions and refueling with good fuel it may seem unnecessary. However, it is not! Because detonation occurs not only due to poor fuel and problems with spark plugs, compression and misfires. Therefore, if you disable the knock sensor, the consequences may be as follows:
- rapid failure (breakdown) of the cylinder head gasket with all the ensuing consequences;
- accelerated wear of elements of the cylinder-piston group;
- cylinder head crack;
- burnout (full or partial) of one or more pistons;
- failure of the jumpers between the rings;
- connecting rod bend;
- burning of valve plates.
This is due to the fact that if this phenomenon occurs, the electronic control unit will not take measures to eliminate it. Therefore, in no case should you turn it off and install a jumper from the resistance, because this is fraught with expensive repairs.
[custom_ads_shortcode2]
Checking the sensor with removal
You need to find the location of the sensor. Most often this place is in the middle of the cylinder block between the middle cylinders. However, it is better to read the car manual and find out the type of sensor, its resistance and markings.
Withdrawal procedure
First, you need to unscrew the nut on the stud with a 13 or 22 mm wrench, depending on the design of the sensor. Then you should carefully disconnect and move the electrical connector to the side, and remove the sensor from the stud. There are two contacts on the case - a signal terminal and ground.
Inside the sensor there is a piezoelectric crystal, which is sensitive to falls on the floor and various impacts. Its design is non-separable, so you should not try to disassemble it.
To test the operation of the sensor, you can use a multimeter with a measurement interval of several thousandths of a volt. In this case, you should not use old twisted conductors for probes, since their resistance is not compatible with the multimeter. You need to connect the negative probe of the multimeter to the middle hole of the sensor, and the positive probe to the control terminal. If possible, shorter test leads should be used.
Carefully, with little impact, hit the metal middle element of the sensor with some metal object. In this case, the multimeter should show some voltage surge up to 150 millivolts, which means the sensor is working properly. Otherwise there will be no voltage surges.
If you have other known-good sensors, you can test the voltage readings on them. It is better if these sensors have already been used, but are still in good working order. This will be the key to conducting a proper inspection.
A sign of problems with the performance of the knock sensor is too high or low internal resistance.
To check whether there is an internal contact, you need to measure the resistance value between the sensor terminals and compare them with the parameters specified in the instructions.
The most reliable method of checking the functionality of the sensor is to install it on a car with a working sensor. The occurrence of slight detonation confirms the sign that the sensor was not working. Additionally, you can install the sensor being tested on another engine and check it for detonation when you quickly press the gas pedal. As a result, it is necessary to compare the symptoms of a faulty and working sensor. If the symptoms appear on another engine, the sensor must be replaced with a new one.
How to determine if a knock sensor is faulty
When the first signs of DD failure appear, a logical question is of interest - how to check and determine the malfunction of the knock sensor. First of all, it must be said that checking the knock sensor is possible without removing it from the cylinder block, or after removing it from its seat. Moreover, first it is better to do several tests when the sensor is screwed to the block. Briefly the procedure looks like this:
- set the idle speed to approximately 2000 rpm;
- With some metal object (small hammer, wrench), apply one or two gentle blows (!!!) to the cylinder block body in the immediate vicinity of the sensor (you can lightly hit the sensor directly);
- if the engine speed drops after this (this will be audible), it means the sensor is working;
- The speed remains at the same level - an additional check needs to be performed.
To check the knock sensor, a car enthusiast will need an electronic multimeter capable of measuring the value of electrical resistance, as well as DC voltage. The best way to check is with an oscilloscope. A diagram of the sensor operation taken with its help will clearly show whether it is operational or not. But since only a tester is available to the average car enthusiast, it is enough to check the resistance readings given by the sensor when tapped. The range of resistance changes is within 400 ... 1000 Ohms. It is also imperative to carry out a basic check of the integrity of its wiring - whether there is a break, damage to the insulation or short circuit. You also cannot do this without the help of a multimeter.
If the check shows that the fuel knock sensor is working properly, but the error indicates that the sensor signal is outside the permissible range, then perhaps it is worth looking for the cause not in the sensor itself, but in the operation of the engine or gearbox. Why? Sounds and vibration are to blame for everything, which the engine can perceive as fuel detonation and incorrectly adjust the ignition angle!
Did not find an answer to your question? Ask in the comments. We will definitely answer!
The engine design has many auxiliary systems and mechanisms. It is impossible to imagine the operation of a power unit without a crankshaft sensor, coolant temperature, throttle position and many other elements. The knock sensor also plays an important role. The VAZ-2110 is also equipped with it. What is this element for? How to check it and why does it fail? We will talk about this in our article today.
[custom_ads_shortcode3]
Diagnostics and replacement of the knock sensor
Signs of sensor malfunction
If you begin to notice that your car’s engine is running unevenly (troiting), or its dynamics have deteriorated and the “CHECK ENGINE” indicator lights up on the instrument panel when you start to climb or when accelerating, then you should check the knock sensor for possible malfunction. The following instructions will help you diagnose and replace the knock sensor yourself.
Examination
So, on VAZ 2110, 2112, 2114, 2115, replacing the knock sensor begins with reading engine fault codes:
Error code 0325 indicates that there is a break in the electrical circuit of the sensor circuit.
It is necessary to carefully inspect and, if necessary, “ring” the entire circuit and clean the contacts in the sensor connectors, since the main cause of this error is oxidized contacts. In addition, it is necessary to check the timing belt, namely, whether it is installed correctly according to the marks; perhaps it has become loose and has jumped several teeth.
Error number 0328 indicates a high signal level from the knock sensor.
In this case, you need to pay attention to high-voltage wires. This error is issued when there is a breakdown of the power supply and the piezoelectric element, as well as when the valve clearance is increased
Again, recheck the timing belt.
Error codes 0326 and 0327 indicate that the signal level from the sensor is too low.
As in previous cases, we check the electrical circuit circuit; with the sensor removed, we treat the sensor and its contacts with special anti-corrosion agents. Pay special attention to the tightening torque of the sensor, which should be 10-24 N*m. If the instrument panel does not signal you with the “CHECK ENGINE” indicator light, then replacing the knock sensor on VAZ 2114, 2110, 2115 is accompanied by checking it with a voltmeter, for which:
If the instrument panel does not signal you with the “CHECK ENGINE” indicator light, then replacing the knock sensor on VAZ 2114, 2110, 2115 is accompanied by checking it with a voltmeter, for which:
- In the multimeter, set the voltmeter mode and enter the reading limit of 200 MV;
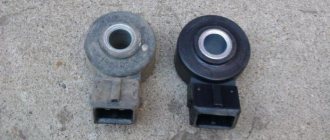
- On a two-contact sensor (broadband type) we connect the multimeter probes to the contacts, and on a one-contact (resonance type) - one to the contact, the second to the sensor body;
- Lightly tap the sensor body with a subsequent increase in impact force with a metal object (screwdriver or bolt) and observe the voltmeter readings;
- When impacted, a voltage surge should be observed: a stronger impact means a higher surge, otherwise the sensor definitely needs to be replaced.
Also, replacing the VAZ 2115 knock sensor may be accompanied by checking it with an ohmmeter, in which the resistance reading should be on a scale of 1-10 MOhm.
Replacement
Replacing the knock sensor of a VAZ 2112, 2110, 2114, 2115 is not difficult at all, so this instruction will not contain any additional video materials. As mentioned above, sensors of both types are installed on the engine cylinder block. The entire replacement process consists of the following:
- With the ignition off, disconnect the wire connector from the sensor, or one wire for a resonant type of sensor;
- In the first case, use a key set to “13” to unscrew the bolt securing the engine...
Replacing the knock sensor VAZ 2115
...and in the second, using a key set to “22”, we unscrew the block from the body and dismantle the device itself;
3. Install in reverse order.
How to change the sensor?
If this element fails, it must be replaced. Fortunately, spare parts for the VAZ-2110 can be found in any store for a low price. A new knock sensor will cost no more than 250 rubles.
How to replace it? First you need to find the element itself. As we said earlier, it is located between the second and third cylinder.
Then, using a 12 mm wrench, unscrew the mounting bolt. Next, you need to press on the plug of the wire clamp and pull it out. Afterwards you can remove the sensor itself.
At the next stage, a new spare part is installed on the VAZ-2110. Having installed the plug with the wires, you should screw back the mounting bolt with a 12mm wrench. At this stage, replacing the knock sensor on the “ten” can be considered complete.
[custom_ads_shortcode2]
Required Tools
Table - Tools and materials required to replace the knock sensor
| Name | Note |
| Socket wrench or socket | “at 10”, “at 13″,” at 19” |
| Vorotok | With ratchet |
| Torque wrench | To check the tightening of the knock sensor fastening |
| Rags and wire brush | To clean dirt |
| Penetrating lubricant | To release stuck threaded fastenings of the crankcase protection |
Work should be carried out with access from the bottom of the car. Therefore, it is recommended to proceed with independent replacement if there is an inspection hole or overpass.