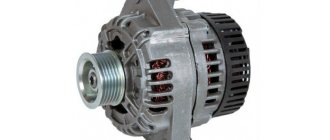
Removing the VAZ 2107 generator
First of all, you should disconnect the battery terminals. To make work easier and improve access to the generator, it is better to remove the battery from the car. The further order of work is as follows:
- disconnect the generator connector;
- remove the insulating cover from the terminal, unscrew the fastening nut using a 10mm wrench;
- disconnect the terminal;
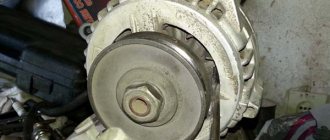
- loosen the generator by unscrewing the nut and remove the belt;
- remove the adjusting bar by unscrewing the fastening nut;
- unscrew the lower fastening nut and remove the bushing with the bolt;
- get the generator.
Reasons for the battery not charging
For proper operation of the ignition system and other electrical circuits of the VAZ 2107, the voltage in the on-board network must be constant. When the engines are not running, the battery maintains constant voltage. After starting the engine, the car's generator comes into operation, charges the battery and maintains the on-board voltage within 13.6-14.2 volts.
Regardless of the speed, the voltage on the generator must remain constant. This is ensured by a relay regulator, which, depending on the speed, changes the voltage of the generator circuit. If the voltage drops below the permissible level, the winding current increases, increasing the output voltage and vice versa.
If there is no charging on the VAZ 2107, possible reasons may be the following:
- poor contact or break in the excitation network of the generator output voltage;
- the relay regulator is faulty;
- broken generator belt.
Troubleshooting the generator should first begin by identifying the cause of the lack of battery charge.
Disassembling the VAZ 2107 generator
For a comprehensive repair, you need a puller to remove the bearing from the shaft, a mandrel for pressing and knocking out the bearing in the generator cover.
Sequence of work:
- unscrew the nut securing the pulley and impeller using a socket wrench, holding the rotor with a screwdriver so that it does not turn;
- dismantle the pulley and impeller, remove the key, remove the washers from the shaft;
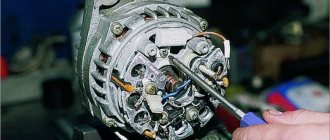
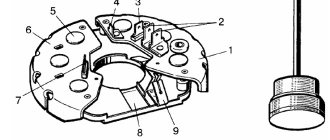
- unscrew the screws securing the voltage regulator relay and remove it, having first disconnected the wire block;
- remove the regulator relay along with the brush assembly;
- unscrew the nuts and remove the bolts securing the generator cover;
- knock down the front cover by hitting the shaft with a rubber hammer (the cover must be rested against a wooden block);
- remove the spacer sleeve from the shaft;
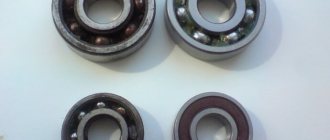
- check the condition of the bearing in the front cover;
Tip: To check the bearing, you need to rock the inner race of the bearing while holding the cap. If there is play, the bearing must be replaced.
- if necessary, unscrew the bearing mounting nuts;
Attention: if the nuts do not unscrew, you should cut off the ends of the fastening bolts. During assembly, it is necessary to install new bolts and, after tightening the nuts, rivet their ends with a core.
- knock the bearing out of the cover using a drift (mandrel);
- rest the back cover against a pair of wooden blocks and knock out the rotor using a soft metal drift and a hammer;
- check the condition of the rear bearing (similar to the front);
- if necessary, replace the bearing by pulling it from the rotor with a puller;
- unscrew the nuts holding the VAZ 2107 diode bridge and the winding terminals;
- remove the bolts;
- remove the stator winding;
- visually check the condition of the winding;
- if the winding has breaks or has turned black from overheating, replace it;
- remove the generator output nut and insulating washer;
- dismantle the diode bridge;
- remove the capacitor by unscrewing the fastening screw;
- remove the bolt securing the rectifier unit;
- check the rotor and stator windings with a test lamp;
- check the diode bridge of the VAZ 2107 generator for broken diodes.
What to do if your belt whistles
After the VAZ-2107 generator has been disassembled, you can troubleshoot problems that have arisen in the operation of the device. But the serviceability of the unit itself does not always suffer; it happens that the breakdown lies in something completely different. For example, when you feel a squealing noise caused by the belt rubbing against the pulleys, it is not surprising if the alternator stops working at full capacity.
When comparing a carburetor and an injector, the main difference in cars is the presence or absence of a crankshaft position sensor, which is removed when the belt is replaced. Why does the whistle appear? There may be several reasons for this:
- The bearing related to the VAZ-2107 generator is faulty.
- Insufficient tension level.
- Contamination in fuel and lubricants.
Assembling a VAZ 2107 generator
Before assembling the generator, it is necessary to clean the parts from contamination. It is better to wash metal parts with gasoline, and wash windings and other complex parts with air from a compressor.
The new bearing is pressed onto the rotor using a mandrel. You can use a head or tube with a diameter that matches the size of the inner ring of the bearing.
Before installing the rear and front covers, it is necessary to check the condition of the bearing seats. They must not be damaged or scratched.
If there are cracks in the cover, they must be replaced with new ones. Bolts and nuts of poor quality must also be replaced.
The sequence of assembling the generator corresponds to the procedure for disassembling it.
After installing and connecting the generator, it is necessary to tighten the belt with the necessary force. If it is overtightened, the bearings will fail; if it is loose, the generator will slip under load and will not produce the required charging current.
Removing the winding (stator)
To do this, you need to unscrew the three nuts from the inside with a head, as shown in the picture:
And after this, the stator can be removed without any problems, since it is disconnected from the diode bridge:
If it needs to be replaced and you need to remove it completely, then of course you will need to disconnect the plug with the wiring, which is visible in the top photo.
Why does the charging system work poorly?
The battery is necessary primarily so that electrical appliances can function without the engine running. And when the engine is activated, the generator takes over control and management of the electrical equipment. This unit provides power:
- car injectors;
- fuel pump;
- electronic control system and many other elements.
But most of all, the generator provides recharge to the battery, the service life of which directly depends on whether the charging unit performs charging efficiently. Sometimes even a new generator is not able to cope with its main purpose. Why the unit provides weak recharge to the battery, and what should be understood if the warning lamp does not light, we will analyze further.
Generator repair
First, you need to clean the generator from dirt, oil, dust and everything that has accumulated on it over the entire period of operation.
Unscrew the pulley nut, placing the generator so that the pulley rests on the floor, and then put a 19mm wrench on the nut. While holding the pulley from turning, it is necessary to make several strong and accurate blows on the key. It is unlikely that you will be able to clamp the pulley tightly with your hand, but your efforts may be enough to tear the nut out of place.
Using a 10mm wrench, you need to unscrew the 4 bolts of the tie rods that assemble the generator device into one whole. Using a chisel, knock out the key. This can be done by installing the generator with the shaft up. Place the chisel against the key and start knocking it out with a hammer. Once you have knocked out the key, remove the front cover of the device. If it goes too hard, you need to try to knock it out by weight.
Belt whistles
Often, when a certain malfunction of the VAZ 2107 appears, you can hear an extraneous sound, which allows you to confidently diagnose the problem. One of the malfunctions may be the belt slipping, resulting in a whistle from friction against the pulleys. This problem leads to unstable operation of the generator and lack of battery charge.
Due to the fact that the generator always has the same type of drive, the problems are always the same. The main difference between injection and carburetor models is the presence of a crankshaft position sensor, which must be removed when replacing the belt.
In fact, you can determine the cause of a belt whistling without any problems by eliminating it without the help of professionals. It is only necessary to determine the diagnosis. Among the main causes of slipping are the following:
- generator bearing failure;
- insufficient tension;
- contamination of fuels and lubricants.
In all these cases, self-repair takes little time and does not require special tools. You will need two wrenches and a pry bar.
How to tighten the belt?
Low tension may be due to the fact that the belt has stretched during operation and began to slip on the pulleys. If its length does not exceed the permissible limit, you just need to tighten it. Otherwise you will have to change it. To tighten it yourself, you should do the following:
- using a 17mm wrench, loosen the nut that secures the generator to the bracket;
- loosen the generator rod nut;
- if you cannot tighten it manually, you need to use a pry bar;
- Having fixed the position with a nut on the adjusting bracket, you should check the degree of tension.
Checking the tension is easy. You need to press the belt between the crankshaft and the pump. The deflection should be within 12-17 mm, and between the generator and the pump - 10-17 mm. After tightening the belt, taking into account these requirements, you need to tighten both nuts in order to prevent spontaneous loosening.
Bearing problem
If the cause of slippage is related to difficult rotation of the VAZ 2107 generator pulley caused by bearing failure, repairs will be required. It is necessary to dismantle the generator and replace the bearings. After this, you should install the device in place and tighten the belt as described above. Not every motorist can replace bearings on their own, so it is often better to immediately contact a workshop. This way you will avoid problems with the generator in the future. The last reason for slipping is a dirty belt. Perhaps the problem can only be solved by replacing it, since you are unlikely to be able to completely clean the belt of dirt without damaging it.
Sometimes, especially in the cold season when the engine is not warmed up, a whistle may be due to the poor quality of the belt, which has become stiff in the cold. After the engine warms up, the whistle disappears. This is a normal phenomenon, that is, no repairs are required in this case. You just need to make sure that the drive belt is intact to avoid it breaking on the road.
Video:
Video:
Video:
How to check the generator on a car without removing it. With and without a multimeter + detailed video
Well, not so long ago I wrote an article about checking the battery with a load fork , actually this happens for two reasons: when the battery is already dying and needs to be checked, and when the battery is new, it also needs to be tested before purchasing. But is it always the battery? Why might it suddenly fail? It’s one thing if it’s winter and it’s really difficult for him to work, but another thing if it’s summer and he’s not “purr-murr” at all. AND even on the instrument panel, the battery sensor begins to blink occasionally, or is constantly on! In such situations, you should not run headlong for a new battery; first you need to establish the reason why it failed, because in 50% of cases it can be the generator. Moreover, the check is quite easy to do without removing it from the car, let’s read more...
Indeed, guys, I have a lot of friends who first ran for a new battery, but later it was discharged to zero. The point is that before purchasing, you MUST check the generator! After all, think for yourself, if it does not recharge the battery (or there is no charge at all), then it will be discharged to zero after a day or two of use, I will say more, it is easy to bring it to a deep discharge , which is very bad even for a new battery, you will lose about 10 at once % capacity, DO YOU NEED IT? Therefore, I repeat once again - CHECKING THE GENERATOR IS MANDATORY
Why does the generator fail?
The generator itself has a simple structure; if you want, it’s a regular electric motor (only made to allow for large current generation), try to spin a regular electric motor and attach a light bulb or LED to it, it will start to light up - and there you have it, an elementary current generator.
Someday I will have an article in which I will tell you what the generator consists of. BUT today it is simple and exaggerated - this is the rotor (moving part), stator (fixed part), brush assembly, relay regulator , and of course the housing in which the whole thing is located.
And now the actual breakdowns.
- The bearings are jammed. This is a fairly common problem with already worn-out generators, the rotor in the housing spins on bearings, from time and moisture (dirt), they wear out and simply jam or wedge. If there is a wedge, then this is one thing - the rod stops rotating. But if wedging occurs, it is difficult to notice; the rod may or may not rotate. In any case, with such symptoms, the belt that turns the generator from the engine is more likely to break. THIS IS THE FIRST CALL.
- The winding on the stator or rotor has burned out. It is there in any case and most likely will be on the stator, so - also from moisture (salt on the roads), it can be corroded and it will simply short out or simply burn out, since copper wires are used there. Accordingly, current generation will stop.
- Failure of the brush assembly. This is also very common, brushes are graphite (often square) rods that run along the stator tracks. So, from time to time they simply wear out and need to be replaced.
- Failure of the regulator relay. This relay prevents the generator from recharging the battery, bringing the voltage and current within the desired range. Often it also fails and the battery does not charge at all! Need to watch.
In general, for these 4 main reasons, the generator may not work, so it must be checked before purchasing a new battery. It's likely that this is what you're dealing with.
Car tips
Actually, I already told you about them from above; if the generator refuses to work, then it is easy to notice even inside the cabin.
- All modern cars will be signaled by a warning lamp - “red battery” on the instrument panel. If it lights up or even blinks, then there is nothing good about it, you need to react immediately, otherwise a discharge is just around the corner.
- Weak glow from all instruments. The “warning lamp” may burn out, but if you notice that the instruments begin to glow dimly, this means that the car is running on the battery, and not on the generator. Again you need to check.
- Belt break. If you crawl under the hood and there you see a break in the belt that spins the generator, then you MUST CHECK THE OPERATION! Otherwise, again, you can kill your battery.
These are all obvious malfunctions, but it happens that the battery is dead and everything seems to be fine, but something inside is “gnawing” - maybe it’s the generator? How to check easily and quickly on a car without removing it? Question? And everything is quite easy here
Check without removing from the car
There are two 100% ways that I personally recommend to you.
1) Check with a multimeter . Of course, not everyone has it, but in fairness it’s worth noting that this is a fairly common device and let’s say your father, neighbor, friend will have it “anyway.” To begin with, we measure with the engine not running, at the battery terminals, the normal voltage should be about 12.5 - 12.7 V, ideally.
How to find the reason for the battery not charging
The first sign of a lack of charging is the warning light on the instrument panel coming on or if the voltmeter needle is not in the green zone when the engine is running. You can more accurately check the voltage on the battery using a multimeter.
When the engine is running, the voltage on the battery should be – 13.9±0.3 V. If the battery is not charging, the voltage will be approximately 12 V.
Warning: to avoid damage to the ECU and regulator relay, do not remove the battery terminals while the engine is running.
Increased or decreased voltage of the on-board network harms the battery. In the first case, the electrolyte boils away, in the second, it is discharged, which leads to failure of the battery.
To find the problem and fix it, you will need the following tools and devices:
- control lamp 12 V;
- multimeter;
- knife;
- flat screwdriver;
- pliers;
- sandpaper.
Common battery problems:
- short circuit of battery electrodes/plates;
- mechanical or chemical damage to the battery plates;
- violation of the tightness of battery cans - cracks in the battery case as a result of impacts or improper installation;
- chemical oxidation of the battery terminals. The main causes of these malfunctions are:
- gross violations of operating rules;
- expiration of the product's service life;
- various manufacturing defects.
How to replace the charging relay?
- Important! First, as always, we turn off the ground, remove the negative wire from the battery terminal, then remove the yellow wire going from the generator to the relay, then use a Phillips screwdriver to unscrew it;
- Then we take it out together with the brushes:
- Now we need to carry out diagnostics. To do this, we test the voltage on the brushes with a voltmeter, and we power the relay itself from the battery, “simulating” the rectified current of the generator. At the same time, we apply (+) to terminal “B”, to the yellow wire, and connect (-) to the other terminal, “ground”. We are familiar with the signs of trouble. If you don’t have a tester, you can take a 1-3 W, 12 V light bulb.
- When installing a new relay, you need to press it firmly during installation, since new, unworn brushes provide more resistance.
If after taking these measures there is no effect, you need to look for the cause in the generator, we’ll talk about this next time. At the same time, remember that if you are removing a generator, then either you have decent knowledge in electrical engineering, or you have someone to give it to. There is no third option, especially if you have an injector.
In conclusion, let me tell you about several other reasons for the lack of charging or imitation, and also give advice:
- If you have a VAZ 2107 injector, then it is strictly not recommended to reset the battery terminal for various “checks” while the engine is running, and especially to allow strangers near the hood for this purpose. This is very harmful to electronic “brains”.
- It is advisable for those who like to “light up” to be able to say a firm “no” if you have a VAZ 2107 injector.
- On the instrument panel, the connectors are not soldered to the board, but riveted. Therefore, in some cars in the cold, while the interior is cold, there is no contact with the charging lamp. It lights up, simulating a lack of current from the generator. After the interior has warmed up, contact is restored and the lamp goes out.
- The next reason for those who like to go to the car wash in the cold. When water gets into the relay and brush assembly and freezes there, there is no charging. The solution is to heat it with any powerful hairdryer.
Sources:
https://7-vaz.ru/remont/propala-zaryadka-vaz-2107.html https://znatokvaz.ru/elektrooborudovanie/remont-generatora-vaz-2107 https://21074.ru/elektrooborudovanie/net- zarjadki-na-vaz-2107-ishhem-prichinu/ https://bumper.guru/klassicheskie-modeli-vaz/generator/remont-generatora-vaz-2107.html https://7vaz.ru/remont/zarjadka-inzhektor .html
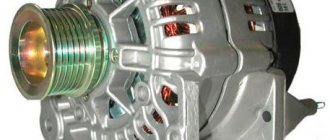
What generators can be installed on the “seven”
The design of the VAZ 2107 allows the installation of not only the G-221A generator. Therefore, if necessary, the driver can install a more efficient device, but in this case some changes will have to be made to the electrical circuit of the car. The question arises: why should a motorcyclist even change his “original” generator?
The G-221A was the optimal device for equipping cars at the beginning of mass production. However, a lot of time has passed since the 1980s, and today almost every motorist uses modern electronic devices:
- sound systems;
- navigation systems;
- additional lighting devices (tuning), etc.
Accordingly, the G-221A generator cannot cope with heavy loads, so drivers begin to look for more powerful units.
At least three more powerful units can be installed on the “seven”:
- G-222 (generator from Lada Niva);
- G-2108 (generator “eight”);
- G-2107-3701010 (Car injection model with carburetor).
It is important that the last two models do not require changes in the design of either the generator housing or its mountings. If you are installing a Niva generator, you will have to make some changes.
Video: principle of operation of the generator
Connection diagram G-221A
As an electronic device, the generator must be used correctly. Accordingly, its connection diagram should not cause misunderstandings. It is worth noting that the “seven” drivers can easily connect all the generator terminals on their own, because the circuit is accessible and understandable to everyone.
Many car owners wonder where to connect which wire when replacing the generator. The fact is that the device has several connectors and wires, and when replacing it is easy to forget which wire goes where:
- The orange one is useless for wiring, you can leave it as is or connect it directly to the gray one to start automatically;
- a thick gray wire goes to the brushes from the voltage regulator;
- the gray thin wire goes to the relay;
- yellow wire - coordinate indicator lamp on the control panel.
Why does the charging system work poorly?
The battery is necessary primarily so that electrical appliances can function without the engine running. And when the engine is activated, the generator takes over control and management of the electrical equipment. This unit provides power:
- car injectors;
- fuel pump;
- electronic control system and many other elements.
But most of all, the generator provides recharge to the battery, the service life of which directly depends on whether the charging unit performs charging efficiently. Sometimes even a new generator is not able to cope with its main purpose. Why the unit provides weak recharge to the battery, and what should be understood if the warning lamp does not light, we will analyze further.
BEARINGS
The generator on a VAZ 2114 car consists of the following main parts:
- A housing consisting of two aluminum covers (front and back);
- Stator (winding located inside the housing);
- A rotor rotating inside the stator;
- Diode bridge;
- Voltage regulator.
The armature (rotor) rotates in two bearings, which are installed: one in the front cover and one pressed onto the rotor. Both bearings are press-fit and therefore are not that easy to replace.
There are usually two main problems with a generator:
- Charging disappears;
- Noise occurs: whistling, grinding or humming.
If there is a whistling noise under the hood, a worn alternator bearing is often to blame. Due to such a malfunction, charging is not lost, but you still shouldn’t drive with noise, since as a result the generator will jam because the rotor will stop rotating.
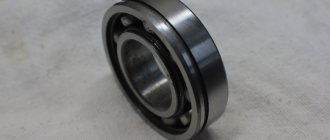
Before changing or starting repairs, you need to buy the necessary spare parts. And before purchasing, you need to find out what bearings are on the VAZ 2114 generator. A bearing of brand 180202 (a foreign analogue of 6202-2RS) is installed on the rear of the rotor, and 180302 (an analogue of 6302-2RS) is installed on the front cover. The cost of Russian parts is low - in the range of 50-80 rubles per piece, imported spare parts are noticeably more expensive - from 200-250 rubles. Bearings are often sold as a set, that is, in pairs. Imported analogues are of much higher quality, so when choosing parts it is better to buy brand 6202-2RS and 6302-2RS.
Bearing 6302-2RS
About replacing the diode bridge (rectifier unit)
Since after removing the winding, the diode bridge is practically free, there is almost nothing to say about replacing it. The only thing you need to do is push the bolts from the inside so that they pop out from the outside:
And the diode bridge has been completely removed and you can replace it:
After carrying out the required repairs to your generator, we reassemble it in the reverse order and do not forget to connect all the winding wires correctly.
Source
Generator bearing and belt diagnostics
To check, the generator does not need to be removed. The test is carried out using a tester. You can use a cheap Chinese tester. The two probes of the measuring device need to be connected to the battery terminals and the voltage checked.
Analysis of voltage values makes it possible to judge the health of the generator set. What voltage the generator device produces can be found in the manual.
Signs of device malfunction:
- The charging indicator light is constantly on or flashes when the engine is running;
- the battery either does not discharge completely or receives an increased charge;
- The headlights do not shine well enough when the engine is running, poor performance of other electricity consumers;
- the headlights are too bright, the electrolyte in the battery boils;
- heats up at high voltage;
- increased noise during engine operation from the generator side.
If the brushes are less than 0.5 cm long, that is, they do not correspond to the required size, they need to be replaced. The condition of the brushes is checked to see how the brushes move in the grooves. After replacing the brushes, the generator restores its operation after a few minutes when the slip rings and brushes grind in.
The three-level regulator should be checked along with the brush holders. If the regulator is working properly, the voltage should be 14.7 V. If the voltage is less than 13 V, the regulator must be replaced with a new one, since it maintains the required voltage for devices in the on-board network.
Problems are possible not only with the cheeks, but also with the diode bridge.
Signs of a diode bridge malfunction:
- There is no charging at all;
- charging significantly exceeds the permissible values.
While the generator is running, with or without noise, it is rarely noticed. But as soon as it stops producing current, its absence is immediately noticed
The battery charging light comes on and the search for a fault begins. But it was enough to just listen to the sounds that the generator makes, and the trouble could have been avoided.
Replacing the VAZ 2114 generator bearing may be required as early as 60-80 thousand km
It all depends on how much the owner pays attention to such little things as the tension of the generator drive belt. First of all, this is what affects the resource of the generator
For prevention, let's check the degree of belt tension.
An ordinary eight-cylinder engine, which costs 2114, does not require special maintenance skills. On the tenth family, the belt is tensioned through a tension roller, but in 2114 there is none of this, and the belt itself no longer drives any mechanisms or assemblies.