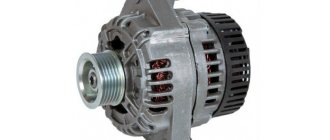
The generator in any car is an integral part, since it charges the battery and powers consumers while the engine is running. If any breakdown occurs with the generator, charging problems immediately appear, which requires an immediate search for the cause and elimination of the malfunction.
- Checking the brushes
Video: checking the brushes of the VAZ 2107 generator
- Simple option
- Using control
- Generator repair
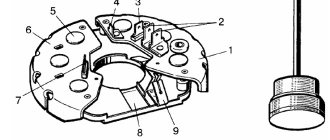
Dismantling the generator
Video: dismantling the generator on a “classic”
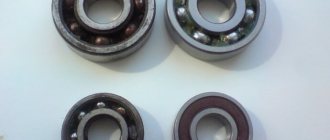
- Table: dimensions and analogues of generator bearings
- Which one can I put?
- Video: dismantling the brushes of the “seven” generator
- Video: tensioning the alternator belt on a “classic”
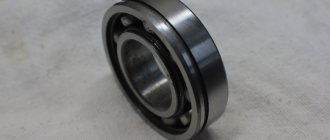
What bearings are on the VAZ 2107 generator, their numbers
The generator bearings of front-wheel drive VAZ nines and tens have different sizes depending on the year of manufacture of the car, as well as whether the car has a carburetor or an injection. They differ in diameter for the landing shaft.
| Dimensions of original VAZ 2110 bearings | ||||
| Year of manufacture of the car | Bearing | vendor code | Catalog number | Dimensions, internal diameter / external diameter / width, mm |
| Before 2001, carburetor | Front | 180302 | 6302 | 15x42x13 |
| Rear | 80202 | 6202 | 15x35x11 | |
| After 2001, injector | Front | 180303 | 6303 | 17x47x14 |
| Rear | 80203 | 6203 | 17x40x12 | |
For cars of the first years of production until 2001, equipped with a carburetor, old-style generators have: front bearing, size - 15x42x13 mm, rear - 15x35x11 mm.
The front one has catalog number 6302 and the original article number 180302, the rear number is 6202 and the factory article number 80202. Parts from foreign manufacturers are marked 6302-2RS and 6202-2RS, respectively.
On injection cars produced after 2001: Front bearing number – 6303, article number – 180303, dimensions – 17x47x14 mm. The rear one comes with number - 6203, article - 80203, 17x40x12 mm. Imported analogues are marked: front - 6303-2RS and rear - 6203-2RS.
The numbers and sizes of bearings may differ if another unit was installed instead of the standard KATEK generator. Bearings KATEK - 303 and 203 are suitable for Denso and BATE generators. Imported ones, for example, the Bosch 14V 53-98A generator, 0124 415 038, are equipped with 6303-2RS - front, with dimensions 15x35x14 and 6003-2RS - rear (analogous to the domestic 180103), the size of which is 17x35x10. The same numbers and sizes of bearings can be found in other foreign generators.
Hello everyone) The bearing on my generator was humming, plus everything was weak charging, although I changed the brushes two years ago. Under full load the voltage dropped to 13 volts. In this regard, two bearings, a belt and a three-level voltage regulator were purchased. I decided to try the three-level one and see how it works. And then the usual regulator did not go away even 20,000 km, although I took the most expensive one.
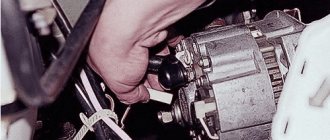
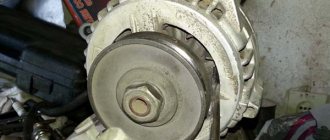
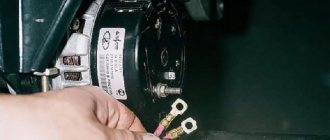
Well, when removing the generator, the fun immediately began. Since no one had removed the generator since it was installed at the factory, the bolt became rusty, and I barely knocked it out. Then the pulley did not want to come off. To remove it, I tore off the nut on the pulley, screwed another one back on, and started hitting the nut to remove the pulley. As a result, I removed the pulley, but at the same time the threads on the rotor were lost (((The photo shows how rusty everything was there.
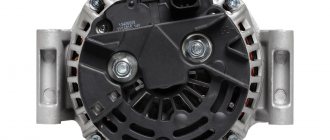
As a result, we have a disassembled generator with a dead thread on the rotor... In short, I freaked out, went to the store, bought a 73 Ampere generator instead of the original 55 Ampere one, installed it, and forgot about the problem of undercharging) At idle 14.3 V, under full load -14.2.
I’ll make an old generator when I’m in the mood) I’ll give it to a turner to sharpen and cut the threads smaller, change the bearings, and let it sit) We’re going into the winter with normal charging)
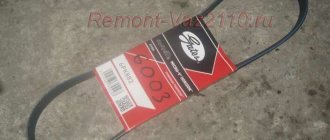
What to do if your belt whistles
After the VAZ-2107 generator has been disassembled, you can troubleshoot problems that have arisen in the operation of the device. But the serviceability of the unit itself does not always suffer; it happens that the breakdown lies in something completely different. For example, when you feel a squealing noise caused by the belt rubbing against the pulleys, it is not surprising if the alternator stops working at full capacity.
When comparing a carburetor and an injector, the main difference in cars is the presence or absence of a crankshaft position sensor, which is removed when the belt is replaced. Why does the whistle appear? There may be several reasons for this:
- The bearing related to the VAZ-2107 generator is faulty.
- Insufficient tension level.
- Contamination in fuel and lubricants.
You can tighten the belt yourself; it’s easy to do:
- Take a 17mm wrench and lightly unscrew the nut securing the generator to the bracket.
- Loosen the generator rod nut in the same way.
- If manual tightening does not produce results, then use a pry bar.
- After fixing the control bracket, check the tension level. To do this, press the belt between the crankshaft and the pump. Ideally, the deflection should be from 12 to 17 mm, and the distance between the generator and the pump should not exceed 17 mm, but a value less than 10 mm is considered detrimental. Tighten both nuts well; this is the only way to avoid spontaneous loosening of the tension.
Lada 2107 2003, engine Gasoline 1.6 liter., 75 hp, Rear drive, Manual - DIY
Comments 3
I also broke my first generator during disassembly, then I used it for spare parts. On the second generator, the seat for the rear bearing on the rotor was worn out, the rotor was pulled out of the back cover without the bearing, the bearing got wedged, replaced the back cover, installed it from the first generator, but due to the wear out of the seat, the rotor scraped against the stator. Now there is a third generator, just as shiny as yours, before that they were painted, the other day the pulley on it fell apart and the key was cut off, the nut seemed to be tightened, but the pulley was not clamped, it started with a whistling belt, I didn’t notice it the first time, I tightened the belt, for the second time something started to rattle, I thought it was the bearing on the pump, which I had recently changed, and again the belt whistled, I looked and it was weak again, I started looking at the pump, and it turned out to be a generator. From this generator I threw out the pulley, impeller and all the spacer washers, installed everything from the old one, where the pulley mount seemed more reliable to me. So save the old one for spare parts
Playlist about generators. Play the video and click on YouTube. There is something about assembly and disassembly there.
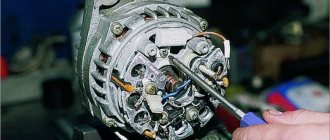
So in this article I will describe the generator overhaul. We will talk about the 37.3701 generator, although everything on the G-222 generator is almost identical and this article will be suitable for it with some adjustments. I bought for replacement: 1. Diode bridge - 190 rubles 2. Generator capacitor - 15 rubles 3. Bearings - I took Andycar - 65 rubles 4. four nuts for 8. The relay regulator on the generator is new, so I decided not to change it. We will also need a universal puller (I personally used a rod puller instead, it wasn’t very convenient, but after fiddling around I removed the bearing with it). It is very desirable to have a brush for metal; I bought a set of three brushes and some sandpaper.
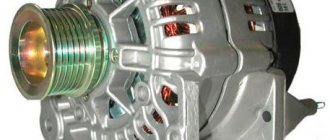
Clean the generator from dirt with a brush. And unscrew the pulley nut. We place the generator so that the pulley rests on the floor, put a 19mm wrench on the nut and, holding the pulley with one hand from turning it, apply strong and sharp blows to the wrench with a hammer. The pulley will of course turn, but the nut will eventually begin to unscrew, I knocked like this for 2-3 minutes
Using a 10mm wrench, unscrew the four bolts and remove the studs holding the generator together.
further, unfortunately, several photos were lost