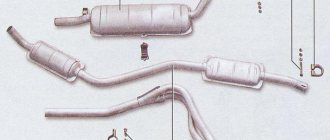
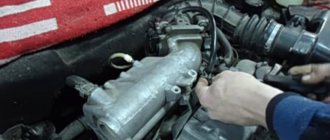
The exhaust manifold (EC) of a car engine is an element of the exhaust gas removal system. Its role is to collect combustion products from all cylinders and, combining them, transfer them to the exhaust pipe. From there they go to the catalyst, and after that to the muffler.
The exhaust manifold is attached to the cylinder head of the power unit (cylinder head). The tightness of this connection is ensured using a special gasket. Due to constant temperature loads, it sometimes fails. And although such a malfunction does not pose a serious threat to the engine, it is better to eliminate it immediately after detection.
In this article we will look at how to replace the exhaust manifold gasket using the example of domestically produced VAZ cars. But first, let's figure out what the VC itself is and how to determine that it's time to change its seal.
How long does an exhaust manifold gasket last?
The exhaust manifold gasket is not one of those elements whose replacement is included in the routine maintenance plan. It can serve for two, five, or ten years. Its condition does not depend on age and mileage. The only factor that affects its service life is the correct operation of the engine. If it operates in standard mode, does not overheat, uses good fuel, the gasket will last a long time. If the opposite is true, it may burn out even after three months of operation.
Signs of a burnt-out VK gasket
Signs of a burnt gasket may include:
- change in the sound of a running engine;
- the appearance of a characteristic smell of exhaust gases in the vehicle interior;
- violation of engine stability, CHECK lamp on the dashboard is on.
As for the sound of the power unit, when the gasket burns out, a characteristic “chirping” is usually heard. In such cases, they say that the engine is “cutting.” This sound is created by exhaust gases escaping where the seal is damaged. Naturally, exhaust from under the hood enters the cabin through the heating and ventilation system. This creates additional inconvenience for the driver and passengers, and also poses a certain threat to their health, so in any case, replacing the exhaust manifold gasket if it is damaged is a necessary necessity.
In cars with injection engines, the operation of which is controlled by an electronic control unit (ECU), if the integrity of the gasket is damaged, the CHECK lamp on the dashboard may light up. This is due to the fact that the lambda probe, installed on the manifold itself or the exhaust pipe, detects changes in the amount of oxygen in the exhaust and transmits a signal to the ECU. Until the fault is eliminated, the controller forces the engine to operate in emergency mode.
How much does a repair at a service station cost?
How much will it cost to replace the exhaust manifold gasket? The price for this type of work depends on the type of engine (carburetor, injection, 8-valve, 16-valve), the model of the seal itself, as well as the prices of the service station where you plan to repair your car.
On average, the work itself, together with the seal, costs somewhere around 1,500 rubles.
But you don’t have to spend money on work. Replacing the VAZ exhaust manifold gasket can be done on your own without much difficulty. Especially if you have a set of hand tools and you have even the slightest idea about the design of your car’s engine.
Chevrolet Niva 2002+: Appendix 1. Tightening torques for Chevrolet Niva threaded connections
The service life of the valve cover gasket on a Chevrolet Lacetti, as a rule, barely reaches 15–20 thousand.
An oil leak can occur as a result of engine overheating , then the cover becomes deformed and loses its seal. This is rare, but mostly oil oozes from under the cap and penetrates into the spark plug wells simply due to the gasket losing its elasticity and the sealant losing its properties.
Oil leakage occurs as a result of loss of elasticity of the valve cover gasket.
At the first appearance of traces of oil, and even more so when oil appears in the spark plug wells, you should not wait, but look for a new gasket as soon as possible.
Huge variety of articles
The market offers about a dozen gaskets for the cover of Lacetti engines; they are the same for 1.4 and 1.6-liter engines .
The original GM gasket bears article number GM96 353 002. It has a simple square profile, lasts quite a long time, but costs about 450 rubles.
There is a very inexpensive analogue of Parts Mall with the same index at a price of about 180–200 rubles . Many people prefer the Victor Reinz 155345601 . Its price is approximately 600 rubles , the gasket has a T-shaped profile and works no worse than the factory one. It is not recommended to buy cheap analogues, since they harden quickly, even a good sealant will not save you.
Valve cover gasket GM 96 353 002.
What is needed for repairs
Replacing the exhaust manifold gasket involves using the following means:
- set of spanners;
- slotted and Phillips screwdrivers;
- sharp knife or spatula (to remove old gasket);
- a container with a wide neck with a volume of at least 5 liters (for draining coolant);
- rust preventative (WD-40 or similar);
- dry rags.
Important: replacing the exhaust manifold gasket 2114, like other VAZ models, requires preliminary draining of the coolant. Otherwise, you risk flooding the engine intake windows with it.
Replacing the exhaust manifold gasket of a VAZ 2114
The algorithm for performing work for the “fourteenth” model of “Samara” is as follows:
- We install the machine on an inspection hole or overpass, dismantle the engine protection, and drain the coolant.
- Remove the negative terminal of the battery.
- Remove the air filter housing.
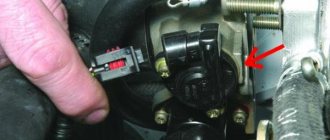
- Disconnect the accelerator cable and fuel pipes from the throttle assembly.
- Disconnect the throttle sensor and idle air control connectors.
- Disconnect the crankcase ventilation and brake booster hoses from the receiver.
- We dismantle the receiver itself, disconnect the wire connectors of the injection control unit.
- Remove the fuel rail (do not unscrew the injectors).
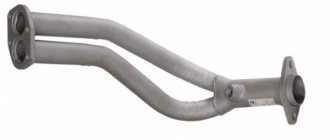
- Disconnect the receiving pipe from the VC.
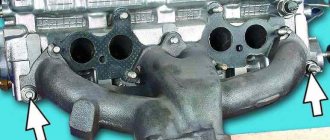
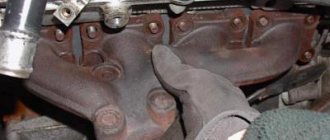
- We dismantle the intake manifold, followed by the exhaust manifold.
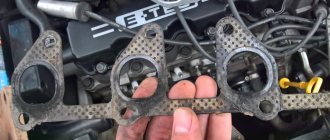
- Remove the old gasket.
- Using a knife (spatula), carefully clean the mating surfaces of the manifold and cylinder head.
- Install a new gasket.
- We carry out installation in reverse order.
- Fill the coolant to the required level.
The cylinder head device in a Chevrolet Niva car
The Chevrolet Niva engine traces its origins to the 1.7 liter VAZ 21213 engine . It has the same cylinder diameter of 82 mm and a piston stroke of 80 mm. The differences lie in the design of the cylinder head (cylinder head). Hydraulic compensators and a single-row chain with a hydraulic tensioner appeared. The cylinder head itself is cast from aluminum alloy and is designed to attach the gas distribution mechanism, valves, spark plugs and form an optimal combustion chamber in the cylinders. This head received the index 21214, it has been produced since 2003.
Important! The cylinder head, camshaft, tensioner mechanism in VAZ 21214 engines differ from modifications 21213 and 2121 and are not interchangeable.
The gasket between the head and the engine block performs the following functions:
- sealing of engine cooling channels;
- sealing the oil supply channel to the block head;
- creating optimal gas pressure in the combustion chambers and preventing them from escaping into the block.
To ensure reliable connection, the cylinder head gasket is made of a composite with a metal base or all-metal. The mating surfaces must be smooth, without scratches or cavities; surface curvature of no more than 0.1 mm is allowed.
Changing the VK gasket on a VAZ 2110
Replacing the exhaust manifold gasket 2110 is performed in the following order:
- We put the car on the overpass (inspection hole), remove the protection, and be sure to drain the coolant.
- We de-energize the car's on-board network by disconnecting the negative terminal from the battery.
- Remove the air filter.
- Disconnect the hose of the brake booster, pneumatic valve cover, and fuel pressure regulator from the receiver.
- Disconnect the throttle sensor and idle air control.
- Disconnect the air duct and turn off the air flow sensor.
- Disconnect the crankcase ventilation hoses from the throttle pipe.
- Remove the inlet and outlet hoses of the cooling system from the manifold.
- We dismantle the receiver assembly with the throttle assembly.
- Unscrew the 5 fastening nuts and remove the inlet manifold.
- We unscrew the bolts (3 pcs.) that secure the exhaust manifold to the exhaust pipe.
- We dismantle the VK.
- Remove the old gasket or its remaining fragments.
- We clean the joints on the manifold and on the cylinder head.
- Install a new gasket.
- We install dismantled elements.
- Don't forget to add antifreeze (antifreeze).
As you can see, for a VAZ 2110, replacing the exhaust manifold gasket is performed using almost the same algorithm. Most importantly, do not forget to drain the coolant.
Preliminary work
Replacing the VAZ 2109 intake manifold gasket with your own hands is not very difficult and does not require specific knowledge or expensive tools - the required set of keys is usually present in the trunk of every car enthusiast.
But before replacing, you should try to tighten the fastening of the intake unit - if the gasket is not burned out, it is the loose fastening that may cause exhaust gases to get under the hood. If tightening the fastening does not help, it means that the gasket is completely burned out and needs to be replaced. Replacing the VAZ 2109 manifold gasket will require preliminary work to dismantle the air filter, remove the carburetor and the manifold itself. All of the above work is carried out exclusively on a cold engine.
Removing the air filter with housing
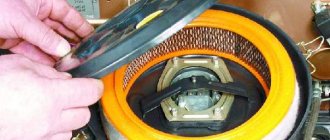
On the injection engine of a VAZ 2109 car, to remove the air filter, it is enough to unscrew the four self-tapping screws securing the cover of the filter element housing - for this, use a 10mm wrench or a ratchet. There will be a filter element under the cover. If the cover is difficult to lift, you can disconnect the mass air flow sensor from the plug.
On a carbureted engine, there are three latches under the hood that can be easily opened. There is a screw in the middle of the metal cover, which can also be unscrewed by hand, after which the cover is removed. Under the cover there is a filter element that must be carefully removed. Subsequently, during reassembly, the filter element can be replaced - if the time has come or if the filter element is very dirty.
Removing the carburetor
After the air filter has been removed, you can begin to remove the carburetor. To remove the carburetor on a VAZ 2109, you will need the following tools:
- two screwdrivers - flat and Phillips;
- 13 open-end wrench;
- head at 8;
- ratchet.
Instructions for dismantling the carburetor will be as follows:
- The coolant supply hose to the carburetor starter is disconnected from the fitting by unscrewing the fastening clamps. The coolant itself is drained into a previously prepared container.
- The exhaust pipe coming from the exhaust manifold and from the cylinder block bracket is disconnected.
- Then the throttle cable bracket is disconnected. To do this, first remove one end of the spring from the throttle control rod, and then remove the entire spring, then loosen the nut on the bracket and remove the cable from its engagement.
- The EPHH screw sensor is disconnected from the power plug.
- Two hoses and a vacuum tube are disconnected from the carburetor heating unit.
- The crankcase ventilation hose is removed.
- Unscrew the 4 nuts securing the carburetor to the intake manifold.
- The carburetor is removed carefully and without jerking - by lifting it from the studs.
The work of removing the carburetor is completed. The presented photos and videos will help you clearly follow the process of removing the carburetor.
Removing the intake manifold
After the work of removing the air filter and dismantling the carburetor is completed, you can begin to remove the intake unit. To do this you will need the following set of tools:
- open-end wrench 13;
- head 13 - regular and deep;
- ratchet and crank;
- ratchet with 10mm head.
The work order will be as follows:
- The platform located under the carburetor is bent back - to do this, two fastening nuts are unscrewed.
- All hoses leading to the manifold are disconnected.
- Six mounting nuts are unscrewed from the intake manifold.
- The intake manifold is removed from the studs - to do this, it should be slightly rocked from side to side, as it can burn to the gasket.
Removing the exhaust manifold
Removing the VAZ 2109 exhaust manifold will require the following tools:
- wrenches 13 - open-end and cap;
- deep head at 13;
- ratchet.
Work order:
- The four nuts securing the exhaust pipe are unscrewed from the manifold.
- The “pants” are pulled off the studs and moved to the side, then the remaining three nuts securing the manifold are unscrewed.
- The exhaust manifold is carefully and without jerking removed from the studs.
When removing the collectors, a problem may arise such as sticking of the studs and nuts - since the metal is constantly heating and cooling, a souring process occurs.
To make work easier, the fastening studs can be filled with WD 40 liquid in advance, about a day before starting work. This will make it much easier to remove the manifold for subsequent gasket replacement. \
If the pin breaks off when unscrewing, you just have to drill it out, and then cut a new thread and screw on a new pin.
Replacing the exhaust manifold gasket: “Niva”
Replacing the gasket on a Niva will also not be particularly difficult. The order of work is as follows:
- To get started, follow the first nine points from the section for the VAZ 2110.
- Remove the bolts securing the front and rear support brackets to the exhaust pipe. Remove the front bracket, move the rear one to the side so that it does not interfere.
- Remove the fuel rail with injectors.
- Unscrew the nut securing the front eye bolt and remove it.
- Unscrew the nuts securing the heat shield of the intake pipe and remove it.
- Unscrew the two outermost and then the two upper nuts securing the intake manifold to the cylinder head.
- Using the wrench handle extension, remove the remaining two (bottom) nuts.
- Remove the intake manifold.
- Remove the starter heat shield.
- Unscrew the nut securing the ground wire to the cylinder head. Remove the conductor tip.
- Unscrew the three nuts securing the VK and dismantle it.
- Remove the seal, clean the mating surfaces and install a new gasket.
- Reinstall the removed parts in reverse order and fill with coolant.
How to extend gasket life
Although replacing the exhaust manifold gasket is inexpensive and can be done successfully in your own garage, who wants to waste their time on it? It's better to let it serve longer. And to extend its service life, listen to the following tips:
- monitor the condition of the cooling system, check the level of antifreeze (antifreeze) to prevent engine overheating;
- use only high-quality fuel;
- check the tightness of the connection between the cylinder head and the exhaust manifold;
- If you find that the integrity of the gasket is damaged, do not wait until it burns out completely, replace it;
- When buying an exhaust manifold gasket, choose a quality product from well-known manufacturers.
Causes of malfunctions
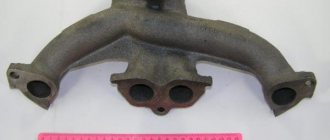
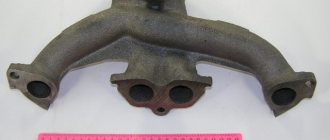
The gasket is placed between the exhaust manifold and the cylinder head. The stamped asbestos gasket is resistant to high temperatures, can be compressed (creating the necessary impermeability) and has increased strength. To enhance the latter quality, the exhaust manifold gaskets are additionally reinforced with steel.
IMPORTANT! The main task of the gasket is to prevent exhaust gases from penetrating under the hood, where they can cause ignition of parts/assemblies of the engine compartment.
The gasket is recognized as the most vulnerable point of the exhaust manifold, which operates under extreme loads in both temperature and pressure. It is not surprising that gaskets have to be changed not only on cars with significant mileage, but also on almost new cars.
Gaskets need to be rotated for several reasons: