What to do if the brake fluid indicator on a LADA is on
The brake system emergency indicator should light up red when the ignition is turned on and go out 2 seconds after the engine starts.
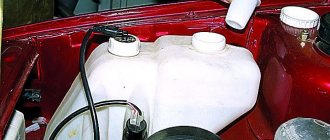
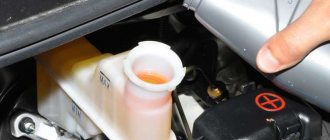
Long-term lighting of the lamp while the engine is running indicates that the parking brake (handbrake) is engaged or the brake fluid level has dropped below the “MIN” mark. It is prohibited to operate a vehicle with the indicator on! The brake fluid level sensor is located in the master cylinder reservoir. When the liquid level drops below o, a signal from the sensor lights up a warning lamp on the instrument panel. It is recommended to check the brake fluid level sensor at each scheduled maintenance inspection.
About the block
The unit is a device with several indicators that light up when there is a malfunction or improper operation of the internal combustion engine. Each indicator has its own lamp, and if there is an error in a specific module or location, the lamp lights up, after which it is recommended to check the equipment to which the indicator refers.
The unit itself can be considered a simple on-board computer that monitors the condition of the car in real time. The unit is located on the center console. The location for this device was not chosen by chance in this particular location; it is perfectly readable and is always under the driver’s eyes, which will allow you to quickly notice errors in the car.
Checking the brake fluid level sensor
Release the parking brake and check the brake fluid level in the reservoir.
If the fluid level in the tank is below the “MIN” mark, and the corresponding icon in the instrument cluster does not light up, press the latch and disconnect the block with wires from the sensor. We close the contacts of the wiring harness block with a piece of wire.
- If the lamp does not light up, then there is a break in the car's wiring.
- If the lamp lights up, the sensor is faulty.
If the fluid level is normal (between “MIN” and “MAX”), and the warning lamp continues to light after starting the engine, press the latch and disconnect the block with wires from the sensor.
- If the lamp goes out, the sensor is faulty.
- If the light remains on, there is a short circuit in the vehicle's wiring or the instrument panel is faulty.
The sensor is replaced together with the brake master cylinder reservoir. A malfunction of the brake system is also indicated by burning ABS and ESC lamps.
Source
Car braking distance
First of all, it is necessary to calculate the braking distance of the Lada Priora car. According to the rule, it should be about 12 m. In order to find out this distance, you must first fill the brake fluid tank full.
Then on a flat road you need to accelerate to 40 km/h and then brake sharply. The distance from the start of braking and the place where the car stops is the braking distance. If it exceeds the norm, then the system is in an unusable state. For more accurate results, it is recommended to do this procedure several times.
Repair of the brake fluid sensor float in Lada Priora
The brake fluid sensor float malfunctioned for 3 weeks at -5 -20. Came to visit. The brake fluid check started popping up just like the regulations: It's on, it's squealing.
Everything is according to the instructions, as seen in the 2011 owner's manual.
1. Checked the fluid in the reservoir. It's a little more than half. Topping it up didn't help. On the road, it appears and disappears. 2. I decided to remove it and figure it out, here’s what happened: — Unscrew the fixed lid, carefully pull it out, wait a couple of seconds for the liquid to drain. Shocked, tugged. It feels like it’s coked, the movement is very tight. The rubber bands crawled one on top of the other, it is not clear how. The bottom float itself stuck stupidly to the rod. He drove like this for a couple of days, he completely stopped showing signs of life and stopped blinking. Let's look further.
3. The sensor, disassembled into parts, works just fine with the rod, moves back and forth on
4 mm as expected. Having connected it in disassembled form, everything is fine! Let's take a look further. By pressing one side, we squeeze it out of the lid (not necessary at all), I couldn’t insert it back myself, but a friend did it in 5 seconds.
4. The rod itself had a good chat back and forth. I folded back the extra inner elastic as shown in the picture (I ended up throwing it out a little later). Pulling the float down, I took it apart into small pieces; the structure couldn’t be easier to disassemble. Again I developed a plug (rod). Put it back together. Now I notice the difference. I checked the operation of the float rod under my own weight, everything works like a clock,
The 4mm stroke is maintained, checking the power supply - it works under its own weight. Then everything was carefully placed and screwed. I checked it a day later and it seems to be working.
5. Conclusion. 20 minutes of work. Fifth grader design. (Price new
230 rubles), mine seems to work. Be sure to monitor the level of brake fluid in the reservoir yourself and there will be no troubles.
Repair of rear brake caliper ZDT Darbis NS2 in Lada Priora
I noticed that the brake fluid began to go away. I looked at the front - everything was dry. I climbed back - the rear right caliper was wet.
Source
Brake fluid level sensor
It is more convenient to check the sensor with an assistant.
Checking the brake fluid level sensor:
1. We prepare the car for work.
3. By pressing from above, we recess the sensor float rod. In this case, the warning lamp for insufficient brake fluid level should light up on the instrument panel.
If the control lamp does not light up, the terminals in the connecting block may have oxidized or the sensor may be faulty. To verify that the sensor is faulty, it is enough to short-circuit the terminals of the connecting block. If the warning light lights up, it means the sensor is faulty and needs to be replaced.
2. Disconnect the wiring harness block from the sensor.
3. Unscrew the cap of the master brake cylinder reservoir. By removing the sensor float from the tank, remove the sensor.
4. We replace the faulty sensor as an assembly.
Installing the brake fluid level sensor:
Install the sensor in reverse order.
Add a comment Cancel reply
You must be logged in to post a comment.
Source
Installation
Install the sensor in reverse order.
I myself had the same thing, although on a service car 2114. This really means a low brake fluid level. But this is also a signal that the brake pads and/or brake discs are worn out! Even if the level of brake fluid is normal, when braking to the floor, the “stroke length” of the brake calipers with worn pads and discs is simply higher than if both were “normally worn.” I knew about this “effect” and immediately looked at the wear of the discs and pads; the pads were very worn out. I got some brake fluid from a colleague and topped it up a little, but little changed. But when I changed the pads at the scheduled maintenance of 15000 (all the service technicians came running to see how in the fall and winter, 15,000 km away, the oak Egoryevskie pads could be erased to zero, while the discs were absolutely not worn out, only “polished”) - then the light bulb stopped burn. So first you should look at the condition of the brake pads and discs - maybe this is the reason for the “long stroke” of the calipers and the low level of brake fluid?
The brake fluid indicator blinks in the Lada Priora
Hello. Such a problem. Today I noticed that the brake fluid indicator began to blink (exclamation mark in a circle). The brake fluid is filled to capacity. I filled it up when I changed the front brake pads a month ago.
The rear pads sometimes locked a couple of times when moving backwards. Not now. I noticed that the indicator blinks mainly when you pass a speed bump, and sometimes like that. What could it be? Rear pads?
Hello. Such a problem. The second day I notice. I pull away from the parking lot in reverse gear, it goes about 2 meters and stops, as if I had pressed the brake. Then I give it forward, back again, and then...
Hello. Recently, about 2 months ago, I installed new front brake pads. They whistled at first, then stopped. Recently it only whistles on the left side. Even if ex.
Hello, such a problem. Today I was driving and a knocking noise started from the right rear. Alarmed. I drove further, okay, at least not at high speed, and there was a terrible thunderous sound again from the right behind.
I needed to replace the front brake pads on a Priora. Can you tell me/advise how to do this?
Badge number 21? If so, then the problem may be, for example, in the brake fluid level sensor, try disconnecting the connector and driving it.
@andrienko.1966 —> Yes, 21. And if I disconnect the connector, what will it give me?
@andrienko.1966 —> If it lights up, then the problem is not in the fluid level and you will need to carry out diagnostics with a scanner, check for errors in the ECU memory. And if it doesn’t light up, then check the brake level sensor. fluid and its wires, connector.
Most often, this problem occurs in the brake fluid reservoir. For example, the float gets stuck and cannot float up. Or it cannot float up because it has become saturated with liquid through the resulting leak (crack, hole) and has become heavy.
You open the lid, lift it along with the float and check how it moves freely up and down, and whether it is filled with liquid (it should be empty when it is working).
Just in case, a question: did you check the level today or then, a month ago, when you changed the pads?
@andrienko.1966 —> But with these words of your question “. The rear pads sometimes locked a couple of times when moving backwards. “, we need to open a new topic and deal with this, because this is not a normal phenomenon (especially since it concerns BRAKES).
@andrienko.1966 —> And if I’m not mistaken, there are no sensors connected to the rear pads (there’s a drum there, isn’t it?). And if there is no sensor, then there is no indicator on the instrument panel.
@andrienko.1966 —> I agree about the rear pads. I checked the level today, everything is fine.
@andrienko.1966 —> It’s not difficult to look at the level, you need to check with the float.
Source
Free pedal travel
The next point in checking the system is to measure the brake pedal play. Typically it should not exceed 5 mm. Using a ruler, measure the distance of the pedal to the floor. Then start pressing the pedal and the moment you feel resistance, measure the distance again.
Less or more free play can create many problems. In the first case, the brake pads may not work due to pressure, and in the second case, the play can lead to late application of the brakes. If performance is unsatisfactory, parts should be replaced.
Repair of the brake fluid sensor float in Lada Priora
The brake fluid sensor float malfunctioned for 3 weeks at -5 -20. Came to visit. The brake fluid check started popping up just like the regulations: It's on, it's squealing.
Everything is according to the instructions, as seen in the 2011 owner's manual.
1. Checked the fluid in the reservoir. It's a little more than half. Topping it up didn't help. On the road, it appears and disappears. 2. I decided to remove it and figure it out, here’s what happened: — Unscrew the fixed lid, carefully pull it out, wait a couple of seconds for the liquid to drain. Shocked, tugged. It feels like it’s coked, the movement is very tight. The rubber bands crawled one on top of the other, it is not clear how. The bottom float itself stuck stupidly to the rod. He drove like this for a couple of days, he completely stopped showing signs of life and stopped blinking. Let's look further.
3. The sensor, disassembled into parts, works just fine with the rod, moves back and forth on
4 mm as expected. Having connected it in disassembled form, everything is fine! Let's take a look further. By pressing one side, we squeeze it out of the lid (not necessary at all), I couldn’t insert it back myself, but a friend did it in 5 seconds.
4. The rod itself had a good chat back and forth. I folded back the extra inner elastic as shown in the picture (I ended up throwing it out a little later). Pulling the float down, I took it apart into small pieces; the structure couldn’t be easier to disassemble. Again I developed a plug (rod). Put it back together. Now I notice the difference. I checked the operation of the float rod under my own weight, everything works like a clock,
Which brake fluid to choose for Priora
The manufacturer fills it with DOT 4. The most popular brake fluids among buyers are ROSDOT 4 and NEVA-M. The first option is more expensive, the second is cheaper. For cars with and without ABS, it is recommended to use different types of fluids.
- DOT-4 plus for vehicles without ABS
- DOT-4 class 6 is designed for modern braking systems (ABS, ESP, VSA)
Depending on the capacity, the cost of the brake fluid indicated above is from 50 to 150 rubles. You can also add DOT 5.1 fluid. It has a lower viscosity than the above samples, as well as a higher boiling point and, according to manufacturers, changes once every five years.
It is prohibited to mix liquids of different types with each other!
Product delivery options
Note! Below are the shipping methods available specifically for this product. Payment options may vary depending on the shipping method. Detailed information can be found on the “Delivery and Payment” page.
Parcel by Russian Post
Available payment methods:
- Cash on delivery (payment upon receipt)
- Using cards Sberbank, VTB, Post Bank, Tinkoff
- Yandex money
- QIWI
- ROBOKASSA
Shipping throughout Russia. Delivery time is from 5 to 12 days.
Do-it-yourself bleeding of the brake system
Each wheel has a special drain fitting to remove air from the brake system. It is through this that you need to remove air and old liquid.
A rubber hose prepared by us is put on the fitting and lowered into a container to drain the old liquid. In this case, the hose in the dish must also be in the liquid so that there is no air leakage.
Using a brake wrench, unscrew the fittings on each wheel sequentially and pump the old fluid out of the system until it is clean. You will need an assistant who will pump the brake pedal; your task is to drain the old fluid.
That is, the assistant pumps the brake pedal 5-10 times and presses it. You unscrew the fitting a little and drain the liquid. The assistant pumps the pedal again, then presses it and drains the liquid again.
And this must be done with each wheel. When bleeding the brakes, keep an eye on the fluid level in the reservoir; it should not be empty.
After bleeding, make sure that the brake fluid in the reservoir is between MIN and MAX. This completes the replacement of brake fluid on the Lada Priora.
Have a good time everyone. The following story happened here: I was reading the service book in my spare time and read that after 50,000 km or after 3 years it is necessary to change the brake fluid. Well, said and done. I read the reviews (here are some more). And I chose Mobil brake fluid. The volume of the system is 0.45, I took a liter to properly flush the system (a little less than 500 rubles).
Mobil brake fluid Came to change it... but didn’t change it, couldn’t unscrew the bleeder bolt on the rear right wheel. I took a closer look at the brakes and realized that the bolt was not my only problem. The front pads were running out (as were the discs that were “shaved” by the last set of pads), the rear left one did not spin freely. In general, I freaked out :) Brembo MAX brake discs for R14 (4000 rubles) + Brembo brake pads (800 rubles)
Discs with pads. Pad guides 2112 (500 rubles) + caliper repair kits (240 rubles).
Guides and repair kits.
Installing all this fun turned out to be not so easy, since Kalina’s caliper is assembled with “non-Orthodox” bolts with an E12 type star head.
But there were no heads for such bolts. But one bolt was easily unscrewed with a regular 12-point 9-point socket. But the euphoria did not last long; the second bolt, instead of unscrewing, “slipped off”.
The final attempt to unscrew it with a gas wrench completely licked it off, and it was necessary to use extreme measures. Weld the nut to 17 :).
Tuning the bolt Realizing that I would still have to go get the bolts, I decided not to bother the rest of the bolts and at the same time buy a head. Everything would have been fine if it had not been Sunday, and also after lunch. The shops literally don't work at all. In the end, I managed to buy something like this.
Set of bolts From left to right: • Upper caliper bolt 2108. Was found in the amount of only one piece. (10 rubles) • I don’t know why the bolt is for an internal hexagon. A little long, was bought for reasons: “At least I’ll shorten something with sandpaper, just to put the same bolts” (40 rubles) • Lower caliper bolt 2101. Was found in the right quantity, has the right length, and is “Orthodox” ” key to 17. At this point the search was stopped (40 rubles) • Original bolt, for a sample. Out of hopelessness (due to little experience, “tuning” the bolts using welding and nuts took too much time, and the car had to be done in the evening) the E12 head was purchased for an insane 250 rubles. ☻. Later, on weekdays, a set of heads E8, E10, E12, E14 E16 was purchased for 400 rubles. Well, in the end
Everything is in place. Let's move on to the rear brakes. A set of Nippon brake pads (500 rubles).
Rear brake pads Set of springs on both sides (RUB 80)
Springs on one side Nippon brake cylinders (RUB 560)
Rear brake cylinders Everything at the rear was not without surprises. I broke off one pin of the protective casing above the exhaust pipe, but I’ll probably make a separate post about fixing this problem. I didn’t take a photo of the result, since visually nothing had changed. The only thing I would like to note is that the parking brake lever had to be hammered into the block in a natural way. Which didn’t make me very happy. I’m still grinding the brakes, but I can already feel the difference. Satisfied like an elephant.
Something like that. Thanks to everyone who read. P.
S. I immediately forgot to write. I came across such a miracle in the store.
Front brake pads Lada Sport.
And I couldn’t pass it by, I bought it (320 rubles). Inside was TIIR 295. The reviews on the drive are positive, maybe I’ll try to install it.
But for now just as a souvenir☺.
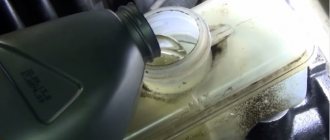
You will need: an “8” wrench for pipeline nuts, brake fluid, a transparent or rubber hose, a transparent container.
Following the manufacturer's recommendations, it is necessary to replace the brake fluid after 3 years of operation or 45 thousand kilometers (whichever comes first).
The system is filled with a special brake fluid DOT-4. Useful tips. Brake fluid is very hygroscopic (actively absorbs moisture from the air), which, in addition to causing corrosion on the parts of the braking system, can reduce the boiling point of the fluid, which can lead to brake failure in the event of frequent and intense braking. This is why it is recommended to change the brake fluid at least once every 2 years.
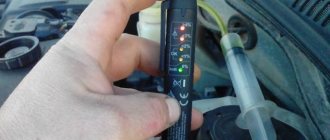
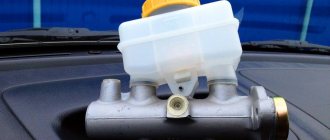
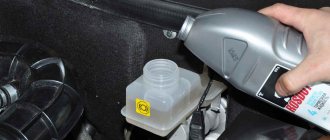
This is what a pipe nut wrench looks like1. While holding the level sensor wire block from rotating, unscrew the tank cap...2.... and place it on a clean cloth. Be careful: brake fluid may drip from the float.
3. Pump out the old fluid from the tank using a syringe or a rubber bulb and fill in new fluid to the lower edge of the filler neck.
4. On a machine that is not equipped with ABS, do the following additionally. If the rear wheels of the car are suspended, first unlock the pressure regulator of the rear brake mechanisms by inserting a screwdriver between the piston and the plate. It must be removed when finishing work.
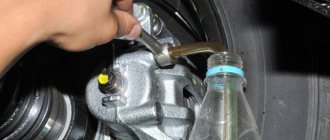
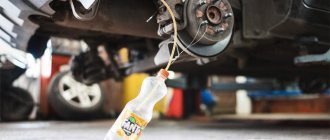
5. Clean the air release valve from the right rear brake mechanism from dirt. Remove the protective rubber cap from the valve. Place a rubber hose onto the valve fitting (it is recommended to use a transparent hose to observe the flowing liquid) and lower its end into a transparent, clean container.
6. The assistant needs to sharply press the brake pedal of the Lada Kalina car 4-5 times (with intervals between presses of 1-2 s), and then hold the pedal in the pressed position. 7.
Unscrew the air release valve ½-3/4 turn until dirty old brake fluid begins to flow out of the hose. The brake pedal should smoothly reach the stop. When the fluid stops flowing, the air release valve should be closed.
8. Constantly monitor the brake fluid level in the reservoir itself to prevent it from falling below the “MIN” mark and, if necessary, add new fluid. Operations 4 and 5 must be repeated until clean new fluid begins to flow from the Lada Viburnum car hose.
To work you need to prepare:
- Brake fluid (recommended by the manufacturer);
- Key to "8";
- A syringe or bulb for pumping out the old brake and a piece of tube, preferably transparent (for putting on the fitting);
- Dishes for draining fuel fluid;
- Rags;
- You will also need an assistant.
A few words about safety precautions
- Be careful when handling brake fluid as it is toxic.
- Avoid contact of TJ with skin and eyes.
- Do not allow brake fluid to come into contact with plastic or rubber products or paint surfaces.
- If liquid gets on any of the above, wipe them immediately using a clean cloth.
Note : Brake fluid is hygroscopic (capable of absorbing moisture and various substances from the air), so reuse or filtering is not permitted. TJ can only be stored in a closed container.
Replacing brake fluid (method No. 1)
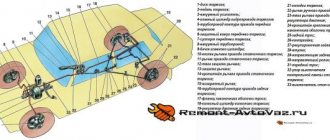
The traditional, familiar way of replacing brake fluid in the brake hydraulic drive system is by substitution. The pumping order for modern Lada cars (Granta, Kalina, Priora, Largus, Vesta and XRAY) is rear right, front left, rear left, front right wheels. For Niva 4x4 – rear right, rear left, front right, front left.
- Pump out the liquid from the tank (with a syringe or rubber bulb);
- Fill in new brake fluid;
- Remove the protective cap from the brake fitting, loosen the fitting with a wrench and put on the hose (immerse the other end in a container half filled with liquid).
To force the brake fluid to flow out of the fitting, you will need an assistant, who must press the brake pedal 1-2 times and then hold it with his foot. Instead of an assistant, you can put a spacer or create pressure in the tank using a special lid or lungs (covering your mouth with a rag). We discussed such methods of bleeding brakes without an assistant earlier.
As soon as a lighter liquid runs instead of a dark liquid, we move to another wheel according to the contour diagram (see above). Periodically check the level of brake fluid in the reservoir and add it if necessary, otherwise air will enter the brake system.
Brake pads
Also, the main elements of the braking system include brake pads for the front and rear mechanisms.
For the first case, put the car on a jack and remove the front wheels. Then you should turn the steering wheel and monitor the brake mechanism. The thickness of the pads should not be less than 1.5 mm. If the value does not correspond to the specified value, all pads should be replaced. You should also check the performance of the piston. If there are any defects, it should also be replaced.
For the second case, you must first unscrew the rear wheel brake plug. Next, inspect the thickness of the pads; if at least one of them does not correspond to the above size, all pads are replaced.
How much brake fluid do you need to replace a Priora?
Replace brake fluid
In modern cars it is known that the brake system is equipped with a hydraulic drive. This helps make it more responsive. However, the working chemical elixir ages during operation. Therefore, it is necessary to replace the brake fluid. To understand why this is so necessary, we will simply list what happens to an obsolete chemical.
- It is filled with dirt particles from friction parts.
- It collects air pockets.
- The components absorb moisture through compensation holes, the composition is replenished with water, which significantly deteriorates its quality.
- Additives lose their chemical properties.
All this leads to a sharp decrease in braking efficiency.
Below we will look at some important issues related to the hydraulic drives of these systems. Namely, we will find out what is the frequency of changing the brake fluid. We are also looking into the process of replacing it with a car.
Now let's talk about how to replace brake fluid with your own hands. For example, take several different brands. First we will turn to VAZ cars, and then to foreign cars.
Our brand
- Do not allow the chemical to come into contact with your hands, inside your body, or on wires, paints, or varnishes;
- it is necessary to use the chemical specified by the manufacturer of the machine brand;
- Keep leftovers tightly sealed.
So, let's look at an example of a brake fluid on a VAZ 2110 car. What you need to have on hand. we will explain below:
How much fluid we need is indicated in the car's passport. For VAZ 2110 it is 0.55 liters. To go down.
- Open the system reservoir.
- Raise the rear of the car and unlock the rear brake pressure regulator. insert a screwdriver between the piston and the plate.
- Remove the right rear air outlet valve from the rubber cover, insert the hose, the end of which is connected to the container.
- The partner must press the pedal sharply 5 times and leave it pressed for the last time.
- We close the valve with a key. this is enough to make three quarters of a revolution, the waste fluid should begin to flow out. Once the leak is fixed, tighten the valve and the partner should not release the pedal until the lock is tightened.
- You need to add new media once the tank reaches the bottom line. When the mesh spills liquid , the operation is stopped.
- We repeat everything completely to the left Front brake mechanism.
- Then we repeat the manipulations with the second circuit again. first we go to the left rear gear and finally to the right front.
- We put the covers back on, remove the screwdriver from the pressure regulator, and check the functionality of the system.
This is a replacement. brake VAZ 2110 liquid. Dividing the system into two independent circuits for greater security should not be a surprise. just remember your driving lessons.
You may also like
- DC fast charging, air cooling wear out EV batteries faster, study shows A new study looked at 6,300 EVs and found it led to faster battery degradation. Don't worry, the battery will last a very long time. Like many...
- How to Clean a Lambda Probe at Home
How to remove the Lambda probe? Ways to comment Many drivers are interested in how to clean the lambda probe. The fact is that this greatly affects the performance of the machine. At least …
Skoda Octavia A5 Removing the Rear Bumper Video
Describes the Skoda Octavia bumper, interior trim and tools required to remove the front and rear bumpers. The second generation Skoda Octavia was produced from 2004 to 2012. Kaki...
Changing the Oil in Automatic Transmission Toyota Prius 20
Automatic oil change in an automatic transmission Toyota Prius 20And one more question: how much is needed to get a different amount of oil to a different limit? Have a good time, tell me when...
Replacing Antifreeze on Nissan Qashqai J11
Coolant (coolant) is essential to the proper operation of your vehicle. Thanks to this, the engine does not overheat while driving. Its timely replacement will extend the service life...
Which is better Renault Logan or Kia Rio
What is better to choose: Renault Logan or Kia Rio? There is something to choose from in the category of sedans on the Russian market. domestic manufacturers presented a wide range of different models…
replacing a VAZ 2114 is done in exactly the same way. Speaking of Lada Kalina, there are no differences there either. The fluid in viburnum is replaced according to the same instructions. The only thing worth paying attention to. This is how much viburnum brake fluid needs to be completely replaced. The volume here is 0.45 l.
Replace brake fluid
In this issue of Technical Environment, its host Gennady Emelkin will talk about how to replace it yourself.
Replacing brake fluid and bleeding VAZ 2108 2110 2114 Priority
Replacing brake fluid
and brake pumps VAZ 2108 2110 2114 priority
make frost into frost.
At Lada Priore we act the same way. Replacing the Priora is also not particularly difficult. The volume of the new medium is also 0.45 l. For all these cars, DOT 3 is recommended. The replacement rate for a front-wheel drive VAZ is from 2 to 3 years or from 50 to 60,000 km. run.
Not our brand
- Unscrew the system reservoir cap.
- Remove the cover from the right rear wheel cylinder. Put on the hose. The end of the hose is connected to the container.
- The assistant presses the pedal 5 times, holding it for the fifth time. At the same time we unscrew the valve. Three quarters of a turn is enough. The spent medium begins to flow out of the hose. Turn on the valve immediately after a leak.
- Fill the tank as soon as the old chemical reaches the bottom line.
- Continue until clean new fluid flows out of the valve.
- The manipulations are repeated for the left front wheel, as well as for the second wheel, similar to that described earlier.
Replacing brake fluid (method No. 2)
On certain cars (for example, Lada Vesta, Largus, XRAY with French JH3/JR5 gearboxes) there is an easier way to change the brake fluid - use a clutch bleeder. It will take less time, but the brake fluid will only be partially replaced.
We put a hose on the fitting (immerse the other end in a container half filled with liquid). Next, you need to depressurize the pipeline; to do this, lower the bracket down (No. 4) and pull out the plastic tube (No. 1, to the right) by 7-9 mm. We drain about 150 ml of liquid (with or without an assistant, see above) and seal the circuit back. Check the brake fluid level in the reservoir. This process is in detail.
Let us remind you that brake fluid that gets on the paintwork, plastic parts and wiring of the car can cause damage. Immediately clean surfaces of brake fluid. Do you change the brake fluid yourself?
What difficulties did you experience during the first replacement? By the way, do you know which brake fluid is better to choose?
Keywords: lada xray brakes | Lada Vesta brakes | Lada Largus brakes | Lada Granta brakes | Lada Kalina brakes | Lada Priora brakes | 4x4 brakes | universal article 4
Found an error? Select it and press Ctrl+Enter..